중간고사 기간을 지나, 여러 고난과 역경을 이겨내고 데이터 증강하기까지 완료되었다!
지금까지 한 것을 정리해보겠다.
- 인당 300장씩 사진 데이터 더 수집하기
- 128x128 이미지 리스케일링
- 고화질이 아닌 경우, 업스케일링해 오기
- 데이터 증강해서 4배로 만들어오기
- Fliplr (수평 뒤집기)
- Additive Gaussian Noise (가우시안 노이즈 추가)
- Gaussian Blur (가우시안 블러)
드디어! 데이터가 모두 완료되었다! 역시 데이터셋 만들기가 가장 어려운 것 같다..
코드들 중에, 수정된 것들이 있다.
먼저 얼굴 추출 코드의 경우 성능이 좀 떨어지는 것 같아서, gpt의 추천과 검색을 통해
1. 사진 데이터 더 수집하기 + 중복 삭제
import os
import cv2
import mediapipe as mp

# 입력 및 출력 경로 설정
input_dir = os.path.expanduser("~/Desktop/cropped_faces")
output_dir = os.path.expanduser("~/Desktop/idol_faces")

# Mediapipe 초기화
mp_face_detection = mp.solutions.face_detection
mp_drawing = mp.solutions.drawing_utils

# 모델 로드 (정확도 높이려면 model_selection=1)
face_detection = mp_face_detection.FaceDetection(model_selection=1, min_detection_confidence=0.6)

# 출력 폴더 생성
os.makedirs(output_dir, exist_ok=True)

# 아이돌 폴더 순회
for idol_name in os.listdir(input_dir):
    idol_path = os.path.join(input_dir, idol_name)
    if not os.path.isdir(idol_path):
        continue

    save_path = os.path.join(output_dir, idol_name)
    os.makedirs(save_path, exist_ok=True)

    face_count = 0

    for image_file in os.listdir(idol_path):
        image_path = os.path.join(idol_path, image_file)
        img = cv2.imread(image_path)

        if img is None:
            print(f"❌ 이미지 로드 실패: {image_path}")
            continue

        height, width, _ = img.shape
        img_rgb = cv2.cvtColor(img, cv2.COLOR_BGR2RGB)
        results = face_detection.process(img_rgb)

        if not results.detections:
            print(f"😢 얼굴 감지 실패: {image_path}")
            continue

        for idx, detection in enumerate(results.detections):
            # bounding box 정보 추출
            bbox = detection.location_data.relative_bounding_box
            x = int(bbox.xmin * width)
            y = int(bbox.ymin * height)
            w = int(bbox.width * width)
            h = int(bbox.height * height)

            # 정사각형 중심 크롭
            size = max(w, h)
            cx, cy = x + w // 2, y + h // 2
            x1 = max(cx - size // 2, 0)
            y1 = max(cy - size // 2, 0)
            x2 = min(cx + size // 2, width)
            y2 = min(cy + size // 2, height)

            face_img = img[y1:y2, x1:x2]

            face_filename = f"{os.path.splitext(image_file)[0]}_face{idx}.jpg"
            cv2.imwrite(os.path.join(save_path, face_filename), face_img)
            face_count += 1

    print(f"📸 {idol_name}: 얼굴 {face_count}개 추출 완료")

# 종료
face_detection.close()
위와 같은 only_face.py 코드를 작성하였다.
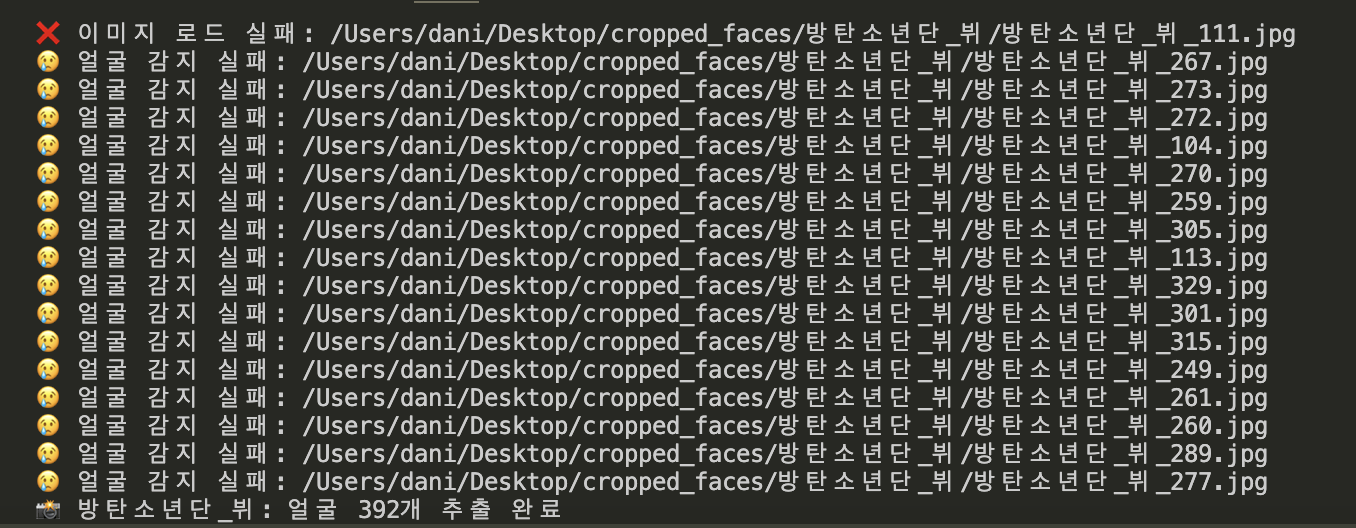
훨씬훨씬 성능이 좋아졌다. 물론 위의 사진은 얼굴 감지 실패 메세지지만ㅎㅎ
사진들을 수집하다보니 중복이 너무 많은 것 같아서 중복 사진 삭제 코드도 작성하였다.
import os
import hashlib

def hash_file(filepath):
    """파일을 해시로 변환"""
    with open(filepath, "rb") as f:
        return hashlib.md5(f.read()).hexdigest()

def remove_duplicates(folder_path):
    seen_hashes = {}
    removed_files = 0

    for root, _, files in os.walk(folder_path):
        for filename in files:
            file_path = os.path.join(root, filename)

            try:
                file_hash = hash_file(file_path)
            except Exception as e:
                print(f"⚠️ {file_path} 처리 중 에러: {e}")
                continue

            if file_hash in seen_hashes:
                # 중복 파일이면 삭제
                os.remove(file_path)
                removed_files += 1
                print(f"🗑 중복 삭제: {file_path}")
            else:
                seen_hashes[file_hash] = file_path

    print(f"\n✅ 중복 제거 완료! 삭제된 파일 개수: {removed_files}")

target_dir = os.path.expanduser("~/Desktop/cropped_faces")
remove_duplicates(target_dir)
remove_duplicates.py 코드이다! 열심히 모아온 사진 데이터들이 정말 한 번에 훅훅훅 사라져서 너무 슬프다ㅎㅎㅠ
2. 이미지 리스케일링 + 데이터 증강
나의 경우 이미지 리스케일링과 데이터 증강을 동시에 진행하였다. 딱히 따로 하든 같이 하든 상관이 없을 것 같았기 때문이다! 증강은 flip, noise, blur 이렇게 3가지를 진행하였다.
import os
import imageio
import numpy as np
import cv2
from imgaug import augmenters as iaa

# 증강 정의
flip_aug = iaa.Fliplr(1.0)  # 수평 뒤집기
noise_aug = iaa.AdditiveGaussianNoise(scale=(0.03*255, 0.05*255))  # 노이즈
blur_aug = iaa.GaussianBlur(sigma=(0.5, 1.0))  # 블러

# 경로 설정
input_root = os.path.expanduser("~/Desktop/idol_faces")
output_root = os.path.expanduser("~/Desktop/idol_manymany")
target_size = (128, 128)

# 사람별 폴더 순회
for person_name in os.listdir(input_root):
    person_input_path = os.path.join(input_root, person_name)
    if not os.path.isdir(person_input_path):
        continue

    person_output_path = os.path.join(output_root, person_name)
    os.makedirs(person_output_path, exist_ok=True)

    # 이미지 순회
    for fname in os.listdir(person_input_path):
        if not fname.lower().endswith(('.jpg', '.jpeg', '.png', '.bmp')):
            continue

        img_path = os.path.join(person_input_path, fname)
        img = imageio.imread(img_path)
        base, ext = os.path.splitext(fname)

        def resize_and_save(image, suffix):
            resized = cv2.resize(image, target_size)
            save_path = os.path.join(person_output_path, f"{base}_{suffix}{ext}")
            imageio.imwrite(save_path, resized)

        # 1. 원본 저장
        resize_and_save(img, "orig")

        # 2. 수평 뒤집기
        flipped = flip_aug(image=img)
        resize_and_save(flipped, "flip")

        # 3. 노이즈 추가
        noised = noise_aug(image=img)
        resize_and_save(noised, "noise")

        # 4. 블러 추가
        blurred = blur_aug(image=img)
        resize_and_save(blurred, "blur")

    print(f"✅ {person_name} 완료!")

print("전체 증강 + 리사이즈 완료!")
예상 외로 시간이 매우 짧게 걸려서 놀랐다. 게다가, 모든 걸 끝내니 용량이 확 줄어서 내가 뭔가 놓친건가 불안해지기까지 하였다.. 데이터셋 4배 증강까지 끝냈는데, 원래 고화질 이미지 파일이 7.02GB 였는데, idol_manymany 폴더는 267.4MB 밖에 없다.. 사진도 꽤나 고화질이고 내가 원한대로 다 적용은 되어서 그냥.. 사진 리스케일링이 가장 큰 원인으로 보고 있다.
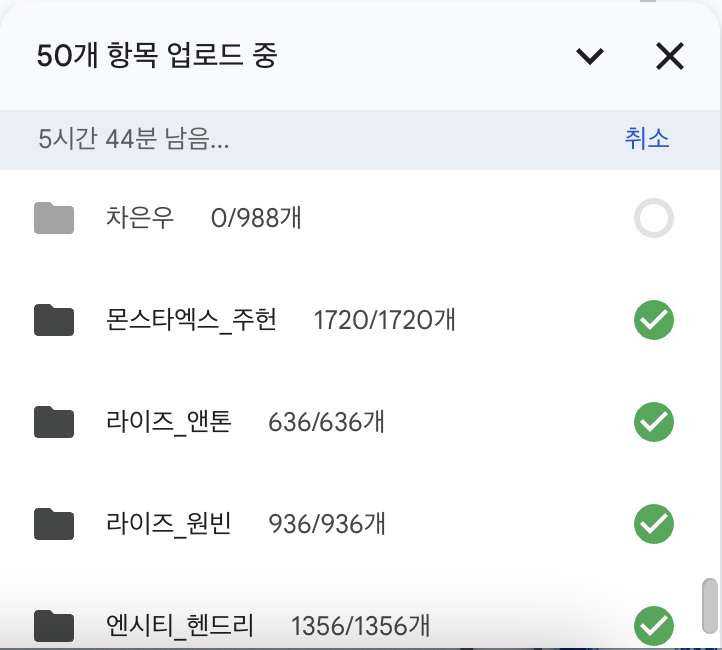
이제 남은 것은 인내의 업로드.. 이미 11개의 파일을 업로드 성공했는데, 50개의 파일이 남았고 5시간 44분이 걸린다고 한다.. 다행이 조원이 2TB 구글 드라이브를 사용해서 넉넉하게 업로드는 가능할 것 같다! 나이스~!! 데이터셋 빠잉! 끄읕!