
본 시리즈는 프로그래밍 자료구조의 개념을 정리하고 실습을 진행해보는 시리즈입니다.
- 실습은 다음과 같은 개발환경 및 버전에서 진행하였습니다.
- IDE : IntelliJ IDEA (Ultimate Edition)
- Java : JDK 21 (corretto-21)
- Python : 3.9 (conda env)
자료구조 - LinkedList
0. 서론: LinkedList란?
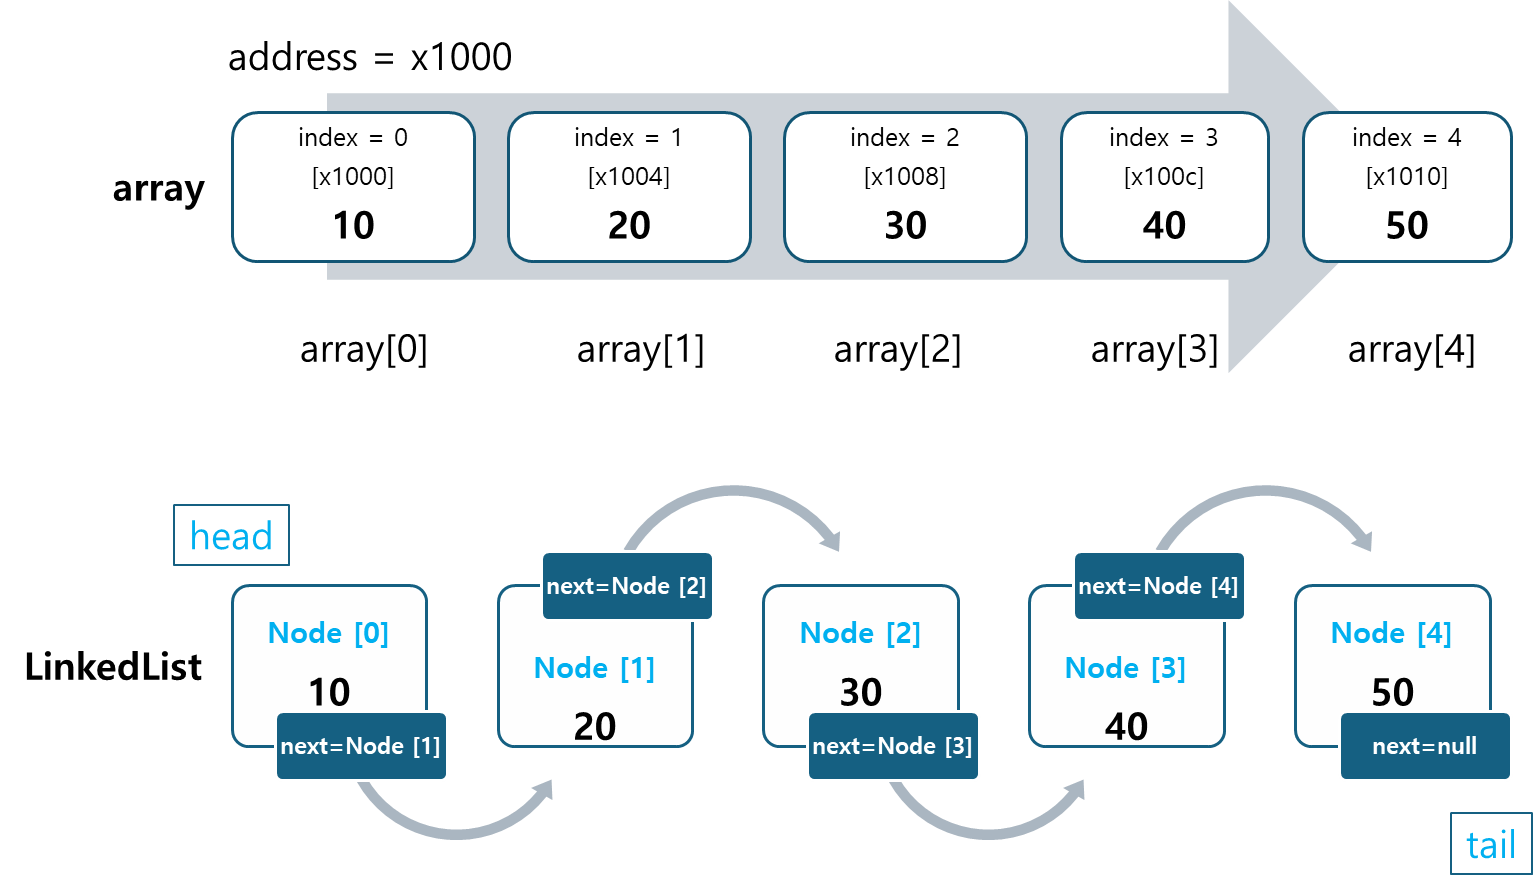
배열과의 차이점
- 배열과 달리 연결 리스트(LinkedList)는 각 요소가 노드(Node)로 연결된 선형 자료구조입니다.
- 노드는 데이터와 다음 노드를 가리키는 포인터로 구성되며, 필요에 따라 동적으로 크기를 확장할 수 있습니다.
- 배열은 인덱스를 통한 빠른 접근이 필요한 경우 적합하지만, 크기가 고정적이라 삽입/삭제가 빈번하게 발생하는 경우 비효율적입니다.
- 반면, LinkedList는 빈번한 삽입/삭제가 필요할 때 유리하지만, 요소 접근 속도가 느리다는 단점이 있습니다.
LinkedList 장점
- 중간 삽입/삭제가 배열보다 효율적입니다.
- 배열은 데이터를 이동해야 하는 반면, 연결 리스트는 연결된 링크만 수정하면 됩니다.
- 빈번한 삽입/삭제가 필요할 때 상당히 유리합니다.
LinkedList 단점
- 인덱스를 통한 직접 접근이 불가능하여, 특정 위치의 요소를 조회하려면 순차적으로 탐색해야 합니다.
- 추가적으로, 연결 리스트는 포인터를 유지해야 하므로, 메모리 사용량이 배열보다 더 큽니다.
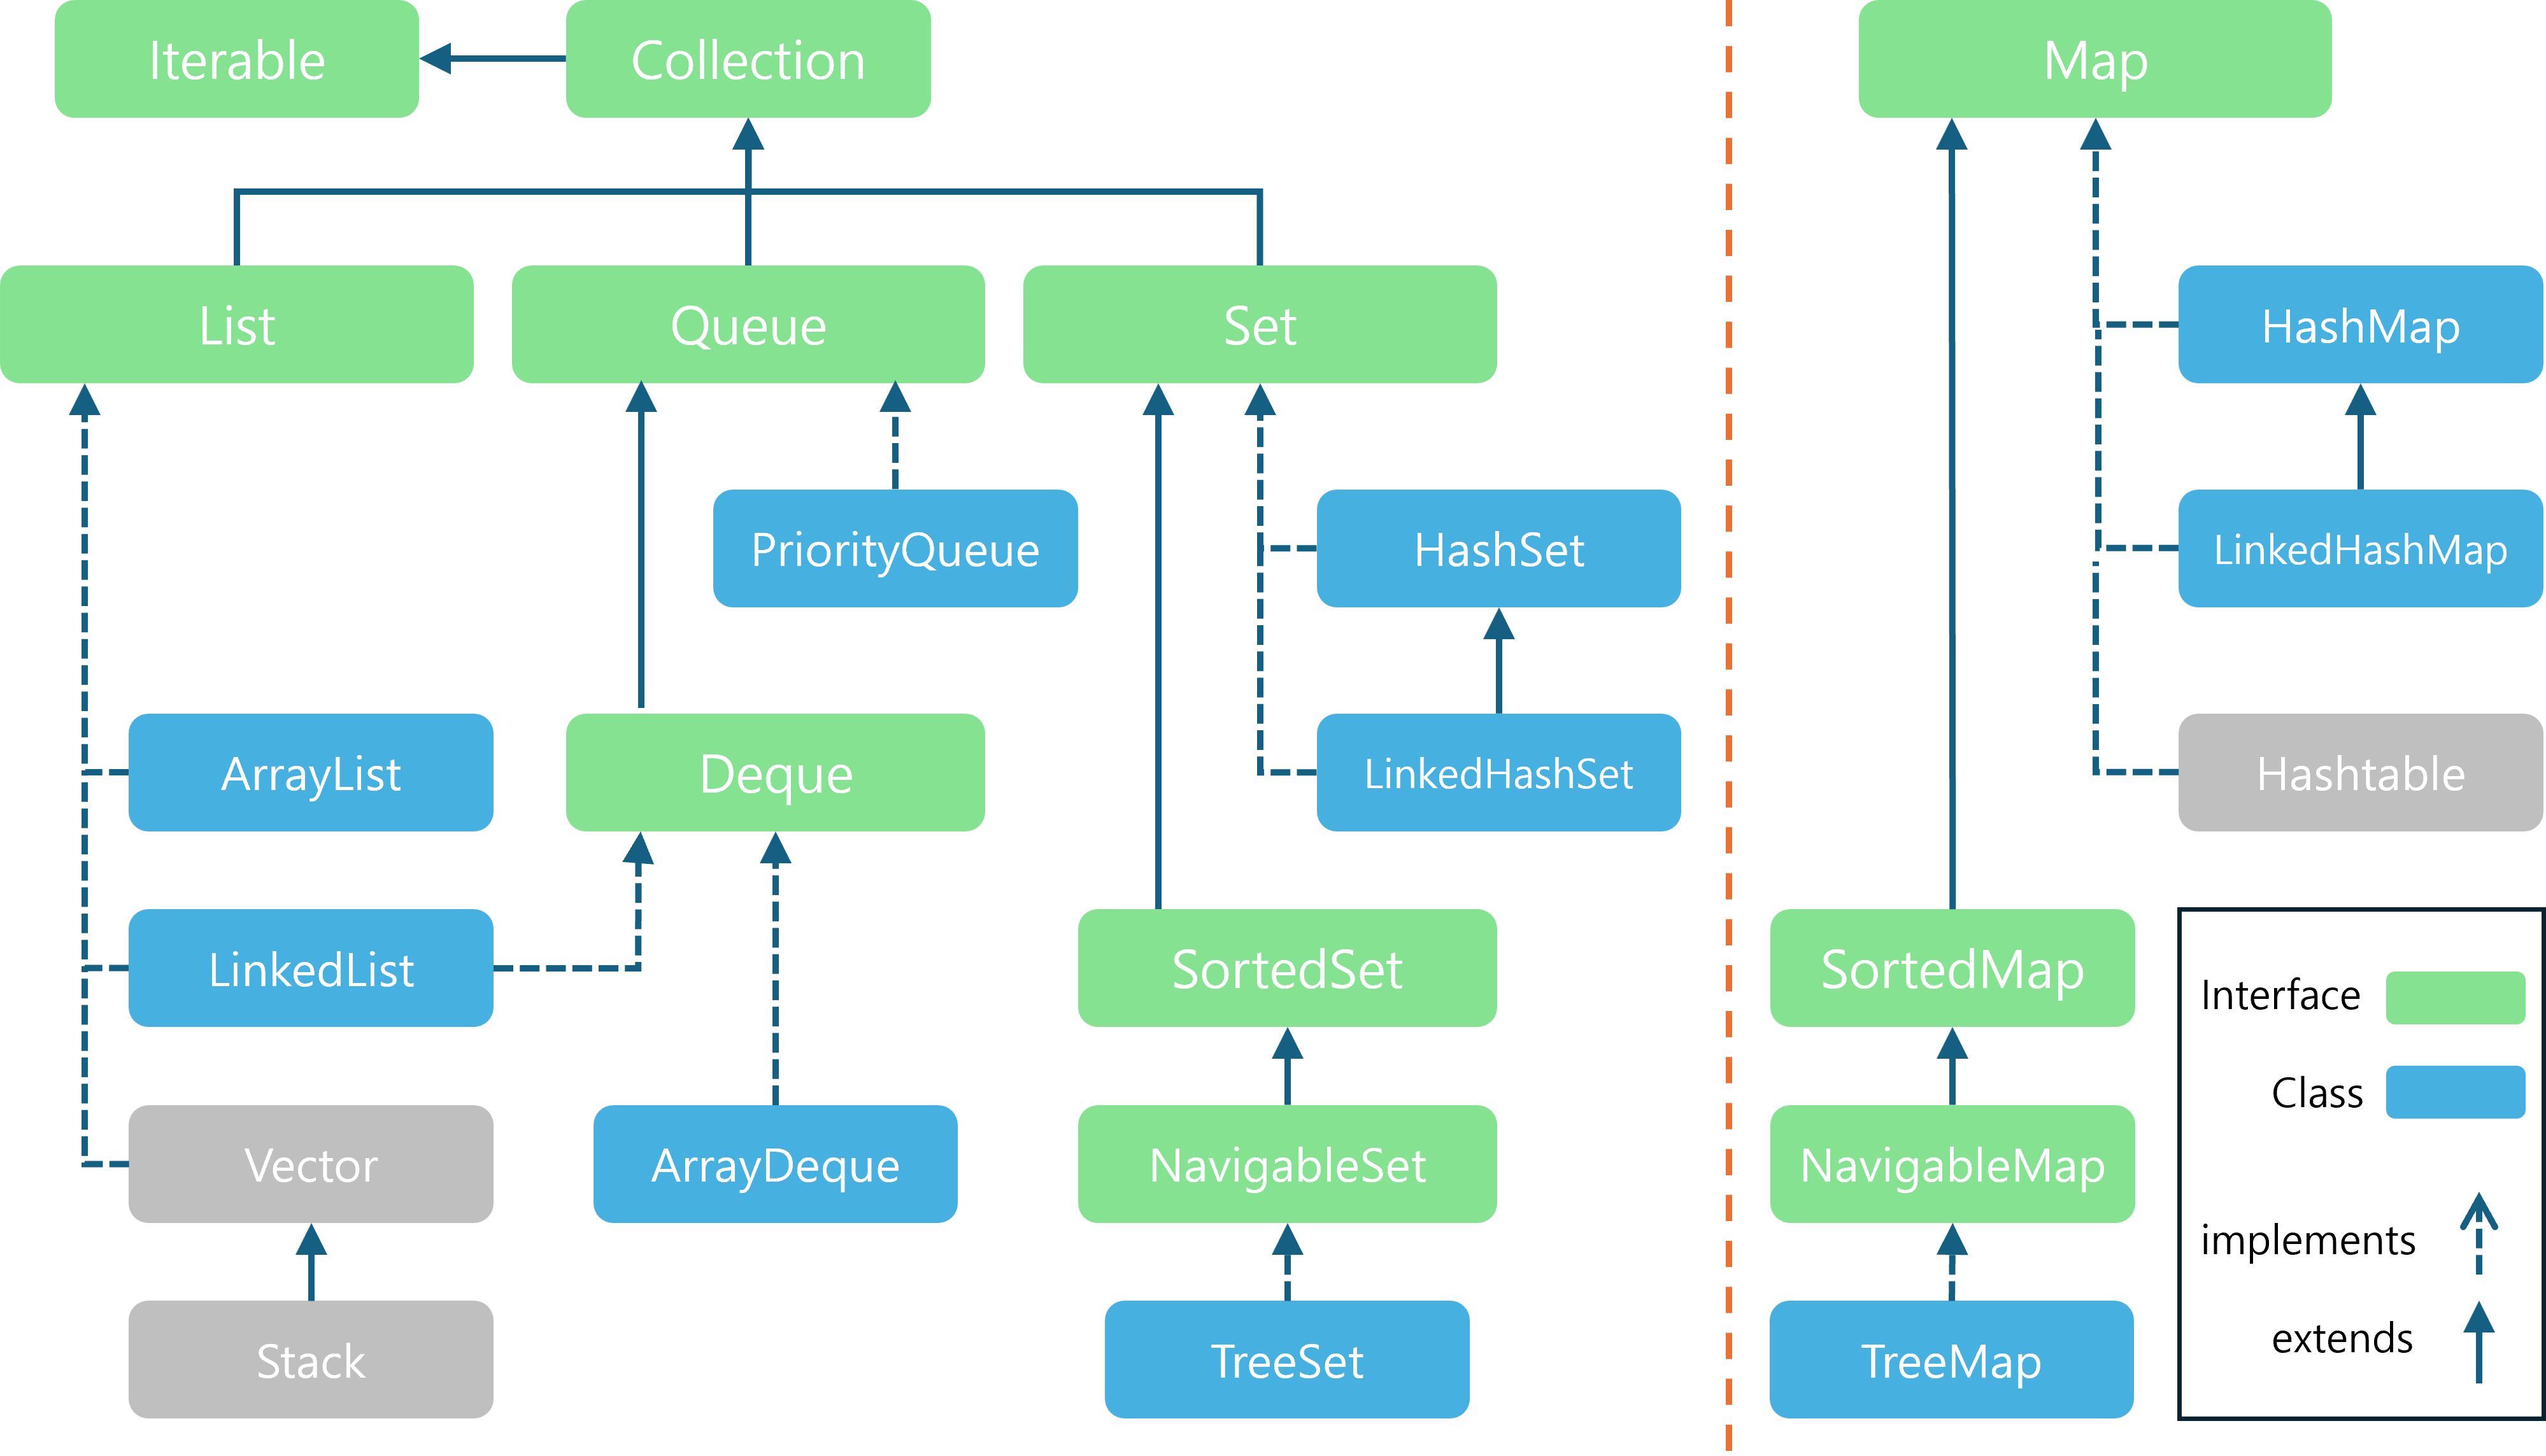
Python과 Java의 연결리스트
- Python에서는 기본적으로
LinkedList를 제공하지 않으므로, 직접Node와LinkedList클래스를 구현해야 합니다. - 반면, Java에서는
java.util.LinkedList클래스를 통해 이미 구현된 연결 리스트를 사용할 수 있으며, 이는 이중 연결 리스트로 구현되어 있습니다.
1. LinkedList 개념과 기본 구현
연결 리스트는 크게 단일 연결 리스트(Singly Linked List), 이중 연결 리스트(Doubly Linked List), 원형 연결 리스트(Circular Linked List)로 분류됩니다.
- 단일 연결 리스트(Singly Linked List): 각 노드가 하나의 다음 노드만 가리키며 연결됩니다.
- 앞에서부터 순차적으로 탐색해야 하며, 단방향으로만 움직일 수 있습니다.
- 이중 연결 리스트(Doubly Linked List): 각 노드가 다음 노드와 이전 노드를 가리키며 연결됩니다.
- 양방향 탐색이 가능하여, 삽입/삭제 시 양방향으로 더 효율적으로 동작할 수 있습니다.
- 원형 연결 리스트(Circular Linked List): 마지막 노드가 첫 번째 노드를 가리켜서 리스트의 끝이 다시 처음과 연결됩니다.
- 순환형 데이터 처리나 리소스 관리 등에 사용되지만, 일반적으로는 많이 사용되지 않습니다.
Python과 Java에서의 LinkedList
- Python에서는
LinkedList를 기본적으로 제공하지 않기 때문에 직접 구현해야 합니다. - Java에서는
java.util.LinkedList클래스를 통해 이미 구현된 연결 리스트를 바로 사용할 수 있습니다.
참고: 이번 포스팅에서는 단일 연결 리스트와 이중 연결 리스트의 구조와 구현 방법에 집중하며, 원형 연결 리스트는 자세히 다루지 않습니다.
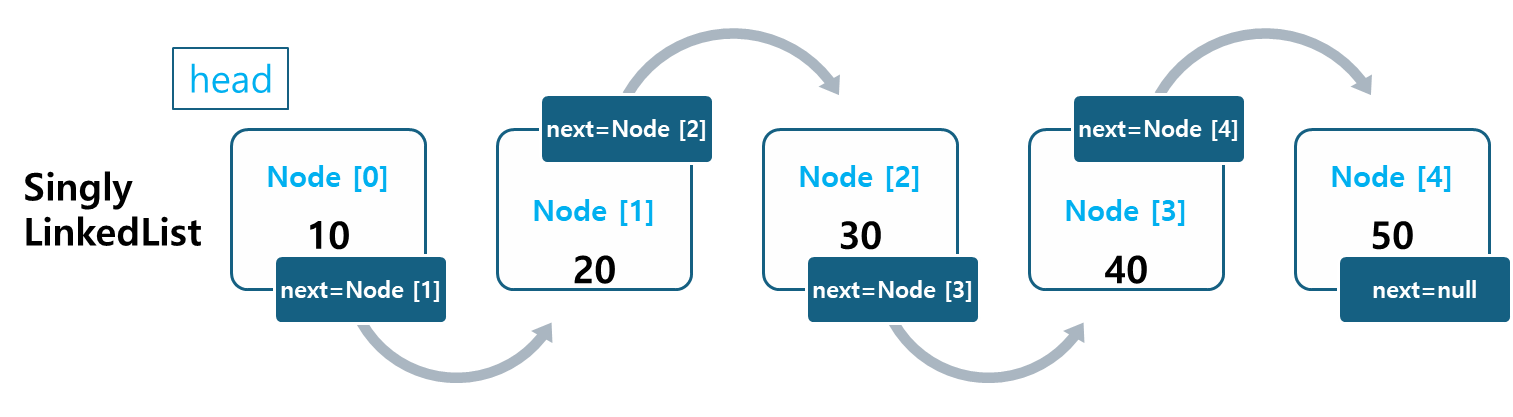
1.1 단일 연결 리스트(Singly Linked List)
단일 연결 리스트는 각 노드가 하나의 다음 노드만 가리키며 연결되는 단방향 자료구조입니다.
- 처음과 마지막 노드를 제외하고, 모든 노드는 하나의 참조만 가집니다.
- 노드는 데이터를 저장하고, 다음 노드를 가리키는 포인터로 구성됩니다.
특징
- 삽입/삭제가 중간에 일어나는 경우, 배열보다 효율적입니다.
- 순차 탐색을 해야 하기 때문에, 인덱스를 통한 접근은 비효율적입니다.
Java에서의 LinkedList 사용 예시
Java의 LinkedList는 사실 이중 연결 리스트로 구현되어 있지만, 단일 연결 리스트처럼 사용할 수 있습니다.
- 아래 코드는 Java의
LinkedList를 이용한 단일 연결 리스트처럼 사용하는 예입니다.
import java.util.LinkedList;

public class Main {
    public static void main(String[] args) {
        LinkedList<Integer> list = new LinkedList<>();
        list.add(10);  // 끝에 추가 (O(1))
        list.add(20);
        list.add(30);

        list.add(1, 15);  // 중간 삽입 (O(n))
        System.out.println(list);  // [10, 15, 20, 30]

        list.remove(2);  // 중간 삭제 (O(n))
        System.out.println(list);  // [10, 15, 30]
    }
}
Python에서의 단일 연결 리스트 구현 예시
Python에서는 LinkedList가 내장되어 있지 않기 때문에, 직접 Node와 SinglyLinkedList 클래스를 구현해야 합니다.
- 아래 코드는 Python에서 단일 연결 리스트를 직접 구현한 예시입니다.
Node클래스는 데이터와 다음 노드를 가리키는 참조를 저장하며,SinglyLinkedList클래스는 노드를 관리하는 구조입니다.
class Node:
    def __init__(self, data):
        self.data = data
        self.next = None

class SinglyLinkedList:
    def __init__(self):
        self.head = None

    def append(self, data):
        # 끝에 노드를 추가하는 연산은 O(1)의 시간 복잡도를 가집니다.
        new_node = Node(data)
        if not self.head:
            self.head = new_node
        else:
            current = self.head
            while current.next:
                current = current.next
            current.next = new_node

    def insert_at(self, index, data):
        # 인덱스 위치에 노드를 삽입하는 연산은 O(n)의 시간 복잡도를 가집니다.
        if index == 0:
            new_node = Node(data)
            new_node.next = self.head
            self.head = new_node
            return
        current = self.head
        for i in range(index - 1):
            if current is None:
                raise IndexError("Index out of bounds")
            current = current.next
        new_node = Node(data)
        new_node.next = current.next
        current.next = new_node

    def display(self):
        current = self.head
        while current:
            print(current.data, end=" -> ")
            current = current.next
        print("None")

# 실습
slist = SinglyLinkedList()
slist.append(10)
slist.append(20)
slist.append(30)
slist.display()  # 10 -> 20 -> 30 -> None
- 이외에도 탐색(search), 삭제(pop, remove) 등도 구현할 순 있는데, 이건 뒤에서 다시 다루도록 하겠습니다.
1.2 이중 연결 리스트(Doubly Linked List)
이중 연결 리스트는 각 노드가 다음 노드와 이전 노드를 모두 가리킵니다.
- 양방향 탐색이 가능하여, 앞뒤로 쉽게 이동할 수 있는 구조입니다.
- 노드가 추가되거나 삭제될 때 앞이나 뒤에서 빠르게 처리할 수 있어 효율적입니다.

Java에서의 이중 연결 리스트 사용 예시
- Java의
LinkedList는 기본적으로이중 연결 리스트로 구현되어 있습니다. - 아래 코드는 Java의
LinkedList를 사용한 이중 연결 리스트 예제입니다.
LinkedList<Integer> list = new LinkedList<>();
list.add(10);  // 끝에 추가 (O(1))
list.add(20);
list.add(30);
list.addFirst(5);  // 맨 앞에 삽입 (O(1))  -> [5, 10, 20, 30]
list.removeLast();  // 끝에서 삭제 (O(1))  -> [5, 10, 20]
System.out.println(list); // [5, 10, 20]addFirst()는 첫 번째 위치에 노드를 삽입하고,removeLast()는 마지막 노드를 삭제합니다.- 이 두 연산은 이중 연결 리스트의 양방향 탐색 기능 덕분에 O(1)의 시간 복잡도로 처리됩니다.
Python에서의 이중 연결 리스트 구현 예시
- 단일 연결 리스트와 거의 동일하지만, 삽입된 노드의 prev와 기존 tail의 연결만 추가적으로 처리해줍니다.
class Node:
    def __init__(self, data):
        self.data = data
        self.prev = None
        self.next = None

class DoublyLinkedList:
    def __init__(self):
        self.head = None
        self.tail = None

    def append(self, data):
        # 끝에 노드를 추가하는 연산은 O(1)의 시간 복잡도를 가집니다.
        new_node = Node(data)
        if not self.head:
            self.head = new_node
            self.tail = new_node
        else:
            self.tail.next = new_node  # 기존 tail의 다음 노드로 연결
            new_node.prev = self.tail  # 새 노드의 이전 노드를 기존 tail로 연결
            self.tail = new_node  # tail을 새로운 노드로 업데이트

    def remove_last(self):
        # 마지막 노드를 삭제하는 연산 (O(1))
        if not self.tail:
            raise IndexError("List is empty")
        elif self.head == self.tail:
            self.head = None
            self.tail = None
        else:
            self.tail = self.tail.prev
            self.tail.next = None

    def display(self):
        current = self.head
        while current:
            print(current.data, end=" <-> ")
            current = current.next
        print("None")

# 실습
dlist = DoublyLinkedList()
dlist.append(10)
dlist.append(20)
dlist.append(30)
dlist.display()  # 10 <-> 20 <-> 30 <-> None

dlist.remove_last()
dlist.display()  # 10 <-> 20 <-> None
1.3 단일 연결리스트 & 이중 연결리스트 비교
- 단일 연결 리스트는 각 노드가 하나의 다음 노드만 가리키며 연결되는 단방향 리스트입니다.
- 이중 연결 리스트는 각 노드가 다음 노드와 이전 노드를 모두 가리키며, 양방향 탐색이 가능합니다.
시간복잡도 비교
| 자료구조 | 끝에서 삽입 | 중간 삽입 | 끝에서 삭제 | 중간 삭제 | 탐색 |
|---|---|---|---|---|---|
| 단일 연결 리스트 | O(1) | O(n) | O(n) | O(n) | O(n) |
| 이중 연결 리스트 | O(1) | O(n) | O(1) | O(n) | O(n) |
- 단일 연결 리스트:
- 끝에서 삽입하는 연산은 O(1)이지만, 중간 삽입 및 삭제는 노드를 하나씩 순차적으로 찾아야 하므로 O(n)의 시간 복잡도를 가집니다.
- 끝에서 삭제할 때도 이전 노드를 찾기 위해 전체 리스트를 탐색해야 하므로 O(n)이 소요됩니다.
- 이중 연결 리스트:
- 삽입 및 삭제 시 앞과 뒤에서는 O(1)로 빠르게 처리할 수 있지만, 중간 삽입 및 중간 삭제는 삭제할 노드를 찾기 위해 O(n)의 시간이 소요됩니다.
2-1. 양방향 LinkedList 직접 구현해보기 - Java
- Java에서 기본적으로 제공하는
LinkedList를 사용해도 무방하지만, 이번엔 직접 구현해보며 원리를 파악해보도록 하겠습니다.
2-1.1 LinkedList 생성
- 먼저
Node클래스를 정의하고, 각 노드는data,next,prev필드를 가집니다. - 그리고
DoublyLinkedList클래스에서head와tail노드를 관리합니다.
class Node {
    int data;
    Node prev;
    Node next;

    public Node(int data) {
        this.data = data;
        this.prev = null;
        this.next = null;
    }
}

class DoublyLinkedList {
    Node head;
    Node tail;

    public DoublyLinkedList() {
        this.head = null;
        this.tail = null;
    }
}
2-1.2 데이터 추가/삽입
데이터를 앞/뒤 또는 중간에 삽입하는 메서드를 작성합니다.
addFirst()메서드는 리스트의 앞에 노드를 삽입하고,addLast()메서드는 리스트의 뒤에 노드를 삽입하며,insertAt()메서드는 중간에 데이터를 삽입합니다.

class DoublyLinkedList {
    // 기존 생성자 생략...

    // 리스트의 앞에 노드를 추가하는 메서드
    public void addFirst(int data) {
        Node newNode = new Node(data);
        if (head == null) {
            head = tail = newNode;
        } else {
            newNode.next = head;
            head.prev = newNode;
            head = newNode;
        }
    }

    // 리스트의 뒤에 노드를 추가하는 메서드
    public void addLast(int data) {
        Node newNode = new Node(data);
        if (tail == null) {
            head = tail = newNode;
        } else {
            tail.next = newNode;
            newNode.prev = tail;
            tail = newNode;
        }
    }

    // 특정 인덱스에 노드를 삽입하는 메서드
    public void insertAt(int index, int data) {
        if (index == 0) {
            addFirst(data);
            return;
        }

        Node newNode = new Node(data);
        Node current = head;

        for (int i = 0; i < index - 1; i++) {
            if (current == null) {
                throw new IndexOutOfBoundsException("Index out of bounds");
            }
            current = current.next;
        }

        newNode.next = current.next;
        if (current.next != null) {
            current.next.prev = newNode;
        }
        newNode.prev = current;
        current.next = newNode;

        if (newNode.next == null) {
            tail = newNode;
        }
    }
}
2-1.3 데이터 삭제
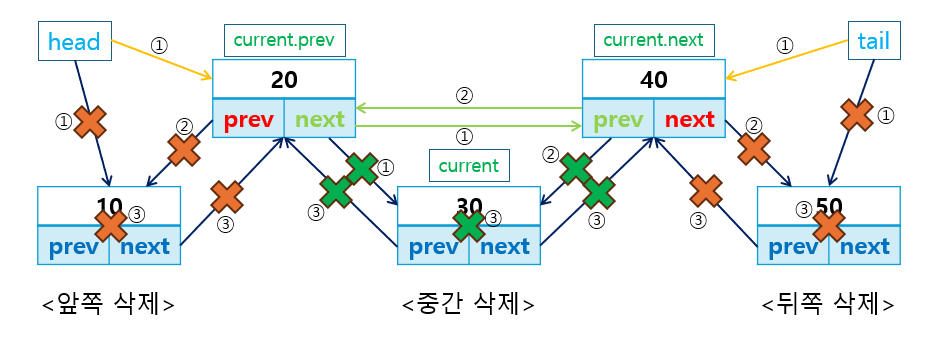
삭제 연산은 앞/뒤 또는 특정 위치에서 노드를 삭제합니다.
removeFirst()는 리스트의 첫 번째 노드를 삭제하고,removeLast()는 리스트의 마지막 노드를 삭제하며,removeAt()는 특정 위치의 노드를 삭제합니다.
class DoublyLinkedList {
    // 기존 생성 및 삽입 메서드 생략...

    // 리스트의 첫 번째 노드를 삭제하는 메서드
    public void removeFirst() {
        if (head == null) {
            throw new IndexOutOfBoundsException("List is empty");
        }
        if (head == tail) {
            head = tail = null;
        } else {
            head = head.next;
            head.prev = null;
        }
    }

    // 리스트의 마지막 노드를 삭제하는 메서드
    public void removeLast() {
        if (tail == null) {
            throw new IndexOutOfBoundsException("List is empty");
        }
        if (head == tail) {
            head = tail = null;
        } else {
            tail = tail.prev;
            tail.next = null;
        }
    }

    // 특정 인덱스의 노드를 삭제하는 메서드
    public void removeAt(int index) {
        if (index == 0) {
            removeFirst();
            return;
        }

        Node current = head;
        for (int i = 0; i < index; i++) {
            if (current == null) {
                throw new IndexOutOfBoundsException("Index out of bounds");
            }
            current = current.next;
        }

        if (current == tail) {
            removeLast();
        } else {
            current.prev.next = current.next;
            if (current.next != null) {
                current.next.prev = current.prev;
            }
        }
    }
}
- 참고로 구현한
removeAt메서드는 중간에 노드를 삭제할 때O(n)의 시간 복잡도를 가집니다.- 중간에 있는 노드를 찾는 과정에서 순차 탐색을 해야 하므로, 삭제할 노드의 위치에 따라 성능이 크게 달라질 수 있습니다.
- 그래서 삭제 연산을 최적화하려면, 중간 삽입/삭제가 빈번히 발생하는 경우 다른 자료구조를 고려하는 것이 좋습니다.
2-1.4 탐색/출력
리스트를 순방향 또는 역방향으로 탐색하면서 데이터를 출력하는 메서드를 작성합니다.
class DoublyLinkedList {
    // 기존 생성, 삽입, 삭제 메서드 생략...

    // 리스트의 모든 노드를 순방향으로 출력하는 메서드
    public void displayForward() {
        Node current = head;
        while (current != null) {
            System.out.print(current.data + " <-> ");
            current = current.next;
        }
        System.out.println("None");
    }

    // 리스트의 모든 노드를 역방향으로 출력하는 메서드
    public void displayBackward() {
        Node current = tail;
        while (current != null) {
            System.out.print(current.data + " <-> ");
            current = current.prev;
        }
        System.out.println("None");
    }
}
2-1.5 테스트 코드 실행
- 이제
DoublyLinkedList클래스의 모든 주요 연산이 구현되었습니다.- 각 연산이 어떻게 동작하는지 확인하기 위해 테스트 코드를 추가하여 실행해 봅시다.
public class Main {
    public static void main(String[] args) {
        DoublyLinkedList list = new DoublyLinkedList();

        list.addLast(10);
        list.addLast(20);
        list.addLast(30);
        list.displayForward();  // 10 <-> 20 <-> 30 <-> None

        list.addFirst(5);
        list.displayForward();  // 5 <-> 10 <-> 20 <-> 30 <-> None

        list.removeAt(2);
        list.displayForward();  // 5 <-> 10 <-> 30 <-> None

        list.insertAt(2, 15);
        list.displayForward();  // 5 <-> 10 <-> 15 <-> 30 <-> None
        list.displayBackward(); // 30 <-> 15 <-> 10 <-> 5 <-> None
    }
}
2-2. 양방향 LinkedList 직접 구현해보기 - Python
- 이번에는 Python에서 양방향 LinkedList를 직접 구현해보겠습니다.
- Java와 비슷한 방식으로
Node와DoublyLinkedList클래스를 정의하여 각 노드의data,prev,next를 관리합니다.
2-2.1 LinkedList 생성
먼저 Node 클래스를 정의하고, DoublyLinkedList 클래스에서 head와 tail 노드를 관리합니다.
class Node:
    def __init__(self, data):
        self.data = data
        self.prev = None
        self.next = None

class DoublyLinkedList:
    def __init__(self):
        self.head = None
        self.tail = None
2-2.2 데이터 추가/삽입
다음으로, 앞/뒤 또는 중간에 데이터를 삽입하는 메서드를 작성합니다.
add_first()는 리스트의 앞에 노드를 삽입하고,add_last()는 리스트의 뒤에 노드를 삽입하며,insert_at()는 중간에 데이터를 삽입합니다.
class DoublyLinkedList:
    # 기존 생성자 생략...

    # 리스트의 앞에 노드를 추가하는 메서드
    def add_first(self, data):
        new_node = Node(data)
        if self.head is None:
            self.head = self.tail = new_node
        else:
            new_node.next = self.head
            self.head.prev = new_node
            self.head = new_node

    # 리스트의 뒤에 노드를 추가하는 메서드
    def add_last(self, data):
        new_node = Node(data)
        if self.tail is None:
            self.head = self.tail = new_node
        else:
            self.tail.next = new_node
            new_node.prev = self.tail
            self.tail = new_node

    # 특정 인덱스에 노드를 삽입하는 메서드
    def insert_at(self, index, data):
        if index == 0:
            self.add_first(data)
            return

        new_node = Node(data)
        current = self.head
        for _ in range(index - 1):
            if current is None:
                raise IndexError("Index out of bounds")
            current = current.next

        new_node.next = current.next
        if current.next is not None:
            current.next.prev = new_node
        new_node.prev = current
        current.next = new_node

        if new_node.next is None:
            self.tail = new_node
2-2.3 데이터 삭제
데이터 삭제 연산도 앞/뒤 또는 특정 위치에서 노드를 삭제하는 메서드를 작성합니다.
remove_first()는 리스트의 첫 번째 노드를 삭제하고,remove_last()는 리스트의 마지막 노드를 삭제하며,remove_at()는 특정 위치의 노드를 삭제합니다.

class DoublyLinkedList:
    # 기존 생성자 및 삽입 메서드 생략...

    # 리스트의 첫 번째 노드를 삭제하는 메서드
    def remove_first(self):
        if self.head is None:
            raise IndexError("List is empty")
        if self.head == self.tail:
            self.head = self.tail = None
        else:
            self.head = self.head.next
            self.head.prev = None

    # 리스트의 마지막 노드를 삭제하는 메서드
    def remove_last(self):
        if self.tail is None:
            raise IndexError("List is empty")
        if self.head == self.tail:
            self.head = self.tail = None
        else:
            self.tail = self.tail.prev
            self.tail.next = None

    # 특정 인덱스의 노드를 삭제하는 메서드
    def remove_at(self, index):
        if index == 0:
            self.remove_first()
            return

        current = self.head
        for _ in range(index):
            if current is None:
                raise IndexError("Index out of bounds")
            current = current.next

        if current == self.tail:
            self.remove_last()
        else:
            current.prev.next = current.next
            if current.next is not None:
                current.next.prev = current.prev
2-2.4 탐색/출력
- 리스트의 데이터를 순방향 또는 역방향으로 탐색하며 출력하는 메서드를 작성합니다.
class DoublyLinkedList:
    # 기존 생성, 삽입, 삭제 메서드 생략...

    # 리스트의 모든 노드를 순방향으로 출력하는 메서드
    def display_forward(self):
        current = self.head
        while current:
            print(current.data, end=" <-> ")
            current = current.next
        print("None")

    # 리스트의 모든 노드를 역방향으로 출력하는 메서드
    def display_backward(self):
        current = self.tail
        while current:
            print(current.data, end=" <-> ")
            current = current.prev
        print("None")
2-2.5 테스트 코드 실행
- 이제
DoublyLinkedList클래스의 모든 주요 연산이 구현되었습니다.- 이를 테스트하기 위한 코드를 작성하여 실행해봅시다.
# 테스트
dlist = DoublyLinkedList()
dlist.add_last(10)
dlist.add_last(20)
dlist.add_last(30)
dlist.display_forward()  # 10 <-> 20 <-> 30 <-> None

dlist.add_first(5)
dlist.display_forward()  # 5 <-> 10 <-> 20 <-> 30 <-> None

dlist.remove_at(2)
dlist.display_forward()  # 5 <-> 10 <-> 30 <-> None

dlist.display_backward()  # 30 <-> 10 <-> 5 <-> None
3. LinkedList 활용 및 최적화
3.1 고급 활용과 변형: 원형 연결 리스트(Circular LinkedList)
원형 연결 리스트는 마지막 노드가 첫 번째 노드를 가리키는 구조로, 연결 리스트의 끝과 처음이 연결된 순환형 구조입니다.
- 이 자료구조는 특정 상황에서 메모리와 연산의 효율성을 극대화하기 위해 사용됩니다.
원형 연결 리스트의 주요 특징:
- 단방향 원형 리스트: 마지막 노드의
next가 첫 번째 노드를 가리킴. - 이중 원형 리스트: 마지막 노드의
next가 첫 번째 노드를, 첫 번째 노드의prev가 마지막 노드를 가리킴.
원형 연결 리스트 활용 예시:
- 리소스 관리: 원형 구조는 일정한 자원을 반복적으로 사용할 때 유리합니다.
- 예를 들어, 프로세스 관리에서 라운드 로빈 스케줄링(Round Robin Scheduling)에서 사용됩니다. (일단 이런게 있구나 하고 넘어가셔도 됩니다)
- 순환 버퍼: 데이터 스트림의 연속적 처리나 네트워크 패킷의 저장을 위한 버퍼 관리에 적합합니다.
원형 연결 리스트 구현 예시: Java
class Node {
    int data;
    Node next;

    public Node(int data) {
        this.data = data;
        this.next = null;
    }
}

class CircularLinkedList {
    Node head = null;
    Node tail = null;

    public void addLast(int data) {
        Node newNode = new Node(data);
        if (head == null) {
            head = newNode;
            tail = newNode;
            tail.next = head;  // 원형 구조
        } else {
            tail.next = newNode;
            tail = newNode;
            tail.next = head;
        }
    }

    public void display() {
        Node current = head;
        if (head != null) {
            do {
                System.out.print(current.data + " -> ");
                current = current.next;
            } while (current != head);
            System.out.println("(head)");
        }
    }
}
원형 연결 리스트 구현 예시: Python
class Node:
    def __init__(self, data):
        self.data = data
        self.next = None

class CircularLinkedList:
    def __init__(self):
        self.head = None
        self.tail = None

    def add_last(self, data):
        new_node = Node(data)
        if self.head is None:
            self.head = self.tail = new_node
            self.tail.next = self.head  # 원형 구조
        else:
            self.tail.next = new_node
            self.tail = new_node
            self.tail.next = self.head

    def display(self):
        current = self.head
        if self.head is not None:
            while True:
                print(current.data, end=" -> ")
                current = current.next
                if current == self.head:
                    break
            print("(head)")
3.2 Queue/Deque로서의 LinkedList 활용
Queue와 Deque는 자료구조에서 자주 사용하는 개념입니다.
- Queue는 FIFO(First In First Out) 방식으로, Deque는 양쪽 끝에서 삽입과 삭제가 가능한 자료구조입니다. (다음 포스팅부터 Stack/Queue/Deque를 정리할 예정입니다)
Java에서의 활용
Java의 LinkedList는 Queue와 Deque 인터페이스를 구현하고 있으므로, 간단한 코드로 Queue와 Deque로 활용할 수 있습니다.
import java.util.LinkedList;
import java.util.Queue;
import java.util.Deque;

public class Main {
    public static void main(String[] args) {
        // Queue로 LinkedList 사용
        Queue<Integer> queue = new LinkedList<>();
        queue.add(10);
        queue.add(20);
        System.out.println(queue.poll());  // 10 출력

        // Deque로 LinkedList 사용
        Deque<Integer> deque = new LinkedList<>();
        deque.addFirst(5);
        deque.addLast(10);
        System.out.println(deque.removeFirst());  // 5 출력
        System.out.println(deque.removeLast());  // 10 출력
    }
}
Python에서의 활용
Python에서는 collections.deque를 사용하여 큐와 덱의 기능을 사용할 수 있습니다.
- Python에서
collections.deque는 양방향 큐로 동작하며, 양쪽 끝에서 삽입/삭제가 O(1)의 시간 복잡도를 가집니다.- 이는
LinkedList보다 효율적인 구현이기 때문에, Python에서는 대부분의 경우deque를 사용하는 것이 더 좋은 선택입니다. - 또한,
deque는 리스트 연산보다 메모리 사용량도 적어 성능이 매우 뛰어납니다.
- 이는
from collections import deque

# Queue로 deque 사용
queue = deque()
queue.append(10)
queue.append(20)
print(queue.popleft())  # 10 출력

# Deque로 deque 사용
deque_obj = deque()
deque_obj.appendleft(5)
deque_obj.append(10)
print(deque_obj.popleft())  # 5 출력
print(deque_obj.pop())  # 10 출력
3.3 성능 최적화 및 트레이드오프
연결 리스트의 메모리 사용량 분석
- 연결 리스트는 각 노드가 추가적인 포인터(
next,prev)를 유지해야 하므로, 노드 수가 많아질수록 배열에 비해 메모리 사용량이 더 커집니다.- 각 노드는 데이터를 저장할 뿐만 아니라 포인터 필드를 저장해야 하므로, 노드 수가 많을수록 메모리 사용량이 증가합니다.
- 예를 들어, 100개의 요소를 가진
LinkedList는 100개의 데이터 필드뿐만 아니라 100개의 추가 포인터 필드를 유지해야 합니다. 반면, 배열은 하나의 연속된 메모리 블록에 모든 데이터를 저장하므로, 포인터에 대한 추가 비용이 들지 않습니다.
- 메모리 트레이드오프: 대량의 데이터가 있을 때 메모리 효율성이 중요하다면, 배열이 더 유리할 수 있습니다.
LinkedList vs ArrayList 성능 비교 (Java에만 해당되는 내용)
Java에서 LinkedList와 ArrayList는 모두 동일한 List 인터페이스를 구현한 구현체이지만, 각기 다른 상황에서 적합한 성능을 보여줍니다.
- 여기선 삽입/삭제와 탐색 성능 차이를 알아보겠습니다.
| 자료구조 | 삽입 시간 복잡도 | 삭제 시간 복잡도 | 탐색 시간 복잡도 |
|---|---|---|---|
| ArrayList | O(n) (중간) | O(n) (중간) | O(1) (인덱스 접근) |
| LinkedList | O(1) (앞/뒤) | O(1) (앞/뒤) | O(n) (순차 탐색) |
ArrayList는 인덱스 접근이 빠르지만, 중간 삽입/삭제 시 모든 요소를 이동해야 하므로 성능이 떨어집니다.LinkedList는 중간 삽입/삭제 시 포인터만 변경하면 되므로 유리하지만, 탐색 속도가 느리다는 단점이 있습니다.
다만, 실무에서는 대부분의 경우 ArrayList가 LinkedList보다 더 나은 성능을 제공합니다.
- 이는 Java에서
ArrayList가 내부적으로 고속 복사 메서드인System.arraycopy를 사용하기 때문입니다. - 그래서 중간 삽입 및 삭제에서도
ArrayList는 데이터 블록을 통째로 복사하는 방식으로 상대적으로 빠르게 처리할 수 있습니다.
따라서 대용량 데이터를 처리할 때도 LinkedList보다 ArrayList가 더 효율적인 경우가 많습니다.
3.4 언제 ArrayList를 사용하고, 언제 LinkedList를 사용할까?
ArrayList는 읽기/탐색이 빈번한 경우 적합합니다. 특히 대규모 데이터를 순차적으로 접근할 때 유리합니다.LinkedList는 대용량 데이터의 삽입/삭제가 빈번한 경우 적합하며, 특히 양방향 탐색이나 큐/덱 구조에서 유리합니다.
참고 : 굳이 이렇게 분류했지만, 실무에서는 일반적으로 ArrayList가 LinkedList보다 훨씬 더 좋은 성능을 나타내기 때문에 List 자료형이 필요한 경우 ArrayList를 쓰면 된다고 생각하시면 됩니다.
마무리
이번 포스팅에서는 LinkedList의 구조와 구현 방법에 대해 자세히 알아보았습니다.
- 단일 연결 리스트와 이중 연결 리스트의 차이점과 각각의 장단점, 그리고 원형 연결 리스트와 Queue/Deque로서의 활용 방법을 살펴보았습니다.
Java의 경우 실제 개발에서는 대용량 데이터를 처리할 때는 ArrayList를 사용하는 것이 대부분 더 적합합니다.
- 다만 앞쪽이나 뒤쪽으로 대량의 데이터 삽입과 삭제가 빈번한 경우에는 LinkedList 또는 deque를 사용하는 것이 유리할 수 있습니다.
다음 포스팅부터는 Stack/Queue/Deque 자료구조와 그 활용에 대해 다루어 보도록 하겠습니다.