이번 글은 cs231n 과제3 Q2를 구현하며 헷갈리거나 몰랐던 부분들을 정리해보려고 한다. 트랜스포머 자체에 대한 이해도 전혀 없었기 때문에 논문을 읽고 정리하느라 꽤 힘들었다.
1. class MultiHeadAttention
class MultiHeadAttention(nn.Module):

    def forward(self, query, key, value, attn_mask=None):
        """
        Calculate the masked attention output for the provided data, computing
        all attention heads in parallel.

        In the shape definitions below, N is the batch size, S is the source
        sequence length, T is the target sequence length, and E is the embedding
        dimension.

        Inputs:
        - query: Input data to be used as the query, of shape (N, S, E)
        - key: Input data to be used as the key, of shape (N, T, E)
        - value: Input data to be used as the value, of shape (N, T, E)
        - attn_mask: Array of shape (S, T) where mask[i,j] == 0 indicates token
          i in the source should not influence token j in the target.

        Returns:
        - output: Tensor of shape (N, S, E) giving the weighted combination of
          data in value according to the attention weights calculated using key
          and query.
        """
        N, S, E = query.shape
        N, T, E = value.shape

        # Create a placeholder, to be overwritten by your code below.
        output = torch.empty((N, S, E))
        ############################################################################
        # TODO: Implement multiheaded attention using the equations given in       #
        # Transformer_Captioning.ipynb.                                            #
        # A few hints:                                                             #
        #  1) You'll want to split your shape from (N, T, E) into (N, T, H, E/H),  #
        #     where H is the number of heads.                                      #
        #  2) The function torch.matmul allows you to do a batched matrix multiply.#
        #     For example, you can do (N, H, T, E/H) by (N, H, E/H, T) to yield a  #
        #     shape (N, H, T, T). For more examples, see                           #
        #     https://pytorch.org/docs/stable/generated/torch.matmul.html          #
        #  3) For applying attn_mask, think how the scores should be modified to   #
        #     prevent a value from influencing output. Specifically, the PyTorch   #
        #     function masked_fill may come in handy.                              #
        ############################################################################
        # *****START OF YOUR CODE (DO NOT DELETE/MODIFY THIS LINE)*****
        H=self.n_head
        key_head=self.key(key).reshape((N,T,H,E//H)).swapaxes(1,2)
        value_head=self.value(value).reshape((N,T,H,E//H)).swapaxes(1,2)
        query_head=self.query(query).reshape((N,S,H,E//H)).swapaxes(1,2)
        qdot=torch.matmul(query_head,key_head.swapaxes(2,3)) #(N,H,T,T)
        qdot/=torch.sqrt(torch.tensor(E//H))

        if attn_mask!=None:
          qdot=torch.masked_fill(qdot, attn_mask==0, float('-inf'))


        output=self.attn_drop(F.softmax(qdot,dim=-1))
        output=torch.matmul(output,value_head)
        output=output.swapaxes(1,2)
        output=self.proj(output.reshape((N,S,E)))
        # *****END OF YOUR CODE (DO NOT DELETE/MODIFY THIS LINE)*****
        ############################################################################
        #                             END OF YOUR CODE                             #
        ########
기본적으로 아래의 Attention 공식을 코드로 구현하는 내용이다.

구현을 하려고 하면 차원을 맞춰줘야 하고, head별로 나눠서 attention을 진행하기 때문에 notation을 살짝 다르게 봐야 한다. 과제에서 이 부분은 아래 사진과 같이 짚어주기 때문에 그닥 어렵진 않다.
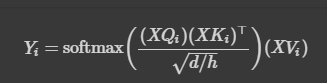
는 각 head에 대한 output을 의미한다. 내가 제일 헷갈렸던 부분은 이다. 주어진 클래스에서는 input이 없는데, 가 공식에 있다. 알고 보니 이를 계산해주는 것이 클래스에서 미리 선언된 nn.Linear layer였다.
또 하나 신경 써야 할 것은 차원이다. 아래 정리된 것처럼 차원을 바꿔주며 계산하면 된다.

self.proj도 일종의 nn.Linear layer로 선언되어 있는 것을 볼 수 있다.
2. class Positional Encoding
class PositionalEncoding(nn.Module):
    """
    Encodes information about the positions of the tokens in the sequence. In
    this case, the layer has no learnable parameters, since it is a simple
    function of sines and cosines.
    """
    def __init__(self, embed_dim, dropout=0.1, max_len=5000):
        """
        Construct the PositionalEncoding layer.

        Inputs:
         - embed_dim: the size of the embed dimension
         - dropout: the dropout value
         - max_len: the maximum possible length of the incoming sequence
        """
        super().__init__()
        self.dropout = nn.Dropout(p=dropout)
        assert embed_dim % 2 == 0
        # Create an array with a "batch dimension" of 1 (which will broadcast
        # across all examples in the batch).
        pe = torch.zeros(1, max_len, embed_dim)
        ############################################################################
        # TODO: Construct the positional encoding array as described in            #
        # Transformer_Captioning.ipynb.  The goal is for each row to alternate     #
        # sine and cosine, and have exponents of 0, 0, 2, 2, 4, 4, etc. up to      #
        # embed_dim. Of course this exact specification is somewhat arbitrary, but #
        # this is what the autograder is expecting. For reference, our solution is #
        # less than 5 lines of code.                                               #
        ############################################################################
        # *****START OF YOUR CODE (DO NOT DELETE/MODIFY THIS LINE)*****
        i = torch.arange(max_len).reshape(-1,1) # (max_len,1)
        pows = torch.pow(10000, -torch.arange(0, embed_dim, 2) / embed_dim) #pows.shape=(embed_dim/2)
        #setting pows as shown is because we need to use different functions(sin,cos) for even/odd indices.
        pe[0, :, 0::2] = torch.sin(i * pows)
        pe[0, :, 1::2] = torch.cos(i * pows) #pe.shape=(1,max_len,embed_dim)
        # *****END OF YOUR CODE (DO NOT DELETE/MODIFY THIS LINE)*****
        ############################################################################
        #                             END OF YOUR CODE                             #
        ############################################################################

        # Make sure the positional encodings will be saved with the model
        # parameters (mostly for completeness).
        self.register_buffer('pe', pe)
Positional Encoding은 아래 수식과 같이 정의할 수 있다. Self-attention으로는 sequential한 정보의 순서를 transformer에게 알려줄 수 없기 때문에, positional encoding을 통해 추가적인 정보를 주는 것이다.
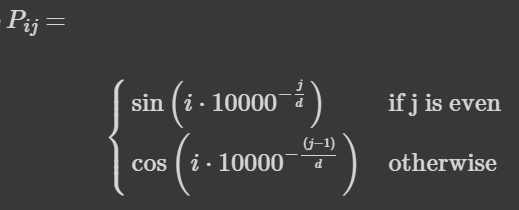
위의 수식에서 는 row, 는 column의 index를 뜻한다. 짝수 열의 경우 을 이용해 position을 표현하고, 홀수의 경우 으로 표현한다. 코드로 어떻게 구현되는지 알아보자.
코드에서 TO-DO 부분을 보면, 각 row당 거듭제곱이 0,0,2,2,4,4...embed_dim, embed_dim와 같이 표현되어야 한다. 각 숫자가 2개씩 있는 이유는 sin, cos에 각각 들어가야 하기 때문이다. 또한, pe 행렬은 (1,max_len,embed_dim)의 크기를 갖기 때문에, 위의 공식에서 는 max_len 차원, 는 embed_dim 차원에 해당한다는 것을 알 수 있다. 문제를 해결하는데 가장 중요한 포인트는 pe를 한 번에 채우려고 하면 안된다는 것이다. sin,cos을 번갈아 사용해야 하기 때문에, row와 column으로 나누어 생각하는 것이 좋다.
위 코드의 는 row vector를 의미하기 때문에, 해당 차원의 크기인 max_len으로 배열을 만들어 주었다. 뒤에 차원을 하나 더 만들어주는 것은 broadcasting이 되게 하기 위해서이다. pows 배열은 공식의 거듭제곱 부분을 표현한 것이다. 단, 과 에 따로 적용시켜 줄 것이기 때문에 column vector 차원의 반인 embed_dim/2 크기로 만들어준다. 그리고 나서 과 에 넣어서 계산해주면 된다.
def forward(self, x):
        """
        Element-wise add positional embeddings to the input sequence.

        Inputs:
         - x: the sequence fed to the positional encoder model, of shape
              (N, S, D), where N is the batch size, S is the sequence length and
              D is embed dim
        Returns:
         - output: the input sequence + positional encodings, of shape (N, S, D)
        """
        N, S, D = x.shape
        # Create a placeholder, to be overwritten by your code below.
        output = torch.empty((N, S, D))
        ############################################################################
        # TODO: Index into your array of positional encodings, and add the         #
        # appropriate ones to the input sequence. Don't forget to apply dropout    #
        # afterward. This should only take a few lines of code.                    #
        ############################################################################
        # *****START OF YOUR CODE (DO NOT DELETE/MODIFY THIS LINE)*****

        output = x + self.pe[:,:S,:] # sequence might be shorter than expected, so we slice them.
        output = self.dropout(output)

        # *****END OF YOUR CODE (DO NOT DELETE/MODIFY THIS LINE)*****
        ############################################################################
        #                             END OF YOUR CODE                             #
        ############################################################################
        return output
positional encoding이 끝나면 이를 input에 반영해 주어야 한다. 그러나 들어오는 sequence의 크기가 max_len보다 짧을 수도 있으므로, 주어진 sequence 길이인 S만큼만 slicing해서 더해주면 된다.
3. class TransformerDecoderLayer
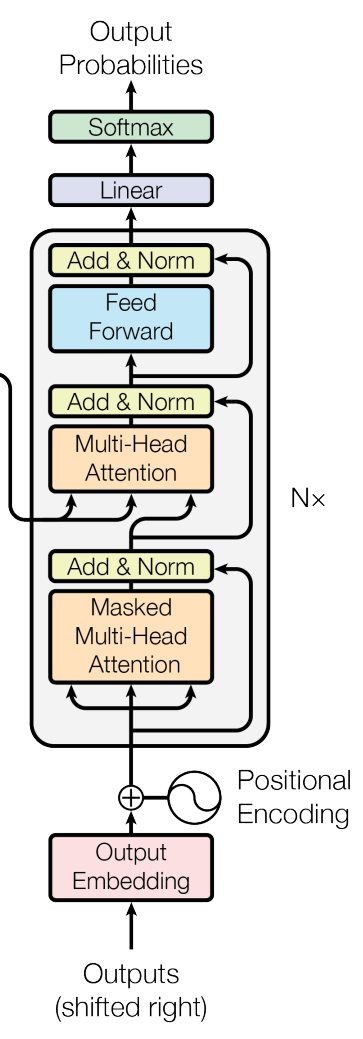
이 class와 아래 class는 말 그대로, transformer를 이용해서 image captioning을 해보는 과정을 구현한 것이다. Q1에서 구현한 RNN 버전보다 test set에서 더 좋은 성능을 낸다고 한다. 이쯤 되니까 보고 이해해야 되는 코드 양이 꽤 돼서 당황스러웠다 ㅋㅋㅋ...그래서 일단 코드의 전체적인 흐름과 기존에 배운 decoder architecture를 비교하며 이해해 봤다.
class TransformerDecoderLayer(nn.Module):
    """
    A single layer of a Transformer decoder, to be used with TransformerDecoder.
    """
    def __init__(self, input_dim, num_heads, dim_feedforward=2048, dropout=0.1):
        """
        Construct a TransformerDecoderLayer instance.

        Inputs:
         - input_dim: Number of expected features in the input.
         - num_heads: Number of attention heads
         - dim_feedforward: Dimension of the feedforward network model.
         - dropout: The dropout value.
        """
        super().__init__()
        self.self_attn = MultiHeadAttention(input_dim, num_heads, dropout)
        self.multihead_attn = MultiHeadAttention(input_dim, num_heads, dropout)
        self.linear1 = nn.Linear(input_dim, dim_feedforward)
        self.dropout = nn.Dropout(dropout)
        self.linear2 = nn.Linear(dim_feedforward, input_dim)

        self.norm1 = nn.LayerNorm(input_dim)
        self.norm2 = nn.LayerNorm(input_dim)
        self.norm3 = nn.LayerNorm(input_dim)
        self.dropout1 = nn.Dropout(dropout)
        self.dropout2 = nn.Dropout(dropout)
        self.dropout3 = nn.Dropout(dropout)

        self.activation = nn.ReLU()


    def forward(self, tgt, memory, tgt_mask=None):
        """
        Pass the inputs (and mask) through the decoder layer.

        Inputs:
        - tgt: the sequence to the decoder layer, of shape (N, T, W)
        - memory: the sequence from the last layer of the encoder, of shape (N, S, D)
        - tgt_mask: the parts of the target sequence to mask, of shape (T, T)

        Returns:
        - out: the Transformer features, of shape (N, T, W)
        """
        # Perform self-attention on the target sequence (along with dropout and
        # layer norm).
        tgt2 = self.self_attn(query=tgt, key=tgt, value=tgt, attn_mask=tgt_mask)
        tgt = tgt + self.dropout1(tgt2)
        tgt = self.norm1(tgt)


        # Attend to both the target sequence and the sequence from the last
        # encoder layer.
        tgt2 = self.multihead_attn(query=tgt, key=memory, value=memory)
        tgt = tgt + self.dropout2(tgt2)
        tgt = self.norm2(tgt)

        # Pass
        tgt2 = self.linear2(self.dropout(self.activation(self.linear1(tgt))))
        tgt = tgt + self.dropout3(tgt2)
        tgt = self.norm3(tgt)
        return tgt
위의 코드는 TransformerDecoderLayer class의 코드이다. Decoder block 하나의 과정을 구현한 것이고, 이 과정을 N번 반복하는 것이다. forward 함수를 보면, 첫 번째 세 줄이 masked self-attention임을 알 수 있다. decoding을 할 때 현재 시점에서 미래의 정보에는 접근하면 안되기 때문에 mask를 도입해준다. attention 후 dropout과 layer norm도 진행해준다. 그리고 나서 Multi-Head attention을 encoder layer에서 받은 k,v 값들을 이용해 진행한다. 이것도 attention layer-dropout-layer norm의 순서로 구현했다. 마지막으로 2개의 FC layer를 거치고 dropout- layer norm을 지나 return 된다.
4. Class CaptioningTransformer
class CaptioningTransformer(nn.Module):

    def forward(self, features, captions):
        """
        Given image features and caption tokens, return a distributfn over the
        possible tokens for each timestep. Note that since the entire sequence
        of captions is provided all at once, we mask out future timesteps.

        Inputs:
         - features: image features, of shape (N, D)
         - captions: ground truth captions, of shape (N, T)

        Returns:
         - scores: score for each token at each timestep, of shape (N, T, V)
        """
        N, T = captions.shape
        # Create a placeholder, to be overwritten by your code below.
        scores = torch.empty((N, T, self.vocab_size))
        ############################################################################
        # TODO: Implement the forward function for CaptionTransformer.             #
        # A few hints:                                                             #
        #  1) You first have to embed your caption and add positional              #
        #     encoding. You then have to project the image features into the same  #
        #     dimensions.                                                          #
        #  2) You have to prepare a mask (tgt_mask) for masking out the future     #
        #     timesteps in captions. torch.tril() function might help in preparing #
        #     this mask.                                                           #
        #  3) Finally, apply the decoder features on the text & image embeddings   #
        #     along with the tgt_mask. Project the output to scores per token      #
        ############################################################################
        # *****START OF YOUR CODE (DO NOT DELETE/MODIFY THIS LINE)*****
        caption_embed=self.embedding(captions)
        caption_embed=self.positional_encoding(caption_embed)
        feature_proj=self.visual_projection(features).unsqueeze(1)
        tgt_mask=torch.tril(torch.ones(T,T))
        out=self.transformer(caption_embed,feature_proj,tgt_mask)
        scores=self.output(out)
        # *****END OF YOUR CODE (DO NOT DELETE/MODIFY THIS LINE)*****
        ############################################################################
        #                             END OF YOUR CODE                             #
        ############################################################################

        return scores
위의 class에서 구현한 과정이 self. transformer()를 이용해 사용된다. 여기서도 과제에서 주어진 힌트를 따라 차근차근 진행하면 된다. 일단 architecture에서 보듯이, positional encoding과 embedding을 해주어야 한다. embedding을 다 해주고, feature들을 linear layer에 태워준 후, transformer decoder layer에 mask 와 함께 먹여주면, 위에서 언급한 과정들을 통해 결과 값이 나오게 된다. 그리고 나서 마지막 FC layer를 태워주면(self.output) scores를 얻을 수 있다.
5. 정리
Transformer는 공부를 더 해야되겠다고 느낀다. 공부를 어느 정도 하고 코드를 보는데도 확 와닿는 느낌이 없다. 알려준대로 구현하긴 했지만, 아직까지 features와 caption가 왜 visual projection layer와 embedding/positional encoding layer에 들어가야 하는지에 대한 명확한 이해가 부족한 것 같다.
내 과제 풀이: