이제 nodejs와 npm, yarn이 설치되었다.
프로젝트 생성
프로젝트를 하나 만들고 내용을 채워보자. Documents 폴더 안에 폴더를 하나 만들고 거기서 yarn init를 실행하자. 채워야 하는 내용은 엔터만 쳐서 모두 기본값으로 채운다.
helloworld@raspberry4:~$ cd Documents/
helloworld@raspberry4:~/Documents$ mkdir helloworld-server
helloworld@raspberry4:~/Documents$ cd helloworld-server
helloworld@raspberry4:~/Documents/helloworld-server$ yarn init
yarn init v1.22.10
question name (helloworld-server):
question version (1.0.0):
question description:
question entry point (index.js):
question repository url:
question author:
question license (MIT):
question private:
success Saved package.json
Done in 14.73s.
helloworld@raspberry4:~/Documents/helloworld-server$
이제 ls를 해보면 package.json이 생긴 것을 알 수 있다.
express 설치하기
yarn을 쓴다면 터미널에 다음과 같이 yarn add express 라고 입력해보자.
helloworld@raspberry4:~/Documents/helloworld-server$ yarn add express
yarn add v1.22.10
info No lockfile found.
[1/4] Resolving packages...
[2/4] Fetching packages...
[3/4] Linking dependencies...
[4/4] Building fresh packages...
success Saved lockfile.
success Saved 29 new dependencies.
info Direct dependencies
└─ express@4.17.1
info All dependencies
:
Done in 8.85s.
helloworld@raspberry4:~/Documents/helloworld-server$
yarn도 install 명령어가 따로 있긴 하지만 yarn add package-name은 npm install package-name --save와 동일하게 package.json에 기록된다. 열어보면 다음과 같이 기록되어 있다. (npm과 yarn의 사용법 비교 보기)
{
  "name": "helloworld-server",
  "version": "1.0.0",
  "main": "index.js",
  "license": "MIT",
  "dependencies": {
    "express": "^4.17.1"
  }
}
index.js 작성
nano index.js로 파일을 작성해보자. 아래 내용을 붙여도 된다.
아래 내용은 우리가 8081번 포트로 접속하면 Hello World!를 출력하고 콘솔에도 결과를 남기는 간단한 소스이다.
const express = require('express')
const app = express()
const port = 8081

app.get('/', (req, res) => {
  res.send('Hello World!')
  console.log('responded')
})

app.listen(port, () => {
  console.log(`app listening at http://localhost:${port}`)
})
구동
터미널에 nodejs index.js 라고 입력한다. 그러면 nodejs가 구동을 시작하면서 최초의 메시지가 나온다.
helloworld@raspberry4:~/Documents/helloworld-server$ nodejs index.js
app listening at http://localhost:8081
방화벽 열고 테스트하기
다음과 같이 방화벽을 열어주고 상태를 확인해보자. 8081번 포트가 잘 열린 것을 확인할 수 있다.
helloworld@raspberry4:~/Documents/helloworld-server$ sudo ufw allow 8081
[sudo] password for helloworld:
Rule added
Rule added (v6)
helloworld@raspberry4:~/Documents/helloworld-server$ sudo ufw status
Status: active
To Action From
-- ------ ----
22/tcp ALLOW Anywhere
8081 ALLOW Anywhere
22/tcp (v6) ALLOW Anywhere (v6)
8081 (v6) ALLOW Anywhere (v6)
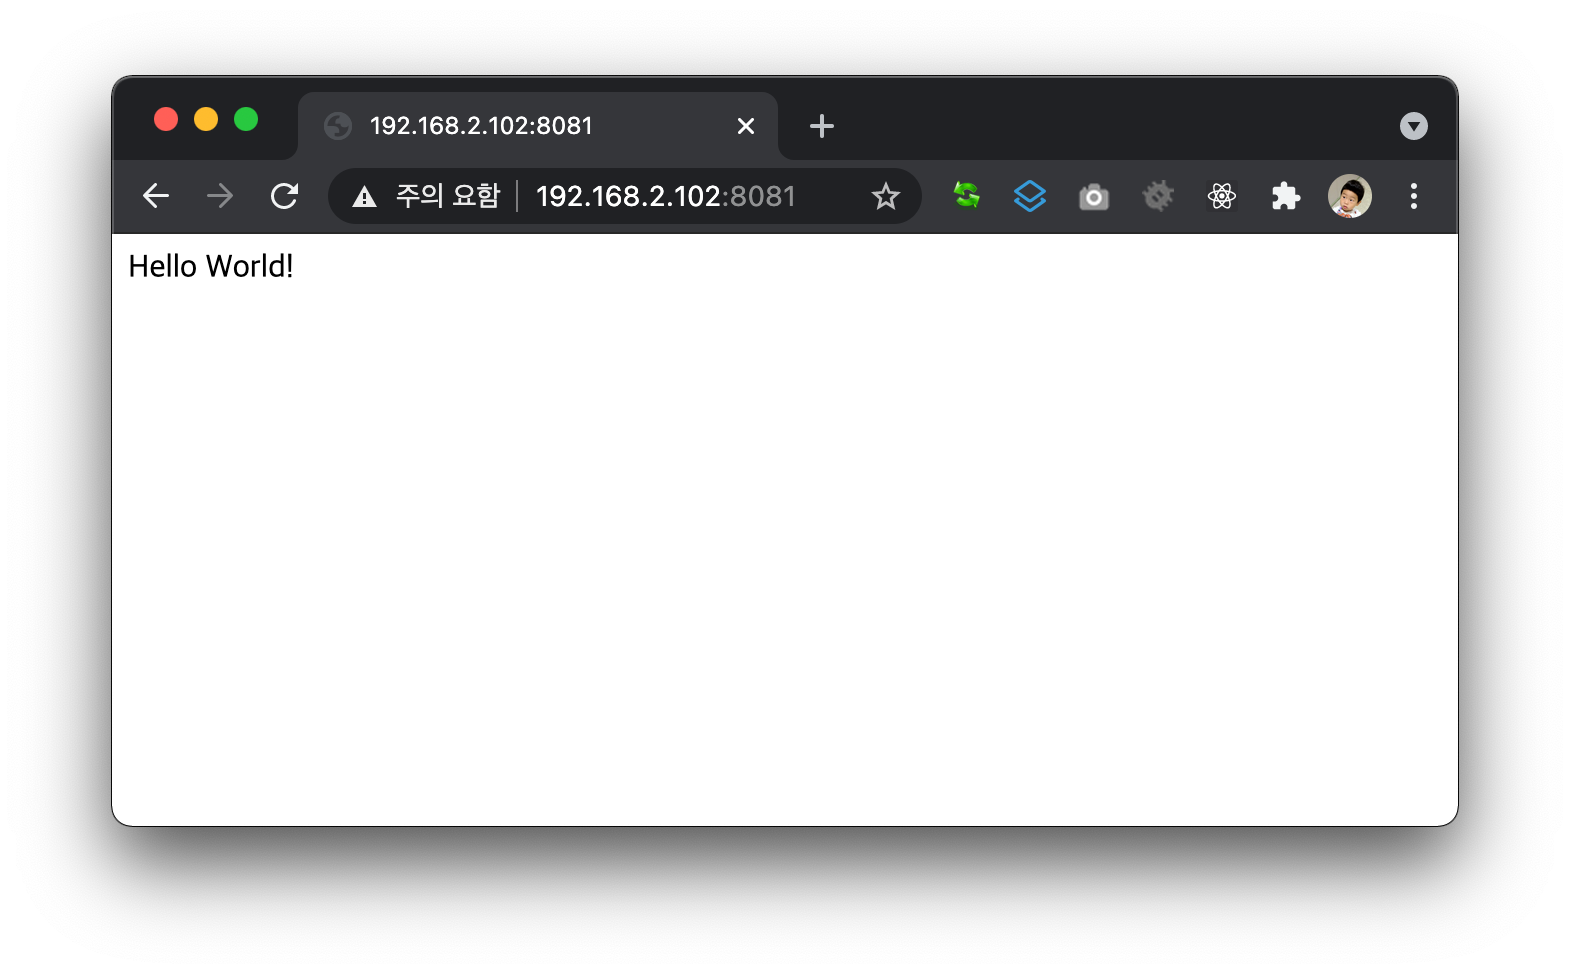
helloworld@raspberry4:~/Documents/helloworld-server$ 이제 우리 컴퓨터에서 해당 ip에 접속해보자. http://ip:8081 이런 식으로 접속해야 한다. 그러면 브라우저에서는 아래와 같은 결과가 나온다!
띄워놓은 터미널에서도 역시 응답했다는 메시지가 추가로 출력된다.
helloworld@raspberry4:~/Documents/helloworld-server$ nodejs index.js
app listening at http://localhost:8081
responded
이렇게 하면 서버 구동과 테스트가 모두 끝났다.
다음 글에서는 ssh를 연결한 터미널을 종료하더라도 서버를 계속 구동시키는 방법에 대해 알아보겠다.