생활코딩 - 웹브라우저 Javascript (자바스크립트)
위 강의를 듣고 정리한 글입니다.
3. Element 객체
Element 객체는 엘리먼트를 추상화한 객체다.
DOM은 HTML만을 제어하기 위한 모델이 아니다.
HTML이나 XML, SVG, XUL과 같이 마크업 형태의 언어를 제어하기 위한 규격이다.
Element는 마크업 언어의 일반적인 규격에 대한 속성을 정의하고 있고, 각각의 구체적인 언어(HTML,XML,SVG)를 위한 기능은 HTMLElement, SVGElement, XULElement와 같은 객체를 통해서 추가해서 사용하고 있다.
다른 객체들과의 관계

식별자
문서내에서 특정한 엘리먼트를 식별하기 위한 용도로 사용되는 API
- Element.classList
- Element.className
- Element.id
- Element.tagName
조회
엘리먼트의 하위 엘리먼트를 조회하는 API
- Element.getElementsByClassName
- Element.getElementsByTagName
- Element.querySelector
- Element.querySelectorAll
속성
엘리먼트의 속성을 알아내고 변경하는 API
- Element.getAttribute(name)
- Element.setAttribute(name, value)
- Element.hasAttribute(name);
- Element.removeAttribute(name);
3.1 식별자 API
HTML에서 엘리먼트의 이름과 id 그리고 class는 식별자로 사용된다.
식별자 API는 이 식별자를 가져오고 변경하는 역할을 한다.
Element.tagName
해당 엘리먼트의 태그 이름을 알아낸다.
태그 이름을 변경하지는 못한다.
<ul>
    <li>html</li>
    <li>css</li>
    <li id="active" class="important current">JavaScript</li>
</ul>
<script>
console.log(document.getElementById('active').tagName)
</script>
Element.id
문서에서 id는 단 하나만 등장할 수 있는 식별자다
(여러개 써도 에러는 발생하지 않지만 작동하지 않음 )
<ul>
    <li>html</li>
    <li>css</li>
    <li id="active">JavaScript</li>
</ul>
<script>
var active = document.getElementById('active');
console.log(active.id);
active.id = 'deactive'; //변경
console.log(active.id);
</script>
Element.className
className보다 clasList가 더 진보적이고 자주 씀
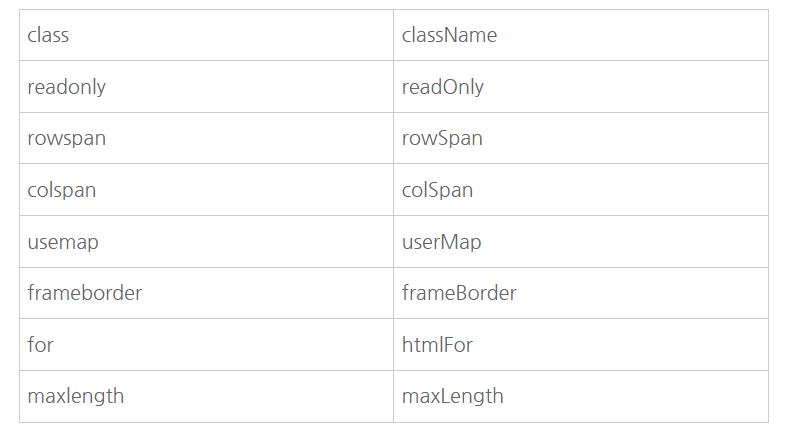
예약어때문에 실제 프로퍼티 이름과 일치하지 않는 경우 존재
<ul>
    <li>html</li>
    <li>css</li>
    <li id="active">JavaScript</li>
</ul>
<script>
var active = document.getElementById('active');
// class 값을 변경할 때는 프로퍼티의 이름으로 className을 사용한다.
active.className = "important current";
console.log(active.className);
// 클래스를 추가할 때는 아래와 같이 문자열의 더한다.
active.className += " readed"
</script>
Element.classList
<ul>
    <li>html</li>
    <li>css</li>
    <li id="active" class="important current">JavaScript</li>
</ul>
<script>
function loop(){
    for(var i=0; i<active.classList.length; i++){
        console.log(i, active.classList[i]);
    }
}
// 클래스를 추가
</script>
<input type="button" value="DOMTokenList" onclick="console.log(active.classList);" />
<input type="button" value="조회" onclick="loop();" />
<input type="button" value="추가" onclick="active.classList.add('marked');" />
<input type="button" value="제거" onclick="active.classList.remove('important');" />
<input type="button" value="토글" onclick="active.classList.toggle('current');" />
3.2 조회 API
지금까지 document.getElementsBy* 메소드를 통해서 엘리먼트를 조회했다.
document 객체는 문서 전체를 의미하는 엘리먼트이기 때문에 document의 조회 메소드는 문서 전체를 대상으로 엘리먼트를 조회한다.
조회의 범위를 좁히는법
Element 객체 역시도 getElementsBy* 엘리먼트를 가지고 있는데 Element 객체의 조회 메소드는 해당 엘리먼트의 하위 엘리먼트를 대상으로 조회를 수행한다.
<ul>
    <li class="marked">html</li>
    <li>css</li>
    <li id="active">JavaScript
        <ul>
            <li>JavaScript Core</li>
            <li class="marked">DOM</li>
            <li class="marked">BOM</li>
        </ul>
    </li>
</ul>
<script>
    var list = document.getElementsByClassName('marked');
    console.group('document');
    for(var i=0; i<list.length; i++){
        console.log(list[i].textContent);
    }
    console.groupEnd();

    console.group('active');
    var active = document.getElementById('active');
    var list = active.getElementsByClassName('marked');
    for(var i=0; i<list.length; i++){
        console.log(list[i].textContent);
    }
    console.groupEnd();
</script>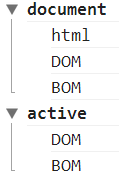
3.3 속성 API
속성은 HTML에서 태그명만으로는 부족한 부가적인 정보이다.
속성을 제어하는 API는 아래와 같다.
- Element.getAttribute(name)
- Element.setAttribute(name, value)
- Element.hasAttribute(name);
- Element.removeAttribute(name);
<a id="target" href="http://opentutorials.org">opentutorials</a>
<script>
var t = document.getElementById('target');
console.log(t.getAttribute('href')); //http://opentutorials.org
t.setAttribute('title', 'opentutorials.org'); // title 속성의 값을 설정한다.
console.log(t.hasAttribute('title')); // true, title 속성의 존재여부를 확인한다.
t.removeAttribute('title'); // title 속성을 제거한다.
console.log(t.hasAttribute('title')); // false, title 속성의 존재여부를 확인한다.
</script>
모든 엘리먼트의 (HTML)속성은 (JavaScript 객체의) 속성과 프로퍼티로 제어가 가능하다.
<p id="target">
    Hello world
</p>
<script>
    var target = document.getElementById('target');
    // attribute 방식
    target.setAttribute('class', 'important');
    // property 방식
    target.className = 'important';
</script>
setAttribute('class', 'important')와 className = 'important'는 같은 결과를 만든다.
전자는 attribute 방식(속성이라고 부르겠다)이고 후자는 property 방식이다.
property 방식은 좀 더 간편하고 속도도 빠르지만, 자바스크립트의 이름 규칙 때문에 실제 html 속성의 이름과 다른 이름을 갖는 경우가 있다.
속성과 프로퍼티는 값이 다를수도 있다.
아래 코드를 실행한 결과는 속성과 프로퍼티의 값이 꼭 같은 것은 아니라는 것을 보여준다.
<a id="target" href="./demo1.html">ot</a>
<script>
//현재 웹페이지가 http://localhost/webjs/Element/attribute_api/demo3.html 일 때
var target = document.getElementById('target');
// http://localhost/webjs/Element/attribute_api/demo1.html
console.log('target.href', target.href);
// ./demo1.html
console.log('target.getAttribute("href")', target.getAttribute("href"));
</script>
3.4 jQuery 속성 제어 API
jQuery 객체의 메소드 중 setAttribute, getAttribute에 대응되는 메소드는 attr이다.
또한 removeAttribute에 대응되는 메소드로는 removeAttr이 있다.
<a id="target" href="http://opentutorials.org">opentutorials</a>
<script src="//code.jquery.com/jquery-1.11.0.min.js"></script>
<script>
var t = $('#target');
console.log(t.attr('href')); //http://opentutorials.org
t.attr('title', 'opentutorials.org'); // title 속성의 값을 설정한다.
t.removeAttr('title'); // title 속성을 제거한다.
</script>
attribute와 property
DOM과 마찬가지로 jQuery도 속성(attribute)과 프로퍼티를 구분한다.
속성은 attr, 프로퍼티는 prop 메소드를 사용한다.
<a id="t1" href="./demo.html">opentutorials</a>
<input id="t2" type="checkbox" checked="checked" />
<script src="//code.jquery.com/jquery-1.11.0.min.js"></script>
<script>
// 현재 문서의 URL이 아래와 같다고 했을 때
// http://localhost/jQuery_attribute_api/demo2.html
var t1 = $('#t1');
console.log(t1.attr('href')); // ./demo.html
console.log(t1.prop('href')); // http://localhost/jQuery_attribute_api/demo.html

var t2 = $('#t2');
console.log(t2.attr('checked')); // checked
console.log(t2.prop('checked')); // true
</script>
jQuery를 이용하면 프로퍼티의 이름으로 어떤 것을 사용하건 내부적으로 올바른 것으로 교정해준다.
<div id="t1">opentutorials</div>
<div id="t2">opentutorials</div>
<script src="//code.jquery.com/jquery-1.11.0.min.js"></script>
<script>
$('#t1').prop('className', 'important');
$('#t2').prop('class', 'current');
</script>
3.5 jQuery 조회 범위 제한
selector context
Element 객체에서 getElementsBy* 메소드를 실행하면 조회의 범위가 그 객체의 하위 엘리먼트로 제한된다.
jQuery에서 가장 간편한 방법은 조회할 때 조회 범위를 제한하는 것이다.
selector context는 jQuery에서 범위를 한정시키는 것이다.
<ul>
    <li class="marked">html</li>
    <li>css</li>
    <li id="active">JavaScript
        <ul>
            <li>JavaScript Core</li>
            <li class="marked">DOM</li>
            <li class="marked">BOM</li>
        </ul>
    </li>
</ul>
<script src="//code.jquery.com/jquery-1.11.0.min.js"></script>
<script>
    $( ".marked", "#active").css( "background-color", "red" );
</script><ul>
<li class="marked">html</li>
<li>css</li>
<li id="active">JavaScript
<ul>
<li>JavaScript Core</li>
<li class="marked" style="background-color: red;">DOM</li>
<li class="marked" style="background-color: red;">BOM</li>
</ul>
</li>
</ul>선택자를 아래처럼 작성해도 결과가 같다.
$( "#active .marked").css( "background-color", "red" );.find()
find는 jQuery 객체 내에서 엘리먼트를 조회하는 기능을 제공한다.
$( "#active").find('.marked').css( "background-color", "red" );
find를 쓰는 이유는 체인을 끊지 않고 작업의 대상을 변경하고 싶을 때 사용한다.
$('#active').css('color','blue').find('.marked').css( "background-color", "red" );
<ul>
    <li class="marked">html</li>
    <li>css</li>
    <li id="active" style="color: blue;">JavaScript
        <ul>
            <li>JavaScript Core</li>
            <li class="marked" style="background-color: red;">DOM</li>
            <li class="marked" style="background-color: red;">BOM</li>
        </ul>
    </li>
</ul>
즉 li.item-li 엘리먼트에 해당하는 모든 엘리먼트의 전경색을 파란색으로 변경한 후에 li 엘리먼트만을 조회해서 배경색을 붉은색으로 지정하고 있다.
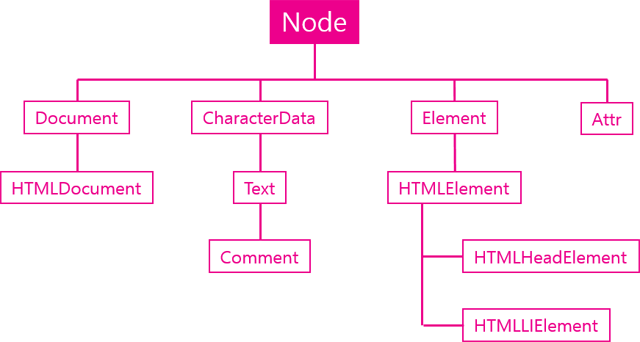
4. Node 객체
4.1 Node 객체
모든 DOM 객체는 Node 객체를 상속 받는다.
주요기능
관계
엘리먼트는 서로 부모, 자식, 혹은 형제자매 관계로 연결되어 있다.
각각의 Node가 다른 Node와 연결된 정보를 보여주는 API를 통해서 문서를 프로그래밍적으로 탐색할 수 있다.
- Node.childNodes
- Node.firstChild
- Node.lastChild
- Node.nextSibling
- Node.previousSibling
- Node.contains()
- Node.hasChildNodes()
노드의 종류
Node 객체는 모든 구성요소를 대표하는 객체이기 때문에 각각의 구성요소가 어떤 카테고리에 속하는 것인지를 알려주는 식별자를 제공한다.
- Node.nodeType
- Node.nodeName
값
Node 객체의 값을 제공하는 API
- Node.nodeValue
- Node.textContent
자식관리
Node 객체의 자식을 추가하는 방법에 대한 API
- Node.appendChild()
- Node.removeChild()
4.2 Node 관계 API
Node 객체는 Node 간의 관계 정보를 담고 있는 일련의 API를 가지고 있다. 다음은 관계와 관련된 프로퍼티들이다.
Node.childNodes
자식노드들을 유사배열에 담아서 리턴한다.
- Node.firstChild
첫번째 자식노드 - Node.lastChild
마지막 자식노드 - Node.nextSibling
다음 형제 노드 - Node.previousSibling
이전 형제 노드
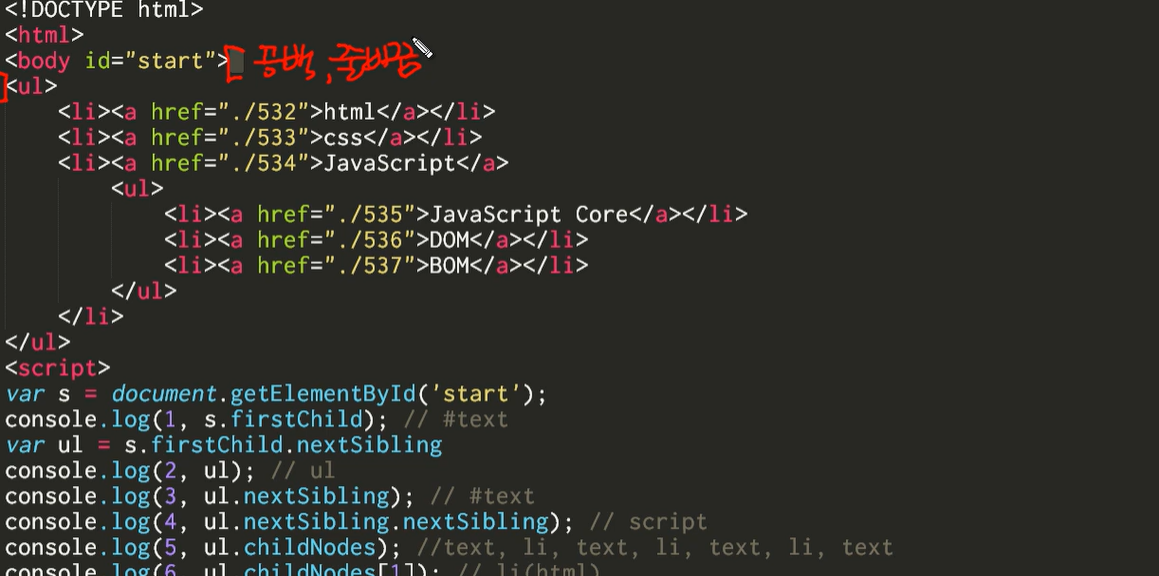
눈에 바로 보이지 않는 줄바꿈도 노드!
ul이 아니라 text노드가 나오게됨
<body id="start">
<ul>
    <li><a href="./532">html</a></li>
    <li><a href="./533">css</a></li>
    <li><a href="./534">JavaScript</a>
        <ul>
            <li><a href="./535">JavaScript Core</a></li>
            <li><a href="./536">DOM</a></li>
            <li><a href="./537">BOM</a></li>
        </ul>
    </li>
</ul>
<script>
var s = document.getElementById('start');
console.log(1, s.firstChild); // #text
var ul = s.firstChild.nextSibling
console.log(2, ul); // ul
console.log(3, ul.nextSibling); // #text
console.log(4, ul.nextSibling.nextSibling); // script
console.log(5, ul.childNodes); //text, li, text, li, text, li, text
console.log(6, ul.childNodes[1]); // li(html)
console.log(7, ul.parentNode); // body
</script>
</body>
4.3 노드 종류 API
노드 작업을 하게 되면 현재 선택된 노드가 어떤 타입인지를 판단해야 하는 경우 nodeType, nodeName API를 사용한다.
Node.nodeType
node의 타입을 의미한다.
Node.nodeName
node의 이름 (태그명을 의미한다.)
노드의 종류에 따라서 정해진 상수가 존재한다.
for(var name in Node){
   console.log(name, Node[name]);
}
ELEMENT_NODE 1
ATTRIBUTE_NODE 2
TEXT_NODE 3
CDATA_SECTION_NODE 4
ENTITY_REFERENCE_NODE 5
ENTITY_NODE 6
PROCESSING_INSTRUCTION_NODE 7
COMMENT_NODE 8
DOCUMENT_NODE 9
DOCUMENT_TYPE_NODE 10
DOCUMENT_FRAGMENT_NODE 11
NOTATION_NODE 12
DOCUMENT_POSITION_DISCONNECTED 1
DOCUMENT_POSITION_PRECEDING 2
DOCUMENT_POSITION_FOLLOWING 4
DOCUMENT_POSITION_CONTAINS 8
DOCUMENT_POSITION_CONTAINED_BY 16
DOCUMENT_POSITION_IMPLEMENTATION_SPECIFIC 32아래 예제는 노드 종류 API를 이용해서 노드를 처리하는 예제다.
함수가 자기 자신을 호출하는 것을 재귀함수라고 한다.
<!DOCTYPE html>
<html>
<body id="start">
<ul>
    <li><a href="./532">html</a></li>
    <li><a href="./533">css</a></li>
    <li><a href="./534">JavaScript</a>
        <ul>
            <li><a href="./535">JavaScript Core</a></li>
            <li><a href="./536">DOM</a></li>
            <li><a href="./537">BOM</a></li>
        </ul>
    </li>
</ul>
<script>
function traverse(target, callback){
    if(target.nodeType === 1){
        //if(target.nodeName === 'A')
        callback(target);
        var c = target.childNodes;
        for(var i=0; i<c.length; i++){
            traverse(c[i], callback);
        }
    }
}
traverse(document.getElementById('start'), function(elem){
    console.log(elem);
});
</script>
</body>
</html>
4.4 노드 변경 API
노드 추가
-
appendChild(child): 노드의 마지막 자식으로 주어진 엘리먼트 추가
-
insertBefore(newElement, referenceElement) :
appendChild와 동작방법은 같으나 두번째 인자로 엘리먼트를 전달 했을 때 이것 앞에 엘리먼트가 추가된다.
노드를 추가하기 위해서는 추가할 엘리먼트를 생성해야 하는데 이것은 document 객체의 기능이다.
아래 API는 노드를 생성하는 API이다.
- document.createElement(tagname) :엘리먼트 노드를 추가한다.
- document.createTextNode(data): 텍스트 노드를 추가한다.
<ul id="target">
    <li>HTML</li>
    <li>CSS</li>
</ul>
<input type="button" onclick="callAppendChild();" value="appendChild()" />
<input type="button" onclick="callInsertBefore();" value="insertBefore()" />
<script>
    function callAppendChild(){
        var target = document.getElementById('target');
        var li = document.createElement('li'); // li라는 엘리먼트 생성
        var text = document.createTextNode('JavaScript');
        li.appendChild(text); //li내용 text 객체 생성
        target.appendChild(li);
    }

    function callInsertBefore(){
        var target = document.getElementById('target');
        var li = document.createElement('li');
        var text = document.createTextNode('jQuery');
        li.appendChild(text);
        target.insertBefore(li, target.firstChild);
    }
</script>
노드제거 removeChild(child)
이 때 메소드는 삭제 대상의 부모 노드 객체의 것을 실행해야 한다.
<ul>
    <li>HTML</li>
    <li>CSS</li>
    <li id="target">JavaScript</li>
</ul>
<input type="button" onclick="callRemoveChild();" value="removeChild()" />
<script>
    function callRemoveChild(){
        var target = document.getElementById('target');
        target.parentNode.removeChild(target);
    }
</script>
노드 바꾸기 replaceChild(newChild, oldChild)
<ul>
    <li>HTML</li>
    <li>CSS</li>
    <li id="target">JavaScript</li>
</ul>
<input type="button" onclick="callReplaceChild();" value="replaceChild()" />
<script>
    function callReplaceChild(){
        var a = document.createElement('a');
        a.setAttribute('href', 'http://opentutorials.org/module/904/6701');
        a.appendChild(document.createTextNode('Web browser JavaScript'));

        var target = document.getElementById('target');
        target.replaceChild(a,target.firstChild);
    }
</script>
4.5 jQuery 노드 변경 API
jQuery에서 노드를 제어하는 기능은 주로 Manipulation 카테고리에 속해 있다.
추가와 관련된 주요한 메소드는 4가지다.
<div class="target">
content1
</div>
<div class="target">
content2
</div>
<script src="//code.jquery.com/jquery-1.11.0.min.js"></script>
<script>
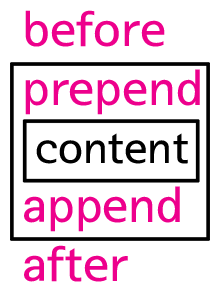
$('.target').before('<div>before</div>');
$('.target').after('<div>after</div>');
$('.target').prepend('<div>prepend</div>');
$('.target').append('<div>append</div>');
</script>제어하고자하는 대상에 모든 엘리먼트를 대상으로 before, after, prepend, append가 지정됨
제거
제거와 관련된 API: remove와 empty
-
remove: 선택된 엘리먼트를 제거하는 것이다. -
empty: 선택된 엘리먼트의 텍스트 노드를 제거하는 것이다.
<div class="target" id="target1">
    target 1
</div>

<div class="target" id="target2">
    target 2
</div>

<input type="button" value="remove target 1" id="btn1" />
<input type="button" value="empty target 2" id="btn2" />
<script src="//code.jquery.com/jquery-1.11.0.min.js"></script>
<script>
    $('#btn1').click(function(){
        $('#target1').remove();
    })
    $('#btn2').click(function(){
        $('#target2').empty();
    })
</script>
바꾸기
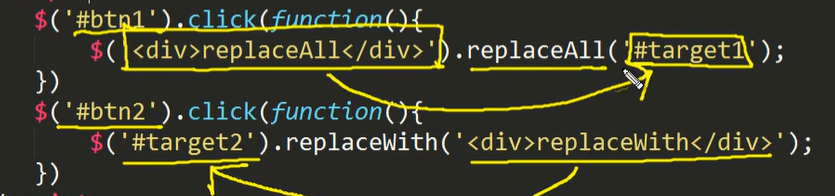
replaceAll과 replaceWith는 노드의 내용을 교체하는 API이다.
replaceWith는 제어 대상을 먼저 지정한다.replaceAll은 제어 대상을 인자로 전달한다.
<div class="target" id="target1">
    target 1
</div>

<div class="target" id="target2">
    target 2
</div>

<input type="button" value="replaceAll target 1" id="btn1" />
<input type="button" value="replaceWith target 2" id="btn2" />
<script src="//code.jquery.com/jquery-1.11.0.min.js"></script>
<script>
    $('#btn1').click(function(){
        $('<div>replaceAll</div>').replaceAll('#target1');
    })
    $('#btn2').click(function(){
        $('#target2').replaceWith('<div>replaceWith</div>');
    })
</script>
복사
.clone()

<div class="target" id="target1">
    target 1
</div>

<div class="target" id="target2">
    target 2
</div>

<div id="source">source</div>

<input type="button" value="clone replaceAll target 1" id="btn1" />
<input type="button" value="clone replaceWith target 2" id="btn2" />
<script src="//code.jquery.com/jquery-1.11.0.min.js"></script>
<script>
    $('#btn1').click(function(){
        $('#source').clone().replaceAll('#target1');
    })
    $('#btn2').click(function(){
        $('#target2').replaceWith($('#source').clone());
    })
</script>
이동
dom manipulation API의 인자로 특정 노드를 선택하면 이동의 효과가 난다
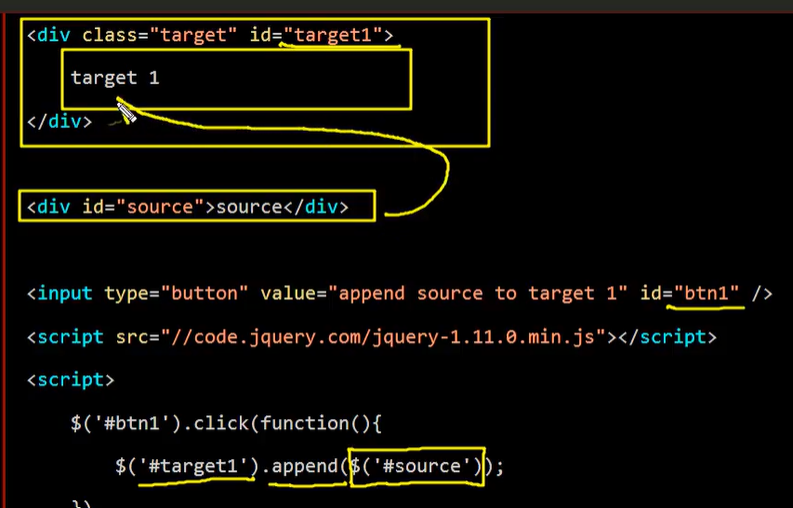
<div class="target" id="target1">
    target 1
</div>

<div id="source">source</div>

<input type="button" value="append source to target 1" id="btn1" />
<script src="//code.jquery.com/jquery-1.11.0.min.js"></script>
<script>
    $('#btn1').click(function(){
        $('#target1').append($('#source'));
    })
</script>
4.6 문자열로 노드 제어
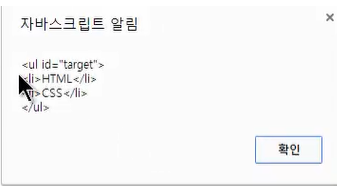
innerHTML
innerHTML는 문자열로 자식 노드를 만들 수 있는 기능을 제공한다.
또한 자식 노드의 값을 읽어올 수도 있다.
<ul id="target">
    <li>HTML</li>
    <li>CSS</li>
</ul>
<input type="button" onclick="get();" value="get" />
<input type="button" onclick="set();" value="set" />
<script>
    function get(){
        var target = document.getElementById('target');
        alert(target.innerHTML);
    }
    function set(){
        var target = document.getElementById('target');
        target.innerHTML = "<li>JavaScript Core</li><li>BOM</li><li>DOM</li>";
    }
</script>
outerHTML
outerHTML은 선택한 엘리먼트를 포함해서 처리된다.
자기자신을 포함한 전체를 보여준다.
<ul id="target">
   <li>HTML</li>
   <li>CSS</li>
</ul>
<input type="button" onclick="get();" value="get" />
<input type="button" onclick="set();" value="set" />
<script>
   function get(){
       var target = document.getElementById('target');
       alert(target.outerHTML);
   }
   function set(){
       var target = document.getElementById('target');
       target.outerHTML = "<ol><li>JavaScript Core</li><li>BOM</li><li>DOM</li></ol>";
   }
</script>
innerText, outerText
값을 읽을 때는 HTML 코드를 제외한 문자열을 리턴한다.
값을 변경할 때는 HTML의 코드를 그대로 추가한다.
<ul id="target">
    <li>HTML</li>
    <li>CSS</li>
</ul>
<input type="button" onclick="get();" value="get" />
<input type="button" onclick="set();" value="set" />
<script>
    function get(){
        var target = document.getElementById('target');
        alert(target.innerText);
    }
    function set(){
        var target = document.getElementById('target');
        target.innerText = "<li>JavaScript Core</li><li>BOM</li><li>DOM</li>";
    }
</script>
insertAdjacentHTML()
좀 더 정교하게 문자열을 이용해서 노드를 변경하고 싶을 때 사용한다.
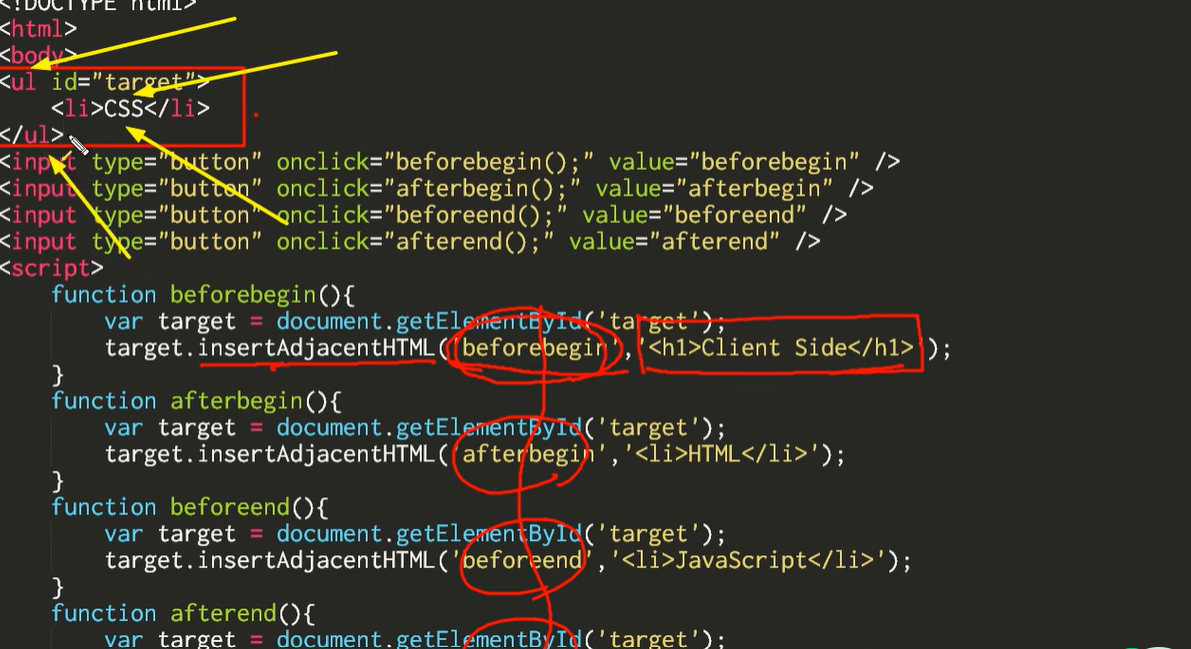
<ul id="target">
    <li>CSS</li>
</ul>
<input type="button" onclick="beforebegin();" value="beforebegin" />
<input type="button" onclick="afterbegin();" value="afterbegin" />
<input type="button" onclick="beforeend();" value="beforeend" />
<input type="button" onclick="afterend();" value="afterend" />
<script>
    function beforebegin(){
        var target = document.getElementById('target');
        target.insertAdjacentHTML('beforebegin','<h1>Client Side</h1>');
    }
    function afterbegin(){
        var target = document.getElementById('target');
        target.insertAdjacentHTML('afterbegin','<li>HTML</li>');
    }
    function beforeend(){
        var target = document.getElementById('target');
        target.insertAdjacentHTML('beforeend','<li>JavaScript</li>');
    }
    function afterend(){
        var target = document.getElementById('target');
        target.insertAdjacentHTML('afterend','<h1>Server Side</h1>');
    }
</script>
5. Document 객체
Document 객체는 DOM의 스팩이고 이것이 웹브라우저에서는 HTMLDocument 객체로 사용된다.
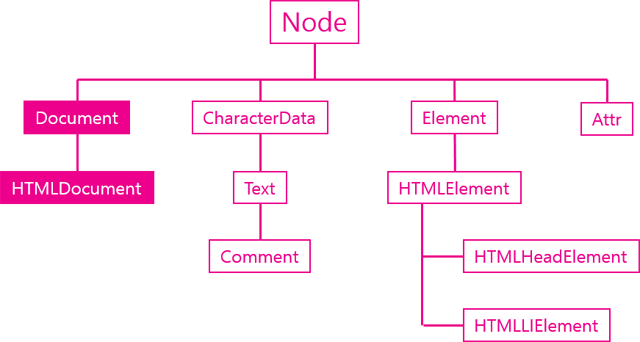
HTMLDocument 객체는 문서 전체를 대표하는 객체이다.
<script>
//document 객체는 window 객체의 소속이다.
console.log(window.document);
//document 객체의 자식으로는 Doctype과 html이 있다.
console.log(window.document.childNodes[0]);
console.log(window.document.childNodes[1]);
</script>
노드 생성 API
document 객체의 주요 임무는 새로운 노드를 생성해주는 역할이다.
- createElement()
- createTextNode()
문서 정보 API
- title
- URL
- referrer
- lastModified
6. Text 객체
6.1 Text 객체

text 객체는 DOM에서 element 아니고 document 아니고 node를 상속받는 객체이다.
텍스트 객체는 텍스트 노드에 대한 DOM 객체로 CharcterData를 상속 받는다.
DOM에서는 공백이나 줄바꿈도 텍스트 노드이다.
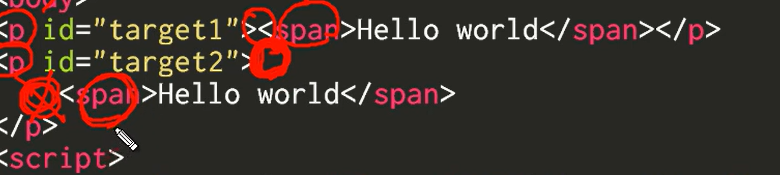
<p id="target1"><span>Hello world</span></p>
<p id="target2">
    <span>Hello world</span>
</p>
<script>
var t1 = document.getElementById('target1').firstChild;
var t2 = document.getElementById('target2').firstChild;

console.log(t1.firstChild.nodeValue);
try{
    console.log(t2.firstChild.nodeValue);
} catch(e){
    console.log(e);
}
console.log(t2.nextSibling.firstChild.nodeValue);

</script>
Hello world
TypeError {stack: (...), message: "Cannot read property 'nodeValue' of null"}
Hello world
값
텍스트 노드의 값을 가져오는 API
- data
- nodeValue
조작
- appendData()
- deleteData()
- insertData()
- replaceData()
- subStringData()
생성
-docuemnt.createTextNode()
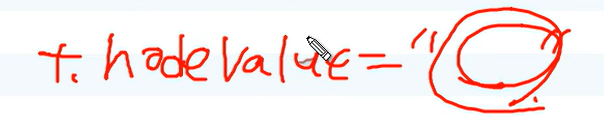
6.2 값 API & 조작 API
값 API
텍스트 노드는 DOM에서 실질적인 데이터가 저장되는 객체이다.
값을 가져오는 두개의 API:
- nodeValue
- data
<ul>
    <li id="target">html</li>
    <li>css</li>
    <li>JavaScript</li>
</ul>
<script>
    var t = document.getElementById('target').firstChild;
    console.log(t.nodeValue);
    console.log(t.data);
</script>
값 변경도 가능하다 .
조작 API
텍스트 노드가 상속 받은 CharacterData 객체는 문자를 제어할 수 있는 다양한 API를 제공함
- appendData()
- deleteData()
- insertData()
- replaceData()
- subStringData()
<!DOCTYPE html>
<html>
<head>
    <style>
    #target{
        font-size:77px;
        font-family: georgia;
        border-bottom:1px solid black;
        padding-bottom:10px;
    }
    p{
        margin:5px;
    }
    </style>
</head>
<body>
<p id="target">Cording everybody!</p>
<p> data : <input type="text" id="datasource" value="JavaScript" /></p>
<p>   start :<input type="text" id="start" value="5" /></p>
<p> end : <input type="text" id="end" value="5" /></p>
<p><input type="button" value="appendData(data)" onclick="callAppendData()" />
<input type="button" value="deleteData(start,end)" onclick="callDeleteData()" />
<input type="button" value="insertData(start,data)" onclick="callInsertData()" />
<input type="button" value="replaceData(start,end,data)" onclick="callReplaceData()" />
<input type="button" value="substringData(start,end)" onclick="callSubstringData()" /></p>
<script>
    var target = document.getElementById('target').firstChild;
    var data = document.getElementById('datasource');
    var start = document.getElementById('start');
    var end = document.getElementById('end');
    function callAppendData(){
        target.appendData(data.value);
    }
    function callDeleteData(){
        target.deleteData(start.value, end.value);
    }
    function callInsertData(){
        target.insertData(start.value, data.value);
    }
    function callReplaceData(){
        target.replaceData(start.value, end.value, data.value);
    }
    function callSubstringData(){
        alert(target.substringData(start.value, end.value));
    }
</script>
</body>
</html>
7. 문서의 기하학적 특성
7.1 문서의 기하학적 특성: 위치, 크기
엘리먼트의 크기를 알아내는 방법
<style>
body{
padding:0;
margin:0;
}
#target{
width:100px;
height:100px;
border:50px solid #1065e6;
padding:50px;
margin:50px;
}
</style>
<div id="target">
Coding
</div>
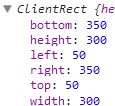
<script>
var t = document.getElementById('target');
console.log(t.getBoundingClientRect());
</script>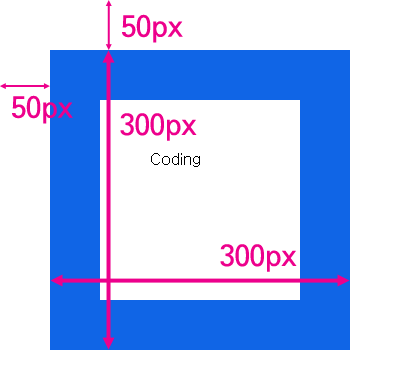
즉 엘리먼트의 테두리와 body 태그 사이의 거리가 50px이다. 그리고 테두리를 포함한 엘리먼트의 크기는 300px이다.
이 값을 알아내고 싶을 때 사용하는 API가 getBoundingClientRect이다.
(*마진값은 포함되지 않는다.)
엘리먼트의 크기와 위치를 알고 싶을 때는 getBoundingClientRect를 사용하면 된다.
getBoundingClientRect의 width 값을 IE는 제공하지 않는다.
엘리먼트가 중첩되어 있는 경우
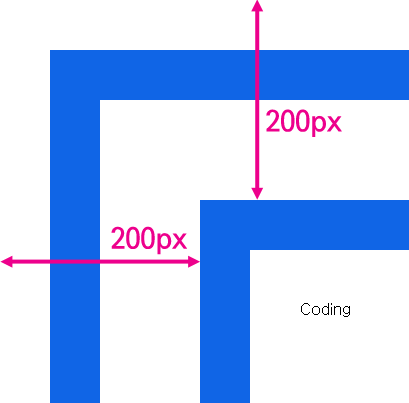
엘리먼트를 중첩했을 때 coding 엘리먼트와 문서와의 거리는 200px이다.
getBoundingClientRect를 호출해보자.
<style>
    body{
        padding:0;
        margin:0;
    }
    div{
        border:50px solid #1065e6;
        padding:50px;
        margin:50px;
    }
    #target{
        width:100px;
        height:100px;
    }
</style>
<div>
    <div id="target">
        Coding
    </div>
</div>
<script>
var t = document.getElementById('target');
console.log(t.getBoundingClientRect());
console.log(t.offsetParent);
</script>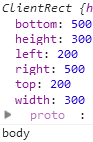
엘리먼트의 위치를 의미하는 top, right의 값을 통해서 기준이 그 부모가 아니라 body이다.
이를 명시적으로 확인할 수 있는 방법은 offsetParent 속성을 호출하는 것이다.
만약 부모 중 CSS position의 값이 static인 td, th, table 엘리먼트가 있다면 이 엘리먼트가 offsetParent가 된다.
오래된 브라우저에서는 getBoundingClientRect를 지원하지 않을 수 있기 때문에 이런 경우 offsetLeft와 offsetTop 프로퍼티를 사용한다.
테두리를 제외한 엘리먼트의 크기를 알고 싶다면 ClientWidth, ClientHeight를 사용한다.
<script>
var t = document.getElementById('target');
console.log('clientWidth:', t.clientWidth, 'clientHeight:', t.clientHeight);
</script>
7.2 Viewport
요소의 위치를 생각할 때는 사실 조금 더 복잡해진다.
문서가 브라우저의 크기보다 큰 경우는 스크롤이 만들어지는데 스크롤에 따라서 위치의 값이 달라지기 때문이다.
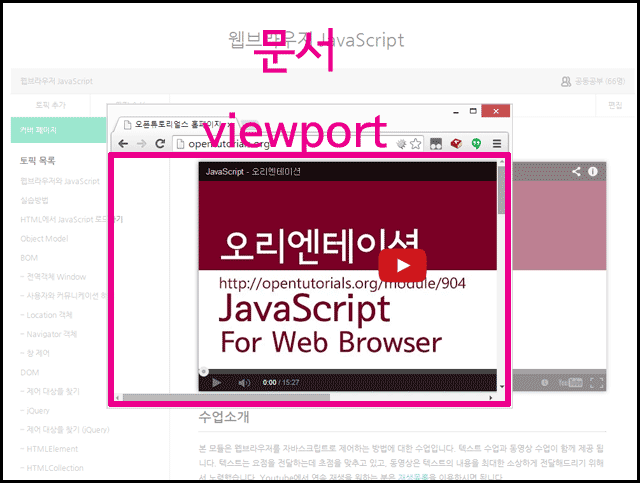
viewport의 좌표
위의 그림처럼 뷰포트는 문서의 내용 중 사용자에게 보여주는 영역을 의미한다. 이에 따라서 문서의 좌표가 있고 뷰포트의 자표가 있다.
우리가 위에서 살펴본 getBoundingClientRect는 viewport의 좌표를 사용한다.
아래 예제를 실행해보면 1초에 한번씩 getBoundingClientRect의 top 속성과 window.pageYOffset의 값이 출력된다.
<style>
    body{
        padding:0;
        margin:0;
    }
    div{
        border:50px solid #1065e6;
        padding:50px;
        margin:50px;
    }
    #target{
        width:100px;
        height:2000px;
    }
</style>
    <div>
        <div id="target">
            Coding
        </div>
    </div>

<script>
var t = document.getElementById('target');
setInterval(function(){
    console.log('getBoundingClientRect : ', t.getBoundingClientRect().top, 'pageYOffset:', window.pageYOffset);
}, 1000)
</script>
(*setInterval: 설정한 초마다 한번씩 함수를 반복 )
getBoundingClientRect의 값이 스크롤에 따라서 달라지는 뷰포트의 좌표를 사용하고 있다.
스크롤의 정도를 알고 싶을 때는 pageYOffset을 사용하면 된다.
오래된 브라우저에서는 pageYOffset 대신 scrollTop 속성을 사용해야 한다.
문서의 좌표
문서의 좌표는 뷰포트의 좌표에 스크롤된 정도를 더해서 알 수 있다.
setInterval(function(){
    console.log('getBoundingClientRect : ', t.getBoundingClientRect().top, 'pageYOffset:', window.pageYOffset, 'document y:', t.getBoundingClientRect().top+window.pageYOffset);
}, 1000)
7.3 스크롤 & 스크린의 크기
문서의 스크롤 값은 scrollLeft와 scrollTop 프로퍼티를 통해 변경한다.
<style>
    body{
        padding:0;
        margin:0;
    }
    div{
        border:50px solid #1065e6;
        padding:50px;
        margin:50px;
    }
    #target{
        width:100px;
        height:2000px;
    }
</style>
<input type="button" id="scrollBtn" value="scroll(0, 1000)" />
<script>
    document.getElementById('scrollBtn').addEventListener('click', function(){
        window.scrollTo(0, 1000);
    })
</script>
<div>
    <div id="target">
        Coding
    </div>
</div>
스크린의 크기는 모니터의 크기와 브라우저 뷰포트의 크기가 있다.
<script>
console.log('window.innerWidth:', window.innerWidth, 'window.innerHeight:', window.innerHeight);
console.log('screen.width:', screen.width, 'screen.height:', screen.height);
</script>window.inner은 뷰포트의 크기를 나타내고, screen.은 스크린의 크기를 나타낸다.