Introduction to PyTorch
- 딥러닝 코드는 처음부터 다 짜기보다 만들어진 프레임워크를 활용하는 것이 일반적
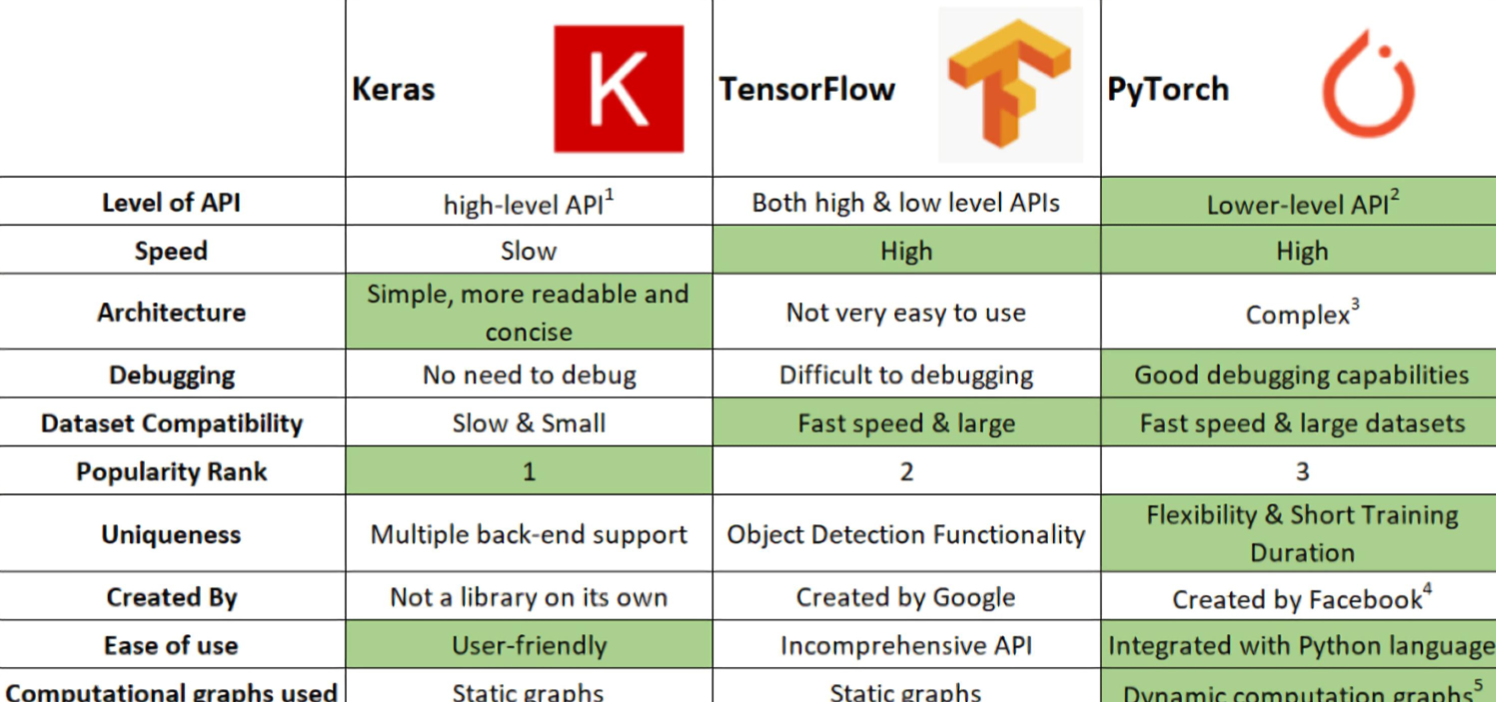
- 대표적인 프레임워크는 PyTorch(Facebook), TensorFlow(Google) 두 가지이다.

우리가 PyTorch를 사용하는 이유
- Define by Run 의 장점
즉시 확인 가능→pythonic code- GPU support, Good API and community
- 사용하기 편한 장점이 가장 큼
- TF는 production 과 scalability의 장점
PyTorch의 특징
- Numpy 구조를 가지는 Tensor 객체로 array 표현
- 자동미분을 지원하여 DL 연산을 지원
- 다양한 형태의 DL을 지원하는 함수와 모델을 지원함
PyTorch Basic
Tensor
- 다차원 Arrays 를 표현하는 PyTorch 클래스
- 사실상 numpy의 ndarray와 동일(TensorFlow의 Tensor와도 동일)
- Tensor를 생성하는 함수도 거의 동일
numpy - ndarray
import numpy as np
n_array = np.arange(10).reshape(2,5)
print(n_array)
print("ndim :", n_array.ndim, "shape :", n_array.shape)
torch - tensor
import torch
t_array = torch.FloatTensor(n_array)
print(t_array)
print("ndim :", t_array.ndim, "shape :", t_array.shape)
- tensor가 가질 수 있는 data 타입은 numpy와 동일하고, 사용법도 그대로 적용된다.
- pytorch의 tensor는 GPU에 올려서 사용 가능
Tensor Handling
view, squeeze, unsqueeze 등으로 tensor 조정가능
- view: reshape과 동일하게 tensor의 shape을 변환
- squeeze: 차원의 개수가 1인 차원을 삭제 (압축)
- unsqueeze: 차원의 개수가 1인 차원을 추가
AutoGrad
PyTorch의 핵심, 자동 미분의 지원
requires_grad=True
loss.backword()
PyTorch Project Architecture
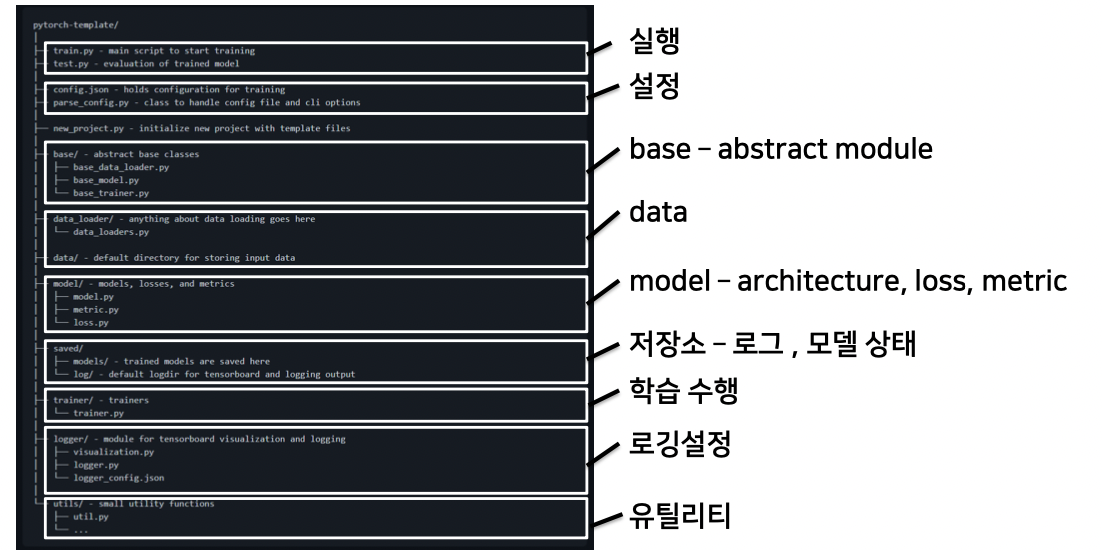
초기 단계에서는 대화식 개발(Jupyter Notebook)이 유리하다. 학습과정과 디버깅 등을 지속적으로 확인할 수 있기 때문. 그러나 배포 및 공유 단계에서는 Notebook공유에는 어려움이 있다. 또한 개발 용이성과 유지보수 능력 향상을 위해서도 OOP/모듈 형태의 프로젝트를 개발하는 것이 필요하다.

AutoGrad & Optimizer
torch.nn.Module
Layer 또는 Block의 반복으로 구성되는 최신 딥러닝 모델을 효율적으로 관리하기 위해 필요한 base class
- Input, Output, Forward, Backward 정의
- 학습의 대상이 되는 parameter(tensor) 정의
nn.Parameter
- Tensor 객체의 상속 객체
- nn.Module 내에 attribute가 될 때는 required_grad=True 로 지정되어 학습 대상이 되는 Tensor - 우리가 직접 지정할 일은 잘 없음 : 대부분의 layer에는 weights 값들이 지정되어 있음
Backward
- Layer에 있는 Parameter들의 미분을 수행
- Forward의 결과값 (model의 output=예측치)과 실제값간의 차이(loss) 에 대해 미분을 수행
- 해당 값으로 Parameter 업데이트
Dataset & Dataloader
모델에 데이터를 학습시키기 위해 필요한 클래스
Dataset
- 데이터 입력 형태를 정의하는 클래스
- 데이터를 입력하는 방식의 표준화
- Image, Text, Audio 등에 따른 다른 입력정의
dataset 클래스 생성시 유의점
- 데이터 형태에 따라 각 함수를 다르게 정의함
- 모든 것을 데이터 생성 시점에 처리할 필요는 없음
: image의 Tensor 변화는 학습에 필요한 시점에 변환 - 데이터 셋에 대한 표준화된 처리방법 제공 필요 →후속 연구자 또는 동료에게는 빛과 같은 존재
- 최근에는 HuggingFace등 표준화된 라이브러리 사용
import torch
 from torch.utils.data import Dataset
 class CustomDataset(Dataset):
     def __init__(self, text, labels):
             self.labels = labels
             self.data = text
def __len__(self):
return len(self.labels)
def __getitem__(self, idx): label = self.labels[idx]
Datasets & Dataloaders
 text = self.data[idx]
sample = {"Text": text, "Class": label}
return sample
Dataloader
- Data의 Batch를 생성해주는 클래스
- 학습직전(GPU feed전) 데이터의 변환을 책임
- Tensor로 변환 + Batch 처리가 메인 업무
- 병렬적인 데이터 전처리 코드의 고민 필요
DataLoader(dataset, batch_size=1, shuffle=False, sampler=None, batch_sampler=None, num_workers=0, collate_fn=None, pin_memory=False, drop_last=False, timeout=0, worker_init_fn=None, *, prefetch_factor=2, persistent_workers=False)