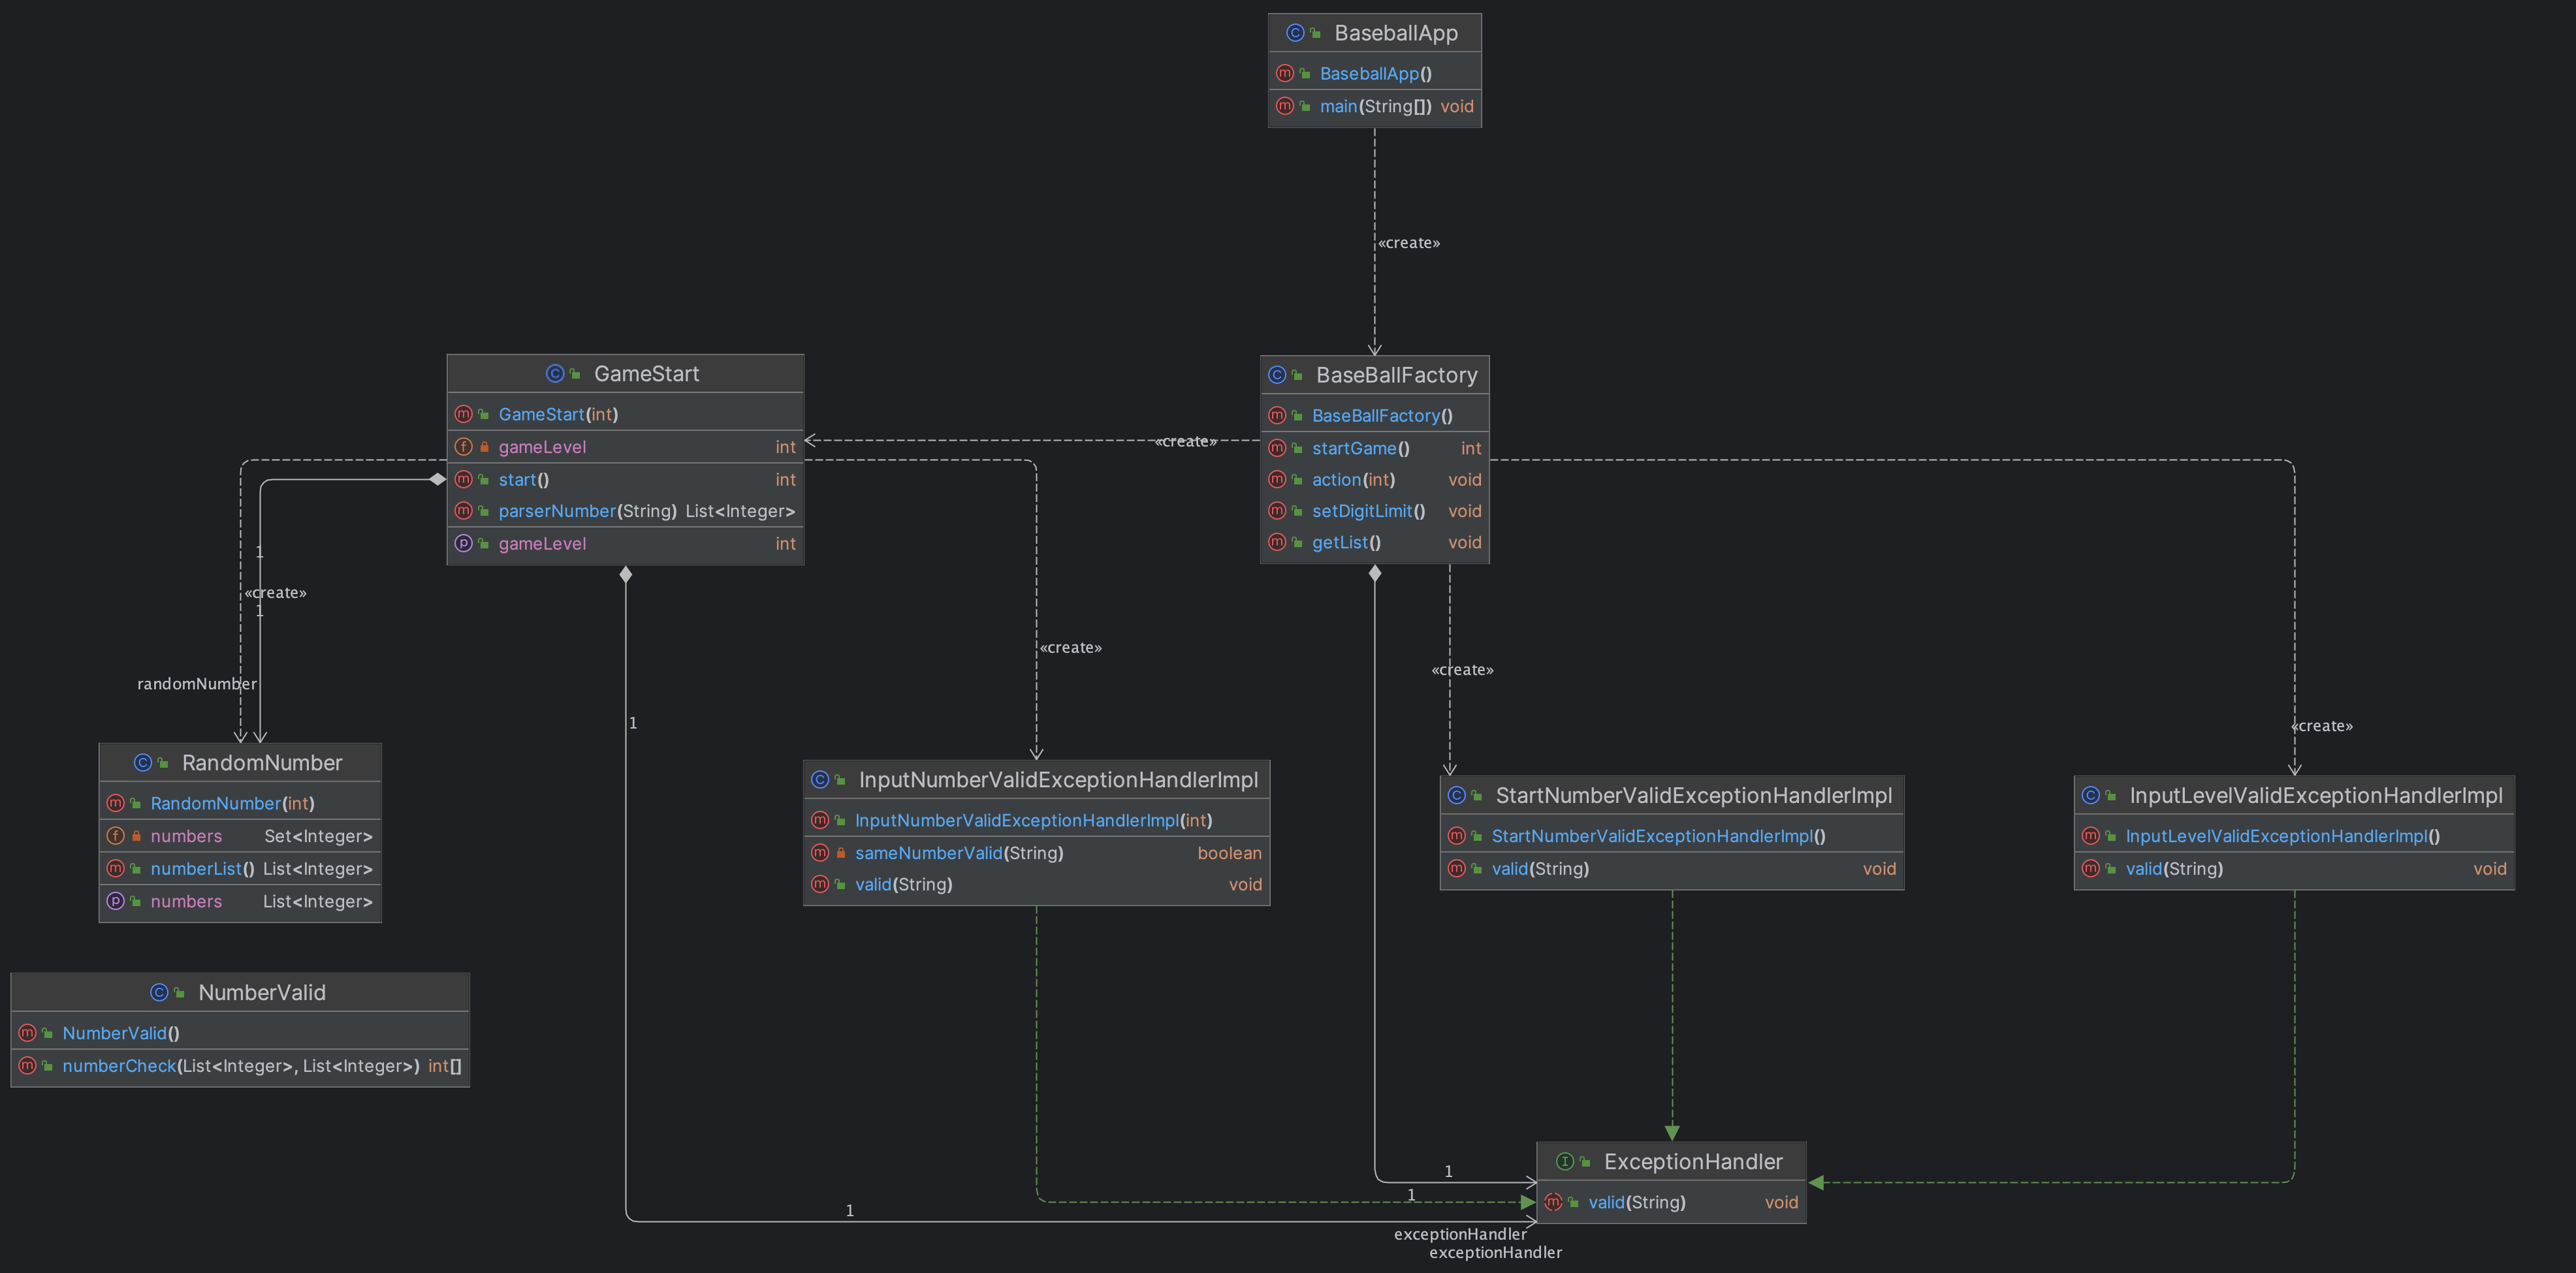
🛠 전체 프로젝트 구조
인터셉터 패턴 - Interceptor Pattern
인터셉터 패턴은 요청 흐름을 가로채는 방식으로 작동하며프록시 패턴과 유사합니다.- 메서드를 호출하기 전에 미리 정해놓은 로직을 실행하거나 메서드가 실행된 후에 추가 로직을 처리할 수 있는 패턴입니다.
인터셉터 패턴을 사용하는 이유
관심사 분리- 핵심 비즈니스 로직과 부가적인 기능(트랜잭션 관리, 로깅, 보안 등) 을 분리할 수 있습니다.
유지 보수성- 코드 중복을 피하고, 여러 클래스에서 공통으로 사용되는 로직을 한 곳에 모아 관리할 수 있습니다.
확장성- 코드에 새로운 기능을 추가할 때, 기존 로직을 변경하지 않고도 인터셉터를 추가할 수 있습니다.
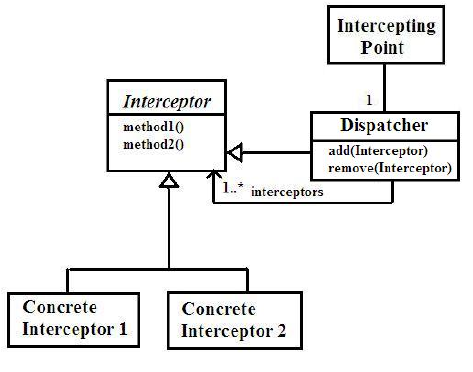
인터셉터 패턴의 구조
Client- 메서드를 호출하는 주체
Service- 실제 비즈니스 로직을 담고 있는 객체
Interceptor- 메서드 호출 전후 특정 로직을 삽입하는 객체
Dispatcher- 메서드 호출을 가로채고 인터셉터 로직을 실행한 후 실제 메서드를 호출합니다.
🧑💻 인터셉터 패턴 코드
Interceptor Interface - 인터셉터 인터페이스
public interface Interceptor {
    void before(Object obj);  // 메서드 호출 전 처리
    void after(Object obj);   // 메서드 호출 후 처리
}- 메서드 호출 전후에 실행할 로직을 정의합니다.
Implement Interceptor - 인터셉터 구현체
public class InterceptorImpl implements Interceptor {

    @Override
    public void before(Object obj) {
        System.out.println("Before method execution");
    }

    @Override
    public void after(Object obj) {
        System.out.println("After method execution");
    }
}- 인터셉터의 로직을 구현한 클래스입니다.
Service - 실제 비즈니스 로직
public class MyService {
    public void doSomething() {
        System.out.println("Service Call!!!!");
    }
}
Dispatcher -디스페처
public class ServiceDispatcher {
    private MyService service;
    private Interceptor interceptor;

    public ServiceDispatcher(MyService service, Interceptor interceptor) {
        this.service = service;
        this.interceptor = interceptor;
    }

    public void doSomething() {
        interceptor.before(service);  // 메서드 호출 전
        service.doSomething();        // 실제 비즈니스 로직 실행
        interceptor.after(service);   // 메서드 호출 후
    }
}- 클라이언트가 실제 서비스 객체를 직접 호출하지 않고 디스페쳐 객체를 통해
인터셉터를 거쳐메서드를호출합니다. 프록시 패턴과 유사한 형태입니다.
Clinet - 클라이언트
public class Main {
    public static void main(String[] args) {
        MyService service = new MyService();
        Interceptor interceptor = new InterceptorImpl();

        ServiceDispatcher dispatcher = new ServiceDispatcher(service, interceptor);
        dispatcher.doSomething();
    }
}doSomething메서드가 호출될때 인터셉터가 메서드 호출 전후에 부가적인 로직을 수행하게 됩니다.
결과
Before method execution
Doing something...
After method execution
📌 결론
- 여러 메서드에 동일한 부가 기능을 쉽게 적용할 수 있습니다.
- 여러 곳에서 동일한 코드를
중복해서 작성하지 않고 인터셉터를 통해일괄적으로 관리할 수 있습니다. - 부가적인 기능을 인터셉터로 분리하여 비즈니스 로직의 수정 없이도 새로운 기능을
추가하거나수정할 수 있습니다. - 하지만 부가적인 작업이 많아질수록 메서드 호출 시
성능에영향을 미칠 수 있습니다. - 인터셉터가 많아지면 코드가
복잡해질 수 있고디버깅이 어려워질 수 있습니다. - 적절히 사용하면
로깅,보안,트랜잭션 관리와 같은 부가적인 기능을 핵심 비즈니스 로직과 분리하여 유연한 구조를 유지할 수 있게 해줍니다. 😃
💡 요구 사항 분석
1부터9까지의 수를 무작위로 자릿수만큼 생성합니다.- 하지만 각 자리수는 서로
중복될 수 없습니다. - 사용자로 부터 값을 입력받아
자릿수를검증합니다. - 입력검증
- 인덱스와 값이 모두 일치하는 경우 :
스트라이크 - 값은 일치하지만 인덱스는 다른 경우 :
볼 - 값과 인덱스 둘 다 틀리는 경우 :
아웃
- 인덱스와 값이 모두 일치하는 경우 :
- 결과 출력
- 사용자가 입력한 값에 대한 결과 출력
- “1
스크라이크, 2볼”
- “1
- 답을 맞추지 못할경우 다시 입력값을 받아 입력
검증수행 - 답을 맞추었을 경우 정답을 출력하고 지속적으로
게임수행 여부체크
- 사용자가 입력한 값에 대한 결과 출력
- 지금까지 한 게임들의
결과를 출력하는 로직 생성을합니다. 난이도를 조절할 수 있는 로직을 생성합니다.- 게임을
종료하는 로직을 생성합니다.
🧑💻 코드 풀이
BaseBallApp
public class BaseballApp {

    public static void main(String[] args) {
        Scanner sc = new Scanner(System.in);
        BaseBallFactory baseBallFactory = new BaseBallFactory();

        String input = "";
        System.out.println("환영합니다! 원하시는 번호를 입력해주세요");
        while (!input.equals("3")) {
            System.out.println("0. 자리수 설정 1. 게임 시작하기  2. 게임 기록 보기  3. 종료하기");
            input = sc.nextLine();
            try {
                baseBallFactory.action(Integer.parseInt(input));
            } catch (Exception e) {
                System.out.println("에러 메시지 : " + e.getMessage());
            }
        }
    }

}
- 게임을 시작하는
App입니다. - 숫자
3이 들어오기 전까지 지속적으로 게임이 실행됩니다. - 게임관련 로직은
BaseBallFactory가 수행합니다. 0, 1, 2, 3숫자만을 허용하기 때문에0, 1, 2, 3숫자 외의 값이 들어오면예외를 발생시킵니다.
BaseBallFactory
public class BaseBallFactory {

    private ExceptionHandler exceptionHandler;
    private Scanner sc;
    private int level;
    private List<Integer> list;

    public BaseBallFactory() {
        this.sc = new Scanner(System.in);
        this.level = 3;
        this.list = new ArrayList<>();
    }

    public void action(int gameSet) throws Exception {
        exceptionHandler = new StartNumberValidExceptionHandlerImpl();
        exceptionHandler.valid(String.valueOf(gameSet));
        if (gameSet == 0) setDigitLimit();
        if (gameSet == 1) list.add(startGame());
        if (gameSet == 2) getList();
        if (gameSet == 3) System.out.println("게임을 종료합니다.");
    }

    private void setDigitLimit() throws Exception {
        exceptionHandler = new InputLevelValidExceptionHandlerImpl();
        System.out.println("자릿수를 입력해주세요");

        String input = sc.nextLine();
        exceptionHandler.valid(input);
        level = Integer.parseInt(input);

        System.out.println("자릿수 설정이 완료되었습니다.");
        System.out.println();

    }

    private int startGame() {
        GameStart gameStart = new GameStart(level);
        return gameStart.start();
    }

    private void getList() {
        System.out.println("< 게임 기록 보기 >");

        if (list.isEmpty()) {
            System.out.println("아직 게임기록이 없어요!!");
        }

        for (int i = 0; i < list.size(); i++) {
            System.out.println((i + 1) + "번째 게임 : 시도 횟수 - " + list.get(i));
        }
        System.out.println();
    }
}
- 게임 수행 로직을 제외한 로직을 수행하는 클래스입니다.
exceptionHandler는 상황에 따라 생성해야하는 구현체가 다르기 때문에 필드로 선언하고 생성자에서 초기화를 시켜주지 않습니다.- 입력값의 따른 로직 수행
- 0일 경우
- 난이도 조절을 수행합니다.
setDigitLimit()함수를 호출합니다.3, 4, 5까지의 수만 입력받고난이도를 조절합니다.
- 1일 경우
게임 시작- 게임을 시작할 수 있는 클래스를 호출하고 결과를
List에 담아줍니다.
- 2일 경우
결과를 출력- 요구사항에 따라
결과를 출력하게됩니다. - 게임 기록이 없다면 게임기록이 없다고
인페이스를 통해 알립니다.
- 3일 경우
게임 종료- 게임을 종료 한다는
인터페이스를 출력합니다.
- 0일 경우
- 게임을 시작할때에는 게임 난이도(
level) 를 파라미터로 전달합니다.
GameStart
public class GameStart {

    private final int gameLevel;
    private Scanner sc;
    private RandomNumber randomNumber;
    private ExceptionHandler exceptionHandler;

    public GameStart(int gameLevel) {
        this.gameLevel = gameLevel;
        this.sc = new Scanner(System.in);
        this.randomNumber = new RandomNumber(this.gameLevel);
        this.exceptionHandler = new InputNumberValidExceptionHandlerImpl(gameLevel);
    }

    public int start() {
        int cnt = 0;
        while (true) {
            System.out.println("숫자를 입력해주세요.");
            String input = sc.nextLine();
            try {
                exceptionHandler.valid(input);
            } catch (Exception e) {
                System.out.println("에러메시지 : " + e.getMessage());
            }
            int[] result = NumberValid.numberCheck(parserNumber(input), randomNumber.numberList());
            if (result[0] == gameLevel) {
                System.out.println("정답입니다. ");
                return cnt;
            } else {
                System.out.println("스트라이크 : " + result[0] + " 볼 : " + result[1] + " 아웃 : " + result[2]);
                cnt += 1;
            }
        }
    }

    public List<Integer> parserNumber(String input) {
        ArrayList<Integer> list = new ArrayList<>();
        for (char c : input.toCharArray()) {
            list.add(Integer.parseInt(String.valueOf(c)));
        }
        return list;
    }
}
- 게임을 수행하는 클래스입니다.
- 생성자를 통해 게임 난이도를 입력받습니다.
- 생성자를 통해
RandomNumber객체를 생성할 때 난이도를 파라미터로 넘겨줍니다.- 이는 랜덤으로 생성한 숫자의 길이를 위해서 입니다.
- 생성자를 통해
exceptionHandler객체를 생성할 때도 난이도를 파라미터로 넘겨줍니다.- 자릿수 검증을 위함입니다.
- 숫자를 입력받게되면
exceptionHandler.valid(input)를 통해 숫자 검증을 수행합니다.- 예외가 발생하면 에러 메시지를 출력 하게됩니다.
- 검증이 완료된 숫자가 입력되었다면
NumberValid.numberCheck()를 통해스트라이크,볼,아웃여부를 판단합니다. - 만약 스트라이크가
게임난이도(gameLevel)와 동일하다면 지금까지 시도한 횟수를return하고 함수를 종료시킵니다. - 그게 아니라면
스트라이크,볼,아웃을 인터페이스를 통해 사용자에게 알리고 시도 횟수(cnt)를 증가시킵니다. parserNumber(String input)- 입력받은 문자형 숫자를 리스트로 반환하는 로직입니다.
NumberValid
public class NumberValid {

    public static int[] numberCheck(List<Integer> numberList, List<Integer> randomNumber) {
        int[] result = new int[3];
        for (int i = 0; i < randomNumber.size(); i++) {
            if (randomNumber.contains(numberList.get(i))) {
                if (randomNumber.get(i).equals(numberList.get(i))) {
                    result[0] += 1;
                } else {
                    result[1] += 1;
                }
            } else {
                result[2] += 1;
            }
        }
        return result;
    }
}- 입력받은 숫자와 랜덤 숫자를 비교하는 로직입니다.
result는 스트라이크, 볼, 아웃의 결과를 담을 정적 배열입니다.- 반복문을 수행하면서 입력받은 숫자가 랜덤숫자에 들어있는지 판별합니다.
- 랜덤숫자에 입력받은 숫자의 값이 있다면 인덱스를 비교합니다.
스트라이크,볼,아웃개수를 카운팅한 후 정적배열을 반환합니다.
RandomNumber
package start;

import java.util.HashSet;
import java.util.List;
import java.util.Random;
import java.util.Set;

public class RandomNumber {

    private final int count;
    private Set<Integer> numbers = new HashSet<>();

    public RandomNumber(int count) {
        this.count = count;
    }

    public List<Integer> numberList() {
        Random random = new Random();

        while (numbers.size() != count) {
            int num = random.nextInt(9) + 1;
            numbers.add(num);
        }

        return numbers.stream().toList();
    }
}- 랜덤숫자를 생성하기 위한 로직입니다.
- 생성자를 통해 랜덤숫자생성 길이(
count)를 입력받습니다. new Random().nextInt(9) + 1을 통해1 ~ 9까지의 수를 랜덤으로 가져옵니다.Set자료구조를 이용하여 중복되는 값이 없이 랜덤숫자생성 길이(count) 만큼 값을 할당해줍니다.- 결과는
List형태로 반환하기 때문에Set을 람다를 통해(stream().toList())List로 반환합니다.
ExceptionHandler
public interface ExceptionHandler{

    void valid(String inputNumber) throws Exception;
}- 여러
에러처리를 위한 인터페이스입니다. - 각 상황에 맞는
구현체를 구현해야 합니다.
InputLevelValidExceptionHandlerImpl
public class InputLevelValidExceptionHandlerImpl implements ExceptionHandler {

    private static final String ONLY_THREE_TO_FIVE = "^[345]+$";

    @Override
    public void valid(String inputNumber) throws Exception {
        if (!Pattern.matches(ONLY_THREE_TO_FIVE, inputNumber)) throw new Exception("3, 4, 5 숫자만 입력가능합니다.");
    }
}
게임난이도조정시 예외처리를 하는 로직입니다.- 오직
3, 4, 5숫자만을 허용합니다.
StartNumberValidExceptionHandlerImpl
public class StartNumberValidExceptionHandlerImpl implements ExceptionHandler {

    private static final String ONLY_ONE_TO_THREE = "^[0123]+$";

    @Override
    public void valid(String inputNumber) throws Exception {
        if (!Pattern.matches(ONLY_ONE_TO_THREE, inputNumber)) throw new Exception("0, 1, 2, 3 숫자만 입력가능합니다.");
    }
}
- 처음 게임 시작시 나타나는 인터페이스에서의 예외 처리하기 위한 로직입니다.
- 오직
0, 1, 2, 3숫자만을 허용하고 그 외의 숫자는Exception을 발생시킵니다.
InputNumberValidExceptionHandlerImpl
public class InputNumberValidExceptionHandlerImpl implements ExceptionHandler {

    private final static String ONLY_NUMBER_REG = "\"^\\\\d+$\"";
    private final int gameLevel;

    public InputNumberValidExceptionHandlerImpl(int gameLevel) {
        this.gameLevel = gameLevel;
    }

    public void valid(String inputNumber) throws Exception {
        if (inputNumber.length() != gameLevel) throw new Exception("제대로 된 자리수를 입력해주세요");
        if (Pattern.matches(ONLY_NUMBER_REG, inputNumber)) throw new Exception("숫자만 입력해주세요.");
        if (inputNumber.contains("0")) throw new Exception("0은 입력할 수 없습니다.");
        if (sameNumberValid(inputNumber)) throw new Exception("중복된 숫자가 입력되었습니다.");
    }

    private boolean sameNumberValid(String input) {
        HashSet<Character> set = new HashSet<>();
        for (char c : input.toCharArray()) {
            if (set.contains(c)) {
                return true;
            }
            set.add(c);
        }
        return false;
    }

}- 오직 숫자만을 입력받기 위해
"\"^\\\\d+$\""정규식을 사용합니다. - 생성자를 통해 게임 난이도(
gameLevel)를 입력받습니다.- 이는 자릿수 길이를 비교하기 위해서입니다.
valid()를 통해 예외처리 로직을 수행합니다.- 자릿수 길이가 같지 않을 경우 예외 발생
- 숫자가 아닌 수가 입력되었을 경우 예외 발생
- 0이 포함되었을 경우 예외발생
- 중복된 숫자가 들어있을 경우 예외 발생
sameNumberValid는 입력값을 하나하나 자료구조Set에 값을 할당하면서중복값여부를 검증합니다.
📖 톺아보기
- 메서드 호출전에 입력값 검증이 지속적으로 이루어지기 때문에 인터셉터 패턴을 사용했다고 볼 수 있었습니다.
- 분리된 공통기능(
예외 처리)을 여러곳에서 재사용할 수 있었습니다. - 인터셉터 패턴은 요청 흐름을 가로채는 방식으로 작동하여
프록시 패턴과 매우 유사하다는 것을 알게 되었습니다. - 관심사를 분리하여
핵심비즈니스 로직에 집중할 수 있었습니다. - 인터페이스를 통해
코드 중복을 피하고 여러 클래스에서공통으로 사용되는로직을한 곳에 모아 관리할 수 있었습니다. - 코드에 새로운 기능을
추가할 때 기존 로직을변경하지 않고도인터셉터(예외 처리 기능)를추가할 수 있었습니다. - 알게 모르게
인터셉터 패턴을 사용하여유지보수성과확장성의 장점을 얻으며유연한 구조로 코드를 작성할 수 있었습니다.

✅ 적당한 추상화를 찾아가는 개발자입니다.