
네이버가 해주는 내 로그인 기능
모든 코드는 🔗깃허브를 참고
✔️ 네이버 소셜 로그인
1. 네이버 API 등록하기
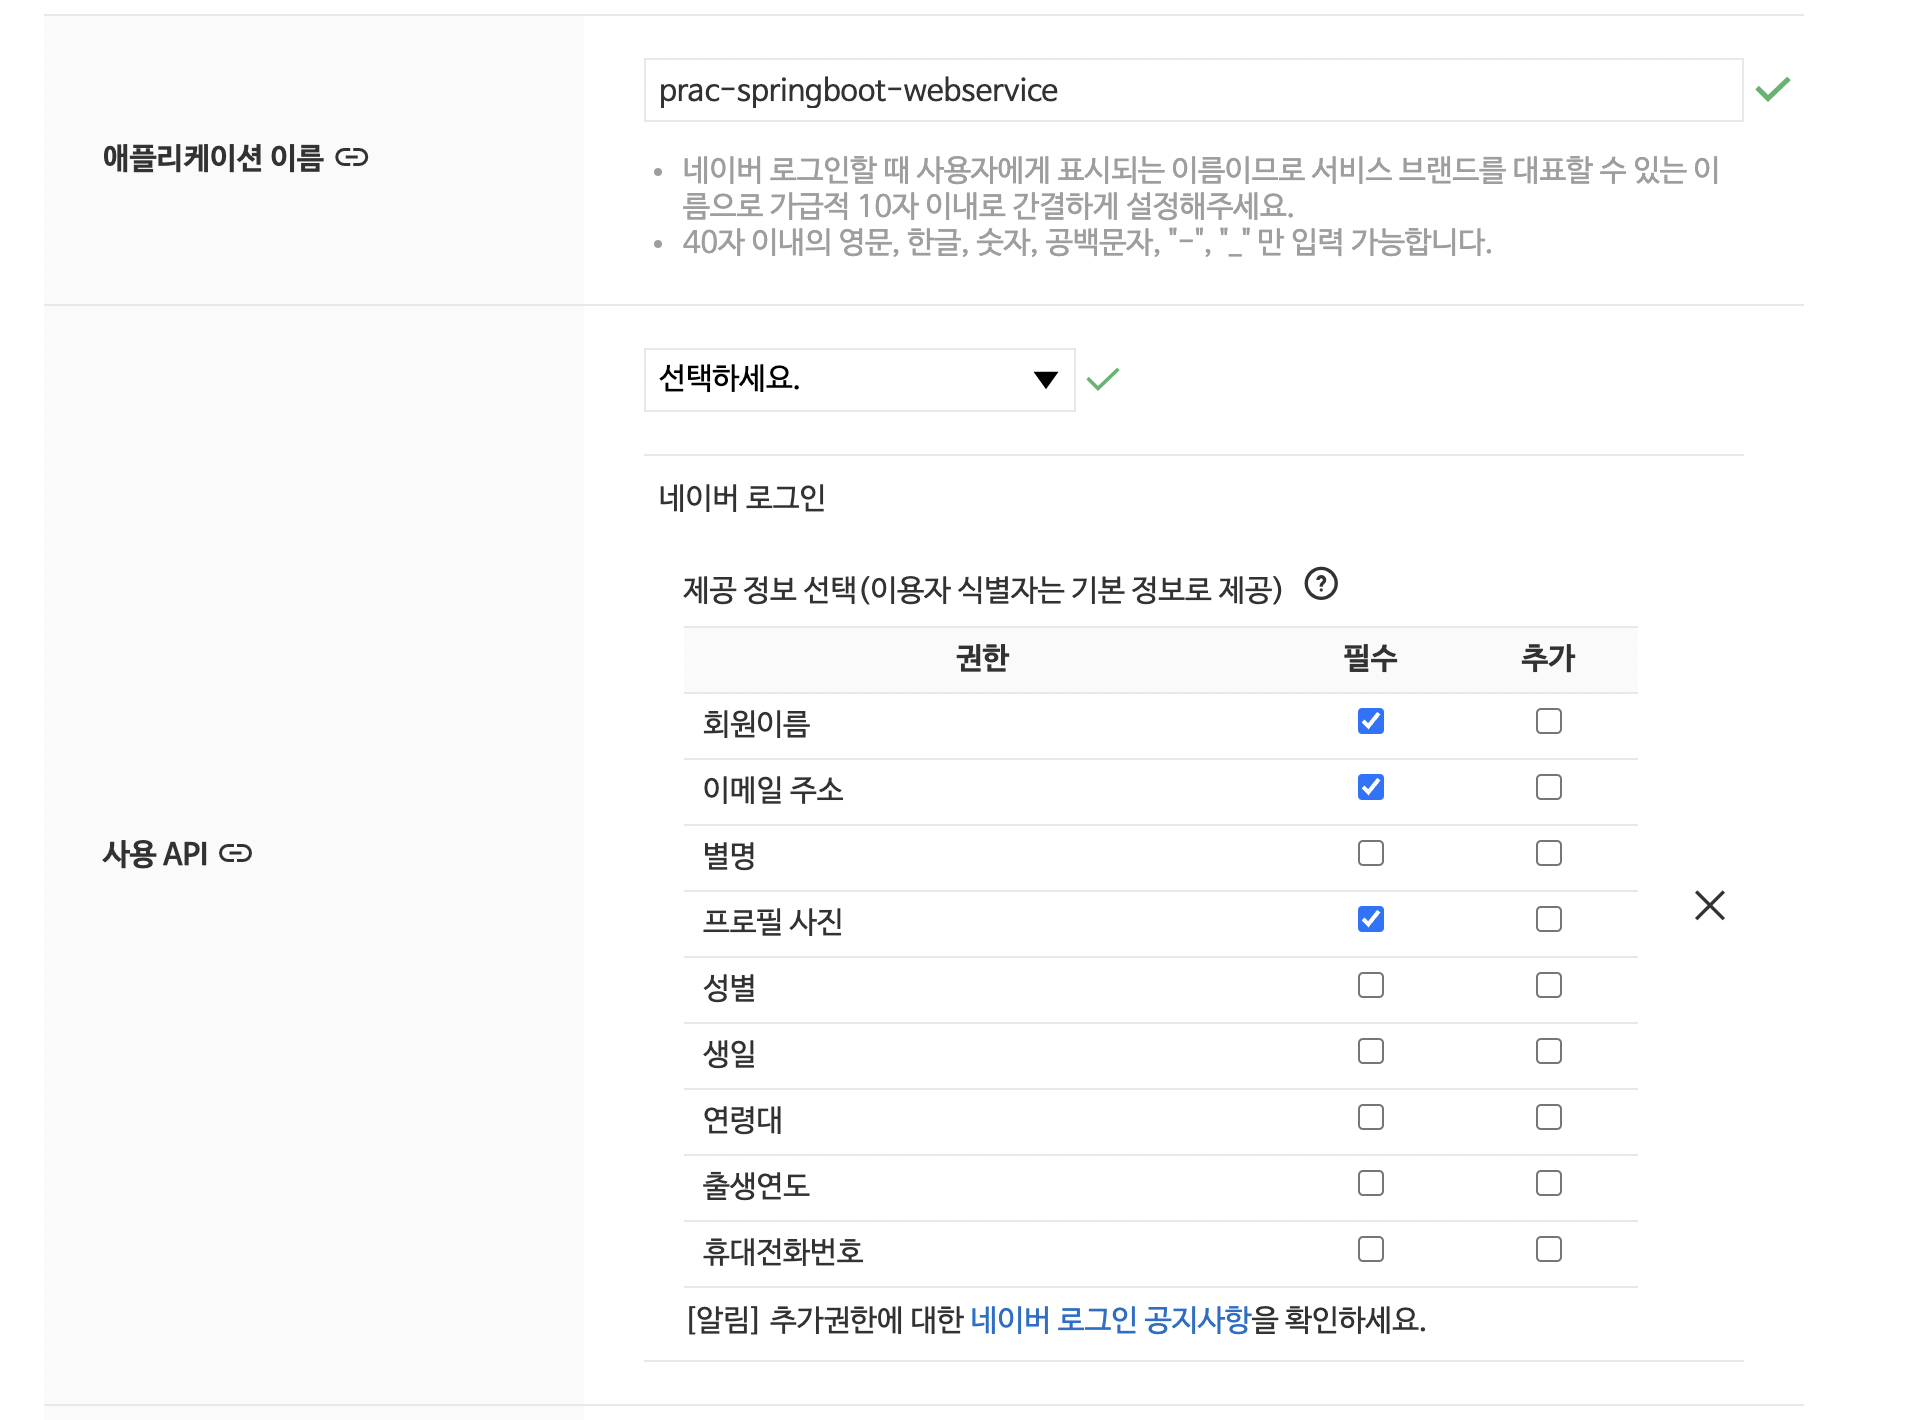
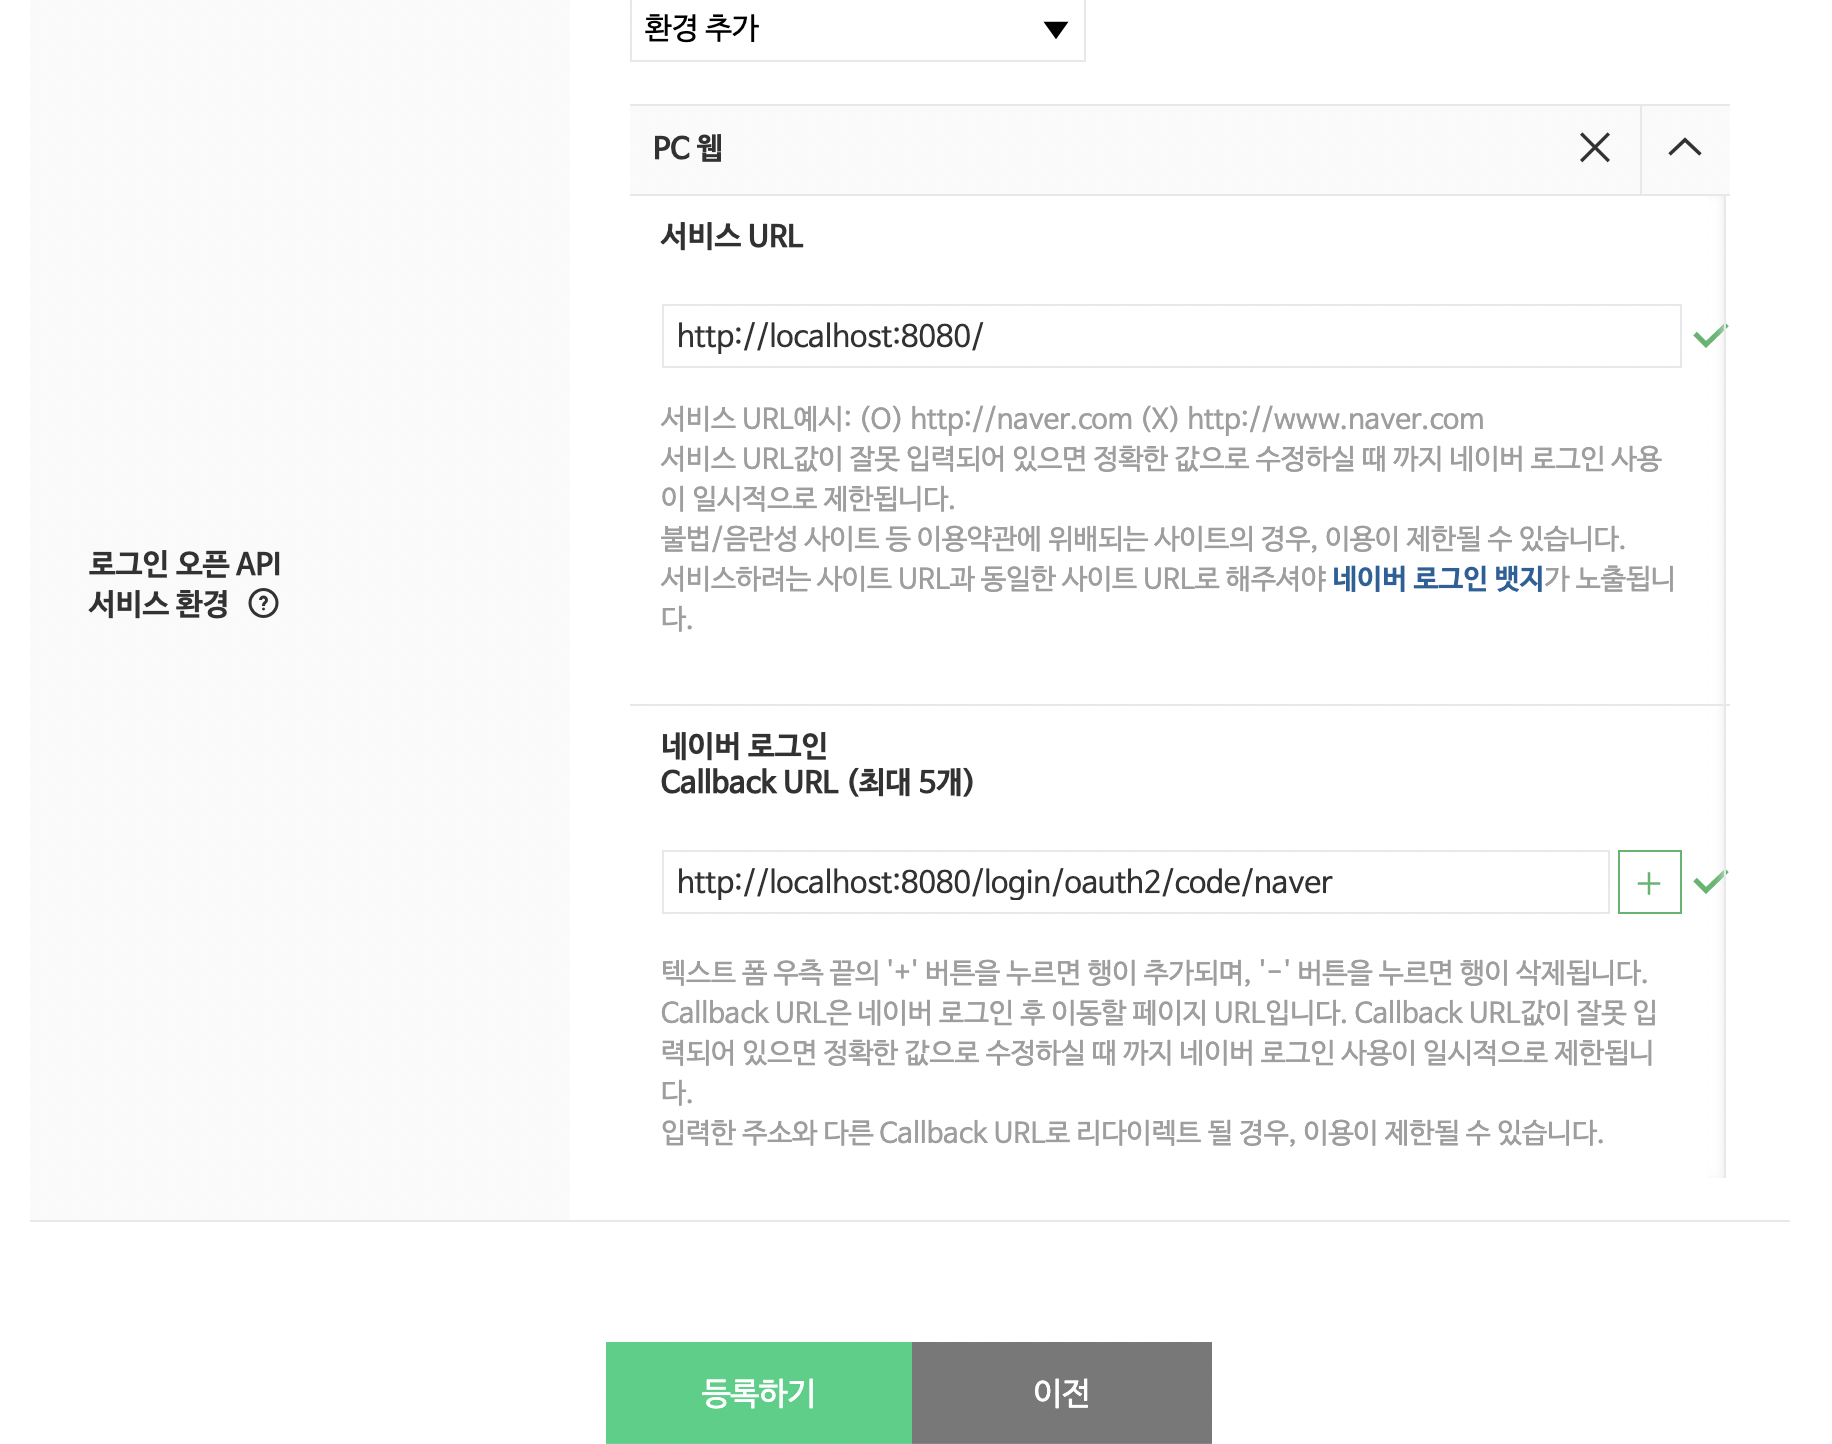
callbackURL: 리다이렉션 URL
이렇게 등록까지 완료하면 clientID와 clientSecret이 생성된다.
이제 이 키 값들을 application-oauth.properties에 등록한다.
그런데 이때, 네이버에서는 스프링 시큐리티를 공식 지원하지 않기 때문에 Common-OAuth2Provider에서 해주던 값들도 전부 수동 입력해야 한다.
⌨️ application-oauth.properties
spring.security.oauth2.client.registration.google.client-id=구글클라이언트ID
spring.security.oauth2.client.registration.google.client-secret=구글클라이언트시크릿
spring.security.oauth2.client.registration.google.scope=profile,email

# registration
spring.security.oauth2.client.registration.naver.client-id=네이버클라이언트ID
spring.security.oauth2.client.registration.naver.client-secret=네이버클라이언트시크릿
spring.security.oauth2.client.registration.naver.redirect-uri={baseUrl}/{action}/oauth2/code/{registrationId}
spring.security.oauth2.client.registration.naver.authorization-grant-type=authorization_code
spring.security.oauth2.client.registration.naver.scope=name,email,profile_image
spring.security.oauth2.client.registration.naver.client-name=Naver

# provider
spring.security.oauth2.client.provider.naver.authorization-uri=https://nid.naver.com/oauth2.0/authorize
spring.security.oauth2.client.provider.naver.token-uri=https://nid.naver.com/oauth2.0/token
spring.security.oauth2.client.provider.naver.user-info-uri=https://openapi.naver.com/v1/nid/me
spring.security.oauth2.client.provider.naver.user-name-attribute=response
➡️ 클라이언트아이디, 클라이언트시크릿은 본인의 것을 넣으면 된다.
user_name_attribute=response
: 기준이 되는 user_name의 이름을 네이버에서는 response로 해야한다.
(네이버 회원 조회 시 반환되는 JSON 형태 때문)
⚠️ 스프링 시큐리티에서는 하위 필드를 명시할 수 없다.
최상위 필드들만 user_name으로 지정 가능한데 네이버 응답값 최상위 필드는 resultCode, message, response이다.
⌨️ 구현해야 하는 코드
application-oauth.properties
2. 스프링 시큐리티 설정 등록하기
OAuthAttributes.java에 네이버인지 판단하는 코드와 네이버 생성자를 추가해준다.
⌨️ 구현/수정해야 하는 코드
OAuthAttributes.javaindex.mustache
이제 서버를 켜 localhost:8080에 접속하면 네이버 로그인을 성공적으로 수행할 수 있다.
✔️ 기존 테스트에 시큐리티 적용
기존 테스트에 시큐리티를 적용하면 문제가 되는 부분들이 있다.
- 기존에는 바로 API를 호출할 수 있어 테스트 코드 역시 바로 API를 호출할 수 있었다.
하지만 시큐리티 옵션이 활성화되면 인증된 사용자만 API를 호출할 수 있어진다.
그럼 이 문제를 기존 API테스트 코드들이 권한을 가지고 있는 것처럼 만들어주면 된다.
문제점
- CustomOAuth2UserService를 찾을 수 없다.
➡️ 테스트에서는 application.properties만 끌어올 뿐 application-oauth.properties는 읽어오지 않기 때문에 적용되지 않는다.
이 경우, src/test/resources/에 가짜 application.properties를 생성해주면 된다.
spring.jpa.show_sql=true
spring.jpa.properties.hibernate.dialect=org.hibernate.dialect.MySQL5InnoDBDialect
spring.h2.console.enabled=true
spring.session.store-type=jdbc

# Test OAuth

spring.security.oauth2.client.registration.google.client-id=test
spring.security.oauth2.client.registration.google.client-secret=test
spring.security.oauth2.client.registration.google.scope=profile,email
- 스프링 시큐리티 설정으로 인증되지 않은 사용자의 요청은 이동된다.
➡️ 임의로 인증된 사용자를 추가하여 해결
이 방법은 스프링 시큐리티에서 공식적으로 지원하고 있다.
build.gradle에 추가해준다.
testCompileOnly('org.springframework.security:spring-security-test')그리고 PostApiControllerTest.java에 임의 사용자 인증을 추가해준다.
@WithMockUser(roles = "USER")
: 인증된 가짜 사용자를 만듦
단, 이는 MockMvc에서만 작동함PostApiControllerTest.java는 @SpringBootTest로만 되어있어 MockMvc를 전혀 사용하지 않는다.
다음과 같이 코드를 변경해주어야 한다.
...
    @Autowired
    private WebApplicationContext context;

    private MockMvc mvc;

    @Before
    public void setup() {
        mvc = MockMvcBuilders
                .webAppContextSetup(context)
                .apply(springSecurity())
                .build();
    }
...
    @Test
    @WithMockUser(roles="USER")
    public void Posts_등록된다() throws Exception {
	...

        // when
        mvc.perform(post(url)
                .contentType(MediaType.APPLICATION_JSON_UTF8)
                .content(new ObjectMapper().writeValueAsString(requestDto)))
                .andExpect(status().isOk());

        // then
        List<Posts> all = postsRepository.findAll();
        assertThat(all.get(0).getTitle()).isEqualTo(title);
        assertThat(all.get(0).getContent()).isEqualTo(content);
    }

    @Test
    @WithMockUser(roles = "USER")
    public void Posts_수정된다() throws Exception {
       ...

        // when
        mvc.perform(put(url)
                        .contentType(MediaType.APPLICATION_JSON_UTF8)
                        .content(new ObjectMapper().writeValueAsString(requestDto)))
                .andExpect(status().isOk());

        // then
        List<Posts> all = postsRepository.findAll();
        assertThat(all.get(0).getTitle()).isEqualTo(expectedTitle);
        assertThat(all.get(0).getContent()).isEqualTo(expectedContent);
    }
@Before
: 매번 테스트 전 MockMvc 인스턴스 생성mvc.perform
: 생성된 MockMvc를 통해 API 테스트
- @WebMvcTest에서 CustomOAuth2UserService를 찾을 수 없다.
➡️ @WebMvcTest에서 @Repository, @Service, @Component는 스캔 대상이 아니다.
이를 해결하기 위해서는 스캔 대상에서 SecurityConfig를 제거하면 된다.
HelloControllerTest.java에서도 마찬가지로 @WithMockUser(roles = "USER")를 사용해 가짜로 인증된 사용자를 만들어낸다.
이 상태로 다시 테스트를 돌려보면 IllegalArgumentException이 발생한다.
이는 @EnableJpaAuditing으로 인해 발생한다.
EnableJpaAuditing를 사용하기 위해서는 최소 하나의 @Entity 클래스가 필요하다.
➡️ 결론적으로 해야할 것은 @EnableJpaAuditing, @SpringBootApplication 분리이다.
Application.java에서 @EnableJpaAuditing를 제거한다.
그리고 config 패키지에 JpaConfig를 생성해 @EnableJpaAuditing를 추가한다.
@Configuration
@EnableJpaAuditing  // JPA Auditing 활성화
public class JpaConfig {
}
⌨️ 구현/수정해야 하는 코드
- src/test/resources/
application.properties build.gradlePostApiControllerTest.javaHelloControllerTest.javaApplication.javaJpaConfig.java
이 글은 이동욱님의 <스프링 부트와 AWS로 혼자 구현하는 웹 서비스> 를 보고 작성한 글입니다.