
될 때까지 한다
✔️ 프로젝트부터 생성하기
프로젝트부터 다시 생성하기
🔗start.spring.io
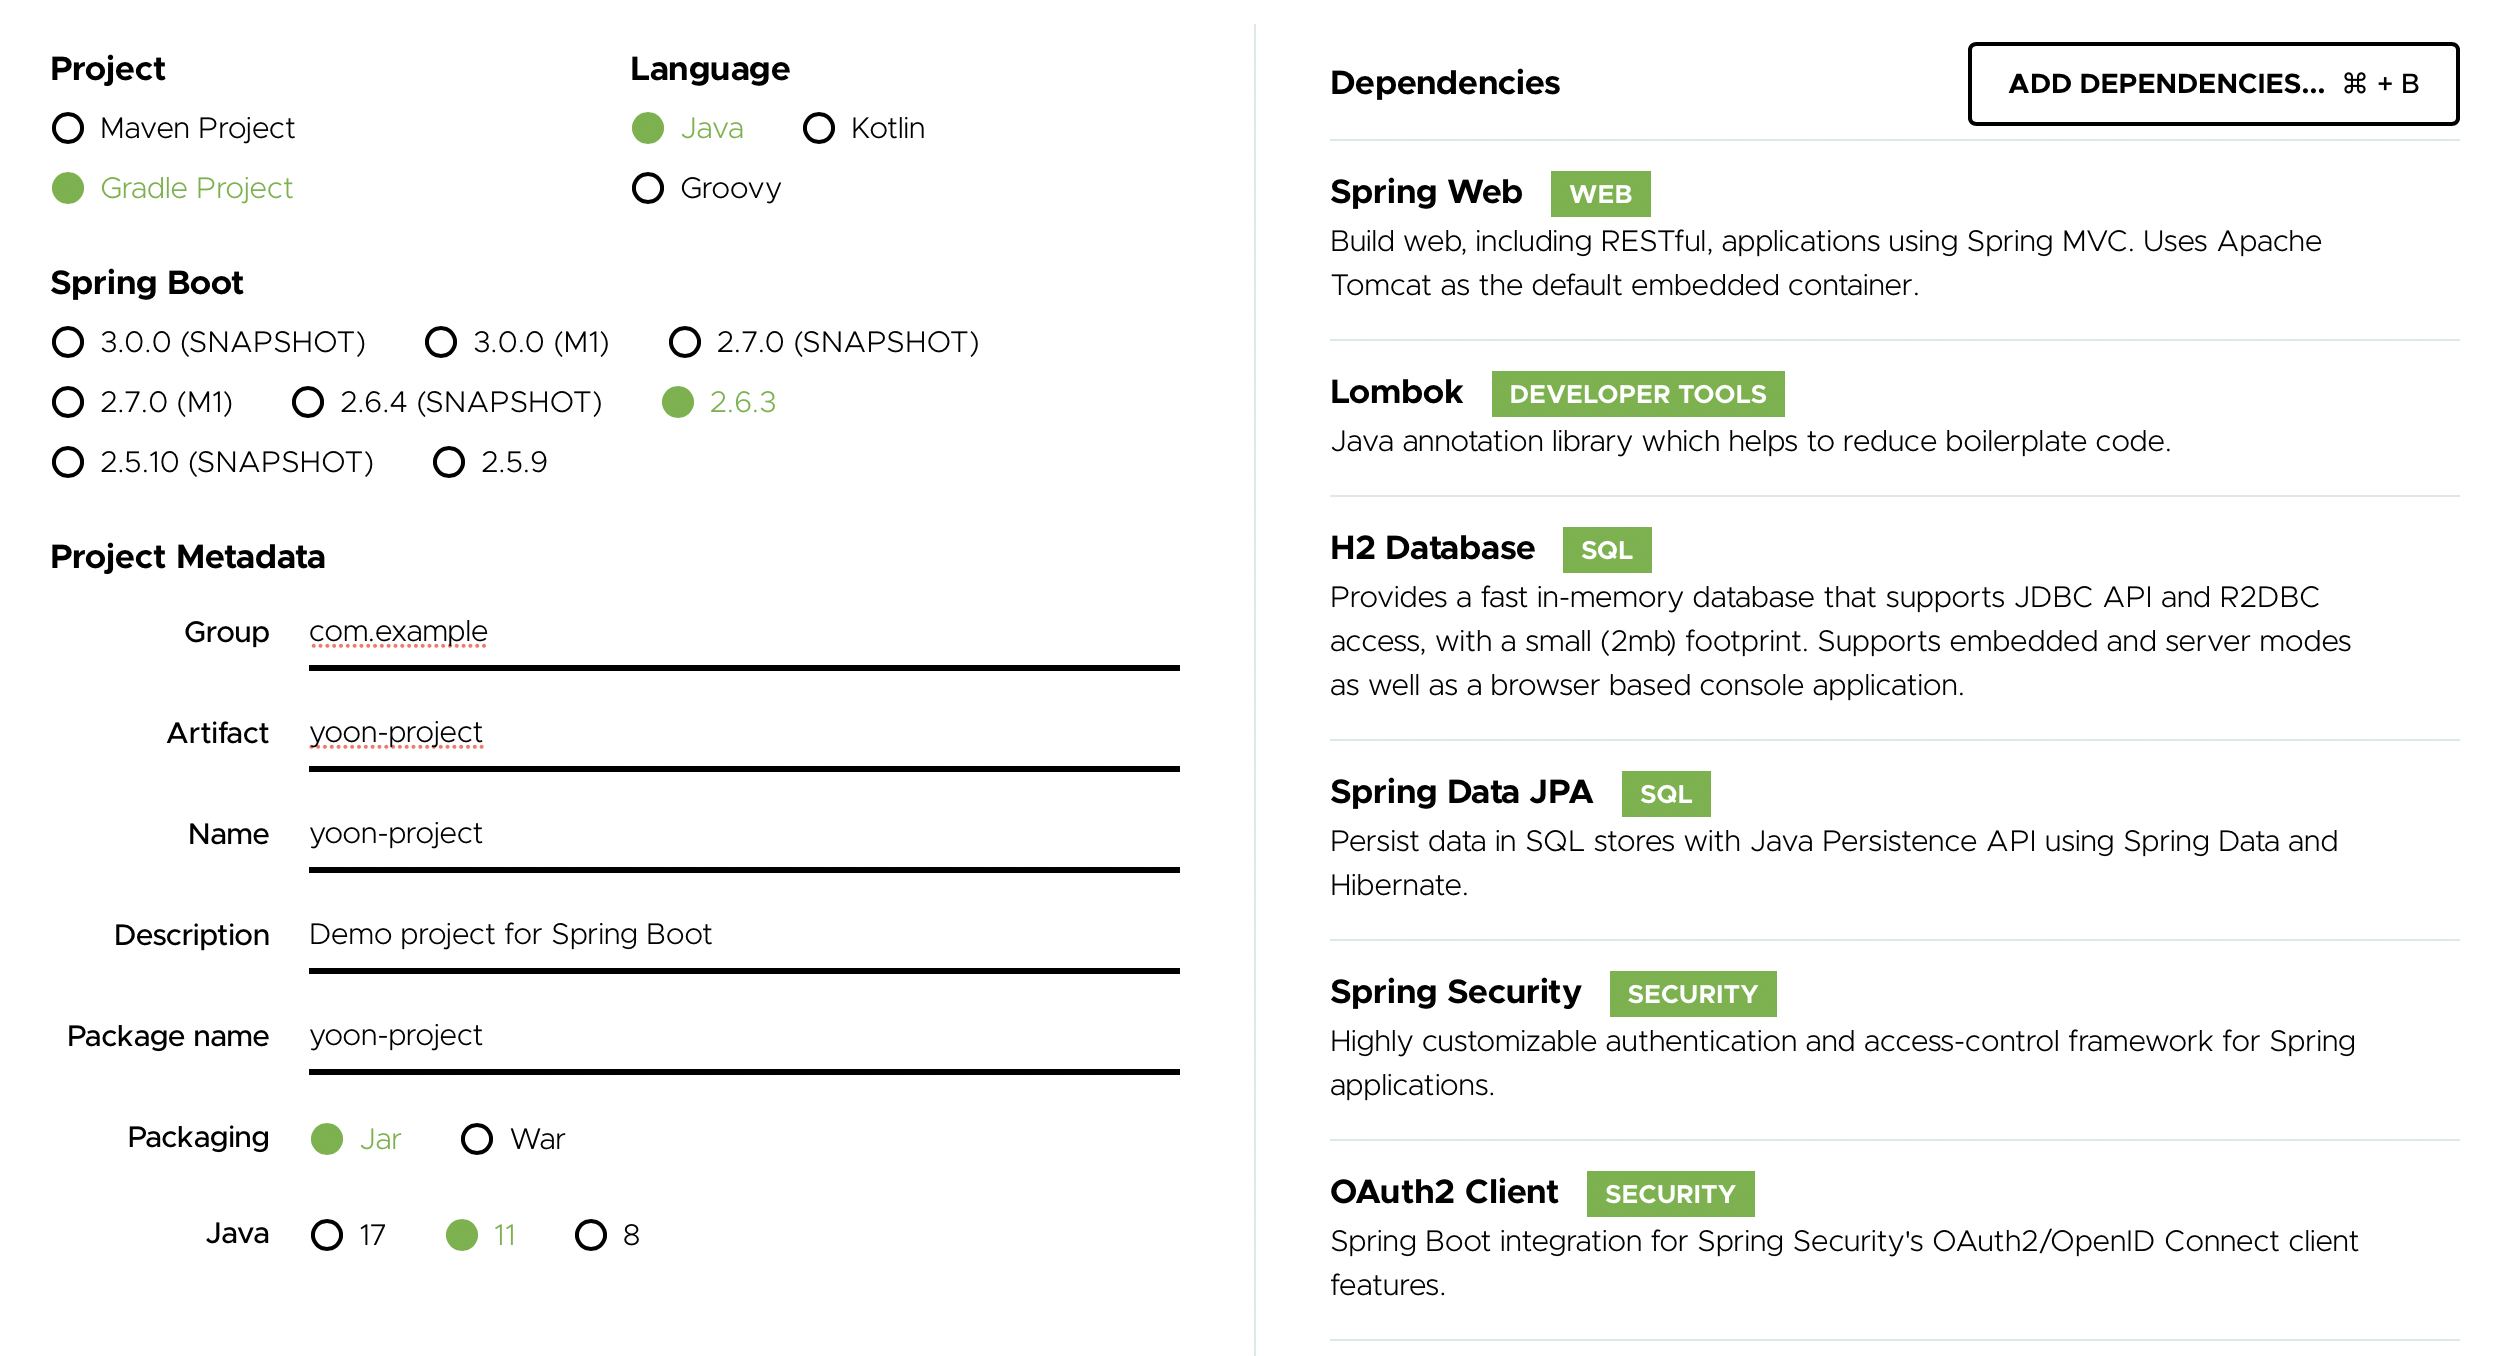
ArtifactId: 프로젝트 이름
Jar: 실행 가능한 Java 패키징 파일 (내장 WAS)
근데 하고나서 깨달은건데 이때 Security와 OAuth2 Client는 지금 등록하면 안된다,, 진짜,,

✔️ 나는 MySQL을 연동한다
이미 설치도 다 해놓았었기 때문에 DB만 생성한다.
mysql 실행 mysql -u root -p
그리고 YOON_DB 생성하기
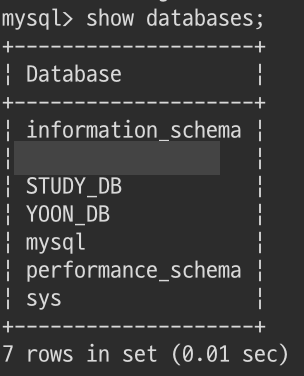
show databases;
use [db명]
show tables;
SELECT * FROM [table명];
"DB 뭐있는지 보여줘"
"[그거] 사용할게"
"테이블 보여줘"
"테이블 안에 뭐있냐"
MySQL을 DB로 사용할거면 gradle과 properties에 아래와 같은 설정이 필요하다.
build.gradle
	implementation 'org.springframework.boot:spring-boot-starter-data-jpa'
	implementation 'mysql:mysql-connector-java'
application.properties
# MySQL Driver
spring.datasource.driver-class-name=com.mysql.cj.jdbc.Driver

# DB URL
spring.datasource.url=jdbc:mysql://IP주소:포트/스키마명?useSSL=false&useUnicode=true&serverTimezone=Asia/Seoul

# DB username
spring.datasource.username=MySQL유저네임

# DB password
spring.datasource.password=MySQL비밀번호

# 콘솔에 SQL 출력 여부
spring.jpa.show-sql=true

# DDL 기능 사용 여부(create/update/create-drop/validate/none)
spring.jpa.hibernate.ddl-auto=update

# SQL 가독성 높여주는 formatting 여부
spring.jpa.properties.hibernate.format_sql=true
위와 같은 설정 후 정상적으로 서버가 실행되면 db 연동에 성공한거임
✔️ 이제 게시판 만든다
나는 게시판을 또 만들기 위해
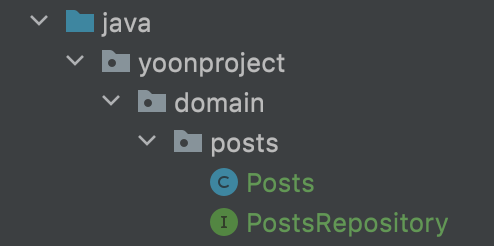
Posts란 이름으로 Entity 클래스(실제 db와 매칭될 클래스)를 생성하고 PostsRepository 인터페이스로 DB에 접근할 수 있도록 해줌
(위치: domain/posts/)
내용물을 채웠으면
save, findAll 테스트 (JUnit4로)
외부 라이브러리로 숨겨진 쿼리 보이게 하기 build.gradle
implementation 'com.github.gavlyukovskiy:p6spy-spring-boot-starter:1.5.8'
 한참 에러 때문에 시간을 많이 버렸는데 이유는 build.gradle에서 프로젝트 생성시 의존성 등록했던 oauth2-client와 security 때문이었다.
로그인 기능을 하나도 구현하지 않은 상태로 JPA로 게시글 save기능을 테스트 하고 있어 권한 때문에 자꾸 실패했던 것이었다^^
Posts_등록() 테스트 후 mySql에 잘 저장되는지 확인하기 위해 @After 어노테이션이 있는 메소드를 잠시 주석처리하고 다시 테스트 해보았다.
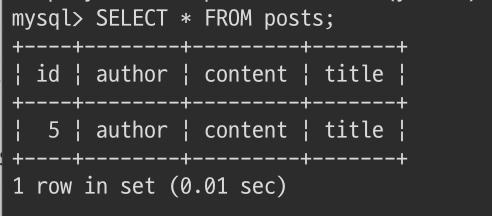 잘되네
잘되네
TestRestTemplate
: REST 방식으로 개발한 API의 Test를 최적화하기 위해 만들어진 클래스
HTTP 요청 후 데이터를 응답 받을 수 있는 템플릿 객체로 ResponseEntity와 함께 자주 사용된다.특히, 테스트에서 사용된
testRestTemplate.exchange()는 update할 때 주로 사용된다. 결과를 ResponseEntity로 반환받으며 Http header를 변경할 수 있다.
그리고 마찬가지로 수정, 조회 API도 만들어준다.
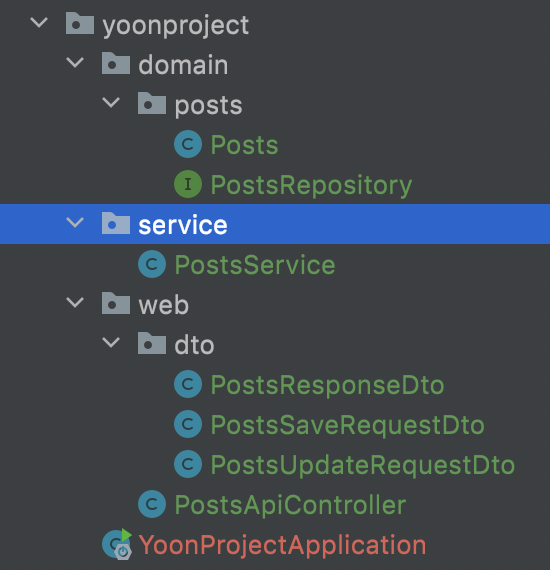
domain 패키지: 도메인을 담을 것(sw 관련 요구사항)service 패키지: service들은 트랜잭션, 도메인 간 순서를 보장할 뿐⚠️ Entity Class와 Repository Interface는 동일 선상에 위치할 것
(Posts와 PostsRepository)⚠️ Entity 클래스를 Request/Response 클래스로 사용하지 말고 Controller에서 사용할 Dto 클래스를 따로 분리해 사용할 것
코드
우선, 게시판을 만들기 위해서는 Request 데이터를 받을 Dto, API 요청받을 Controller, 순서를 보장하는 Service 클래스가 필요하다.
Posts
@Getter
@NoArgsConstructor
@Entity
public class Posts {

    @Id
    @GeneratedValue(strategy = GenerationType.IDENTITY)
    private Long id;

    @Column(length = 500, nullable = false)
    private String title;

    @Column(columnDefinition = "TEXT", nullable = false)
    private String content;

    private String author;

    @Builder
    public Posts(String title, String content, String author) {
        this.title = title;
        this.content = content;
        this.author = author;
    }

    public void update(String  title, String content) {
        this.title = title;
        this.content = content;
    }
}
PostsRepository
public interface PostsRepository extends JpaRepository<Posts, Long> {
}
PostsService
@RequiredArgsConstructor
@Service
public class PostsService {

    private final PostsRepository postsRepository;

    @Transactional
    public Long save(PostsSaveRequestDto requestDto) {
        return postsRepository.save(requestDto.toEntity()).getId();
    }

    @Transactional
    public Long update(Long id, PostsUpdateRequestDto requestDto) {
        Posts posts = postsRepository.findById(id).orElseThrow(
                () -> new IllegalArgumentException("해당 게시글이 없습니다. id=" + id)
        );

        posts.update(requestDto.getTitle(), requestDto.getContent());

        return id;
    }

    public PostsResponseDto findById(Long id) {
        Posts entity = postsRepository.findById(id)
                .orElseThrow(
                        () -> new IllegalArgumentException("해당 게시글이 없습니다. id=" + id)
                );

        return new PostsResponseDto(entity);
    }
}
PostsResponseDto
@Getter
public class PostsResponseDto {

    private Long id;
    private String title;
    private String content;
    private String author;

    public PostsResponseDto(Posts entity) {
        this.id = entity.getId();
        this.title = entity.getTitle();
        this.content = entity.getContent();
        this.author = entity.getAuthor();
    }
}
PostsSaveRequestDto
@Getter
@NoArgsConstructor
public class PostsSaveRequestDto {

    private String title;
    private String content;
    private String author;

    @Builder
    public PostsSaveRequestDto(String title, String content, String author) {
        this.title = title;
        this.content = content;
        this.author = author;
    }

    public Posts toEntity() {
        return Posts.builder()
                .title(title)
                .content(content)
                .author(author)
                .build();
    }
}
PostsUpdateRequestDto
@Getter
@NoArgsConstructor
public class PostsUpdateRequestDto {

    private String title;
    private String content;

    @Builder
    public PostsUpdateRequestDto(String title, String content) {
        this.title = title;
        this.content = content;
    }
}
PostsApiController
@RequiredArgsConstructor
@RestController
public class PostsApiController {

    private final PostsService postsService;

    @PostMapping("/api/posts")
    public Long save(@RequestBody PostsSaveRequestDto requestDto) {
        return postsService.save(requestDto);
    }

    @PutMapping("/api/posts/{id}")
    public Long update(@PathVariable Long id, @RequestBody PostsUpdateRequestDto requestDto) {
        return postsService.update(id, requestDto);
    }

    @GetMapping("/api/posts/{id}")
    public PostsResponseDto findById(@PathVariable Long id) {
        return postsService.findById(id);
    }
}
+ 생성/수정 시간 추가
모든 Entity들의 생성/수정 시간을 책임질 BaseTimeEntity를 만들어 @CreatedDate, @LastModifiedDate 어노테이션으로 자동으로 생성/수정 시간이 만들어질 수 있도록 한다.
@Getter
@MappedSuperclass
@EntityListeners(AuditingEntityListener.class)
public abstract class BaseTimeEntity {

    @CreatedDate
    private LocalDateTime createdDate;

    @LastModifiedDate
    private LocalDateTime modifiedDate;
}
그리고 엔티티 클래스인 Posts에 extends 로 상속 받는다.
public class Posts extends BaseTimeEntity {Jpa Auditing 기능이 활성화될 수 있도록 Application코드에 @EnableJpaAuditing 어노테이션을 추가한다.
@EnableJpaAuditing
@SpringBootApplication
public class YoonProjectApplication {
이렇게만 했는데 자동으로 생성/수정 시간이 자동 추가되었다.
이제 생성/수정시간이 필요하면 BaseTimeEntity 클래스만 상속받으면 사용할 수 있다.
즉,
BaseTimeEntity라는 클래스를 만들어 생성/수정 시간이 필요한 클래스에서 상속받아 사용이 가능하며,
Application에서 @EnableJpaAuditing 어노테이션으로 Jpa Auditing 기능을 사용할 수 있도록 했다.
게시판을 아무나 사용하도록 냅둘 순 없다.
✔️ 이제 소셜 로그인을 구현한다
나는 구글 소셜 로그인을 구현할 것이기 때문에 먼저 구글에 서비스 등록을 한다.
➡️ 🔗구글 클라우드
서비스를 등록해 clientId, clientSecret을 얻는 과정은 저번 포스트에 있으니 생략한다.
➡️ 🔗구글 소셜 로그인, 🔗 네이버 소셜 로그인
서비스 등록을 마쳤으면 application-oauth.properties를 만들어 코드를 입력한다.
spring.security.oauth2.client.registration.google.client-id=[클라이언트ID]
spring.security.oauth2.client.registration.google.client-secret=[클라이언트Secret]
spring.security.oauth2.client.registration.google.scope=profile, email
그리고 사용자 정보를 담당할 User 클래스를 생성해 id, name, email, picture, role을 만든다.
그리고 권한을 관리할 Role Enum 클래스를 생성해준다.
⚠️ Spring Security에서 권한 코드는 늘
ROLE_로 시작한다.
그 다음, User의 CRUD 기능을 위해 UserRepository 인터페이스를 생성한다.
이제 OAuth 라이브러리를 사용해야하기 때문에 build.gradle에 다음 코드를 넣어 의존성을 추가해준다.
build.gradle
implementation 'org.springframework.boot:spring-boot-starter-oauth2-client'domain과 같은 위치에 config 패키지를 생성하고 그 밑에 시큐리티 관련 클래스들을 넣을 auth 패키지를 만든다.
그 패키지에 SecurityConfig, CustomOAuth2UserService 클래스를 생성한다.
그리고 OAuthAttributes는 Dto로 보기 때문에 dto 패키지를 만들어 그 안에 생성해준다.
실행하니 아래와 같은 에러가 발생했다.
Description:

Method springSecurityFilterChain in org.springframework.security.config.annotation.web.configuration.WebSecurityConfiguration required a bean of type 'org.springframework.security.oauth2.client.registration.ClientRegistrationRepository' that could not be found.


Action:

Consider defining a bean of type 'org.springframework.security.oauth2.client.registration.ClientRegistrationRepository' in your configuration.
이 에러는 application.properties에 아래 코드 추가해 해결할 수 있었다.
spring.profiles.include=oauth정리하자면
- 🔗구글 클라우드에서 서비스 등록
→ 클라이언트 Id, 클라이언트 secret 얻기
- application-oauth.properties에 등록
- 사용자 정보를 담당할 User 클래스 생성
+ 권한을 관리할 Role Enum 클래스 생성
- User의 CRUD를 위한 UserRepository 생성
- build.gradle 의존성 추가
→ 이제 OAuth 라이브러리 사용 가능
- SecurityConfig, CustomOAuth2UserService 클래스 생성
(위치: config/auth/ → 시큐리티 관련 클래스 넣을 것)
- OAuthAttributes 클래스는 Dto 클래스이기 때문에 dto 패키지 만들어 그 안에 생성
- SessionUser는 인증된 사용자 정보만 필요하므로 email, name, picture만
코드
User
@Getter
@NoArgsConstructor
@Entity
public class User extends BaseTimeEntity {

    @Id
    @GeneratedValue(strategy = IDENTITY)
    private Long id;

    @Column(nullable = false)
    private String name;

    @Column(nullable = false)
    private String email;

    @Column
    private String picture;

    @Enumerated(EnumType.STRING)
    @Column(nullable = false)
    private Role role;

    @Builder
    public User(String name, String email, String picture, Role role) {
        this.name = name;
        this.email = email;
        this.picture = picture;
        this.role = role;
    }

    public User update(String name, String picture) {
        this.name = name;
        this.picture = picture;

        return this;
    }

    public String getRoleKey() {
        return this.role.getKey();
    }
}
Role
@Getter
@RequiredArgsConstructor
public enum Role {

    GUEST("ROLE_GUEST", "손님"),
    USER("ROLE_USER", "일반 사용자");

    private final String key;
    private final String title;
}
UserRepository
public interface UserRepository extends JpaRepository<User, Long> {

    Optional<User> findByEmail(String email);
}
SecurityConfig
@RequiredArgsConstructor
@EnableWebSecurity
public class SecurityConfig extends WebSecurityConfigurerAdapter {

    private final CustomOAuth2UserService customOAuth2UserService;

    @Override
    protected void configure(HttpSecurity http) throws Exception {
        http
                .csrf().disable()
                .headers().frameOptions().disable() // 여기까지가 h2-console 화면을 위해 해당 옵션 disable한 것
                .and()
                .authorizeRequests()
                .antMatchers("/", "/css/**", "/images/**", "/js/**", "/h2-console/**").permitAll()  // 전체 열람 권한 부여
                .antMatchers("/api/v1/**").hasRole(Role.USER.name())
                .anyRequest().authenticated()   // 나머지는 인증된 사용자만 이용 가능하게
                .and()
                    .logout()
                        .logoutSuccessUrl("/")
                .and()
                    .oauth2Login()
                        .userInfoEndpoint()
                            .userService(customOAuth2UserService);

    }
}
CustomOAuth2UserService
@RequiredArgsConstructor
@Service
public class CustomOAuth2UserService implements OAuth2UserService<OAuth2UserRequest, OAuth2User> {

    private final UserRepository userRepository;
    private final HttpSession httpSession;

    @Override
    public OAuth2User loadUser(OAuth2UserRequest userRequest) throws OAuth2AuthenticationException {
        OAuth2UserService<OAuth2UserRequest, OAuth2User> delegate = new DefaultOAuth2UserService();
        OAuth2User oAuth2User = delegate.loadUser(userRequest);

        String registrationId = userRequest.getClientRegistration().getRegistrationId();    // 현재 로그인 진행 중인 서비스를 구분(Ex. 네이버인지 구글인지 ..)
        String userNameAttributeName = userRequest
                .getClientRegistration().getProviderDetails()
                .getUserInfoEndpoint()
                .getUserNameAttributeName();    // userNameAttributeName: Primary Key와 같은 의미

        OAuthAttributes attributes = OAuthAttributes
                .of(registrationId, userNameAttributeName, oAuth2User.getAttributes());

        User user = saveOrUpdate(attributes);

        httpSession.setAttribute("user", new SessionUser(user));    // SessionUser: Dto class

        return new DefaultOAuth2User(
                Collections.singleton(new SimpleGrantedAuthority(user.getRoleKey())),
                attributes.getAttributes(),
                attributes.getNameAttributeKey()
        );
    }

    private User saveOrUpdate(OAuthAttributes attributes) {
        User user = userRepository.findByEmail(attributes.getEmail())
                .map(entity -> entity.update(attributes.getName(), attributes.getPicture()))
                .orElse(attributes.toEntity());

        return userRepository.save(user);
    }
}
OAuthAttributes
@Getter
public class OAuthAttributes {

    private Map<String, Object> attributes;
    private String nameAttributeKey;
    private String name;
    private String email;
    private String picture;

    @Builder
    public OAuthAttributes(Map<String, Object> attributes, String nameAttributeKey, String name, String email, String picture) {
        this.attributes = attributes;
        this.nameAttributeKey = nameAttributeKey;
        this.name = name;
        this.email = email;
        this.picture = picture;
    }

    public static OAuthAttributes of(String registrationId, String userNameAttributeName, Map<String, Object> attributes) {
        return ofGoogle(userNameAttributeName, attributes);
    }

    private static OAuthAttributes ofGoogle(String userNameAttributeName, Map<String, Object> attributes) {
        return OAuthAttributes.builder()
                .name((String) attributes.get("name"))
                .email((String) attributes.get("email"))
                .picture((String) attributes.get("picture"))
                .attributes(attributes)
                .nameAttributeKey(userNameAttributeName)
                .build();
    }

    public User toEntity() {    // User 엔티티 생성
        return User.builder()
                .name(name)
                .email(email)
                .picture(picture)
                .role(Role.GUEST)   // 가입시 기본 권한
                .build();
    }
}
SessionUser
@Getter
public class SessionUser implements Serializable {

    private String name;
    private String email;
    private String picture;

    public SessionUser(User user) {
        this.name = user.getName();
        this.email = user.getEmail();
        this.picture = user.getPicture();
    }
}
✔️ 홈 화면 만들기
지금은 로그인에 성공해도 리다이렉트 될 홈 화면이 없다.
mustache를 사용할 것이기 때문에 mustache 플러그인을 적용한 후, build.gradle에 다음 코드를 추가해준다.
implementation 'org.springframework.boot:spring-boot-starter-mustache'그리고 index.mustache는 resources/templates/ 에 위치하고, resources/templates/layout/에 footer.mustache, header.mustache가 위치하면 된다.
화면은 주 기능이 아니기때문에 코드는 생략한다.
IndexController의 HttpSession
: HTTP 통신은 Stateless 통신으로 요청에 대한 응답 후 아무것도 남지 않는다.
이러한 특징 때문에 서버는 클라이언트를 구분할 수 없다. 이러한 부분을 해결하기 위한 것이 HttpSession이다.HttpSession 사용 방법
@Autowired로 주입 받기
이 경우에는 API를 호출하는 시점 서블릿 컨테이너에게 session을 달라고 요청한다.
(*Servlet Container가 HttpSession을 생성한다.)- 메소드에서 주입 받기
메소드에서 매개변수를 통해 주입 받는 방식으로 선언시 서블릿 컨테이너에게 session을 달라고 요청한다.@SessionAttribute,@ModelAttribute로 주입 받기
+ 중복 코드 줄이기
어노테이션 기반으로 수정
코드의 반복을 줄이기 위해 어노테이션 기반으로 수정할 것이다.
config/auth에 LoginUser라는 어노테이션을 생성한다.
@Target(ElementType.PARAMETER)
@Retention(RetentionPolicy.RUNTIME)
public @interface LoginUser {
}
그리고 같은 위치에 LoginUserArgumentResolver를 생성한다.
@RequiredArgsConstructor
@Component
public class LoginUserArgumentResolver implements HandlerMethodArgumentResolver {

    private final HttpSession httpSession;

    @Override
    public boolean supportsParameter(MethodParameter parameter) {
        boolean isLoginUserAnnotation = parameter.getParameterAnnotation(LoginUser.class) != null;
        boolean isUserClass = SessionUser.class.equals(parameter.getParameterType());

        return isLoginUserAnnotation && isUserClass;
    }

    @Override
    public Object resolveArgument(MethodParameter parameter,
                                   ModelAndViewContainer mavContainer,
                                   NativeWebRequest webRequest,
                                   WebDataBinderFactory binderFactory) throws  Exception {
        return httpSession.getAttribute("user");
    }
}
HandlerMethodArgumentResolver는 조건에 맞는 메소드가 있다면 이것의 구현체가 지정한 값으로 해당 메소드의 파라미터로 넘길 수 있게 해준다.➡️
LoginUserArgumentResolver는 구현체
이제 스프링에서 인식될 수 있도록 config/에 WebMvcConfigurer에 추가한다.
@RequiredArgsConstructor
@Configuration
public class WebConfig implements WebMvcConfigurer {

    private final LoginUserArgumentResolver loginUserArgumentResolver;

    @Override
    public void addArgumentResolvers(List<HandlerMethodArgumentResolver> argumentResolvers) {
        argumentResolvers.add(loginUserArgumentResolver);
    }
}
⚠️
HandlerMethodArgumentResolver는 항상 WebMvcConfigurer의addArgumentResolvers()를 통해 추가해야 한다.
이제 준비는 다 되었고 IndexController의 코드에서 반복되는 부분을 @LoginUser로 수정하면 된다.
@RequiredArgsConstructor
@Controller
public class IndexController {

    private final PostsService postsService;
    private final HttpSession httpSession;

    @GetMapping("/")
    public String index(Model model) {
        model.addAttribute("posts", postsService.findAllDesc());

        SessionUser user = (SessionUser) httpSession.getAttribute("user");

        if (user != null) {
            model.addAttribute("username", user.getName());
        }

        return "index";
    }

    @GetMapping("/posts/save")
    public String postsSave() {
        return "posts-save";
    }

    @GetMapping("/posts/update/{id}")
    public String postsUpdate(@PathVariable Long id, Model model) {
        PostsResponseDto dto = postsService.findById(id);
        model.addAttribute("post", dto);

        return "posts-update";
    }
}
나는 게시글을 직접 게시, 수정, 삭제하는 화면을 구현하지 않았기 때문에 Controller에 홈으로 연결하는 메소다뿐이다. 그래서 반복되는 코드가 없지만 추후 추가할 때 이렇게 위와 같은 코드를 사용하면 된다.
+ 세션 저장소 변경하기
세션 저장소로 DB를 사용하기 위해서는 build.gradle에 다음과 같은 코드를 추가한다.
implementation 'org.springframework.session:spring-session-jdbc'그리고 application.properties에도 다음과 같은 코드를 추가해준다.
spring.session.store-type=jdbc(내가 H2가 아닌 DB를 사용해서 그런건지 아무래도 이렇게 변경하면 에러가 난다. 이 부분은 나중에 수정하도록 하겠다.)
+ 관리자 권한 추가하기
Role.java에 Admin을 추가할 것이다.
ADMIN("ROLE_ADMIN", "관리자");
(지금은 수정하여 가입시 기본 권한을 USER로 두었다.)
관리자 권한을 추가하였으니 가입할 때 관리자로 가입할지, 보통 이용자로 가입할지 구분할 수 있도록 코드를 추가해야 한다.

게시판 장인‼️