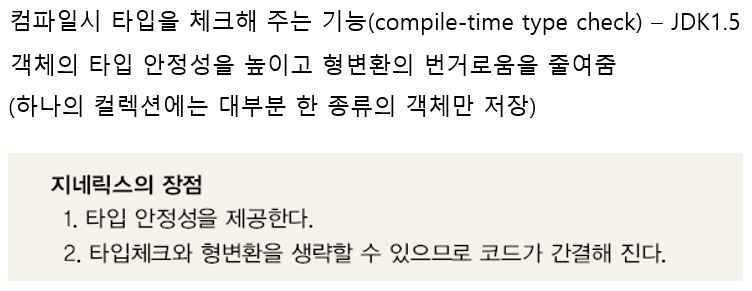
📖 01. 지네릭스(Generics)
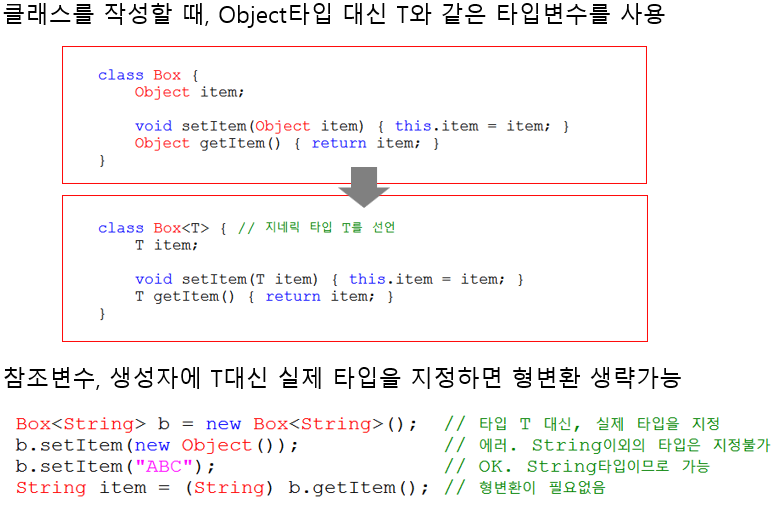
📖 02. 타입 변수 && 30. 타입 변수에 대입하기
📖 04. 지네릭스의 용어
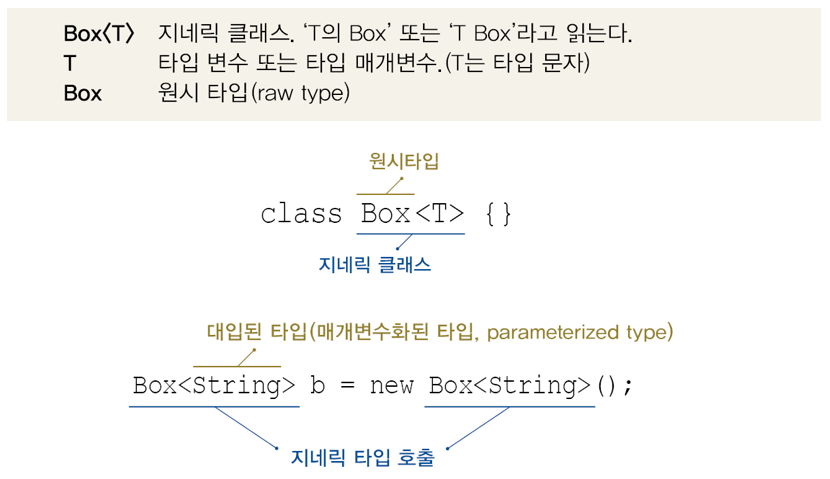
-> Box<String>과 Box는 서로 다른 타입을 대입하여 호출한 것일 뿐, 별개의 클래스를 의미하는 것이 아님!
-> add(1,3), add(2,4)와 같은 관계라고 생각하면 된다. 같은 메서드지만 매개변수가 다른거와 같이 말이다.
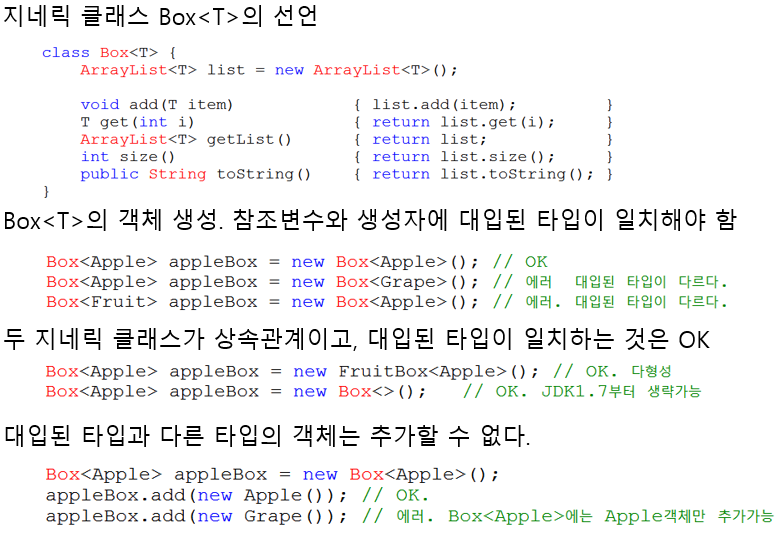
📖 05. 지네릭 타입과 다형성 && 06. 지네릭 타입과 다형성 - 예제
<예제 12-1 >
✍️ 입력
import java.util.*;

class Product {}
class Tv extends Product {}
class Audio extends Product {}

class Ex12_1 {
	public static void main(String[] args) {
		ArrayList<Product> productList = new ArrayList<Product>();
		ArrayList<Tv>      tvList = new ArrayList<Tv>();
//  	ArrayList<Product> tvList = new ArrayList<Tv>(); // 에러.
// 		List<Tv>           tvList = new ArrayList<Tv>(); // OK. 다형성

		productList.add(new Tv());
		productList.add(new Audio());

		tvList.add(new Tv());
		tvList.add(new Tv());

		printAll(productList);
		// printAll(tvList); // 컴파일 에러가 발생한다.
	}

	public static void printAll(ArrayList<Product> list) {
		for (Product p : list)
			System.out.println(p);
	}
}
💻 출력
Tv@2a139a55
Audio@15db9742
- 참조변수에 지정해준 지네릭 타입과 생성자에 저장된 지네릭 타입은 일치해야 한다.
- 지네릭 타입이 아닌 클래스의 타입 간에 다형성을 적용하는 것은 가능하다.
- 부모 지네릭 클래스에 자식 클래스를 넣을 수 있다.
-> 저장된 객체를 꺼낼 때, 형변환이 필요하다.
📖 07. Iterator<E>
<예제 12-2 >
✍️ 입력
import java.util.*;

class Ex12_2 {
	public static void main(String[] args) {
		ArrayList<Student> list = new ArrayList<Student>();
		list.add(new Student("자바왕", 1, 1));
		list.add(new Student("자바짱", 1, 2));
		list.add(new Student("홍길동", 2, 1));

		Iterator<Student> it = list.iterator();
		while (it.hasNext()) {
		//  Student s = (Student)it.next(); // 지네릭스를 사용하지 않으면 형변환 필요.
			Student s = it.next();
			System.out.println(s.name);
        //  System.out.println(it.next().name); 다음과 같이 코드를 보기좋게 사용 할 수 있다.
		}
	} // main
}

class Student {
	String name = "";
	int ban;
	int no;

	Student(String name, int ban, int no) {
		this.name = name;
		this.ban = ban;
		this.no = no;
	}
}
💻 출력
자바왕
자바짱
홍길동
📖 08. HashMap<K,V>
- <k,v>와 같이 두개의 타입을 ','로 구분해서 적어줘야 한다. 'T'나 'E'처럼 임의의 참조형 타입을 의미한다.
- HashMap에서 값을 꺼내올 때 이전에는 형변환을 해주어야 했지만 지네릭 HashMap을 사용하면 형변환을 하지 않아도 된다.
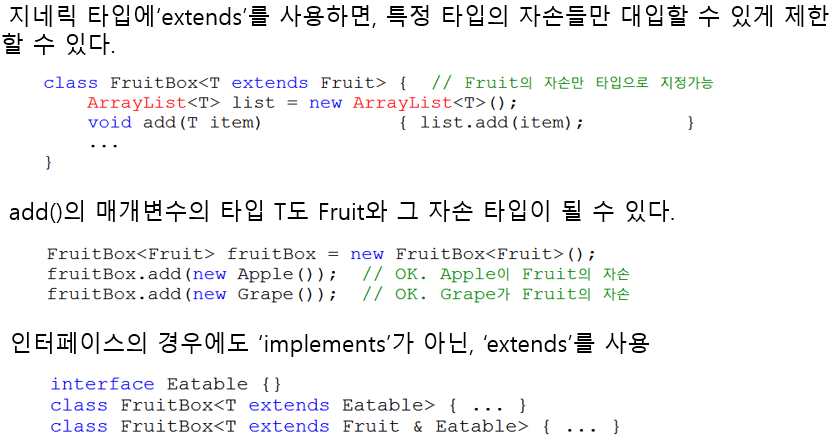
📖 09. 제한된 지네릭 클래스
-
타입 매개변수의 종류를 제한하는 방법은?
-> extends를 사용하자.
ex) class FruitBox<T extends Fruit>
-> toy 클래스가 Fruit의 자손이 아니라고 한다면 FruitBox<toy> 는 오류가 난다. -
인터페이스는 'implements' 가 아니라 'extends'를 사용한다는 것을 주의하자!
📖 10. 제한된 지네릭 클래스 예제
<예제 12-3 >
✍️ 입력
import java.util.ArrayList;

class Fruit implements Eatable {
	public String toString() { return "Fruit";}
}
class Apple extends Fruit { public String toString() { return "Apple";}}
class Grape extends Fruit { public String toString() { return "Grape";}}
class Toy                 { public String toString() { return "Toy"  ;}}

interface Eatable {}

class Ex12_3 {
	public static void main(String[] args) {
		FruitBox<Fruit> fruitBox = new FruitBox<Fruit>();
		FruitBox<Apple> appleBox = new FruitBox<Apple>();
		FruitBox<Grape> grapeBox = new FruitBox<Grape>();
//		FruitBox<Grape> grapeBox = new FruitBox<Apple>(); // 에러. 타입 불일치
//		FruitBox<Toy>   toyBox   = new FruitBox<Toy>();   // 에러.

		fruitBox.add(new Fruit());
		fruitBox.add(new Apple());
		fruitBox.add(new Grape());
		appleBox.add(new Apple());
//		appleBox.add(new Grape());  // 에러. Grape는 Apple의 자손이 아님
		grapeBox.add(new Grape());

		System.out.println("fruitBox-"+fruitBox);
		System.out.println("appleBox-"+appleBox);
		System.out.println("grapeBox-"+grapeBox);
	}  // main
}

class FruitBox<T extends Fruit & Eatable> extends Box<T> {}
// ','가 아니라 '&'을 사용한다.

class Box<T> {
	ArrayList<T> list = new ArrayList<T>();
	void add(T item) { list.add(item);     }
	T get(int i)     { return list.get(i); }
	int size()       { return list.size(); }
	public String toString() { return list.toString();}
}
💻 출력
fruitBox-[Fruit, Apple, Grape]
appleBox-[Apple]
grapeBox-[Grape]
📖 11. 지네릭스의 제약
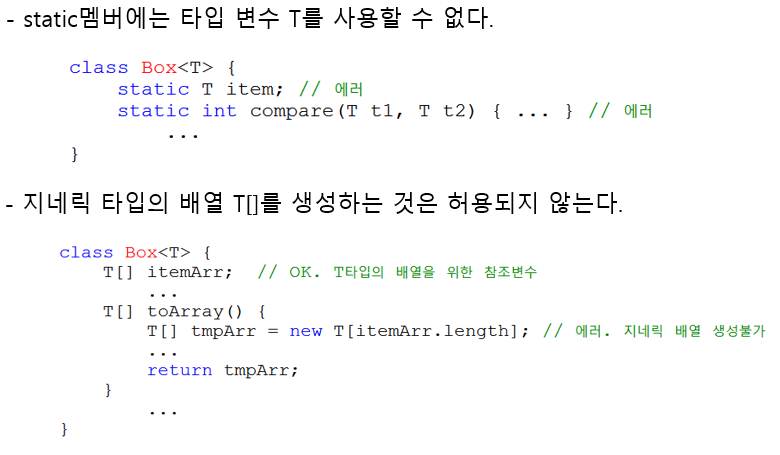
-
static멤버에 타입 변수 T를 사용 할 수 없다.
-> 지네릭스는 객체별로 타입을 지정해 다르게 동작하도록 만든 기능이다. 그러나 static멤버는 모든 동작을 동일하게 동작할 때 사용하므로 적절하지 않다. -
new 연산자 T 불가능 하다.
-> new 연산자는 컴파일 시점에 타입 'T'기 무엇인지 알아야 한다. 그러나 클래스의 T는 컴파일 시 무슨 타입인지 알 수 없기 때문에 new 연산자 옆에 T를 사용 할 수 없다. (intanceOf연산자도 같은 이유로 사용할 수 없다.)
📖 12. 와일드 카드
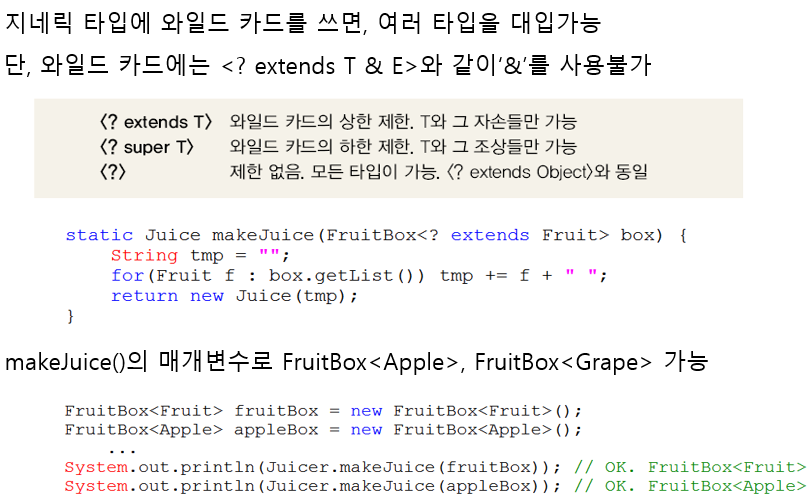
-
지네릭 클래스를 생성할 때, 참조변수에 지정된 지네릭 타입과 생성자에 지정된 지네릭 타입은 일치해야 한다.
-
와일드 카드를 이용하면 하나의 참조변수로 다른 제네릭 타입이 지정된 객체를 다룰 수 있다.
📖 13. 와일드 카드 예제
<예제 12-4 >
✍️ 입력
import java.util.ArrayList;

class Fruit2		       	{ public String toString() { return "Fruit";}}
class Apple2 extends Fruit2	{ public String toString() { return "Apple";}}
class Grape2 extends Fruit2	{ public String toString() { return "Grape";}}

class Juice {
	String name;

	Juice(String name)       { this.name = name + "Juice"; }
	public String toString() { return name;                }
}

class Juicer {
	static Juice makeJuice(FruitBox2<? extends Fruit2> box) {
		String tmp = "";

		for(Fruit2 f : box.getList())
			tmp += f + " ";
		return new Juice(tmp);
	}
}

class Ex12_4 {
	public static void main(String[] args) {
		FruitBox2<Fruit2> fruitBox = new FruitBox2<Fruit2>();
		FruitBox2<Apple2> appleBox = new FruitBox2<Apple2>();

		fruitBox.add(new Apple2());
		fruitBox.add(new Grape2());
		appleBox.add(new Apple2());
		appleBox.add(new Apple2());

		System.out.println(Juicer.makeJuice(fruitBox));
		System.out.println(Juicer.makeJuice(appleBox));
	}  // main
}

class FruitBox2<T extends Fruit2> extends Box2<T> {}

class Box2<T> {
	ArrayList<T> list = new ArrayList<T>();
	void add(T item) { list.add(item);      }
	T get(int i)     { return list.get(i);  }
	ArrayList<T> getList() { return list;   }
	int size()       { return list.size();  }
	public String toString() { return list.toString();}
}
💻 출력
Apple Grape Juice
Apple Apple Juice
📖 14. 지네릭 메서드
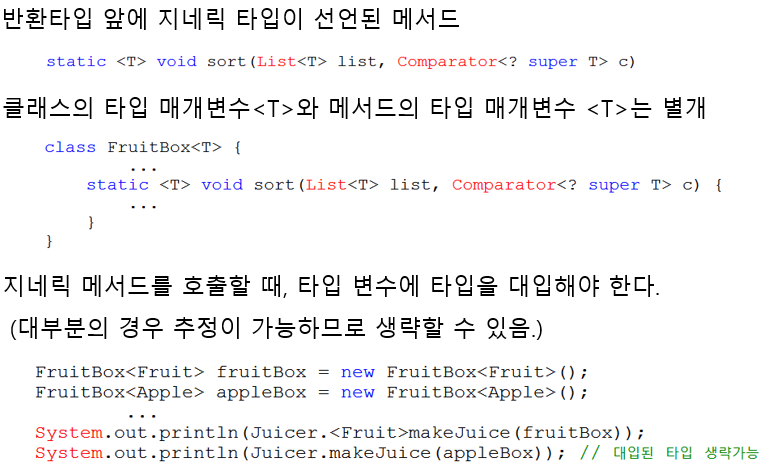
-> 대입된 타입을 생략 할 수 없는 경우에는 꼭 '클래스 이름'을 적어주어야 한다.
cf) 지네릭 메서드는 지네릭 클래스가 아닌 클래스에도 정의 될 수 있다.
📖 15. 지네릭 타입의 형변환
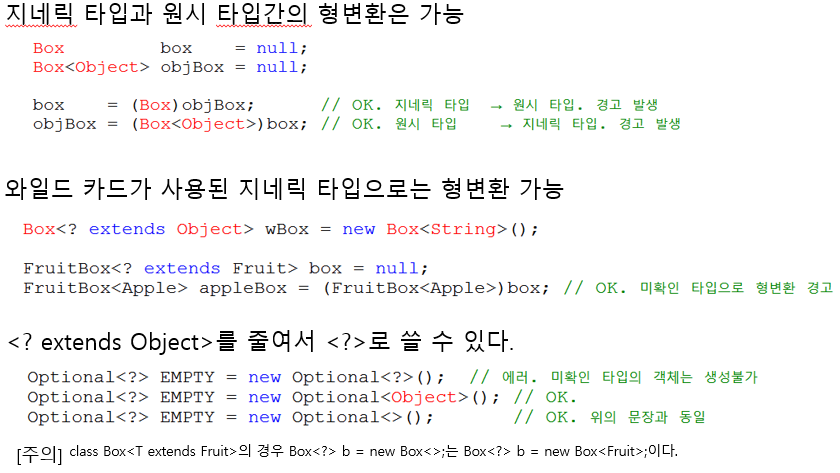
- 지네릭 -> 지네릭 형변환 불가하다.
📖 16. 지네릭 타입의 제거
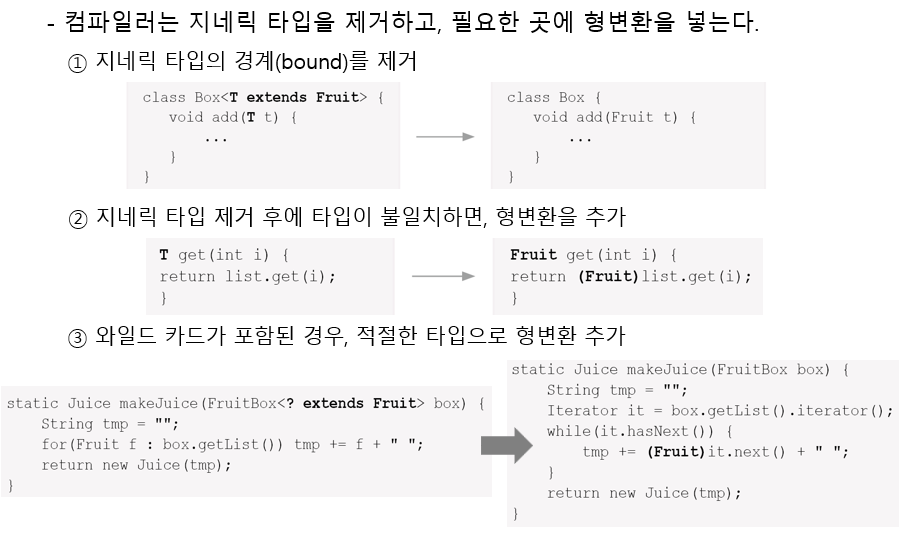
- 컴파일시 지네릭이 Object로 변환된다.
-> why? : 지네릭이 도입되기 이전의 소스 코드와 호환성을 유지하기 위해서!
📖 17. 열거형(enum)
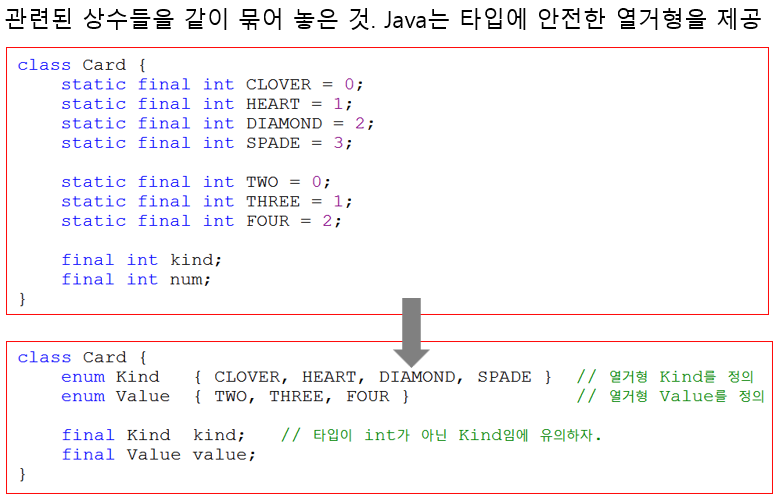
-> 열거형을 비교할 때 값을 비교하기 전에 타입을 먼저 비교한다.
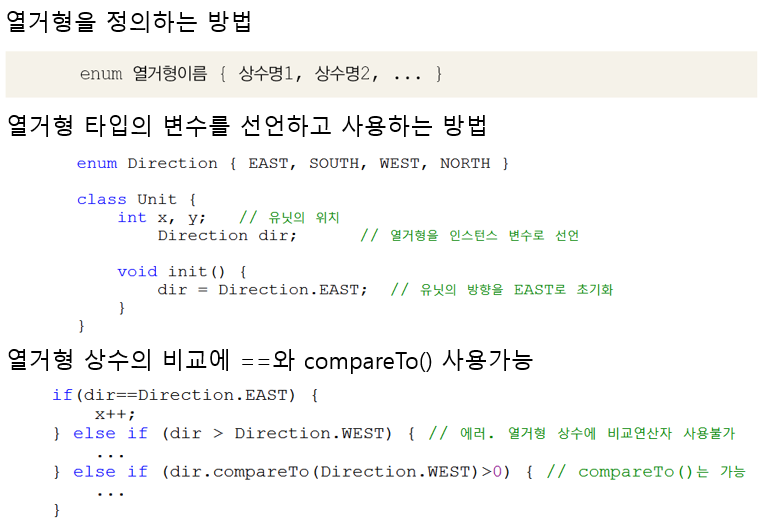
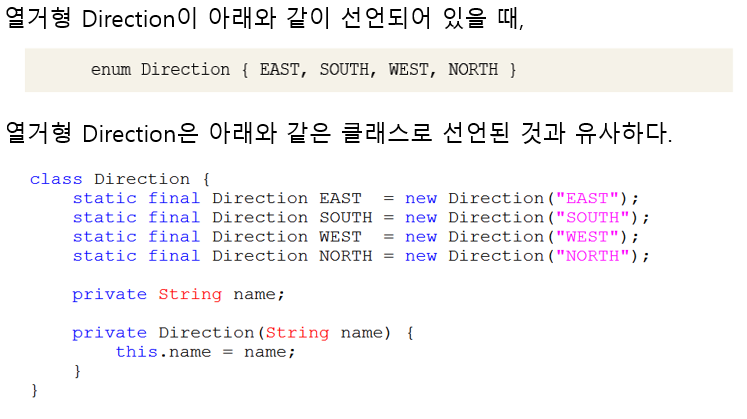
📖 18. 열거형의 정의와 사용
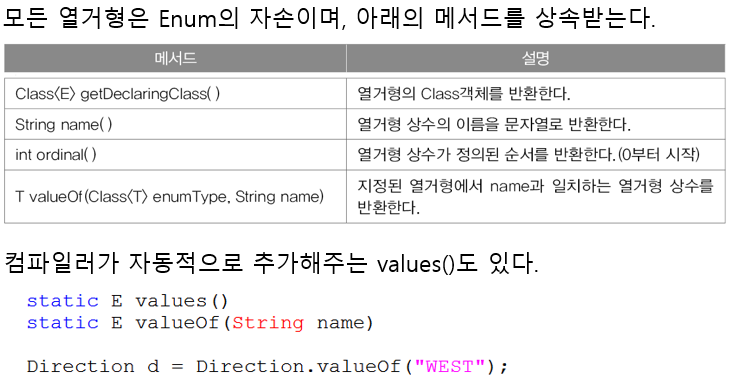
📖 19. 열거형의 조상 - java.lang.Enum
📖 20. 열거형 예제
<예제 12-5 >
✍️ 입력
enum Direction { EAST, SOUTH, WEST, NORTH }

class Ex12_5 {
	public static void main(String[] args) {
		Direction d1 = Direction.EAST;
		Direction d2 = Direction.valueOf("WEST");
		Direction d3 = Enum.valueOf(Direction.class, "EAST");

		System.out.println("d1="+d1);
		System.out.println("d2="+d2);
		System.out.println("d3="+d3);

		System.out.println("d1==d2 ? "+ (d1==d2));
		System.out.println("d1==d3 ? "+ (d1==d3));
		System.out.println("d1.equals(d3) ? "+ d1.equals(d3));
//		System.out.println("d2 > d3 ? "+ (d1 > d3)); // 에러
		System.out.println("d1.compareTo(d3) ? "+ (d1.compareTo(d3)));
		System.out.println("d1.compareTo(d2) ? "+ (d1.compareTo(d2)));

		switch(d1) {
			case EAST: // Direction.EAST라고 쓸 수 없다.
				System.out.println("The direction is EAST."); break;
			case SOUTH:
				System.out.println("The direction is SOUTH."); break;
			case WEST:
				System.out.println("The direction is WEST."); break;
			case NORTH:
				System.out.println("The direction is NORTH."); break;
			default:
				System.out.println("Invalid direction."); break;
		}

		Direction[] dArr = Direction.values();

		for(Direction d : dArr)  // for(Direction d : Direction.values())
			System.out.printf("%s=%d%n", d.name(), d.ordinal());
	}
}
💻 출력
d1=EAST
d2=WEST
d3=EAST
d1==d2 ? false
d1==d3 ? true
d1.equals(d3) ? true
d1.compareTo(d3) ? 0
d1.compareTo(d2) ? -2
The direction is EAST.
EAST=0
SOUTH=1
WEST=2
NORTH=3
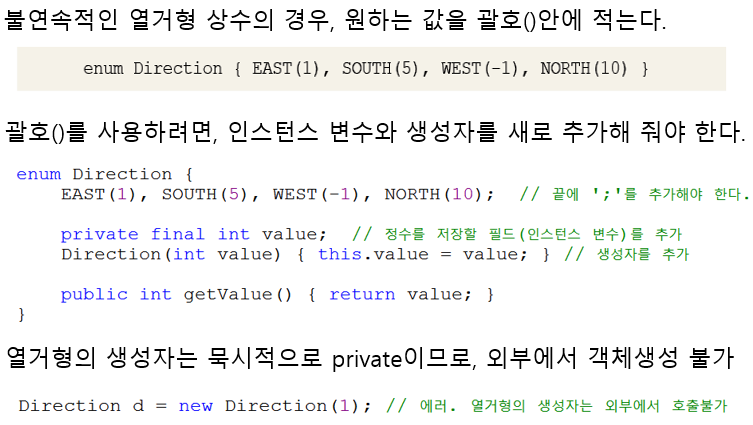
📖 22. 열거형에 멤버 추가하기 예제
<예제 12-6 >
✍️ 입력
enum Direction2 {
	EAST(1, ">"), SOUTH(2,"V"), WEST(3, "<"), NORTH(4,"^");

	private static final Direction2[] DIR_ARR = Direction2.values();
	private final int value;
	private final String symbol;

	Direction2(int value, String symbol) { // 접근 제어자 private이 생략됨
		this.value  = value;
		this.symbol = symbol;
	}

	public int getValue()     { return value;  }
	public String getSymbol() { return symbol; }

	public static Direction2 of(int dir) {
        if (dir < 1 || dir > 4)
            throw new IllegalArgumentException("Invalid value :" + dir);

        return DIR_ARR[dir - 1];
	}

	// 방향을 회전시키는 메서드. num의 값만큼 90도씩 시계방향으로 회전한다.
	public Direction2 rotate(int num) {
		num = num % 4;

		if(num < 0) num +=4; // num이 음수일 때는 시계반대 방향으로 회전

		return DIR_ARR[(value-1+num) % 4];
	}

	public String toString() {
		return name()+getSymbol();
	}
} // enum Direction2

class Ex12_6 {
	public static void main(String[] args) {
		for(Direction2 d : Direction2.values())
			System.out.printf("%s=%d%n", d.name(), d.getValue());

		Direction2 d1 = Direction2.EAST;
		Direction2 d2 = Direction2.of(1);

		System.out.printf("d1=%s, %d%n", d1.name(), d1.getValue());
		System.out.printf("d2=%s, %d%n", d2.name(), d2.getValue());
		System.out.println(Direction2.EAST.rotate(1));
		System.out.println(Direction2.EAST.rotate(2));
		System.out.println(Direction2.EAST.rotate(-1));
		System.out.println(Direction2.EAST.rotate(-2));
	}
}
💻 출력
EAST=1
SOUTH=2
WEST=3
NORTH=4
d1=EAST, 1
d2=EAST, 1
SOUTHV
WEST<
NORTH^
WEST<
📖 23. 애너테이션이란?
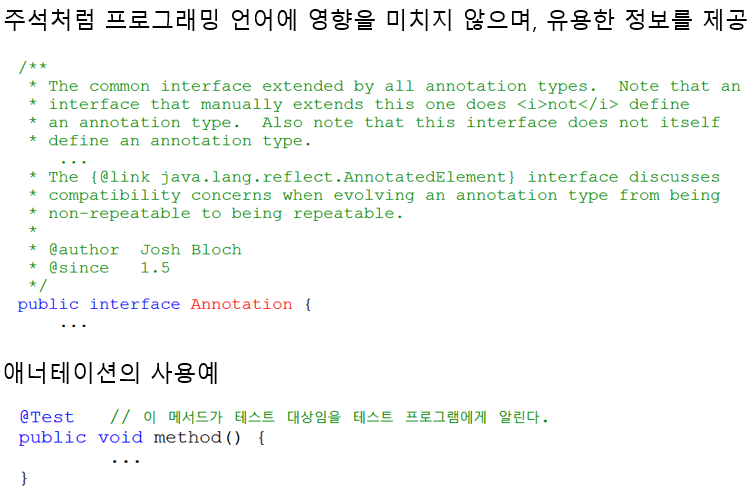
-> 프로그램의 소스코드 안에 다른 프로그램을 위한 정보를 미리 약속된 형식으로 포함시킨 것이 바로 애너테이션이다.
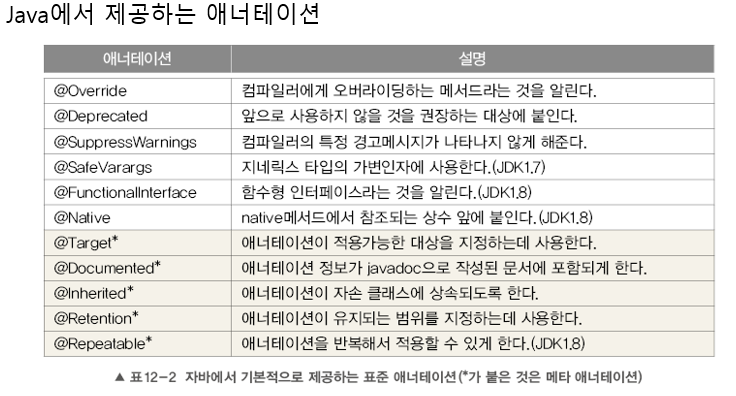
- JDK에서 제공하는 표준 애너테이션은 주로 컴파일러를 위한 것으로 컴파일러에게 유용한 정보를 제공한다. 그리고 새로운 애너테이션을 정의할 때 사용하는 메타 애너테이션도 제공한다.
📖 24. 표준 애너테이션
📖 25. @Override
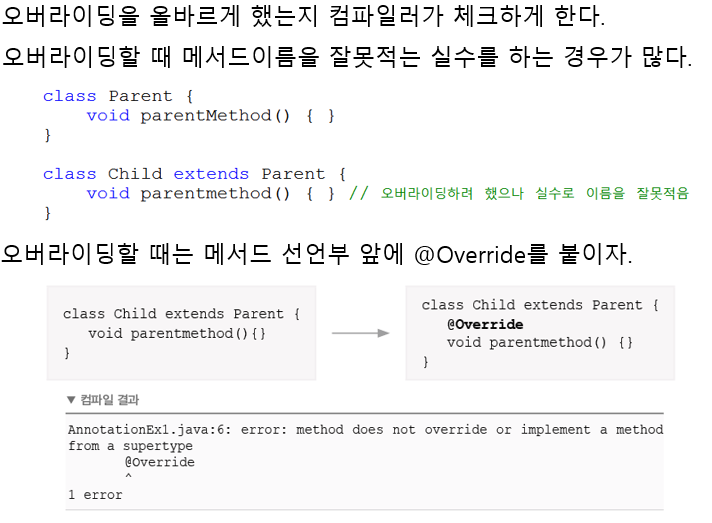
<예제 12-7 >
✍️ 입력
class Parent {
	void parentMethod() { }
}

class Child extends Parent {
	@Override
	void parentmethod() { } // 조상 메서드의 이름을 잘못 적었음.
}
💻 출력
에러
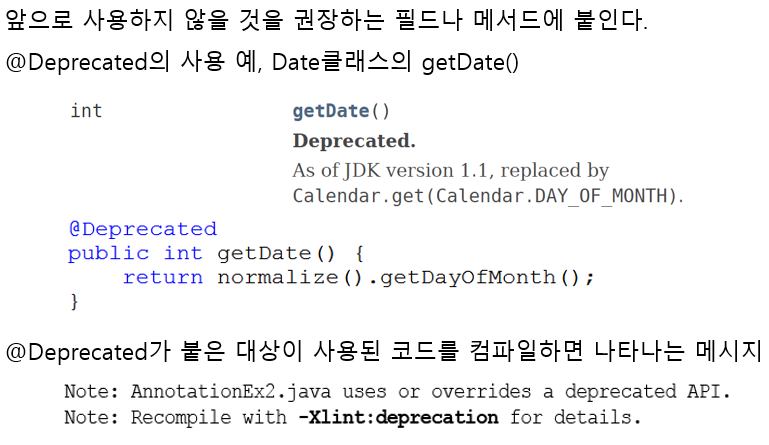
📖 26. @Deprecated
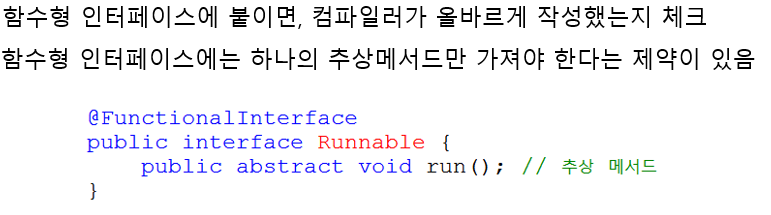
📖 27. @FunctionalInterface
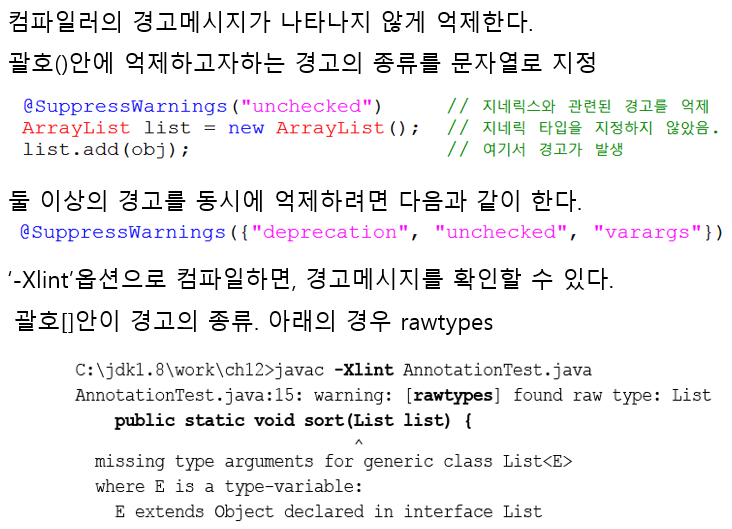
📖 28. @SuppressWarnings
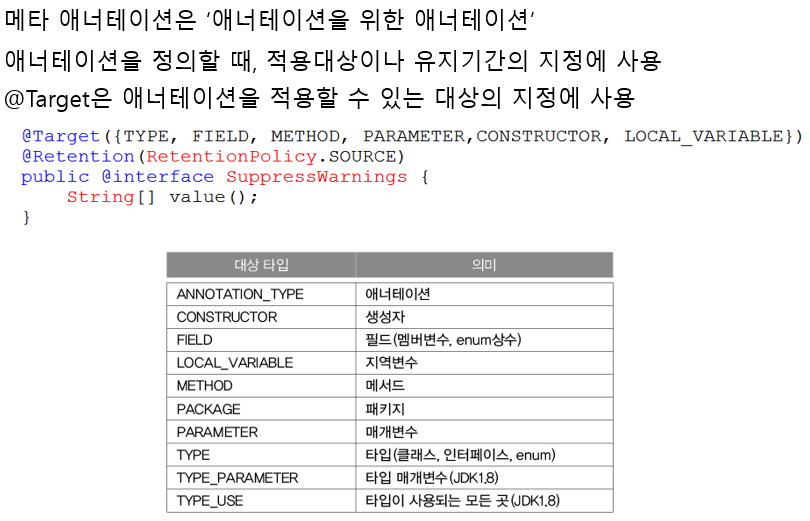
📖 29. 메타 애너테이션 && 30. @Target
@Target({FIELD, TYPE, TYPE_USE})     // 적용대상이 FIELD, TYPE, TYPE_USE
public @interface MyAnnotation { }   // MyAnnotation 정의

@MyAnnotation        // 적용대상이 TYPE인 경우
class MyClass {
	@ MyAnnotation   // 적용대상이 FIELD 경우
    int i;

    @MyAnnotation    // 적용대상이 TYPE_USE 경우
    MyClass mc;
📖 31. @Retention
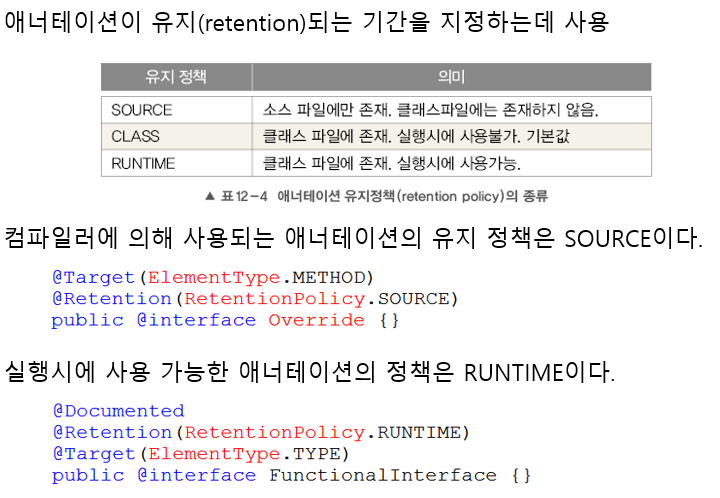
cf) 유지정책 'CLASS'는 컴파일러가 애너테이션의 정보를 클래스 파일에 저장할 수 있지만, JVM에 로딩될 떄는 애너테이션의 정보가 무시되어 실행 시에 애너테이션에 대한 정보를 얻을 수 없다.
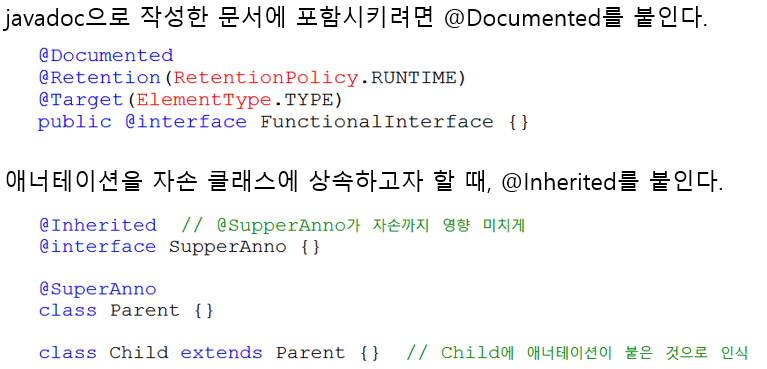
📖 32. @Documented, @Ingerited
📖 33. @Repeatable
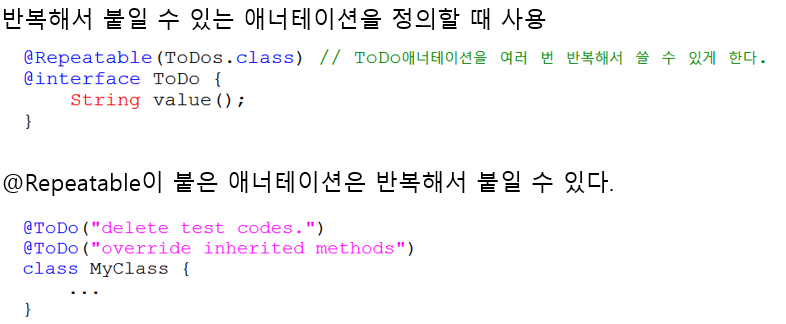
@interface ToDos {
	ToDo[] value();
}
📖 34. 애너테이션 타입 정의하기
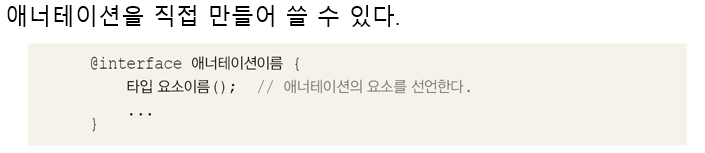
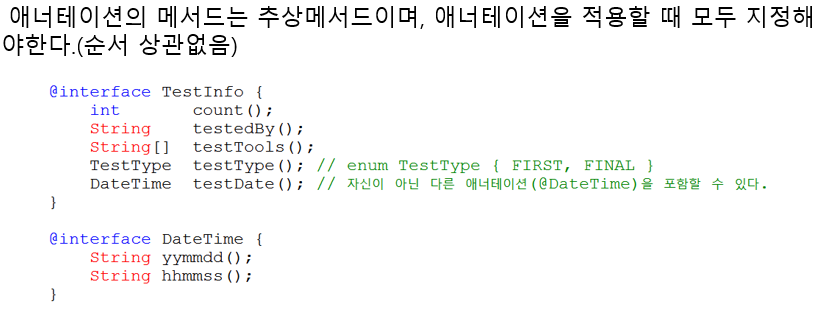
📖 35. 애너테이션의 요소
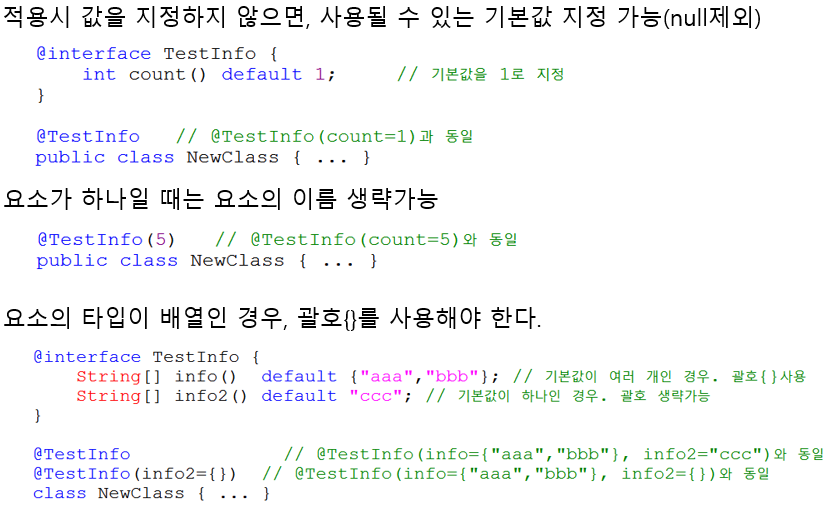
-> 애너테이션 요소가 오직 하나뿐이고 이름이 value인 경우, 애너테이션을 적용할 때 요소의 이름을 생략하고 값만 적어도 된다.
📖 36. 모든 애너테이션의 조상
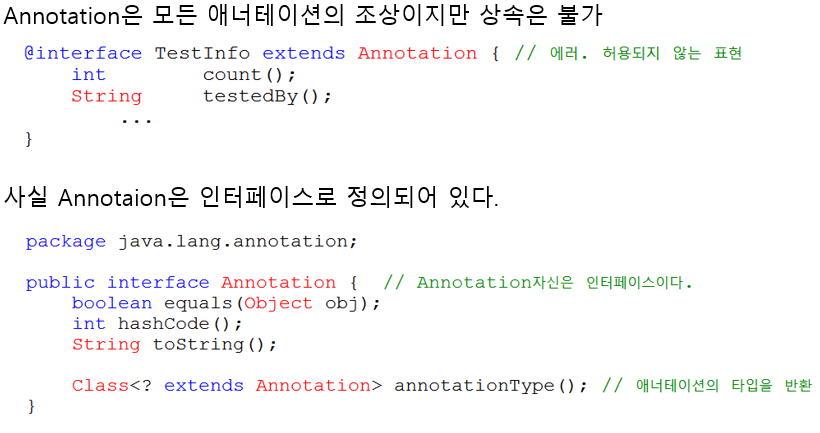
-> 모든 애너테이션의 조상인 Annoatation인터페이스가 위와 같이 정의되어 있기 때문에, 모든 애너테이션 객체에 대해 equals(), hashCode(), toString()과 같은 메서드를 호출하는 것이 가능하다.
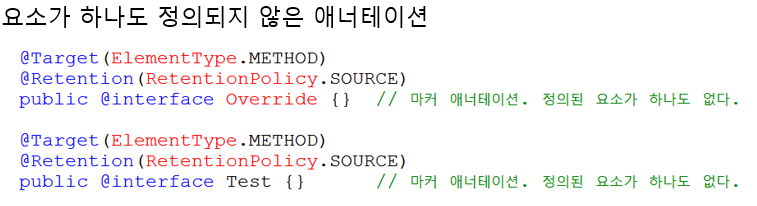
📖 37. 마커 애너테이션
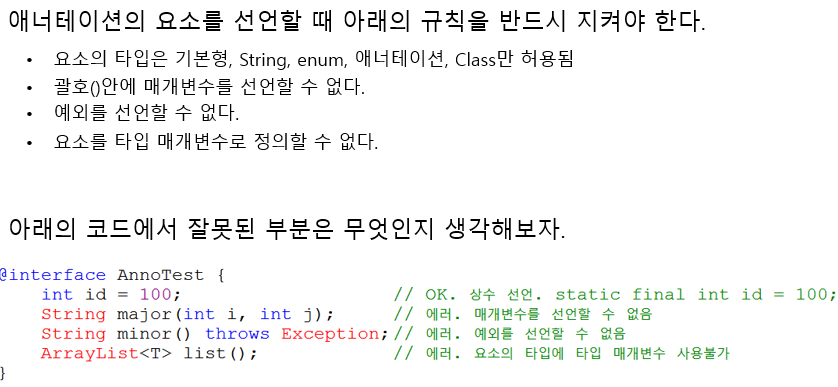
📖 38. 애너테이션 요소의 규칙
📖 39. 애너테이션 활용 예제
<예제 12-8 >
✍️ 입력
import java.lang.annotation.*;

@Deprecated
@SuppressWarnings("1111") // 유효하지 않은 애너테이션은 무시된다.
@TestInfo(testedBy="aaa", testDate=@DateTime(yymmdd="160101",hhmmss="235959"))
class Ex12_8 {
	public static void main(String args[]) {
		// Ex12_8의 Class객체를 얻는다.
		Class<Ex12_8> cls = Ex12_8.class;

		TestInfo anno = cls.getAnnotation(TestInfo.class);
		System.out.println("anno.testedBy()="+anno.testedBy());
		System.out.println("anno.testDate().yymmdd()=" +anno.testDate().yymmdd());
		System.out.println("anno.testDate().hhmmss()=" +anno.testDate().hhmmss());

		for(String str : anno.testTools())
			System.out.println("testTools="+str);

		System.out.println();

		// Ex12_8에 적용된 모든 애너테이션을 가져온다.
		Annotation[] annoArr = cls.getAnnotations();

		for(Annotation a : annoArr)
			System.out.println(a);
	} // main의 끝
}

@Retention(RetentionPolicy.RUNTIME)  // 실행 시에 사용가능하도록 지정
@interface TestInfo {
	int       count()	  	default 1;
	String    testedBy();
	String[]  testTools() 	default "JUnit";
	TestType  testType()    default TestType.FIRST;
	DateTime  testDate();
}

@Retention(RetentionPolicy.RUNTIME)  // 실행 시에 사용가능하도록 지정
@interface DateTime {
	String yymmdd();
	String hhmmss();
}

enum TestType { FIRST, FINAL }
💻 출력
anno.testedBy()=aaa
anno.testDate().yymmdd()=160101
anno.testDate().hhmmss()=235959
testTools=JUnit
@java.lang.Deprecated()
@TestInfo(count=1, testType=FIRST, testTools=[JUnit], testedBy=aaa, testDate=@DateTime(yymmdd=160101, hhmmss=235959))
[출처] 자바의 정석 <기초편> (남궁 성 지음)