1. index.html - 결제 버튼 만들기
먼저 script를 import해준다.
버전 최신화가 필요할 수 있다.
<script src="https://js.bootpay.co.kr/bootpay-4.3.3.min.js" type="application/javascript"></script>그 후 버튼을 만들고,
<body>
    <button id="paymentButton">결제하기</button>
</body>
부트페이 로직 실행
 <script>
    document
      .getElementById("paymentButton")
      .addEventListener("click", async function () {
        // 부트페이 결제 로직
        try {
          // 이 코드는 개발 문서에 나와있는 그대로.
          // 전달 데이터를 따로 뺌.
          // 일반결제 요청하기 로직. 팝업 설정과 승인 분리 설정만 추가함.
          const requestData = {
            // apikey
            application_id: "api키",
            price: 1000,
            order_name: "테스트결제",
            order_id: "TEST_ORDER_ID",
            // 아래의 두 속성 지정하지 않을 시 통합 결제
            //   pg: "카카오",
            //   method: "간편",
            tax_free: 0,
            user: {
              id: "회원아이디",
              username: "회원이름",
              phone: "01000000000",
              email: "test@test.com",
            },
            items: [
              {
                id: "item_id",
                name: "테스트아이템",
                qty: 1,
                price: 1000,
              },
            ],
            extra: {
              open_type: "popup", // 팝업 형태로 결제 창 열기
              popup: {
                width: 800, // 팝업 창의 너비 (픽셀)
                height: 600, // 팝업 창의 높이 (픽셀)
              },
              card_quota: "0,2,3",
              escrow: false,
              separately_confirmed: true, // 승인 전 로직 필요할 시
            },
          };
          // 위의 Data로 부트페이 결제 요청.
          const response = await Bootpay.requestPayment(requestData);

        } catch (error) {
          // 결제 진행중 오류 발생
          // e.error_code - 부트페이 오류 코드
          // e.pg_error_code - PG 오류 코드
          // e.message - 오류 내용
          console.log(error.message);
        }
      });
</script>- 이 과정까지 완료하면, 결제하기 버튼 클릭 시 결제 창이 뜨고,
결제 진행 시(결제 돼도 나중에 관리자 페이지에서 취소 가능함 걱정 ㄴㄴ),

- 이 화면이 나온다.
현재 결제 승인 로직을 작성하지 않았기 때문에 계속 로딩만 된다. - 현재 response 변수에는
{
  "event": "confirm",
  "receipt_id": "63057b73cc125a00171ac13d",
  "gateway_url": "https://gw.bootpay.co.kr",
  "order_id": "1661303666911"
}- 이런 형태의 데이터가 들어가 있다. 저기 있는 receipt_id가 승인 전 임시로 작성된 영수증이고,
우리는 저 id를 기반으로 백엔드에서 영수증을 불러와, 비교하고, 승인하거나 취소(미승인) 할 것이다.
2. 주문 데이터 저장
receipt_id를 서버로 넘겨주기 전, 혹시 Bootpay로 보낸 데이터가 조작되었을 가능성을 대비해
화면에서 데이터를 뽑아 order테이블에 먼저 저장하도록 하겠다.
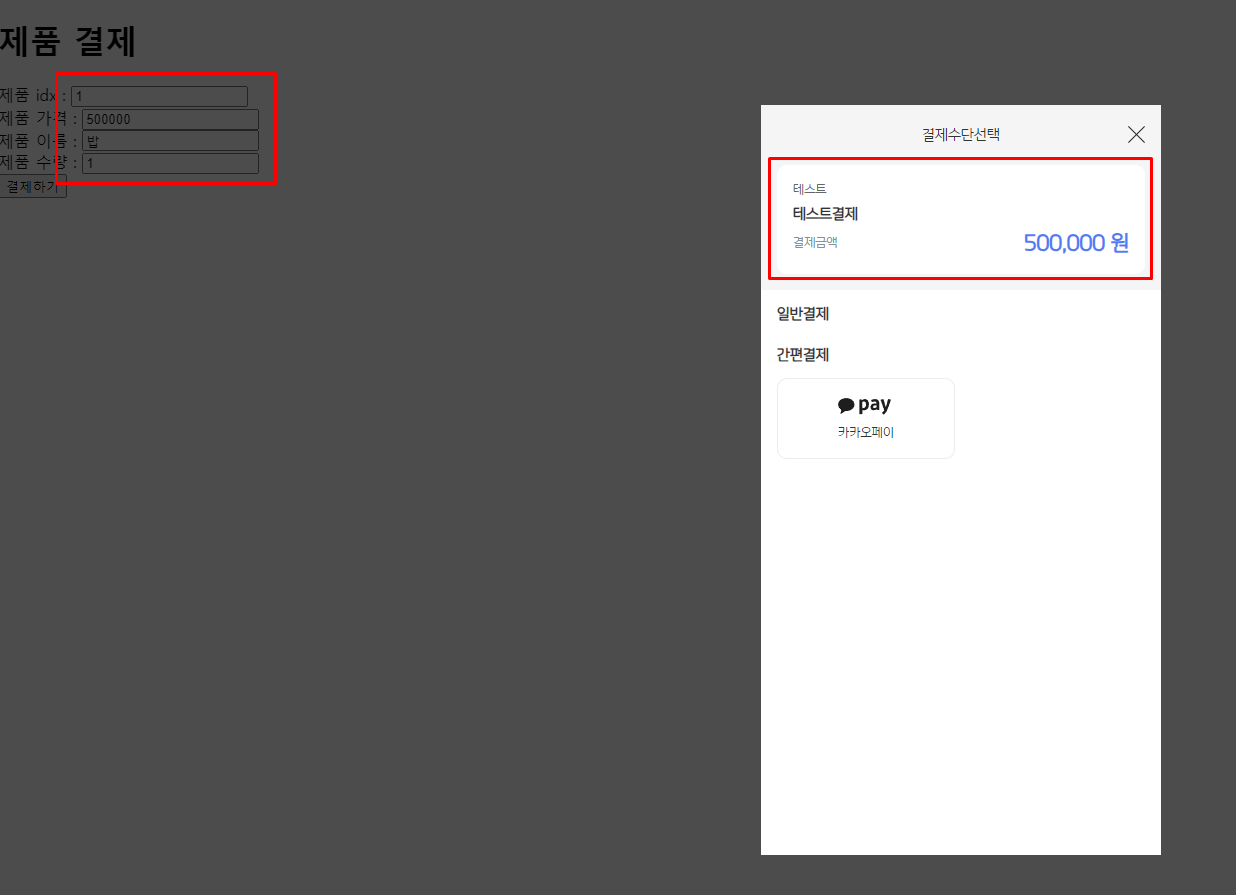
index.html - 주문 데이터 입력 폼 생성, 데이터 서버로 전달
입력 폼을 만들고
<body>
    <h1>제품 결제</h1>
    <span>제품 idx : </span><input type="number" id="item_idx"><br>
    <span>제품 가격 : </span><input type="number" id="item_price"><br>
    <span>제품 이름 : </span><input type="text" id="item_name"><br>
    <span>제품 수량 : </span><input type="number" id="item_amount"><br>
    <button id="paymentButton">결제하기</button>
</body>
Js로 dto를 만들어 넘겨준다.
document
  .getElementById("paymentButton")
  .addEventListener("click", async function () {
  saveOrderDto = {
    item: {
      itemIdx: document.querySelector("#item_idx").value,
      itemPrice: document.querySelector("#item_price").value,
      itemName: document.querySelector("#item_name").value,
      itemAmount: document.querySelector("#item_amount").value,
    },
  };

  var orderIdx;
  await fetch("/api/v1/order", {
    method: "POST",
    headers: {
      "Content-type": "application/json",
    },
    body: JSON.stringify(saveOrderDto),
  })
    .then((response) => response.json())
    .then((data) => {
    if (data.code == 0) {
      // 성공적으로 DB에 저장되었다면, orderIdx를 data로 반환한다.
      orderIdx = data.data;
    } else {
      console.log(data.message);
    }
  })
    .catch((error) => {
    // 오류 처리
    console.error("Error:", error);
  });

  // 부트페이 결제 로직
  try {
ResponseDTO.java
응답 데이터를 구조화함.
package com.example.bootpayvelog.common.dto;

import lombok.AllArgsConstructor;
import lombok.Builder;
import lombok.Getter;
import lombok.NoArgsConstructor;

@NoArgsConstructor
@AllArgsConstructor
@Builder
@Getter
// 메세지와 코드를 같이 보내기 위해 사용
public class ResponseDTO<T> {
    private Integer code;
    private String message;
    private T data;
}
OrderEntity.java - 테이블(엔티티) 생성
주문 정보를 저장할 테이블(엔티티)를 만들고
package com.example.bootpayvelog.model.order.entity;

import jakarta.persistence.Column;
import jakarta.persistence.Entity;
import jakarta.persistence.GeneratedValue;
import jakarta.persistence.GenerationType;
import jakarta.persistence.Id;
import jakarta.persistence.Table;
import lombok.AllArgsConstructor;
import lombok.Builder;
import lombok.Getter;
import lombok.NoArgsConstructor;
import lombok.Setter;

@Entity
@Table(name= "`ORDER`")
@Getter
@Setter
@Builder
@NoArgsConstructor
@AllArgsConstructor
public class OrderEntity {

    @Id
    @GeneratedValue(strategy = GenerationType.IDENTITY)
    @Column(name = "idx", nullable = false, unique = true)
    private Long idx;

    @Column(name = "item_idx", nullable = false, unique = false)
    private Long itemIdx;

    @Column(name = "item_name", nullable = false, unique = false)
    private String itemName;

    @Column(name = "item_amount", nullable = false, unique = false)
    private Long itemAmount;

    @Column(name = "item_price", nullable = false, unique = false)
    private Long itemPrice;

    @Column(name = "order_status", nullable = false, unique = false)
    private String orderStatus;
}
OrderRepository.java - JpaRepository 생성
Repository도 생성
package com.example.bootpayvelog.model.order.repository;

import java.util.Optional;

import org.springframework.data.jpa.repository.JpaRepository;
import org.springframework.stereotype.Repository;

import com.example.bootpayvelog.model.order.entity.OrderEntity;


@Repository
public interface OrderRepository extends JpaRepository<OrderEntity, Long> {
    // 나중에 orderIdx로 DB에서 검색하기 위함
    Optional<OrderEntity> findByIdx(Long orderIdx);
}
ReqOrderSaveDTO.java - 주문 DB 저장 요청 시 받을 데이터 형식
아까 프론트에서 만들어준 dto와 같은 형식으로 DTO 만들어주기. 변수 이름이 전부 똑같아야 함(클래스 이름은 상관X).
Validation도 해준다.
package com.example.bootpayvelog.domain.order.dto;

import jakarta.validation.Valid;
import jakarta.validation.constraints.NotNull;
import lombok.AllArgsConstructor;
import lombok.Builder;
import lombok.Getter;
import lombok.NoArgsConstructor;

@NoArgsConstructor
@AllArgsConstructor
@Getter
@Builder
public class ReqOrderSaveDTO {

    @NotNull(message = "item 정보가 없습니다.")
    private Item item;

    @Valid
    @NoArgsConstructor
    @AllArgsConstructor
    @Getter
    @Builder
    public static class Item{
        @NotNull(message = "itemIdx가 잘못되었습니다.")
        private Long itemIdx;
        @NotNull(message = "itemPirce가 잘못되었습니다.")
        private Long itemPrice;
        @NotNull(message = "itemName이 잘못되었습니다.")
        private String itemName;
        @NotNull(message = "itemAmount가 잘못되었습니다.")
        private Long itemAmount;
    }
}
OrderControllerApiV1.java - 주문 컨트롤러
주문과 관련된 요청을 매핑을 컨트롤러를 생성한다.
package com.example.bootpayvelog.domain.order.controller;

import org.springframework.beans.factory.annotation.Autowired;
import org.springframework.http.ResponseEntity;
import org.springframework.web.bind.annotation.PostMapping;
import org.springframework.web.bind.annotation.RequestBody;
import org.springframework.web.bind.annotation.RequestMapping;
import org.springframework.web.bind.annotation.RestController;

import com.example.bootpayvelog.domain.order.dto.ReqOrderSaveDTO;
import com.example.bootpayvelog.domain.order.service.OrderServiceApiV1;

import jakarta.validation.Valid;

@RestController
@RequestMapping("/api/v1/order")
public class OrderControllerApiV1 {

    @Autowired
    private OrderServiceApiV1 orderServiceApiV1;

    @PostMapping()
    public ResponseEntity<?> saveOrder(@Valid @RequestBody ReqOrderSaveDTO dto){
        return orderServiceApiV1.saveOrder(dto);
    }
}
OrderServiceApiV1.java - 주문 서비스
DB에 주문 정보를 저장하기 위한 로직을 작성한다.
package com.example.bootpayvelog.domain.order.service;

import org.springframework.beans.factory.annotation.Autowired;
import org.springframework.http.HttpStatus;
import org.springframework.http.ResponseEntity;
import org.springframework.stereotype.Service;

import com.example.bootpayvelog.common.dto.ResponseDTO;
import com.example.bootpayvelog.domain.order.dto.ReqOrderSaveDTO;
import com.example.bootpayvelog.model.order.entity.OrderEntity;
import com.example.bootpayvelog.model.order.repository.OrderRepository;

import jakarta.transaction.Transactional;

@Service
public class OrderServiceApiV1 {

    @Autowired
    private OrderRepository orderRepository;

    @Transactional
    public ResponseEntity<?> saveOrder(ReqOrderSaveDTO dto){

        // 엔티티를 만들고,
        OrderEntity entityForSaving = OrderEntity.builder()
        .itemIdx(dto.getItem().getItemIdx())
        .itemPrice(dto.getItem().getItemPrice())
        .itemName(dto.getItem().getItemName())
        .itemAmount(dto.getItem().getItemAmount())
        .build();

        // DB에 저장한다.
        // 이 때 entity에는 DB에 저장된 entity 정보가 들어감(idx가 자동 생성된 데이터)
        OrderEntity entity = orderRepository.save(entityForSaving);

        // 저장이 성공했음을 알리는 code와 message,
        // data에 위에서 저장한 entity의 idx를 넘겨준다.
        return new ResponseEntity<>(
                ResponseDTO.builder()
                        .code(0)
                        .message("주문 저장 성공")
                        .data(entity.getIdx())
                        .build(),
                HttpStatus.OK);
    }
}- 이제 결제 버튼을 눌러서 실제로 DB에 저장되는 지 보자.

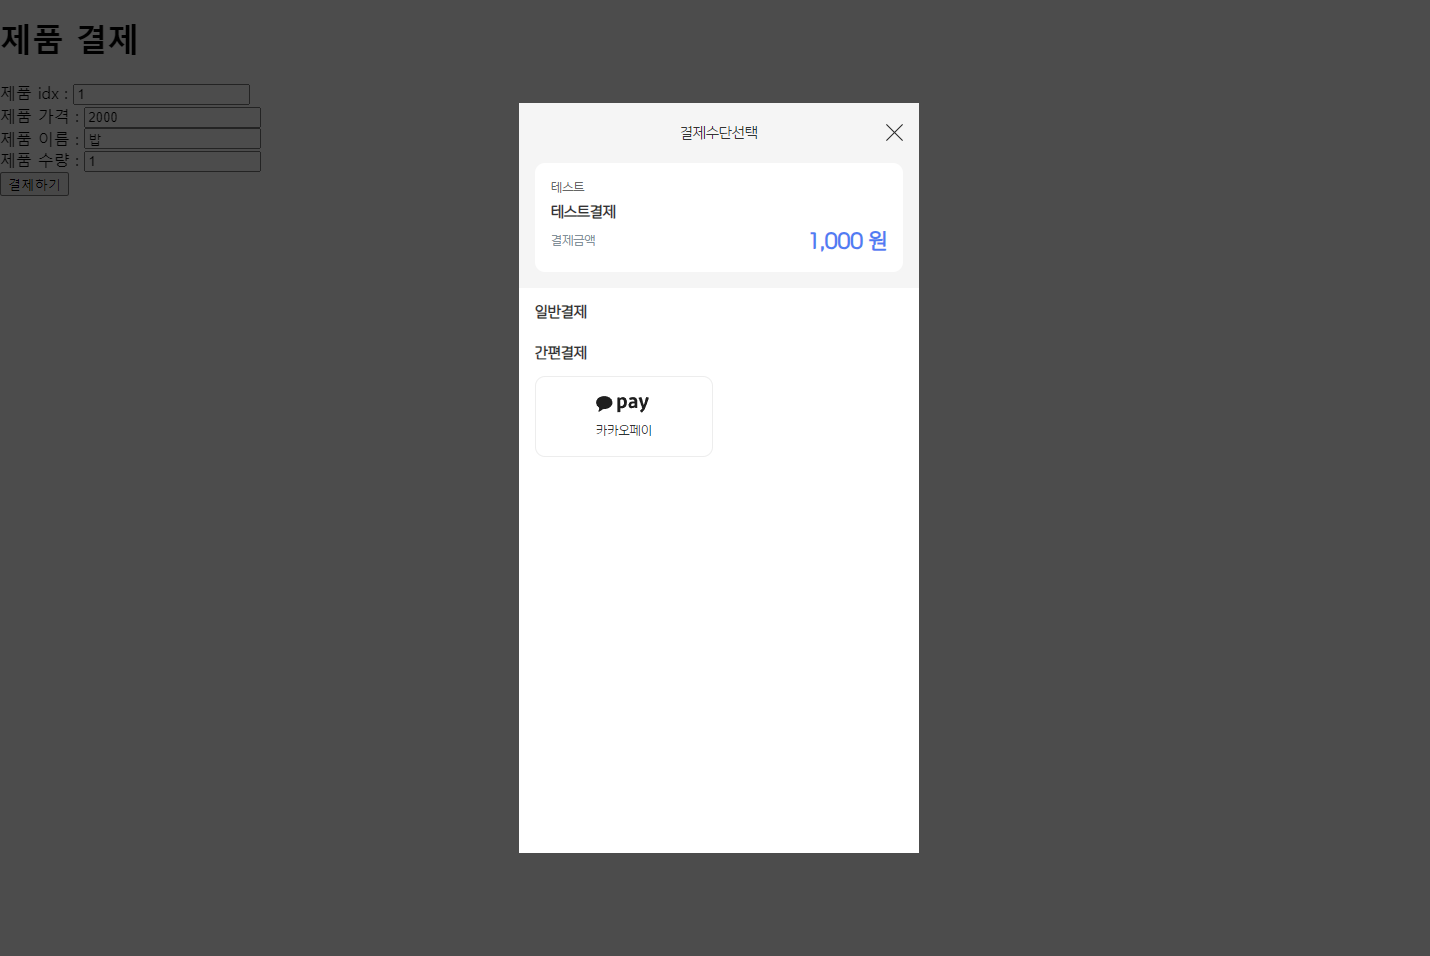
- 결제창이 정상적으로 뜬다.
새 탭을 열어 주소창에서 h2 콘솔로 들어가보자.
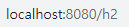
- 사진과 입력되어있는 정보가 다를 수 있다. yml이나 다른 설정들이 다르게 되어있으면 그것대로 하면 되고, yml을 똑같이 복사했다면 사진과 같이 맞춰주면 된다.
들어간 후,
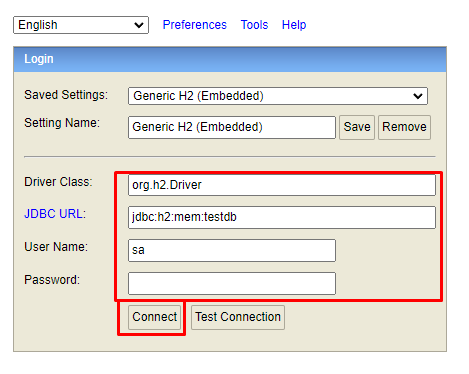
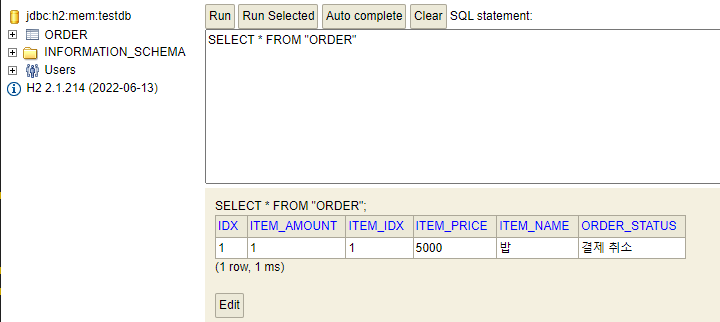
- ORDER 테이블이 정상적으로 생성되어 있고, 테이블 클릭 후 Run버튼 클릭 시 테이블 정보가 보인다.
잘 들어가 있는 걸 확인할 수 있다.
3. index.html - requestData 수정
index에서 우리가 값을 입력 받았으니, 해당 값을 부트페이 서버로 전달해보자.
const requestData = {
            // apikey
            application_id: "",
            // 가격 수정
            price: saveOrderDto.item.itemPrice,
            order_name: "테스트결제",
  		    // order테이블에서 받아온 idx 값을 넣는다.
            order_id: orderIdx,
            // 아래의 두 속성 지정하지 않을 시 통합 결제
            //   pg: "카카오",
            //   method: "간편",
            tax_free: 0,
            user: {
              id: "회원아이디",
              username: "회원이름",
              phone: "01000000000",
              email: "test@test.com",
            },
            items: [
              {
                id: "item_id",
                name: "테스트아이템",
                qty: 1,
                // 가격 수정
                price: saveOrderDto.item.itemPrice,
              },
            ],
            extra: {
              open_type: "popup",
              popup: {
                width: 800,
                height: 600,
              },
              card_quota: "0,2,3",
              escrow: false,
              separately_confirmed: true,
            },
};- 이제 입력한 가격으로 결제창이 뜰 것이다.
4. 백엔드에서 Bootpay 조회 / 승인 / 취소(미승인) 처리
index.html - 서버로 receipt_id 보내기
이제 사용자가 해당 가격으로 결제를 진행 시, 아까 설명했던 구조대로 데이터가 날아온다.
해당 데이터에서 receipt_id를 추출해서, 서버로 보낸다.
switch (response.event) {
            case "issued":
              // 가상계좌 입금 완료 처리
              break;
            case "confirm":
              // receipt_id를 dto에 담아서
              const dto = {
                receiptId: response.receipt_id,
              };

              //  '/api/v1/bootpay/check' 로 보낸다. (구현 예정)
              fetch("/api/v1/bootpay/check", {
                method: "POST",
                headers: {
                  "Content-type": "application/json",
                },
                body: JSON.stringify(dto),
              })
                .then((res) => res.json())
                .then((result) => {
                  // 정상적으로 처리되었는지 메시지를 띄운다.
                  // 정상적으로 승인이 되면 코드에 0을 반환할 것이고,
                  if (result.code === 0) {
                    // 결제창을 닫는다.
                    Bootpay.destroy();
                    alert(result.message);

                    // 아니라면 다른 숫자가 반환된다.
                  } else {
                    alert(result.message);
                  }
                  location.replace("/");
                })
                .catch((err) => {
                  console.error(err);
                });
              break;
            case "done":
              // 결제 완료 처리
              alert("결제 done");
            case "cancel":
              // 결제 취소 처리
              alert("결제 cancel");
            default:
              break;
          }
ReqBootpayConfirmDTO.java - receipt_id를 받기 위한 DTO
DTO를 만들 필요가 있나 싶지만 일단 만들었다.
package com.example.bootpayvelog.domain.bootpay.dto;

import jakarta.validation.constraints.NotNull;
import lombok.AllArgsConstructor;
import lombok.Builder;
import lombok.Getter;
import lombok.NoArgsConstructor;

@NoArgsConstructor
@AllArgsConstructor
@Getter
@Builder
public class ReqBootpayConfirmDTO {
    @NotNull(message = "receiptId가 없습니다.")
    private String receiptId;
}
BootpayControllerApiV1.java - 부트페이 서비스 요청 컨트롤러
package com.example.bootpayvelog.domain.bootpay.controller;

import org.springframework.beans.factory.annotation.Autowired;
import org.springframework.http.ResponseEntity;
import org.springframework.web.bind.annotation.PostMapping;
import org.springframework.web.bind.annotation.RequestBody;
import org.springframework.web.bind.annotation.RequestMapping;
import org.springframework.web.bind.annotation.RestController;

import com.example.bootpayvelog.domain.bootpay.dto.ReqBootpayConfirmDTO;
import com.example.bootpayvelog.domain.bootpay.service.BootpayServiceApiV1;

import jakarta.validation.Valid;

@RestController
@RequestMapping("/api/v1/bootpay")
public class BootpayCotnrollerApiV1 {

    @Autowired
    private BootpayServiceApiV1 bootpayServiceApiV1;

    @PostMapping("/check")
    public ResponseEntity<?> priceCheck(@Valid @RequestBody ReqBootpayConfirmDTO dto){
        return bootpayServiceApiV1.priceCheck(dto);
    }
}
BootpayServiceApiV1.java - 조회 / 승인 / 취소(미승인)
승인은 그냥 하면 되는데,
부트페이에서는 승인이 안 된 결제 건은 취소가 안되기 때문에,
취소가 아닌 승인 요청을 하지 않고, order테이블의 status에 취소되었다고 유지할 것이다.(물론 승인되면 승인으로)
그리고 각 코드들은 공식 문서에 가면 친절하게 설명되어 있다.
토큰 가져오기 / 조회 / 승인
토큰 가져오는 코드는 중복이라 뺐고, 조회와 승인도 추후에 다른 로직 구현시에도 쓰일 수 있을 듯 싶어 각각 함수로 만들었다.
그리고 승인 시엔 order테이블의 정보를 바꾼다.(status column)
package com.example.bootpayvelog.domain.bootpay.service;

import java.util.HashMap;
import java.util.Optional;

import org.springframework.beans.factory.annotation.Autowired;
import org.springframework.http.ResponseEntity;
import org.springframework.stereotype.Service;

import com.example.bootpayvelog.domain.bootpay.dto.ReqBootpayConfirmDTO;
import com.example.bootpayvelog.model.order.entity.OrderEntity;
import com.example.bootpayvelog.model.order.repository.OrderRepository;

import jakarta.transaction.Transactional;
import kr.co.bootpay.Bootpay;

@Service
public class BootpayServiceApiV1 {

    @Autowired
    private OrderRepository orderRepository;

    private Bootpay bootpay;

    // 부트페이 서버에서 토큰을 가져올 수 있는지 확인.
    // 중복되는 코드라 빼봤습니다.
    // 당연히 키 넣어줘야 함.
    public void getBootpayToken() {
        try {
            bootpay = new Bootpay("rest api key", "private key");
            HashMap token = bootpay.getAccessToken();
            if (token.get("error_code") != null) { // failed
                System.out.println("getAccessToken false: " + token);
                return;
            }
        } catch (Exception e) {
            e.printStackTrace();
        }
    }

    // 단건 조회
    public HashMap getBootpayReceipt(String receiptId) {
        try {
            getBootpayToken();
            HashMap res = bootpay.getReceipt(receiptId);
            if (res.get("error_code") == null) { // success
                System.out.println("getReceipt success: " + res);
            } else {
                System.out.println("getReceipt false: " + res);
            }
            return res;
        } catch (Exception e) {
            e.printStackTrace();
            return null;
        }

    }

    // 결제 승인
    @Transactional
    public HashMap confirm(String receiptId){
        try {
            getBootpayToken();
            HashMap res = bootpay.confirm(receiptId);
            if(res.get("error_code") == null) { //success
                System.out.println("confirm success: " + res);

                // order테이블의 status column 데이터를 바꿔준다.
                Long orderIdx = Long.valueOf(res.get("order_id").toString());
                Optional<OrderEntity> orderEntityOptional = orderRepository.findByIdx(orderIdx);
                if(!orderEntityOptional.isPresent()){
                    System.out.println("주문 번호에 해당하는 주문 정보가 없음.");
                    return null;
                }
                OrderEntity orderEntity = orderEntityOptional.get();
                orderEntity.setOrderStatus("결제 승인");

            } else {
                System.out.println("confirm false: " + res);
            }
            return res;
        } catch (Exception e) {
            e.printStackTrace();
            return null;
        }
    }


    public ResponseEntity<?> priceCheck(ReqBootpayConfirmDTO dto) {
        // 여기 메인 로직 구현 예정
        getBootpayReceipt(dto.getReceiptId());
        confirm(dto.getReceiptId());
        return null;
    }
}
- 여기까지 하고 실행 후 결제하면, 터미널에 로그가 뜬다.
참고로 데이터 구조는 hashmap이다.
단건 조회 성공
getReceipt success: {cancelled_price=0, metadata={}, cancelled_tax_free=0, method=카카오페이, gateway_url=https://gw.bootpay.co.kr, sandbox=true, receipt_id=651bb07800c78a00229948dd, method_origin=카카오페이, order_name=테스트결제, method_origin_symbol=kakaopay, method_symbol=kakaopay, tax_free=0, price=2000, company_name=테스트, pg=나이스페이먼츠, status_locale=입금/승인대기, currency=KRW, http_status=200, order_id=2, requested_at=2023-10-03T15:11:04+09:00, status=2}Receipt Details:
- Receipt ID: 651bb07800c78a00229948dd
- Order ID: 2
- Order Name: 테스트결제
- Company Name: 테스트
- Payment Method: 카카오페이
- Payment Method Symbol: kakaopay
- Payment Method Origin: 카카오페이
- Payment Method Origin Symbol: kakaopay
- Payment Gateway URL: https://gw.bootpay.co.kr
- Payment Gateway Sandbox: true
- Payment PG: 나이스페이먼츠
- Currency: KRW
- Price: 2000
- Tax Free Amount: 0
- Cancelled Price: 0
- Cancelled Tax Free Amount: 0
- Status: 입금/승인대기
- HTTP Status: 200
- Requested At: 2023-10-03T15:11:04+09:00
- Metadata: {}
결제 승인 성공
confirm success: {cancelled_price=0, kakao_money_data={tid=nickakao1m01012310031511231870, cancel_tid=null}, metadata={}, cancelled_tax_free=0, method=카카오머니, gateway_url=https://gw.bootpay.co.kr, sandbox=true, receipt_id=651bb07800c78a00229948dd, method_origin=카카오페이, order_name=테스트결제, method_origin_symbol=kakaopay, receipt_url=https://door.bootpay.co.kr/receipt/UnRiMnc0aitmSkFkRGY0ME5FczN5N2dMeGlEQjBSUGJ5cUtLWWNENTBpa3JQ%0AZz09LS1NdEtlYitVMUd0VTlYSm1OLS1xcExKZXM1S1l1cU9wTDlpNTdjbTZR%0APT0%3D%0A, method_symbol=kakao_money, purchased_at=2023-10-03T15:11:24+09:00, tax_free=0, price=2000, company_name=테스트, pg=나이스페이
먼츠, status_locale=결제완료, currency=KRW, http_status=200, order_id=2, requested_at=2023-10-03T15:11:04+09:00, status=1}
Confirmation Details:
- Receipt ID: 651bb07800c78a00229948dd
- Order ID: 2
- Order Name: 테스트결제
- Company Name: 테스트
- Payment Method: 카카오머니
- Payment Method Symbol: kakao_money
- Payment Method Origin: 카카오페이
- Payment Method Origin Symbol: kakaopay
- Payment Gateway URL: https://gw.bootpay.co.kr
- Payment Gateway Sandbox: true
- Payment PG: 나이스페이먼츠
- Currency: KRW
- Price: 2000
- Tax Free Amount: 0
- Cancelled Price: 0
- Cancelled Tax Free Amount: 0
- Status: 결제완료
- HTTP Status: 200
- Requested At: 2023-10-03T15:11:04+09:00
- Purchased At: 2023-10-03T15:11:24+09:00
- Receipt URL: https://door.bootpay.co.kr/receipt/UnRiMnc0aitmSkFkRGY0ME5FczN5N2dMeGlEQjBSUGJ5cUtLWWNENTBpa3JQ%0AZz09LS1NdEtlYitVM1G0VTlYSm1OLS1xcExKZXM1S1l1cU9wTDlpNTdjbTZR%0A
- Kakao Money Data: {tid=nickakao1m01012310031511231870, cancel_tid=null}
- Metadata: {}
취소(미승인)
이제 priceCheck 함수에 값을 검토하는 로직을 구현한다.
@Transactional
public ResponseEntity<?> priceCheck(ReqBootpayConfirmDTO dto) {
// 조회해서 영수증 받아오기
HashMap res = getBootpayReceipt(dto.getReceiptId());
// 영수증의 price와 order table의 price 가져오기
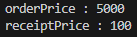
Long receiptPrice = Long.valueOf(res.get("price").toString());
Optional<OrderEntity> orderEntityOptional = orderRepository.findByIdx(Long.valueOf(res.get("order_id").toString()));
// order 테이블에 해당 정보가 있는 지 확인
if(!orderEntityOptional.isPresent()){
return new ResponseEntity<>(
ResponseDTO.builder()
.code(1)
.message("해당 주문이 존재하지 않습니다.")
.build(),
HttpStatus.BAD_REQUEST);
}
OrderEntity entity = orderEntityOptional.get();
Long orderPrice = entity.getItemPrice();
// 두 값이 같으면
// Long은 equals로 비교해야 정확히 비교가 되더라.
if(receiptPrice.equals(orderPrice)){
// confirm()
HashMap resData = confirm(dto.getReceiptId());
return new ResponseEntity<>(
ResponseDTO.builder()
.code(0)
.message("결제 승인")
.data(resData)
.build(),
HttpStatus.OK);
}
// 아니면
else {
// order table에 status를 취소 상태로
entity.setOrderStatus("결제 취소");
return new ResponseEntity<>(
ResponseDTO.builder()
.code(2)
.message("결제가 취소되었습니다.")
.build(),
HttpStatus.BAD_REQUEST);
}
}- 여기까지 됐으면 결제가 정상적으로 처리될 때는 order 테이블에 status가 결제 승인으로 바뀔 것이다.
하지만 취소되는 상황, 즉 requestPayment 요청시의 데이터가 조작되었을 시를 가정해보자.
취소 테스트
index.html의 스크립트 부분에 코드를 살짝 바꾼다.
const requestData = {
            // apikey
            application_id: "",
            // 가격 수정
            price: 100,
            order_name: "테스트결제",
            // order테이블에서 받아온 idx 값을 넣는다.
            order_id: orderIdx,
            // 아래의 두 속성 지정하지 않을 시 통합 결제
            //   pg: "카카오",
            //   method: "간편",
            tax_free: 0,
            user: {
              id: "회원아이디",
              username: "회원이름",
              phone: "01000000000",
              email: "test@test.com",
            },
            items: [
              {
                id: "item_id",
                name: "테스트아이템",
                qty: 1,
                // 가격 수정
                price: 100,
              },
            ],
            extra: {
              open_type: "popup", // 팝업 형태로 결제 창 열기
              popup: {
                width: 800, // 팝업 창의 너비 (픽셀)
                height: 600, // 팝업 창의 높이 (픽셀)
              },
              card_quota: "0,2,3",
              escrow: false,
              separately_confirmed: true, // 승인 전 로직 필요할 시
            },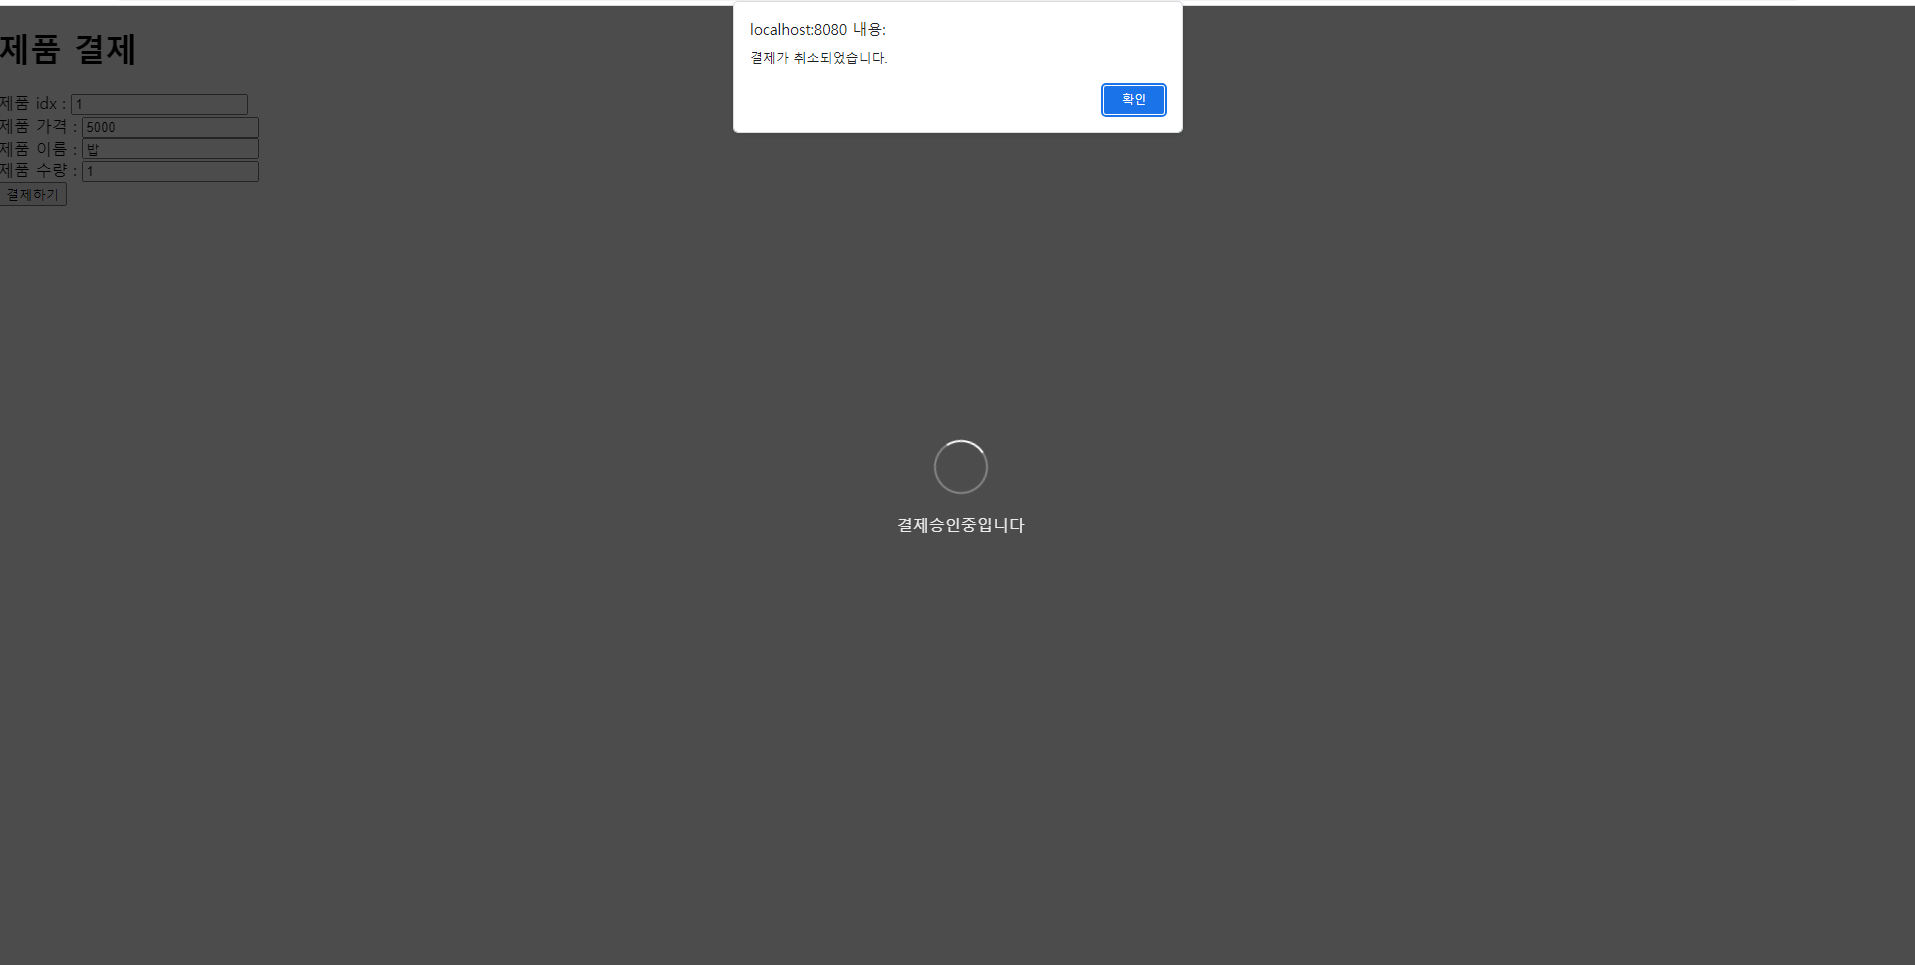
};- price들을 전부 다 100원으로 바꿔서 결제를 하려고 시도하면,

- 5000원을 입력했지만 100원 결제창이 떠버린다.
이대로 결제를 한다면? 카카오페이에서도 100원만 결제된다.
하지만 priceCheck의 로직이 둘의 값을 비교하여,
- 값이 다르므로 결제 승인 로직으로 넘어가지 않고, 취소가 된다.
마무리
- 나중에 좀 더 세부적인 취소 사유를 추가할 수도 있겠다.
- JS를 저렇게 조작할 수 있다고 들어서 check 로직을 넣었지만, 어떻게 조작한다는 건지는 모르겠다.
- 깃허브 주소 https://github.com/dbtmdgks7897/bootpay-velog
