<학습 내용>
사용자 함수
인수와 매개변수
데이터 반환 return
지역변수와 전역변수
중첩함수
Lambda 함수
모듈
패키지
객체지향 프로그래밍
클래스와 객체
함수란
input → calculation → output
# 사용자 함수의 선언
def add_func(x, y):    # 매개변수
    return x + y     # 함수의 연산
		print(add_func(100, 1))
내장함수 vs 사용자함수
내장함수 예시
- numbers.sort()
- numbers.reverse()
- numbers.clear()
함수의 명명은 동사형으로 알아보기 쉽게 (code convention)
선언(define)만 하면 코드가 실행되지 않음. 호출(call)해야 실행됨.
# 함수 호출
function_name(parameter1, parameter2)    # parameter number, type depends on function
함수 내에서 다른 함수 호출도 가능
- 이때, 함수1 실행 도중 함수2 실행 후 함수1의 나머지 구문 실행
- 무한반복 되지 않도록 주의!
인수와 매개변수
- 인수(argument)는 함수가 호출될 때 전달되는 값
- 매개변수(parameter)는 함수를 정의할 때 인수를 받아들이기 위해 선언된 변수
즉, 함수에서 input 값은 인수로, 매개변수로 들어간다.
따라서 인수와 매개변수의 숫자가 동일해야 함.
매개변수 개수가 미정일 때 ‘*’를 이용 (반복 개체로 사용) → tuple 형태로 데이터 저장
# if parameter number is not defined
def parameter_function(*numbers): # data is input as 'tuple'
pass- 튜플(tuple)은 프로그래밍에서 여러 개의 데이터를 한 번에 묶어서 표현하는 자료형입니다. 튜플은 변경이 불가능하며, 괄호로 묶어서 사용합니다.
- matlab의 cell과 비슷한 개념인듯?
데이터 반환
- return 키워드의 사용
- 사용예: 함수의 실행결과를 새로운 변수에 넣을 때
- return을 만나면 함수는 종료됨.
# 인수가 짝수인지 홀수인지 결과 보고

def odd_even(n):
    if n % 2 == 0:
        return "EVEN"
    else:
        return "ODD"
		print("this argument will not be printed.")

input_number = int(input("enter a number: "))
result = odd_even(input_number)
print(f'{input_number} is a(n) {result} number.')
# Create a function that imports a random number from 1 to 100
# Return value if it is Odd number.
import random
def random_odd():
while True:
ranNum = random.randint(1,100)
if ranNum % 2 != 0:
break
return ranNum
number = random_odd()
print(f'random odd number: {number}')지역변수와 전역변수: 변수의 scope에 의한 차이
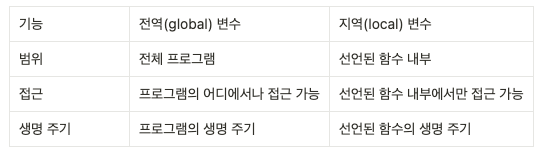
전역변수(global variable)는 프로그램 전체에서 접근 가능한 변수를 말하며, 지역변수(local variable)는 특정한 블록 안에서만 접근 가능한 변수를 말합니다.
전역변수는 프로그램 전체에서 접근 가능한 변수를 말합니다. 이 변수는 함수 내에서도 사용이 가능합니다. 하지만, 전역변수를 남용하면 코드의 가독성이 떨어지고 오류가 발생할 가능성도 높아집니다. 전역변수는 프로그램 규모가 작을 때는 괜찮지만, 규모가 커질수록 지역변수를 사용하는 것이 좋습니다.
반면, 지역변수는 특정한 블록 안에서만 접근 가능한 변수를 말합니다. 함수 내에서 선언된 변수가 대표적인 지역변수입니다. 이 변수는 함수 내에서만 사용이 가능하며, 함수가 종료되면 메모리에서 사라집니다. 지역변수는 전역변수와 달리 가독성과 유지보수에 좋습니다. 함수 내에서만 사용되므로 다른 함수에서 변수명이 중복되어 발생하는 오류도 방지할 수 있습니다.
따라서, 변수를 사용할 때는 변수의 범위를 고려하여 전역변수와 지역변수를 적절히 사용해야 합니다.
my_variable = "This is a global variable."

def my_function():
    print(my_variable)

my_function()
def my_function():
local_variable = "This is a local variable."
print(local_variable)
my_function()
my_variable = "This is a global variable"
def my_function():
		global my_variable # 함수 안에서 전역변수를 수정하고 싶을 때
		my_variable = "Still a global variable, but mutable inside a function."
    print(my_variable)

my_function()
print(my_variable) # These two print the same result.- 전역 변수를 함수 안에서 변경하고 싶을 때 ‘global’ 함수를 쓸 수 있다.
중첩함수
- 내부함수는 외부함수 밖에서는 호출할 수 없다.
# Calculator function that contains embedded calculation functions

def calculator(x, y, oper):
    def cal_add():
        result = x + y
        print(f'{x} + {y} = {result}')

    def cal_sub():
        result = x - y
        print(f'{x} - {y} = {result}')

    def cal_mult():
        result = x * y
        print(f'{x} * {y} = {result}')

    def cal_div():
        result = x / y
        print(f'{x} / {y} = {result}')

    if oper == 1:
        cal_add()
    elif oper == 2:
        cal_sub()
    elif oper == 3:
        cal_mult()
    elif oper == 4:
        cal_div()

# 실행문
while True:
    num1 = float(input('enter first number: '))
    num2 = float(input('enter second number: '))
    oper_num = int(input('1=plus, 2=minus, 3=times, 4=divide, 5=quit'))

    if oper_num == 5:
        print("Good bye.")
        break

    calculator(num1, num2, oper_num)
위 코드를 조금 변형해서, 각 중첩 함수의 결과 값을 상위 함수에서 저장하기(아래 코드)
# Calculator function that contains embedded calculation functions

def calculator(x, y, oper):
    def cal_add():
        result = x + y
        print(f'{x} + {y} = {result}')
        return result

    def cal_sub():
        result = x - y
        print(f'{x} - {y} = {result}')
        return result

    def cal_mult():
        result = x * y
        print(f'{x} * {y} = {result}')
        return result

    def cal_div():
        result = x / y
        print(f'{x} / {y} = {result}')
        return result

    if oper == 1:
        result = (cal_add())
    elif oper == 2:
        result = (cal_sub())
    elif oper == 3:
        result = (cal_mult())
    elif oper == 4:
        result = (cal_div())

    print('result of calculation is: {}' .format(result))

# 실행문
while True:
    num1 = float(input('enter first number: '))
    num2 = float(input('enter second number: '))
    oper_num = int(input('1=plus, 2=minus, 3=times, 4=divide, 5=quit'))

    if oper_num == 5:
        print("Good bye.")
        break

    calculator(num1, num2, oper_num)
lambda 키워드
람다 키워드는 익명 함수를 생성하는 기능으로, 함수형 프로그래밍에서 사용됩니다.
- 간단한 함수는 코드를 간결하게 하여 사용 가능
# lambda function
print(lambda x, y: x + y)(10, 20)
람다 함수 응용 (아래)
# 짝수를 출력하는 람다 함수
numbers = [1, 2, 3, 4, 5, 6, 7, 8, 9, 10]
even_numbers = list(filter(lambda x: x % 2 == 0, numbers))
print(even_numbers)
람다 응용2 (출처: https://www.freecodecamp.org/news/lambda-function-in-python-example-syntax/)
# 리스트 내의 값을 map 함수를 이용해서 2배씩 곱하는 람다 함수
my_list = [1, 2, 3, 4, 5, 6]
new_list = list(map(lambda x: x*2, my_list))
print(new_list) # [2, 4, 6, 8, 10, 12]
람다 함수를 사용하는 것의 이점은 다음과 같습니다:
- 짧고 간결합니다.
- 다른 함수의 인수로 사용할 수 있습니다.
- 익명 함수를 만들 수 있습니다.
람다 함수를 사용하는 것의 단점은 다음과 같습니다:
- 독립적인 함수로 사용할 수 없습니다.
- 읽고 이해하기 어려울 수 있습니다.
모듈 module
함수가 선언되어 있는 파이썬 파일 (계산 모듈, 난수 모듈, 날짜/시간 모듈 등)
파이썬 모듈은 파이썬 코드, 함수 정의, 문장 또는 클래스가 포함된 파일입니다. 모듈에는 실행 가능한 코드도 포함될 수 있습니다. 관련된 코드를 모듈로 그룹화하면 코드를 이해하고 사용하기 쉬워집니다. 또한 코드를 논리적으로 구성할 수 있습니다.
Python에서 모듈을 사용하는 몇 가지 이점은 다음과 같습니다:
- 코드 재사용: 모듈은 다른 Python 프로그램에서 재사용할 수 있습니다.
- 코드 구성: 모듈은 코드를 논리적 단위로 구성하는 데 도움이 됩니다.
- 테스트: 모듈은 쉽게 격리해서 테스트할 수 있습니다.
- 문서화: 모듈은 쉽게 문서화할 수 있습니다.
Python에는 내장 모듈과 사용자 정의 모듈 두 가지 유형의 모듈이 있습니다.
- 내장 모듈: 이것들은 파이썬 인터프리터와 함께 제공되는 모듈입니다. 파일 I/O, 문자열 조작 및 수학 연산과 같은 다양한 기능을 제공합니다.
- 외장 모듈: 별도 설치 후 사용할 수 있는 모듈입니다. (Pandas, NumPy, etc.)
- 사용자 정의 모듈: 이것들은 사용자가 생성하는 모듈입니다. 사용자가 포함하려는 모든 코드를 포함할 수 있습니다.
모듈을 사용하려면 프로그램에 가져와야 합니다. 이를 수행하기 위해 import 문을 사용합니다. 예를 들어 math 모듈을 가져오려면 다음 코드를 사용합니다:
# 16의 제곱근 구하기
import math

sqrt_16 = math.sqrt(16)

print(sqrt_16)
실습: random 모듈의 sample 함수를 이용해서 0부터 100사이의 난수 10개 발생시키기.
# 0~100 중 10개의 난수 생성
import random

rNums = random.sample(range(0, 100), 10)
print(rNums)
모듈 직접 만들어 보기
로또 번호 생성기 (lotto.py)
# output 6 random numbers from 1 to 46

import random

def lotto():
    result = random.sample(range(1, 46), 6)

    return result
실행 파일 (lotto_execute.py)
# this file executes the lotto module.

import lotto # python file name

lotto_nums = lotto.lotto() # function name

print('lucky numbers: {}' .format(lotto_nums))
문자열 뒤집기 모듈
def reverse(str):
    reversed_str = ''
    for character in str:
        reversed_str = character + reversed_str
    return reversed_str
실행 파일
import reverseStr

string = 'hello'

result = reverseStr.reverse(string)
print(result)
모듈을 사용하는 다양한 방법
- import, from, as 키워드 사용법을 익혀보자.
- import는 이미 사용 중이므로 생략.
as 키워드
- 함수에 단축된 닉네임 설정하기 → 모듈명(=파이썬 파일명)이 길 때 사용할 수 있다.
from ~
- 모듈명을 생략하고 모듈 내의 특정 함수만을 사용하고 싶을 때
from calculator import add
from calculator import sub

# from 키워드를 사용하면 모듈명을 일일이 사용할 필요가 없다.
add(x, y)
sub(x, y)

# 또는
from calculator import add, sub, mul
add(x, y)
sub(x, y)
mul(x, y)- 이때 from import 되지 않은 함수 사용시 NameError이 발생한다.
from 키워드를 사용해서 모듈 내의 모든 함수를 쓰고 싶을 때:
from calculator import * # 모듈명 생략 후 모든 함수 사용 가능.예제: 시험점수를 입력하면 총점, 평균을 출력하는 모듈
# 1. addScore(): 점수 입력(리스트)
# 2. getScore(): 입력된 점수 list의 return
# 3. sumScore(): 입력된 점수의 합
# 4. avgScore(): 입력된 점수의 평균

scores = []

def addScore(score):
    scores.append(score)    # adds item into list

def getScore():
    return scores

def sumScore():
    total = 0
    for score in scores:
        total += score
    return total

def avgScore():
    avg = sumScore() / len(scores)
    return avg
실행 코드
from scores import *

korScore = int(input('enter Korean score: '))
engScore = int(input('enter English score: '))
mathScore = int(input('enter Math score: '))

addScore(korScore)
addScore(engScore)
addScore(mathScore)

print('scores: ', getScore())
print('sum: ', sumScore())
print('average: ', avgScore())전역변수name 을 이용한 실행파일 지정.
- name 에는 모듈 이름이 저장되거나 ‘main’이 저장된다(코드가 스크립트로 실행되는 경우, 또는 실행파일인 경우).
- 실행파일과 모듈을 구분할 수 있다. 프로그램이 여러 개의 모듈(파이썬 파일)로 구성되어 있을 때, name 전역변수를 통해 실행파일을 찾아 갈 수 있다. 예를 들어:
if __name__ == "__main__":
  print("This message is only printed when the module is run as a script.")
또한, 위 코드를 통해 해당 파일이 실행파일(main file)일 때에만 특정 기능이 실행되도록 할 수 있다.
name 전역변수를 이용한 실행파일 지정
(예제) 단위 환산 모듈: cm를 mm, inch, m, ft로 변환
# module file (unitConversion.py)

def cm_to_mm(n):
    return round(n * 10, 3)

def cm_to_inch(n):
    return round(n * 0.393, 3)

def cm_to_m(n):
    return round(n * 0.01, 3)

def cm_to_ft(n):
    return round(n * 0.032, 3)

if __name__ == '__main__':
    print('The following is executed as a main file.')
    cm = 10
    print(f'{cm_to_mm(cm)}mm')
    print(f'{cm_to_inch(cm)} inch')
    print(f'{cm_to_m(cm)}m')
    print(f'{cm_to_ft(cm)} feet')
# execution file
import unitConversion as uc
if __name__ == '__main__':
print('The following is executed as part of main function.')
inputNumber = int(input('Please enter a number in cm: '))
print(f'{inputNumber} in mm is: {uc.cm_to_mm(inputNumber)}')
print(f'{inputNumber} in inch is: {uc.cm_to_inch(inputNumber)}')
print(f'{inputNumber} in meter is: {uc.cm_to_m(inputNumber)}')
print(f'{inputNumber} in feet is: {uc.cm_to_ft(inputNumber)}')패키지
- 패키지는 모듈의 집합.
- 관련 있는 모듈을 하나의 그룹으로 관리할 수 있다.
- 패키지의 directory는 **init**.py 파일이 있다.
- 패키지의 초기화와 변수의 정의를 담당하는 파일.
- 환경 설정을 위한 파일
패키지의 장점
- 코드 구성: 패키지는 코드를 논리 단위로 구성하는 데 도움이 됩니다.
- 재사용성: 패키지는 다른 Python 프로그램에서 재사용할 수 있습니다.
- 문서화: 패키지는 쉽게 문서화할 수 있습니다.
- 배포: 패키지를 다른 사용자에게 쉽게 배포할 수 있습니다.
from my_package import my_module여기서 my_package는 모듈들이 위치한 디렉토리명입니다.
site-packages
- 이 디렉토리에 위치한 패키지는 어디서나 접근 가능합니다.
import sys   # 시스템에 대한 정보를 담은 모듈

for path in sys.path:   # 모듈의 경로를 가지고 있는 모듈
	print(path)    # 이 프로그램이 돌아가기 위해 참조하는 디렉토리의 나열.
이때 아래 output을 보면..
... /Documents/zerobase_dataschool/pythonex/project/**venv**/lib/python3.11/site-packages여기서 venv 는 virtual environment (가상 환경)을 의미합니다. 이 안에 사용되는 라이브러리들이 존재합니다.
Python에서 가상 환경은 서로 다른 Python 프로젝트와 해당 종속성을 격리하는 방법입니다. 이는 다음과 같은 여러 가지 이유로 유용합니다.
- 패키지 충돌 방지: 패키지를 설치하면 시스템 전체에 설치됩니다. 이것은 Python을 사용하는 다른 프로젝트도 해당 패키지에 액세스할 수 있음을 의미합니다. 두 프로젝트에 충돌하는 종속성이 있는 경우 문제가 발생할 수 있습니다. 가상 환경을 사용하면 프로젝트별 방식으로 패키지를 설치할 수 있으므로 다른 프로젝트와 충돌하지 않습니다.
- 다양한 버전의 Python 관리: Python은 지속적으로 발전하고 있으며 새 버전이 정기적으로 릴리스됩니다. 특정 버전의 Python이 필요한 프로젝트에서 작업하는 경우 가상 환경을 사용하여 해당 버전의 Python이 설치된 샌드박스를 만들 수 있습니다. 이렇게 하면 프로젝트를 손상시킬 수 있는 최신 버전의 Python을 실수로 설치하는 것을 방지할 수 있습니다.
- 프로젝트 공유를 더 쉽게 만들기: Python 프로젝트를 다른 사람과 공유하려는 경우 프로젝트와 함께 가상 환경을 쉽게 내보낼 수 있습니다. 이렇게 하면 문제 없이 다른 사람의 컴퓨터에서 프로젝트를 실행할 수 있습니다.
모든 디렉토리에서 접근가능한 범용환경인 셈.
패키지를 만들어서 venv 디렉토리로 옮기면 다른 파이썬 파일에서 해당 모듈을 사용할 수 있습니다.
자주 사용되는 모듈
- math
- random
- time
# math related functions

# sum
listVar = [1,2,3,4,5]
print(sum(listVar))

# max/min num
print(max(listVar))
print(min(listVar))

# power
print(pow(13, 2))

# round up
print(round(135.565656, 1))
print(round(135.565656, 2))
print(round(135.565656, 3))

import math

# absolute value
print(math.fabs(-10.111))

# round up
print(math.ceil(10.111))
print(math.ceil(-10.111))

# round down
print(math.floor(12.111))
print(math.floor(-12.111))

# truncate
print(math.trunc(-12.111))
print(math.trunc(12.111))

# greatest common denominator
print(math.gcd(14, 21))

# factorial
print(math.factorial(10))

# square root
print(math.sqrt(65))

# random related
import random

# 0이상 1미만 난수
print(f'random.random(): {random.random()}')

# 1이상 20이하 난수
print(f'random.randint(1, 20): {random.randint(1, 20)}')

# 1이상 20미만 난수
print(f'random.randrange(1, 20): {random.randrange(1, 20)}')

# 1이상 21미만 난수 5개
print(f'random.sample(range(1, 21), 5): {random.sample(range(1, 21), 5)}')

# 무작위 한개 추출
listVar = [0, 1, 2, 3, 4, 5, 6]
print(f'random.choice(listVar): {random.choice(listVar)}')

# 섞음
print(f'listVar: {listVar}')
random.shuffle(listVar)
print(f'shuffle listVar: {listVar}')

# time related
import time

# 시스템 시간
lt = time.localtime()
print(f'time.localtime(): {lt}')

print(f'lt.tm_year: {lt.tm_year}')
print(f'lt.tm_mon: {lt.tm_mon}')
print(f'lt.tm_mday: {lt.tm_mday}')
print(f'lt.tm_hour: {lt.tm_hour}')
print(f'lt.tm_min: {lt.tm_min}')
print(f'lt.tm_sec: {lt.tm_sec}')
print(f'lt.tm_wday: {lt.tm_wday}')
Object-oriented programming 객체지향 프로그래밍
- 객체(object)는 속성(attribute)과 기능(function)으로 구성되어 있습니다.
- 객체는 class에서 생성됩니다.
- 즉, 클래스가 더 상위 개념. 클래스가 1만 있어도 여러 개의 객체를 만들 수 있습니다. 붕어빵 틀만 있으면 붕어빵 여러개를 찍어낼 수 있는 것과 같이.
- OOP에서 클래스는 객체 생성을 위한 청사진 또는 템플릿 역할을 합니다. 해당 클래스의 개체가 소유하게 될 특성과 메서드를 정의합니다. 특성은 개체와 관련된 데이터이며 메서드는 개체에서 수행할 수 있는 작업 또는 동작을 정의합니다.
- 코드의 재사용/유지, 모듈화에 용이합니다.
- 배터리 교체가 가능한 전자제품과 같음.
- 서로 다른 경우에 같은 기능을 사용해야 할 때, 코드를 반복하기 보다는 클래스를 기반으로 새로운 객체를 생성해서 사용할 수 있어 효율적임.
클래스와 객체 생성
- 클래스 선언(class 키워드; 클래스명은 첫 글자를 대문자로)
- 생성자, 속성(init 메소드 내에 설정)
- 기능
클래스의 기본 구조는 아래와 같습니다.
class ClassName:
    def __init__(self, parameter1, parameter2, ...):
        # Constructor method
        # Initialize attributes

    def method1(self, parameter1, parameter2, ...):
        # Method definition

    def method2(self, parameter1, parameter2, ...):
        # Method definition

    # Additional methods and attributes

# Outside the class definition

# Create objects/instances of the class
object1 = ClassName(argument1, argument2, ...)
object2 = ClassName(argument1, argument2, ...)

# Access attributes and call methods of the objects
object1.method1(parameter1, parameter2, ...)
object2.method2(parameter1, parameter2, ...)- class 키워드는 새 클래스를 정의하는 데 사용됩니다. 클래스 이름(이 예에서는 ClassName)은 Python의 명명 규칙(일반적으로 CamelCase 사용)을 따라야 합니다.
- init 메서드는 생성자로 알려진 특수 메서드입니다. 클래스에서 객체가 생성될 때 호출됩니다. 객체의 속성을 초기화합니다. self 매개변수는 작성 중인 클래스의 인스턴스를 참조합니다.
- 생성자 다음에 클래스 내에서 추가 메서드를 정의할 수 있습니다. 메소드는 클래스에 속하는 함수이며 해당 속성에 대해 작동할 수 있습니다.
- 메서드 내에서 self 매개 변수는 메서드를 호출하는 클래스의 인스턴스를 참조하는 데 사용됩니다. 개체의 속성 및 메서드에 대한 액세스를 허용합니다.
- 클래스 정의 외부에서 마치 함수인 것처럼 클래스 이름을 호출하고 필요한 인수를 전달하여 클래스의 개체(인스턴스라고도 함)를 만들 수 있습니다. 이렇게 하면 클래스의 새 인스턴스가 생성됩니다.
- 객체가 있으면 속성에 액세스하고 점 표기법(예: object1.method1())을 사용하여 메서드를 호출할 수 있습니다.
자동차 예제
class Car:
    def __init__(self, col, len):
        self.color = col
        self.length = len

    def doStop(self):    # class 안에 있는 기능은 매개변수로 self를 받는다
        print('STOP')

    def doStart(self):    # class 안에 있는 기능은 매개변수로 self를 받는다
        print('START')

    def printCarInfo(self):
        print(f'self.color: {self.color}')
        print(f'self.length: {self.length}')

# 클래스를 선언한다고 객체가 만들어 지진 않는다.

car1 = Car('red', 200)    # 객체 1의 레퍼런스 변수
car2 = Car('blue', 300)    # 객체 2의 레퍼런스 변수

car1.printCarInfo()
car2.printCarInfo()

# 객체에 입력된 값을 __init__ 생성자로 전달해서 속성의 값을 초기화.
비행기 예제
class Plane:
    def __init__(self, col, len, wt):
        self.color = col
        self.length = len
        self.weight = wt

    def fly(self):
        print('TAKE OFF!')

    def land(self):
        print('Welcome to Seoul')

    def printPlaneInfo(self):
        print(f'color: {self.color}')
        print(f'length: {self.length}')
        print(f'weight: {self.weight}')

plane1 = Plane('blue', 20, 200)
plane2 = Plane('orange', 50, 250)
plane3 = Plane('red', 35, 150)

print(f'plane 1 info: {plane1.printPlaneInfo()}')
print(f'plane 2 info: {plane2.printPlaneInfo()}')
print(f'plane 3 info: {plane3.printPlaneInfo()}')

plane1.fly()
plane2.land()
plane3.land()
객체 속성 변경
class NewGenerationPC:
    def __init__(self, name, cpu, ram, ssd):
        self.name = name
        self.cpu = cpu
        self.ram = ram
        self.ssd = ssd

    def doExcel(self):
        print('Excel run')

    def doPhotoshop(self):
        print(*'Photoshop run')

    def printPCInfo(self):
        print(f'self.name: {self.name}')
        print(f'self.cpu: {self.cpu}')
        print(f'self.ram: {self.ram}')
        print(f'self.ssd: {self.ssd}')

pc1 = NewGenerationPC('pc1', 'i5', '16', '256g')
pc1.printPCInfo()

pc2 = NewGenerationPC('pc2', 'i9', '64', '2T')
pc2.printPCInfo()

# change properties of pc1
pc1.cpu = 'i9'
pc1.memory = '64'
pc1.ssd = '4T'

pc1.printPCInfo()
객체와 메모리에 대한 이해
- 생성자를 생성해서 객체를 만들면 그 객체의 데이터와 속성은 메모리에 저장됩니다.
- 변수에 객체를 할당해서 사용했습니다(=레퍼런스 변수)
- 정확히는, 변수 안에 저장된 객체의 메모리 주소를 찾아가 그 객체가 호출되는 형식입니다.
- 만약 레퍼런스 변수를 또 다른 변수에 할당할 경우, 이때 역시 같은 객체에 대한 레퍼런스 변수가 또 생성되는 셈입니다. 즉, 메모리 주소가 복사된 것이지, 객체의 숫자가 늘어난 것은 아닙니다.
- 따라서, 만약 하나의 레퍼런스 변수를 통해서 객체의 속성을 변경했을 때, 다른 하나의 레퍼런스 변수에서도 변경되어 나타납니다.
scores = [int(input('enter Kor score: ')),
          int(input('enter Eng score: ')),
          int(input('enter math score: '))]

print(scores)

copyScores = scores.copy() # 리스트 값을 그대로 복사
print(copyScores)

for index, score in enumerate(copyScores): # index값과 실제값을 모두 가진 tuple을 출력하는 함수
    result = score * 1.1
    copyScores[index] = 100 if result > 100 else result

print(f'이전 평균: {sum(scores)/len(scores)}')    # 원래 값은 그대로 유지
print(f'이후 평균: {sum(copyScores)/len(copyScores)}')    # 복사된 값은 변경