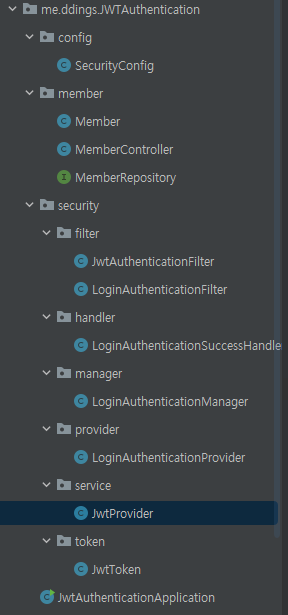
프로젝트 생성과 초기 구성
프로젝트 생성은 Spring Initializr 를 이용했다.
스프링 시큐리티는 기본적으로 Session 기반 로그인을 지원한다.
현재 포스팅에서는 JWT를 이용한 인증을 구현할 것이기 때문에 몇 가지 설정을 건들여줘야 한다.
Spring Security 아키텍처 를 공부했던 내용을 되살리면서 생각해보자
- JWT를 사용하므로, Session 설정을 끈다
- Session을 끄기때문에 사용자의 이미 인증된 정보를 바탕으로 공격하는 CSRF 보호설정을 끈다
@Configuration
@EnableWebSecurity
public class SecurityConfig {

    @Bean
    public SecurityFilterChain securityFilterChain(HttpSecurity http) throws Exception {
        return http
                .sessionManagement(sessions -> sessions
                        .sessionCreationPolicy(SessionCreationPolicy.STATELESS) // 세션 사용안함.
                )
                .csrf(AbstractHttpConfigurer::disable) // csrf 보안 비활성화
                .build();
    }
}
Session 생성 정책을 STATELESS로 설정했기 때문에 SecurityContext를 저장하는 SecurityContextRepository로 NullSecurityContextRepository 이 사용될 것이다.
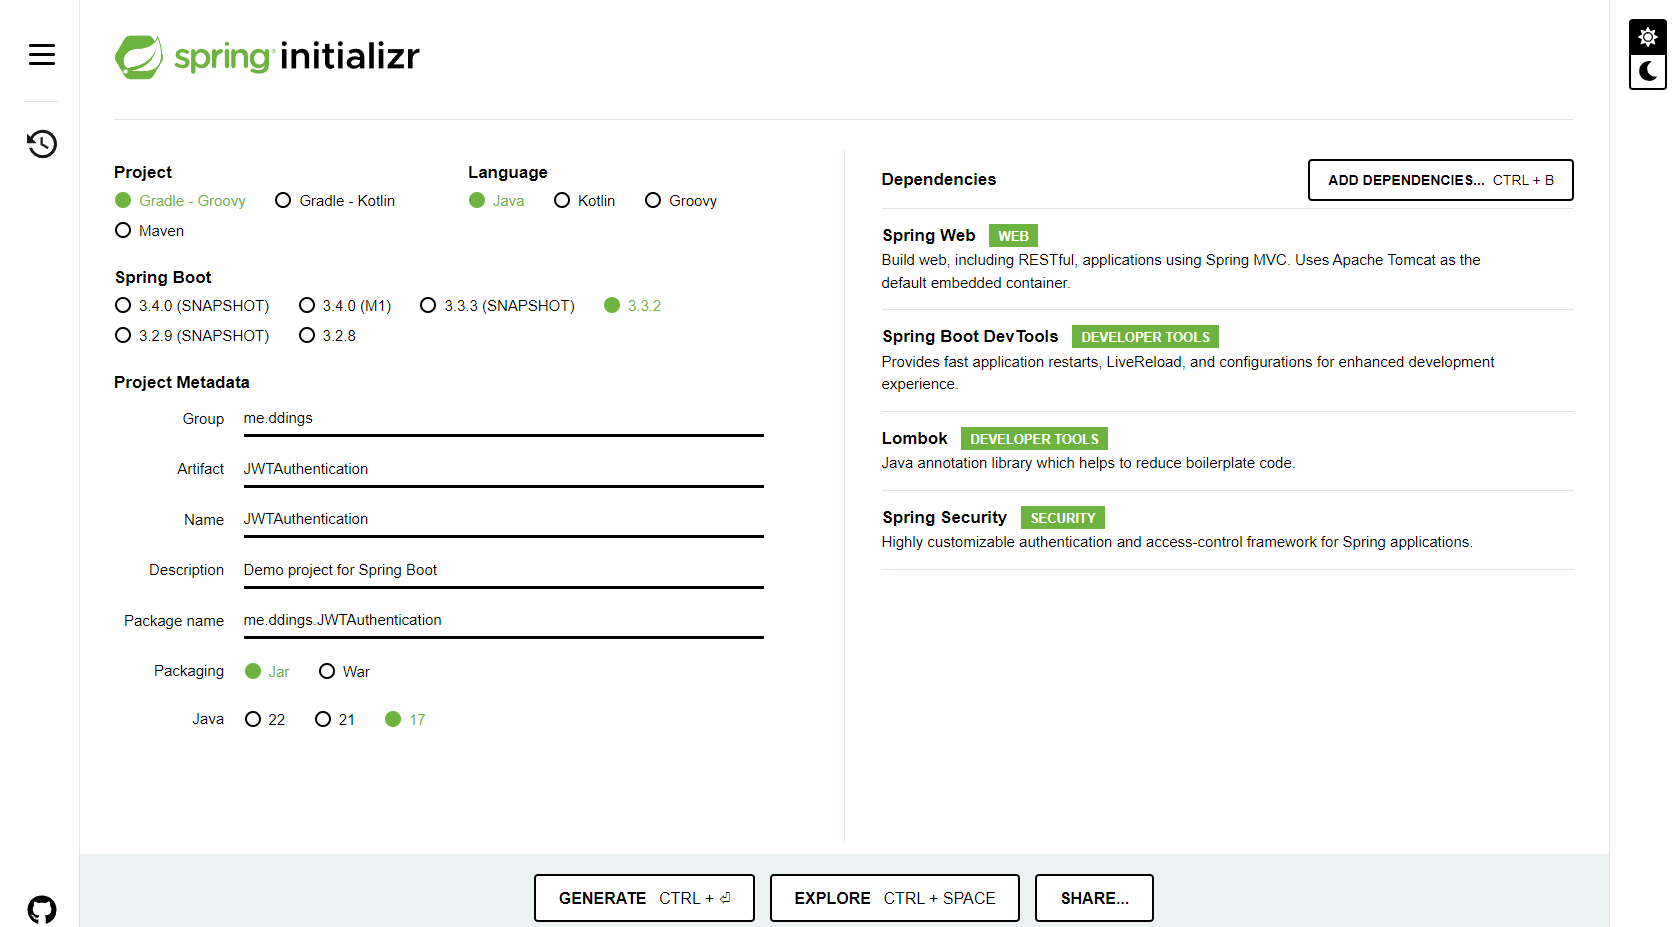
다음으로, JWT 인증이 수행될 위치를 선정해야 한다.
스프링 시큐리티는 FilterChain 기반으로 동작하여 실제 인증 작업이 이뤄지는 위치는 AuthenticationProvider 다.
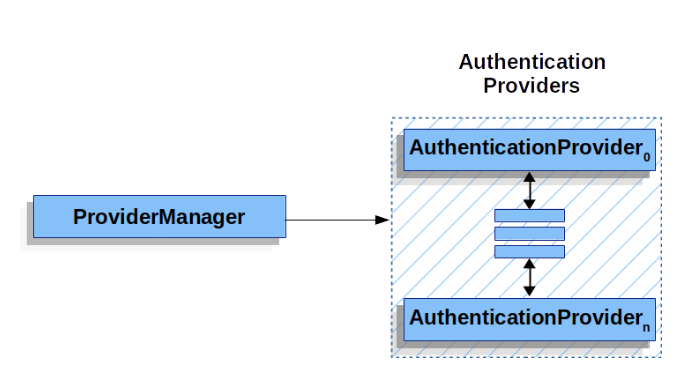
formLogin 에 기본적으로 사용되는 DaoAuthenticationProvider를 이용하는 방법도 생각해볼만 하다.
해당 AuthenticationProvider는 요청에서 받은 인증정보를 UsernamePasswordAuthenticationToken의 형태로 가공하고, UserDetailsService와 PasswordEncoder를 이용하여 인증절차를 수행한다.
UserDetailsService를 이용하여UsernamePasswordAuthenticationToken에서 유저정보를 얻어오고, 해당 유저정보에저장된 password와 입력받은 password를 비교하는 과정을 통해 유저를 인증한다
따라서, 커스텀 UserDetailsService 를 등록하여 JWT인증을 수행하는 로직을 작성해도된다.
하지만 UserDetailsService와 UserDetails를 그대로 사용해야 하므로 클래스 사용이 제한된다고 생각도 든다.
결론적으로 이번 포스팅에서는 AuthenticationProvider 자체를 커스텀하여 Spring MVC와 함께 할 수 있는 구성으로 구현해볼 것이다.
뼈대 구성
- 사용자가 로그인 요청(
POST /auth/login)- 요청에 포함된 인증정보가 애플리케이션에 존재하는 정보인지 확인
a. 존재하는 정보라면, JWT를 생성하고 사용자에게 반환
b. 존재하지 않는 정보라면, 예외처리- 인증이 필요한 요청에 포함된 JWT를 기반으로 사용자 인증
a. JWT 인증에 성공하면 정상처리
b. JWT가 존재하지 않거나 잘못된 토큰이라면, 예외처리
사용자 로그인 요청
LoginAuthenticationProvider
formLogin 을 사용하면 DaoAuthenticationProvider가 동작하여 인증을 수행하는 것처럼,
POST /auth/login 요청을 처리할 AuthenticationProvider를 생성한다
@Component
@RequiredArgsConstructor
public class LoginAuthenticationProvider implements AuthenticationProvider {

    private final PasswordEncoder passwordEncoder = PasswordEncoderFactories.createDelegatingPasswordEncoder();
    private final MemberRepository memberRepository;

    @Override
    public Authentication authenticate(Authentication authentication) throws AuthenticationException {
        String username = (String) authentication.getPrincipal();
        String password = (String) authentication.getCredentials();

        Member member = memberRepository.findByUsername(username).orElseThrow(() -> {
            throw new BadCredentialsException("Illegal username");
        });

        String encryptedPassword = member.getPassword();
        if(passwordEncoder.matches(password, encryptedPassword)){
            final List<GrantedAuthority> grantedAuthorities = new ArrayList<>();
            grantedAuthorities.add(new SimpleGrantedAuthority("ROLE_USER"));

            return UsernamePasswordAuthenticationToken.authenticated(username, password, grantedAuthorities);
        }

        return UsernamePasswordAuthenticationToken.unauthenticated(username, password);
    }

    @Override
    public boolean supports(Class<?> authentication) {
        return authentication.equals(UsernamePasswordAuthenticationToken.class);
    }
}
Authentication 객체로부터 사용자가 입력한 인증정보를 얻어낸 다음, DB에 있는 사용자인지 검색한다.
만약, DB에 존재하는 사용자라면 저장된 비밀번호와 입력받은 비밀번호를 비교한다.
기초적인 코드구성은 위와 같이 하였으며, 예외상황에서는 401 UnAuthorized 가 발생한다.
LoginAuthenticationFilter
이제 AuthenticationProvider를 동작시키기 위해서는 필터체인에서 이를 호출해줄 필터가 필요하다.
public class LoginAuthenticationFilter extends AbstractAuthenticationProcessingFilter {

    private static final AntPathRequestMatcher DEFAULT_ANT_PATH_REQUEST_MATCHER = new AntPathRequestMatcher("/auth/login", "POST");

    public LoginAuthenticationFilter(AuthenticationManager authenticationManager){
        super(DEFAULT_ANT_PATH_REQUEST_MATCHER, authenticationManager);
    }


    @Override
    public Authentication attemptAuthentication(HttpServletRequest request, HttpServletResponse response) throws AuthenticationException, IOException, ServletException {

        ObjectMapper objectMapper = new ObjectMapper();
        Map<String, String> map = objectMapper.readValue(request.getInputStream(), Map.class);

        String username = map.get("username");
        String password = map.get("password");

        UsernamePasswordAuthenticationToken unauthenticated = UsernamePasswordAuthenticationToken.unauthenticated(username, password);

        return this.getAuthenticationManager().authenticate(unauthenticated);
    }
}AuthenticationFilter에는 필터가 동작할 URL과 필터에서 동작시킬 Provider를 관리할 AuthenticationManager가 필요하다.
일단 해당부분을 제외하고보면 POST 요청에서 body를 통해 사용자의 입력을 받을 예정이다.
따라서 ObjectMapper를 이용하여 body데이터를 JSON 형태로 변환하고, Authentication 객체를 생성한다.
Authentication객체로UsernamePasswordAuthenticationToken를 이용한 이유는 우선 기본적인 형태로 구성해놓을 생각이기 때문이다.
Authentication 객체를 생성한 후에는 등록해놓은 AuthenticationManager를 이용하여 작업을 처리할 Provider를 호출한다.
LoginAuthenticationManager
@Component
@RequiredArgsConstructor
public class LoginAuthenticationManager implements AuthenticationManager {

    private final LoginAuthenticationProvider loginAuthenticationProvider;

    @Override
    public Authentication authenticate(Authentication authentication) throws AuthenticationException {
        if(loginAuthenticationProvider.supports(authentication.getClass())){
            return loginAuthenticationProvider.authenticate(authentication);
        }

        return authentication;
    }

}AuthenticationManager에는 동작시킬 AuthenticationProvider를 주입받아서 사용한다.
앞에서 생성한 Authentication 객체타입인지 검증하고, 가능하다면 인증작업을 수행한다.
@Configuration
@EnableWebSecurity
@RequiredArgsConstructor
public class SecurityConfig {

    private final LoginAuthenticationManager loginAuthenticationManager;

    @Bean
    public SecurityFilterChain securityFilterChain(HttpSecurity http) throws Exception {

        return http
                .sessionManagement(sessions -> sessions
                        .sessionCreationPolicy(SessionCreationPolicy.STATELESS) // 세션 사용안함.
                )
                .csrf(AbstractHttpConfigurer::disable) // csrf 보안 비활성화
                //AuthenticationFilter 등록
                .addFilterAfter(new LoginAuthenticationFilter(loginAuthenticationManager), UsernamePasswordAuthenticationFilter.class)
                .build();
    }

}AuthenticationManager와 함께 필터를 등록해주면 기본적인 로그인 작업이 가능해진다.
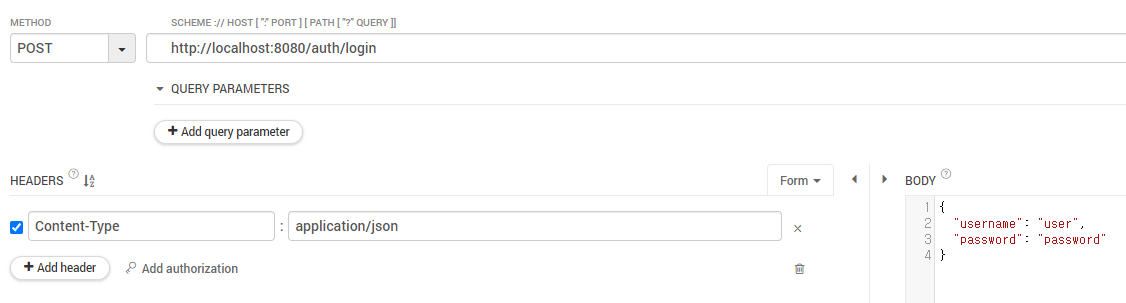

Talend API Tester를 이용해서 API 요청을 보내면 정상적으로 작업을 처리하여 /로 redirect 된다
만약, 비밀번호가 틀리거나 없는 사용자라면401 UnAuthorized가 발생한다.

JWT토큰 생성과 응답
LoginAuthenticationSuccessHandler
public class LoginAuthenticationSuccessHandler implements AuthenticationSuccessHandler {
    @Override
    public void onAuthenticationSuccess(HttpServletRequest request, HttpServletResponse response, Authentication authentication) throws IOException, ServletException {


        response.sendRedirect("/");
    }
}
로그인 인증에 성공했을 때, JWT를 생성하고 응답에 담을 AuthenticationSuccessHandler를 만든다
이를 AuthenticationFilter를 등록할 때, 같이 등록해주면 된다.
@Bean
public SecurityFilterChain securityFilterChain(HttpSecurity http) throws Exception {

    return http
            .sessionManagement(sessions -> sessions
                    .sessionCreationPolicy(SessionCreationPolicy.STATELESS) // 세션 사용안함.
            )
            .csrf(AbstractHttpConfigurer::disable) // csrf 보안 비활성화
            // AuthenticationFilter 등록
            .addFilterAfter(loginAuthenticationFilter(), UsernamePasswordAuthenticationFilter.class)
            .authorizeHttpRequests(requests -> requests
                    .anyRequest().authenticated()
            )
            .build();
}

@Bean
public LoginAuthenticationFilter loginAuthenticationFilter() throws Exception {
    LoginAuthenticationFilter loginAuthenticationFilter = new LoginAuthenticationFilter(loginAuthenticationManager);
    loginAuthenticationFilter.setAuthenticationSuccessHandler(new LoginAuthenticationSuccessHandler());

    return loginAuthenticationFilter;
}
시험삼아 응답에 더미데이터를 넣어서 보내보자
@Override
public void onAuthenticationSuccess(HttpServletRequest request, HttpServletResponse response, Authentication authentication) throws IOException, ServletException {
    response.setHeader("DUMMY-HEADER", "DUMMY");
    response.sendRedirect("/");
}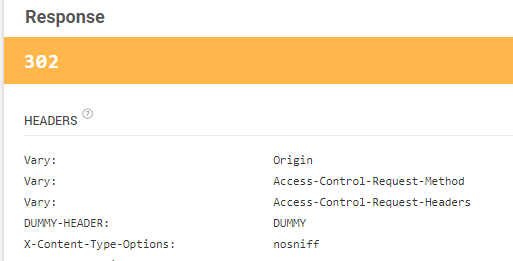
응답에 정상적으로 헤더가 추가되는 것을 확인할 수 있다.
JwtProvider
JWT를 생성하기 위해 관련 API로 공식 문서 찾아가서 확인하기에 좋아서 jjwt-api를 선택했다.
// https://mvnrepository.com/artifact/io.jsonwebtoken/jjwt-api
implementation group: 'io.jsonwebtoken', name: 'jjwt-api', version: '0.12.6'
@Getter @Setter
@RequiredArgsConstructor
public class JwtToken {
private final String access;
private final String refresh;
}
@Component
@RequiredArgsConstructor
public class JwtProvider {
private SecretKey key = Jwts.SIG.HS256.key().build(); // 대칭키 알고리즘 선택
private static final String AUTHORITIES_KEY = "role";
public JwtToken generateToken(String uid, Collection<? extends GrantedAuthority> role) {
long tokenPeriod = 1000L * 60L * 90L;
long refreshPeriod = 1000L * 60L * 60L * 24L;
Date now = new Date();
List<String> authorities = role.stream().map(GrantedAuthority::getAuthority).toList();
String accessToken = Jwts.builder()
.subject(uid)
.claim(AUTHORITIES_KEY, authorities)
.issuedAt(now) // 토큰 발행시간
.expiration(new Date(now.getTime() + tokenPeriod)) // 토큰 만료기간
.signWith(key) // JWS Signature 계산에 사용할 대칭키
.compact();
String refreshToken = Jwts.builder()
.expiration(new Date(now.getTime() + refreshPeriod))
.signWith(key)
.compact();
return new JwtToken(accessToken, refreshToken);
}
}토큰 탈취 등의 이유로 access와 refresh 두 개의 토큰을 운용해볼 생각이다.
access의 경우, 90분 /refresh의 경우, 1일 으로 만료기간을 잡아놨다.
@Component
@RequiredArgsConstructor
public class LoginAuthenticationSuccessHandler implements AuthenticationSuccessHandler {

    private final JwtProvider jwtProvider;

    @Override
    public void onAuthenticationSuccess(HttpServletRequest request, HttpServletResponse response, Authentication authentication) throws IOException, ServletException {
        String username = (String) authentication.getPrincipal();
        Collection<? extends GrantedAuthority> authorities = authentication.getAuthorities();
        JwtToken token = jwtProvider.generateToken(username, authorities);

        Cookie refresh = new Cookie("refresh", token.getRefresh());
        refresh.setPath("/");
        refresh.setHttpOnly(true);

        response.addHeader(HttpHeaders.AUTHORIZATION, token.getAccess());
        response.addCookie(refresh);
    }
}
이제 LoginAuthenticationSuccessHandler를 마저 작성해주자.
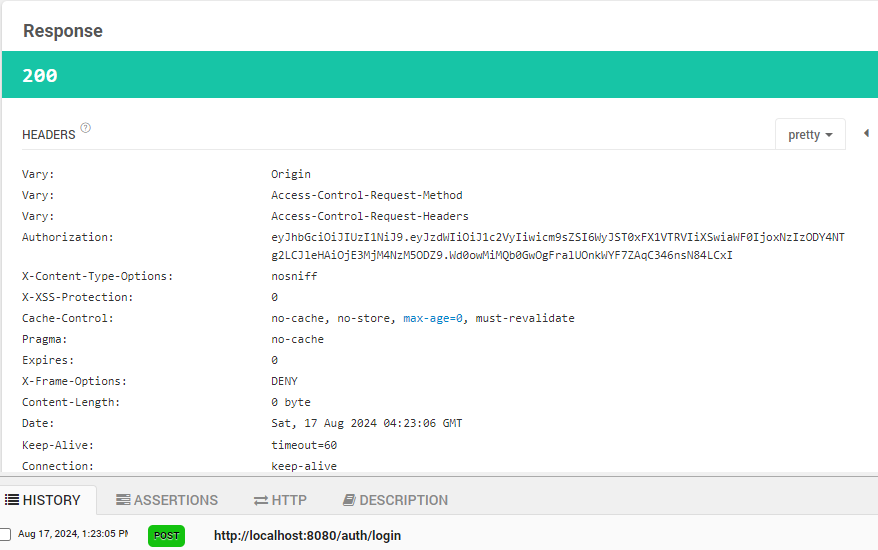
토큰의 반환 위치로 access는 헤더, refresh는 쿠키를 선택했다.
access의 경우, 매 인증요청마다 전달되므로 앞으로도 Authorization 헤더를 이용할 예정이다.
refresh는 access의 만료상황에서 재발급을 위해 사용되는 토큰이므로 XSS공격의 방지를 위해 httpOnly로 쿠키에 저장했다.
정상적으로Authorization헤더와 쿠키에 토큰이 전달되는 것을 확인할 수 있다.

JWT 인증
로그인을 통해 사용자 인증이 완료되면, 이름과 authorities를 담아서 JWT를 생성한다.
따라서, JWT가 포함된 요청이 도달하면 JWT를 검증하고 Authentication을 얻어낸 다음, 정상적인 토큰이라면 계속해서 진행하여 Spring MVC의 DispatcherServlet 까지 도달시키는게 목표다.
생각해볼 부분은 어떤 필터를 구현해야하는가? 다
각 인증에 대한 작업분기를 간단하게 표현하면 아래와 같다.
- access 가 존재하고 정상인 경우
- access 가 존재하고 비정상인 경우
a. refresh 가 존재하고 정상인 경우
b. refresh 가 존재하고 비정상인 경우
c. refresh 가 존재하지 않는 경우- access 가 존재하지 않는 경우
위 요청들을 인증이 필요한 모든 요청마다 한번씩 실행해야 한다.
AbstractAuthenticationProcessingFilter의 경우, 설명을 읽어보면 기본적으로 로그인 상황에 맞춰서 작성되었다는 것을 알 수 있다.
JWT는 로그인이 완료된 상황에서 이뤄지는 인증이기 때문에 OncePerRequestFilter를 선택하는게 더 적절하다고 생각했다.
JwtAuthenticationFilter
@Component
@RequiredArgsConstructor
public class JwtAuthenticationFilter extends OncePerRequestFilter {

    private final JwtProvider jwtProvider;

    @Override
    protected void doFilterInternal(HttpServletRequest request, HttpServletResponse response, FilterChain filterChain) throws ServletException, IOException {
        logger.info("JwtAuthenticationFilter doFilterInternal 시작");

        final String bearer_access = request.getHeader(HttpHeaders.AUTHORIZATION);

        if(bearer_access != null && bearer_access.startsWith("Bearer ")) {
            String access = bearer_access.substring(7);

            try {
                Authentication authentication = jwtProvider.getAuthentication(access);
                SecurityContextHolder.getContext()
                        .setAuthentication(authentication);
            }catch (Exception e){
                logger.warn("Access Token 이 유효하지 않습니다.");
                if(e instanceof ExpiredJwtException) {
                    Claims claims = ((ExpiredJwtException) e).getClaims();
                    if(regenerateTokenProcess(request, response, claims)){
                        access = response.getHeader(HttpHeaders.AUTHORIZATION);
                        Authentication authentication = jwtProvider.getAuthentication(access);
                        SecurityContextHolder.getContext().setAuthentication(authentication);
                    }
                }
            }
        }else{
            logger.warn("JWT Token 이 Bearer 문자열로 시작하지 않습니다.");
        }


        filterChain.doFilter(request, response);
    }

    private boolean regenerateTokenProcess(HttpServletRequest request, HttpServletResponse response, Claims claims) {
        logger.info("JWT 토큰이 만료되어 재발급 절차를 실행합니다. ");
        Cookie refreshCookie = WebUtils.getCookie(request, "refresh");
        String refreshToken = refreshCookie.getValue();

        if(jwtProvider.verifyToken(refreshToken)){
            String username = claims.getSubject();
            List<GrantedAuthority> authorities = jwtProvider.getAuthoritiesFromClaims(claims);

            JwtToken token = jwtProvider.generateToken(username, authorities);
            Cookie refresh_cookie = new Cookie("refresh", token.getRefresh());
            refresh_cookie.setPath("/");
            refresh_cookie.setHttpOnly(true);

            response.addHeader(HttpHeaders.AUTHORIZATION, token.getAccess());
            response.addCookie(refresh_cookie);

            return true;
        }

        logger.warn("Refresh Token 이 유효하지 않습니다.");

        return false;
    }
}
토큰에
Bearer를 붙히는건 인증방식을 의미한다
예를들어, HTTP Basic 이면Basic이 붙고 JWT나 OAuth면Bearer를 붙힌다
위 코드에서는 Refresh 토큰이 만료되지 않았다면 항상 유효한 토큰이라고 가정한다.
하지만, 새로운 Refresh 토큰이 발급되더라도 이전의 Refresh 토큰은 만료되기 전까지 유효하다.JWT는 토큰이 유효한지 검증이 가능할 뿐, 특정 토큰을 강제로 만료시킬 수 없다.
따라서, 서버에서 유효한 Refresh 토큰을 별도로 관리해주는 것을 생각해봐야 한다.즉, 현재 유효한 Refresh 토큰을 따로 관리해줘야 한다는 이야기이며 저장소 역할로 메모리, 캐시, DB를 고려할 만 하다.
JWT 인증과정에서 메서드를 JwtProvider에 추가해준다
@Component
@RequiredArgsConstructor
public class JwtProvider {

    private SecretKey key = Jwts.SIG.HS256.key().build();           // 대칭키 알고리즘 선택
    private static final String AUTHORITIES_KEY = "role";

    private final MemberRepository memberRepository;

    public JwtToken generateToken(String username, Collection<? extends GrantedAuthority> role) {
        long tokenPeriod = 1000L * 60L * 90L;
        long refreshPeriod = 1000L * 60L * 60L * 24L;

        Date now = Date.from(LocalDateTime.now()
                .atZone(ZoneId.systemDefault())
                .toInstant());

        List<String> authorities = role.stream().map(GrantedAuthority::getAuthority).toList();
        String accessToken = Jwts.builder()
                .subject(username)
                .claim(AUTHORITIES_KEY, authorities)
                .issuedAt(now)                                          // 토큰 발생시간
                .expiration(new Date(now.getTime() + tokenPeriod))      // 토큰 만료기간
                .signWith(key)                                          // // JWS Signature 계산에 사용할 대칭키
                .compact();

        String refreshToken = Jwts.builder()
                .expiration(new Date(now.getTime() + refreshPeriod))
                .signWith(key)
                .compact();

        return new JwtToken(accessToken, refreshToken);
    }

    public boolean verifyToken(String token){
        try{
            Date now = Date.from(LocalDateTime.now()
                    .atZone(ZoneId.systemDefault())
                    .toInstant());

            return Jwts.parser()
                    .verifyWith(key).build()        // 검증에 사용할 대칭키 입력
                    .parseSignedClaims(token)       // JWS의 Claim 획득
                    .getPayload()                   // byte[] 또는 Claim 인스턴스로 Payload 반환
                    .getExpiration()                // 작성된 만료기간 확인
                    .after(now);             // 만료기간이 지났는지 확인
        } catch (ExpiredJwtException e) {
            return false;                           // 만료된 토큰이면 false
        }
    }

    @SuppressWarnings("unchecked")
    public Authentication getAuthentication(String accessToken) throws ExpiredJwtException {
        Claims claims = parseClaims(accessToken);   // 토큰 검증 및 Payload 획득

        final String username = claims.getSubject();
        Member member = memberRepository.findByUsername(username).orElseThrow(() -> {
            throw new IllegalArgumentException("존재하지 않는 회원정보 입니다.");
        });

        List<String> role = (List<String>) claims.get(AUTHORITIES_KEY);

        List<GrantedAuthority> grantedAuthorities = new ArrayList<>();
        role.forEach(s -> grantedAuthorities.add(new SimpleGrantedAuthority(s)));

        return UsernamePasswordAuthenticationToken.authenticated(username, "", grantedAuthorities);
    }

    private Claims parseClaims(String accessToken) throws ExpiredJwtException{
        return Jwts.parser()
                .verifyWith(key).build()            // 검증에 사용할 대칭키 입력
                .parseSignedClaims(accessToken)     // JWS의 Claim 획득
                .getPayload();                      // byte[] 또는 Claim 인스턴스로 Payload 반환
    }

    @SuppressWarnings("unchecked")
    public List<GrantedAuthority> getAuthoritiesFromClaims(Claims claims) {
        List<String> role = (List<String>) claims.get(AUTHORITIES_KEY);

        List<GrantedAuthority> grantedAuthorities = new ArrayList<>();
        role.forEach(s -> grantedAuthorities.add(new SimpleGrantedAuthority(s)));

        return grantedAuthorities;
    }
}
여기까지 진행하면 로그인 -> JWT반환 -> JWT인증요청 -> 응답 까지의 요청흐름이 수행된다.
POST /login 요청이 정상이라면 JWT가 포함된 응답을 반환해주고
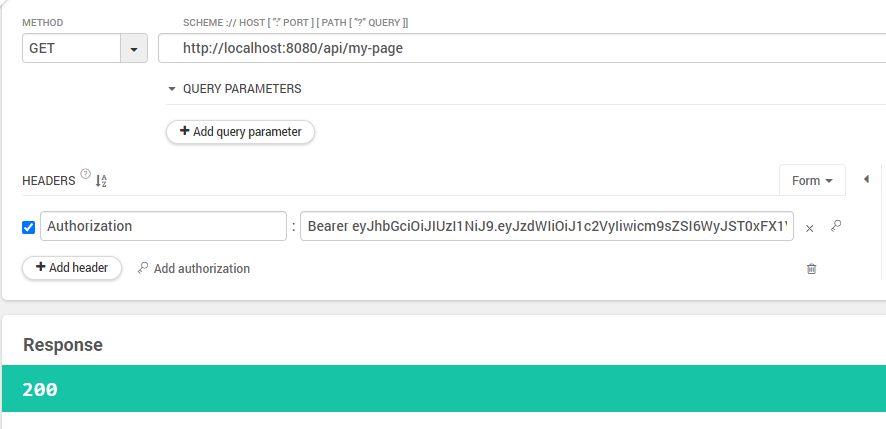
JWT를 포함한 GET 요청을 보내면 200응답이 반환되며
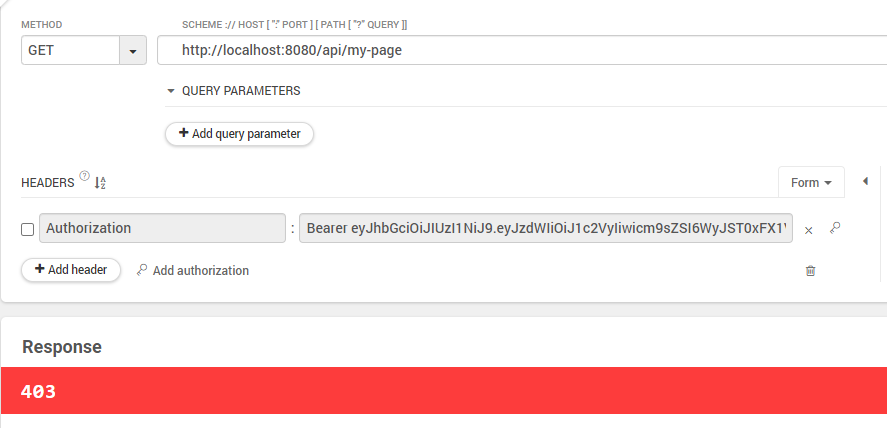
JWT를 제외한 GET 요청을 보내면 403응답이 반환된다.
