Authorize HttpServletRequests
스프링 시큐리티에서는 요청수준에서 인가모델을 설정할 수 있다.
예를들어, 특정 URL 하위의 모든 요청들에 인가검증을 수행할 수 있다
기본적으로 모든 요청들에 인가가 필요하며, 필요에따라 HttpSecurity를 통해 이를 조절하는게 가능하다.
http
    .authorizeHttpRequests((authorize) -> authorize
        .anyRequest().authenticated()
    )
Request Authorization Components 동작흐름
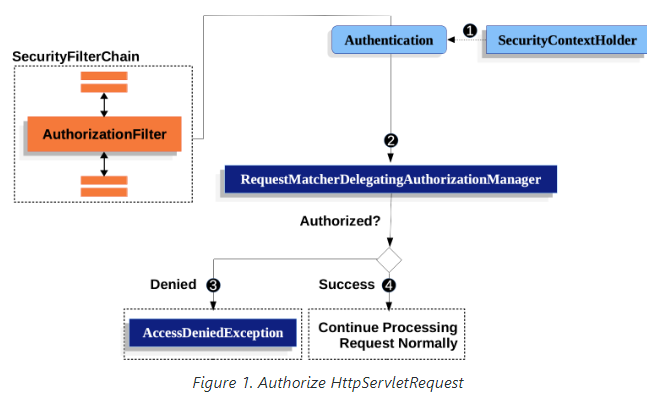
스프링 시큐리티는 각 요청에 대해 아래의 단계를 거쳐 인가작업이 동작한다
AuthorizationFilter에서SecurityContextHolder에서 인증 객체를 탐색- 탐색한 객체인
Supplier<Authentication>와HttpServletRequest가 함께AuthorizationManager로 이동
a. 인가 거부인 경우,AuthorizationDeniedEvent가 발행되며AccessDeniedException예외 발생
b. 인가 성공인 경우,AuthorizationGrantedEvent가 발행되며 필터 체인을 이어서 실행1번 과정에서 탐색한 객체가
Supplier<Authentication>로 반환되는 점이 특이하다
이 때문에 실제Authentication를 꺼내지 않는 경우 요청 속도가 빨라진다
AuthorizationFilter
인가 검증을 수행하는 AuthorizationFilter는 기본적으로 스프링 시큐리티 필터체인의 마지막에 위치한다.
즉, 인증 필터와 CSRF등의 보안동작에 인가가 필요없다는 말이며 특정 필터를 추가하고 싶다면 AuthorizationFilter 전에 위치시켜야한다.
AuthorizationFilter는 모든 요청뿐만 아니라 모든 디스패치 ( FORWARD , ERROR 등 )에도 동작한다.
예를들어, Spring MVC에서 FORWARD를 통해 ViewResolver로 랜더링 요청을 하게되면 2번의 인가작업이 실행된다.
@Controller
public class MyController {
    @GetMapping("/endpoint")
    public String endpoint() {
        throw new UnsupportedOperationException("unsupported");
    }
}
다음과 같이 에러가 발생하는 상황에서도 2번의 인가작업이 실행된다. ( 엔드포인트로 향하면서 + 에러 디스패치 과정 )
이러한 이유에서 특정 디스패치들은 인가작업이 수행되지 않게 설정하는 것을 고려해야한다.
Authorizing an Endpoint
@Bean
public SecurityFilterChain web(HttpSecurity http) throws Exception {
    http
        .authorizeHttpRequests((authorize) -> authorize
	    .requestMatchers("/endpoint").hasAuthority("USER")
            .anyRequest().authenticated()
        )
        // ...

    return http.build();
}
엔드포인트로의 접근은 패턴과 규칙 쌍으로 이뤄진다.
AuthorizationFilter는 나열된 순서대로 이를 수행하므로, 위 코드와 같이 작성이 가능하다
만약, 이러한 설정을 테스트하고 싶다면 아래 코드와 같이 작성하면 된다.
@WithMockUser(authorities="USER")
@Test
void endpointWhenUserAuthorityThenAuthorized() {
    this.mvc.perform(get("/endpoint"))
        .andExpect(status().isOk());
}

@WithMockUser
@Test
void endpointWhenNotUserAuthorityThenForbidden() {
    this.mvc.perform(get("/endpoint"))
        .andExpect(status().isForbidden());
}

@Test
void anyWhenUnauthenticatedThenUnauthorized() {
    this.mvc.perform(get("/any"))
        .andExpect(status().isUnauthorized());
}
Matching Requests
Ant를 이용하는 경우
Ant는 스프링 시큐리티에서 요청 매칭에 사용하는 기본언어다.
단일 엔드포인트나 디렉토리로 매칭시키는데 사용할 수 있으며, 특정 HTTP 메서드와 일치하도록 구체화도 가능하다.
http
    .authorizeHttpRequests((authorize) -> authorize
        .requestMatchers("/resource/**").hasAuthority("USER")
        .anyRequest().authenticated()
    )
예를들어, /resource 하단의 모든 요청에 USER권한이 필요하게 코드를 작성할 수 있다.
http
    .authorizeHttpRequests((authorize) -> authorize
        .requestMatchers("/resource/{name}").access(new WebExpressionAuthorizationManager("#name == authentication.name"))
        .anyRequest().authenticated()
    )
또는, 위 코드처럼 요청에서 경로값을 추출하여 현재 인증정보와 대조하는 것도 가능하다.
http
    .authorizeHttpRequests((authorize) -> authorize
        .requestMatchers(RegexRequestMatcher.regexMatcher("/resource/[A-Za-z0-9]+")).hasAuthority("USER")
        .anyRequest().denyAll()
    )
코드에서 볼 수 있는 것처럼
RegexRequestMatcher를 활용하여**보다 엄격한 매칭조건을 걸 수 있다.
HTTP 메서드를 포함하는 경우
http
    .authorizeHttpRequests((authorize) -> authorize
        .requestMatchers(HttpMethod.GET).hasAuthority("read")
        .requestMatchers(HttpMethod.POST).hasAuthority("write")
        .anyRequest().denyAll()
)read나 write같이 특정 권한이 부여된 경우에만 특정 HTTP 메서드를 사용하도록 설정하는 예시코드다.
Dispatcher 타입을 포함하는 경우
http
    .authorizeHttpRequests((authorize) -> authorize
        .dispatcherTypeMatchers(DispatcherType.FORWARD, DispatcherType.ERROR).permitAll()
        .requestMatchers("/endpoint").permitAll()
        .anyRequest().denyAll()
    )
앞서 말했던 것처럼 두 번 인가작업이 이뤄지는 것을 방지하기 위해 Dispatcher 타입에 대한 인가설정을 할 수 있다.
기본적으로는 모든 Dispatcher 타입에 대해 인가작업이 이뤄진다.
MvcRequestMatcher를 사용하는 경우
서블릿 경로와 컨트롤러 경로를 분할하는 등의 목적으로 MvcRequestMatcher를 사용할 수 있다
@Bean
MvcRequestMatcher.Builder mvc(HandlerMappingIntrospector introspector) {
	return new MvcRequestMatcher.Builder(introspector).servletPath("/spring-mvc");
}

@Bean
SecurityFilterChain appEndpoints(HttpSecurity http, MvcRequestMatcher.Builder mvc) {
	http
        .authorizeHttpRequests((authorize) -> authorize
            .requestMatchers(mvc.pattern("/my/controller/**")).hasAuthority("controller")
            .anyRequest().authenticated()
        );

	return http.build();
}
이러한 설정은 최소 두 가지의 경우에서 필요할 수 있다.
spring.mvc.servlet.pathproperty 설정을 통해 기본 접근경로가 변경된 경우- 둘 이상의
DispatcherServlet를 가진 경우
Custom Matcher를 사용하는 경우
RequestMatcher printview = (request) -> request.getParameter("print") != null;
http
    .authorizeHttpRequests((authorize) -> authorize
        .requestMatchers(printview).hasAuthority("print")
        .anyRequest().authenticated()
    )
위 코드에서 requestMatchers에 람다를 사용하지 않는 이유는 default 메서드를 재정의하여 값을 추출하기 위함이다
Requests 인가 메서드
permitAll: 요청에 대한 인증이 필요없음denyAll: 모든 상황에서의 요청거부hasAuthority: 특정 권한을 가진 대상에게만 허용hasRole:ROLE_이 표시된 특정 권한을 가진 대상에게만 허용hasAnyAuthority: 주어진 권한 중 하나이상 가진 대상에게한 허용hasAnyRole: 주어진ROLE_이 표시된 권한 중 하나이상 가진 대상에게만 허용access: 커스텀AuthorizationManager에서 접근 결정
Security Matchers
securityMatchers는 주어진 HttpSecurity가 어떤 요청에 적용되어야 하는지를 결정한다.
즉, 특정 URL 패턴에서만 인증/인가가 필요하도록 설정할 수 있다
@Configuration
@EnableWebSecurity
public class SecurityConfig {

	@Bean
	public SecurityFilterChain securityFilterChain(HttpSecurity http) throws Exception {
		http
			.securityMatcher("/api/**")
			.authorizeHttpRequests(authorize -> authorize
				.requestMatchers("/user/**").hasRole("USER")
				.requestMatchers("/admin/**").hasRole("ADMIN")
				.anyRequest().authenticated()
			)
			.formLogin(withDefaults());
		return http.build();
	}
}
예를들어, 위 코드에서 설정된 코드들은 아래와 같다
securityMatcher("/api/**")
=>HttpSecurity가/api/하위의 요청에만 적용된다requestMatchers("/user/**").hasRole("USER")
=>/user/로 시작되는 요청은USERrole이 있어야한다requestMatchers("/admin/**").hasRole("ADMIN")
=>/admin/로 시작되는 요청은ADMINrole이 있어야한다
securityMatcher(s)와 requestMatcher(s)는 가장 적합한 RequestMatcher 구현체를 선택한다
Spring MVC를 사용하고 있다면
MvcRequestMatcher
Spring MVC를 사용하지 않는다면AntPathRequestMatcher
만약, 커스텀 RequestMatcher 구현체를 사용하고 싶다면 아래와 같이 사용하면 된다
import static org.springframework.security.web.util.matcher.AntPathRequestMatcher.antMatcher;
import static org.springframework.security.web.util.matcher.RegexRequestMatcher.regexMatcher;

@Configuration
@EnableWebSecurity
public class SecurityConfig {

	@Bean
	public SecurityFilterChain securityFilterChain(HttpSecurity http) throws Exception {
		http
			.securityMatcher(antMatcher("/api/**"))
			.authorizeHttpRequests(authorize -> authorize
				.requestMatchers(antMatcher("/user/**")).hasRole("USER")
				.requestMatchers(regexMatcher("/admin/.*")).hasRole("ADMIN")
				.requestMatchers(new MyCustomRequestMatcher()).hasRole("SUPERVISOR")
				.anyRequest().authenticated()
			)
			.formLogin(withDefaults());
		return http.build();
	}
}

public class MyCustomRequestMatcher implements RequestMatcher {

    @Override
    public boolean matches(HttpServletRequest request) {
        // ...
    }
}
Method Security
@EnableMethodSecurity와 @Configuration을 포함한 설정 파일을 생성하면 메서드에 애노테이션를 다는 방식으로 인가설정이 가능하다.
설정파일을 생성하고나면 Spring이 관리하는 클래스에 @PreAuthorize, @PostAuthorize, @PreFilter, @PostFilter를 이용하여 메서드 실행에 대한 인가설정을 할 수 있다.
Spring Boot Starter Security에는 기본적으로 메서드 수준의 인가가 꺼져있다
자세한 사용방법은 공식문서를 확인하자. 여기선 동작흐름 정도만 파악할 예정이다
Method Security 동작흐름
스프링 시큐리티의 Method Security는 Spring AOP를 이용하여 구성되어있다.
@Service
public class MyCustomerService {
    @PreAuthorize("hasAuthority('permission:read')")
    @PostAuthorize("returnObject.owner == authentication.name")
    public Customer readCustomer(String id) { ... }
}
위에 작성된 예시코드의 동작흐름은 아래와 같다
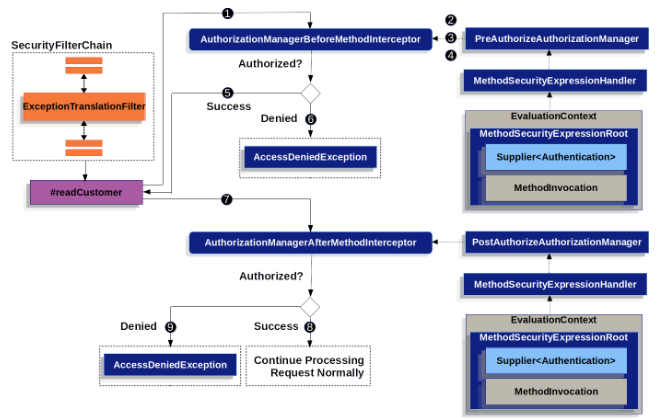
- AOP가
readCustomer에 대한 프록시 메서드를 실행.
@PreAuthorizepointcut과 일치하는AuthorizationManagerBeforeMethodInterceptor실행- 인터셉터에서
PreAuthorizeAuthorizationManager#check실행- 애노테이션의
SpEL expression해석과EvaluationContext구성을 위해MethodSecurityExpressionHandler사용EvaluationContext에서Authentication을 읽어 권한이 있는지 확인- 권한이 있다면, 실제 메서드 실행
- 권한이 없다면,
AuthorizationDeniedEvent와AccessDeniedException예외 발생, 403 응답- 실제 메서드가 반환되면 AOP에서
@PostAuthorizepointcut과 일치하는AuthorizationManagerAfterMethodInterceptor에서PostAuthorizeAuthorizationManager를 활용하여 동작- 평가가 통과되면, 이어서 실행
- 평가가 실패하면,
AuthorizationDeniedEvent와AccessDeniedException예외 발생, 403 응답
주의사항
- 여러 애노테이션이 설정된 경우, 한번에 하나씩 실행된다
- 동일 애노테이션을 여러개 사용하는 것은 허용되지 않는다
- 각 애노테이션은 고유의 pointcut을 가지고 있다
- 각 애노테이션은 각자의 interceptor를 가지고 있다
- 복잡한 SpEL 표현식 대신 권한 부여를 사용할 수 있다
Request 수준 인가와의 비교
| request-level | method-level | |
|---|---|---|
| 인가 타입 | coarse-grained | fine-grained( 좀 더 세밀 ) |
| 설정 위치 | config 클래스 | 메서드 선언 |
| 설정 스타일 | DSL | 애노테이션 |
| 인증 정의 | 프로그래밍 방식 | SpEL |
Authorization Events
인가에 대하여 성공과 실패 상황에 대해 다음과 같은 이벤트가 발생한다
- 성공 :
AuthorizationGrantedEvent- 실패 :
AuthorizationDeniedEvent
이러한 이벤트들을 처리하기 위해서는 AuthorizationEventPublisher가 필요하다
@Bean
public AuthorizationEventPublisher authorizationEventPublisher
        (ApplicationEventPublisher applicationEventPublisher) {
    return new SpringAuthorizationEventPublisher(applicationEventPublisher);
}
@Component
public class AuthenticationEvents {
@EventListener
public void onFailure(AuthorizationDeniedEvent failure) {
// ...
}
}SpringAuthorizationEventPublisher를 이용하여 applicationEventPublisher를 등록해주면 아래와 같이 @EventListener로 발생한 이벤트를 잡아서 처리할 수 있다.
AuthorizationGrantedEvent의 경우 문제발생의 가능성이 높아서 기본적으로는publish되지 않는다
