지금까지는 서버와 관련된 부분을 공부했다. 이번에는 프론트엔드에서 사용하는 템플릿 엔진에대해 알아보려한다.
HTML은 정적인 언어이다. 사용자가 주어진 기능만 쓸 수 있고, 새로운 기능을 처리할 수 없으며 반복문도 불가능하다. 템플릿 엔진은 자바스크립트를 사용해서 HTML을 렌더링할 수 있게 한다.
이번 포스팅에서는 대표적인 템플릿 엔진인 1. 퍼그(Pug), 2. 넌적스(Nunjucks)를 다뤄보겠다. 이전에 포스팅한 express 웹 서버 만들기 -1, 2에서 사용한 코드에 추가할 것이므로, 보고 오면 좋다.
책 Node.js 교과서(개정 2판) 책의 6장의 내용을 참고했다.
+모든 코드는 github주소에 있다. 주석 부분이 조금 다르니 블로그 글을 보면서 이해하는 것이 좋다.
1. 퍼그(Pug)
예전 이름이 제이드(Jade)이며 루비(Ruby) 문법과 비슷하다.
- 설치
npm i pug- express와 연결 시 app.js에 적어줘야 함
// pug
app.set('views', path.join(__dirname, 'views')); // views는 템플릿 파일들이 위치한 폴더를 지정
app.set('view engine', 'pug'); // pug 템플릿을 이용한다고 나타냄
사용법
[html 표현]
-부모 자식 관계: 동일한 종류의 들여쓰기(ex. 탭 한 번, 스페이스 두 번)
-태그 속성: 태그명 뒤에 소괄호(ex. link(rel='stylesheet', href='/stylesheets/style.css')
-속성: id는 #으로, class는 .(ex. #login-button, .post-image)
-html 텍스트: 태그 또는 속성 뒤에 한 칸을 띄고 입력(ex. p Welcome to Express, button(type='submit') 전송)
-텍스트 여러 줄: |(파이프) 넣음
ex.
p
 | 안녕하세요.
 | 여러 줄을 입력합니다.
 br
| 태그도 중간에 넣을 수 있습니다.-style, script: 태그 뒤에 점(.)을 붙힘(ex. style., script.)
[변수]
- 텍스트, 속성으로 사용: 태그 뒤에 =을 붙인 후 변수를 입력 (ex.
h1=title) - 텍스트 중간에 변수 넣기: #{변수} (ex.
#{title}) - 내부에 직접 변수 선언: 빼기(-) (ex.
-const node = 'Node.js') - 이스케이프(문법과 관련 없는 문자로 바꾸는 행위)
ex)
p= '<strong>이스케이프</strong>'
p!= '<strong>이스케이프하지 않음</strong>'
+res.render 호출시 - Git [routes/index.js] 中 일부
// GET / 라우터
router.get('/', (req, res) => {
    res.send('Hello, Express');
    // 변수 넣기 방법1
    res.locals.title = 'Express'; //  pug, 넌적스 같은 템플릿 엔진이 res.locals 객체를 읽어 title이라는 변수를 집어넣음
    res.render('index');
    // 변수 넣기 방법2
    res.render('index', {title: 'Express'}); // 템플릿 엔진이 처리
});
[반복문]
반복 가능한 변수인 경우에만 해당
ex) **each 대신 for 사용 가능
ul
	each fruit, index in ['사과', '배', '오렌지', '바나나', '복숭아']
    		li= (index+1) +'번째' +fruit
[조건문]
if, else if, else, case문 사용 가능
if EXAMPLE )
if isLoggedIn
	div 로그인 되었습니다.
else
	div 로그인이 필요합니다.
** isLoggedIn: res.render('user',{isLoggedIn:'false'}); 이렇게 넘겨준 객체
case EXAMPLE )
case fruit
	when 'apple'
    	p 사과입니다.
    when 'banana'
    	p 바나나입니다.
    default
    	p 사과도 바나나도 아닙니다.
** default: 기본 값
[include]
다른 퍼그나 html 파일을 넣을 수 있음
ex)
header.pug
header
	a(href='/') Home
	a(href='/about) About
footer.pug
footer
	div 푸터입니다
main.pug
include header
main
	h1 메인 파일
	p 다른 파일을 include할 수 있습니다.
include footer
[extends와 block]
레이아웃을 정할 수 있음
ex)
layout.pug
doctype html
html
	head
		title=title
		link(rel='stylesheet', href='/style.css')
		block style
	body
		header 헤더입니다.
		block content
		footer 푸터입니다.
		block script
body.pug
extends layout

block content
	main
		p 내용입니다.

block script
		script(src="/main.js")
--
퍼그 주요 실행 코드
Git [views/layout.pug]
doctype html
html
head
title=title
link(rel='stylesheet', href='/style.css')
body
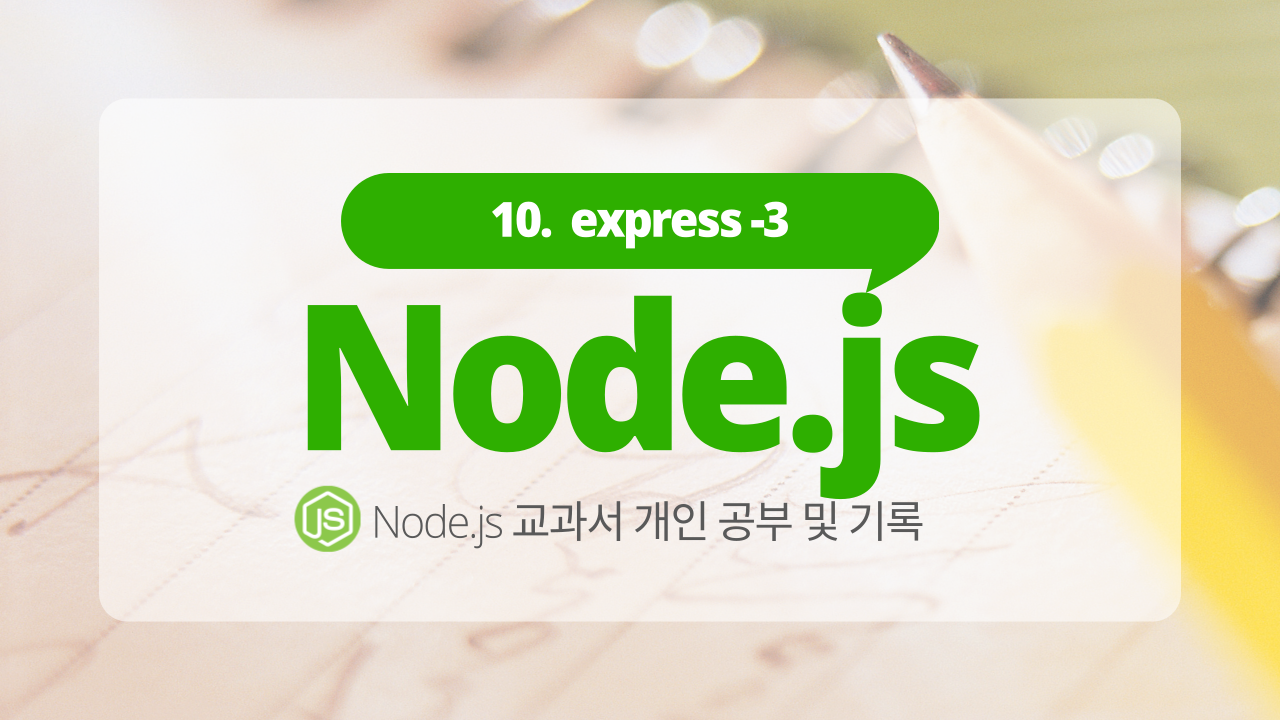
block contentGit [views/index.pug]
extends layout
block content
        h1= title
        p Welcome to #{title}
Git [views/error.pug]
extends layout

block content
    h1= message
    h2= error.status
    pre #{error.stack}
Git [app.js] 中 일부
// pug
app.set('views', path.join(__dirname, 'views')); // views는 템플릿 파일들이 위치한 폴더를 지정
app.set('view engine', 'pug'); // pug 템플릿을 이용한다고 나타냄
// 에러 처리
app.use((req, res, next) => {
const error = new Error(`${req.method} ${req.url} 라우터가 없습니다.`);
error.status = 404;
next(error);
});
app.use((err, req, res, next) =>{
console.error(err);
// res.status(500).send(err.message);
res.locals.message = err.message; // res.locals 속성에 값을 대입해 템플릿 엔진에 변수를 주입, message라는 변수를 넣음
res.locals.error = process.env.NODE_ENV !== 'production' ? err : {}; // 배포 환경이 아닐 시에만 표시, process.env.NODE_ENV : 시스템 환경
res.status(err.status || 500); // 굳이 안줘도 되지만 서버에서 그냥 에러상태 주는 것,,
res.render('error.pug');
// res.render('error');
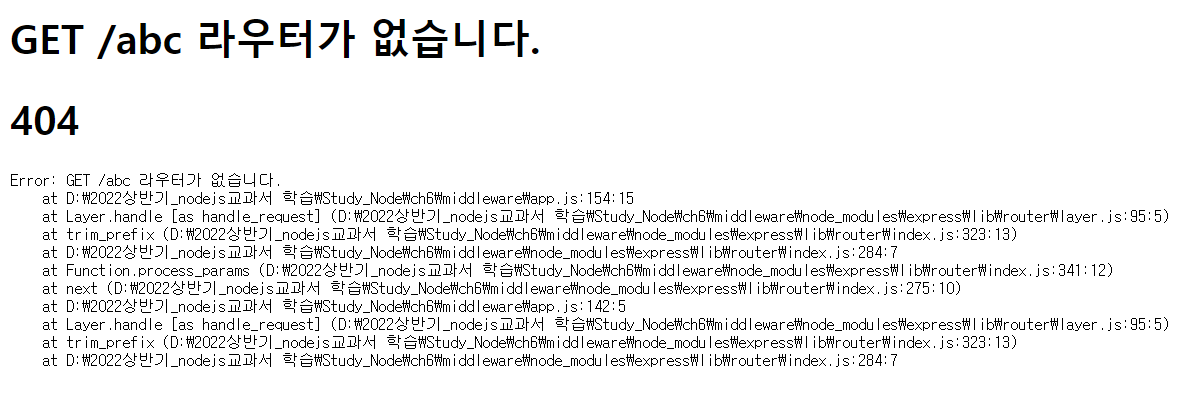
});실행결과(웹 브라우저)
-
http://127.0.0.1:3000/abc

** 404 아래의 Error 부분이 스택 트레이스임(서버 폴도 구조 유추 가능해서 배포 시에는 숨김)
2. 넌적스(Numjucks)
- 설치
npm i nunjucks- express와 연결 시 app.js에 적어줘야 함
// 넌적스
app.set('view engine', 'html'); // 넌적스임을 구분하려면 html 대신 njk를 쓰면 됨
const nunjucks = require('nunjucks');
nunjucks.configure('views', { // 폴더 경로: views
    express: app, // 위에 const app = express();라서 app객체 즉, express 함수를 넣음
    watch: true, // html 파일이 변경될 때, 템플릿 엔진을 다시 렌더링
});
사용법
확장자를 html로 계속 사용할 것인데, njk를 사용해도 됨(위에 주석 참고)
[변수]
- {{ 변수 }} (ex.
{{title}}) - 내부에 직접 변수 선언: {% set 변수 = '값' %} (ex.
{% set node= 'Node.js %}) - 이스케이프(문법과 관련 없는 문자로 바꾸는 행위)
ex)
<p>{{'<strong>이스케이프</strong>'}}</p>
<p>{{'<strong>이스케이프하지 않음</strong>' | safe }}</p>
** 이스케이프하고 싶지 않다면 {{ 변수 | safe }}
+res.render 호출시 - Git [routes/index.js] 中 일부
// GET / 라우터
router.get('/', (req, res) => {
    res.send('Hello, Express');
    // 변수 넣기 방법1
    res.locals.title = 'Express'; //  pug, 넌적스 같은 템플릿 엔진이 res.locals 객체를 읽어 title이라는 변수를 집어넣음
    res.render('index');
    // 변수 넣기 방법2
    res.render('index', {title: 'Express'}); // 템플릿 엔진이 처리
});
[반복문]
{% %}안에 씀, for in문과 endfor사이에 반복문 위치
ex)
<ul>
  {% set fruits = ['사과', '배', '오렌지', '바나나', '복숭아'] %}
  {% for item in fruits %}
  <li>{{item}}</li>
  {% endfor %}
</ul>
[조건문]
- {% if 변수 %} {% elif %} {% else %} {% endif %}로 이루어짐
- case문 없음
ex)
{% if isLoggedIn %}
<div>로그인 되었습니다.</div>
{% else %}
<div>로그인이 필요합니다.</div>
{% endif %}
ex2) - elif 사용
{% if fruit === 'apple' %}
<p>사과입니다.</p>
{% elif fruit === 'banana' %}
<p>바나나입니다.</p>
{% else %}
<p>사과도 바나나도 아닙니다.</p>
{% endif %}
ex3) - {{ }} 사용
<div>{{'참' if isLoggedIn}}</div>
<div>{{'참' if isLoggedIn else '거짓'}}</div>
[include]
다른 html 파일을 넣을 수 있음
ex)
header.html
<header>
  <a href="/">Home</a>
  <a href="/about">About</a>
</header>
footer.html
<footer>
  <div>푸터입니다.</div>
</footer>
main.html
{% include "header.html" %}
<main>
  <h1>메인 파일</h1>
  <p>다른 파일을 include할 수 있습니다.</p>
</main>
{% include "footer.html" %}
[extends와 block]
레이아웃을 정할 수 있음, 공동퇴는 레이아웃 부분을 따로 관리할 수 있어서 좋음
ex)
layout.html
<!DOCTYPE html>
<html>
    <head>
        <title>{{title}}</title>
        <link rel="stylesheet" href="/style.css"/>
    </head>
    <body>
      <header>헤더입니다.</header>
      {% block content %}
      {% endblock %}
      <footer>푸터입니다.</footer>
      {% block script %}
      {% endblock %}
    </body>
</html>
body.html
{% extends 'layout.html' %}

{% block content %}
<main>
	<p>내용입니다.</p>
</main>
{% endblock %}

{% block script %}
<script src="/main.js"></script>
{% endblock %}
--
넌적스 주요 실행 코드
Git [views/index.html]
<!-- 간접적으로 실행되는 파일 -->
<!DOCTYPE html>
<html>
    <head>
        <title>{{title}}</title>
        <link rel="stylesheet" href="/style.css"/>
    </head>
    <body>
        {% block content %}
        {% endblock %}
    </body>
</html>
Git [views/index.html]
<!-- 직접적으로 실행되는 파일 -->
{% extends 'layout.html' %}

{% block content %}
<h1>{{title}}</h1>
<p>Welcome to {{title}}</p>
{% endblock %}
Git [views/error.html]
<!-- 직접적으로 실행되는 파일 -->
{% extends 'layout.html' %}

{% block content %}
<h1>{{message}}</h1>
<h1>{{error.status}}</h1>
<pre>{{error.stack}}</pre>
{% endblock %}
Git [app.js] 中 일부
// 넌적스
app.set('view engine', 'html'); // 넌적스임을 구분하려면 html 대신 njk를 쓰면 됨
const nunjucks = require('nunjucks');
nunjucks.configure('views', { // 폴더 경로: views
    express: app, // 위에 const app = express();라서 app객체 즉, express 함수를 넣음
    watch: true, // html 파일이 변경될 때, 템플릿 엔진을 다시 렌더링
});

// 에러 처리
app.use((req, res, next) => {
const error = new Error(`${req.method} ${req.url} 라우터가 없습니다.`);
    error.status = 404;
    next(error);
});

app.use((err, req, res, next) =>{
    console.error(err);
    // res.status(500).send(err.message);
    res.locals.message = err.message; // res.locals 속성에 값을 대입해 템플릿 엔진에 변수를 주입, message라는 변수를 넣음
    res.locals.error = process.env.NODE_ENV !== 'production' ? err : {}; // 배포 환경이 아닐 시에만 표시, process.env.NODE_ENV : 시스템 환경
    res.status(err.status || 500); // 굳이 안줘도 되지만 서버에서 그냥 에러상태 주는 것,,
    // res.render('error.pug');
    res.render('error'); // error.html 파일이 렌더링 됨
});
실행결과(웹 브라우저)

둘 중에 자신이 편한 것으로 사용하면 되는데, 앞으로의 포스팅은 넌적스를 이용할 것 같다!


진도가 빠르시네요,,,^^,,,ㅎㅎ,,