이번 포스팅에서는 간단한 개발용 프로그램을 구현하기 위해 CLI 프로그램을 만들어보겠다.
책 Node.js 교과서(개정 2판) 책의 14장의 내용을 참고했다.
+모든 코드는 github주소에 있다.
CLI
- Command Line Interface(명령줄 인터페이스)
- 콘솔 창을 통해 프로그램을 수행하는 환경
1. 간단한 콘솔 명령어 구현하기
콘솔(console)에 cli를 입력했을 때 template.js, template2.js를 실행하기 위해 package.json을 먼저 만들어준다.
Git [node-cli/package.json]
{
  "name": "node-cli-delay100",
  "version": "1.0.0",
  "description": "",
  "main": "index.js",
  "author": "delay100",
  "license": "ISC",
  "bin": {
    "cli": "./template2.js"
  }
}
Git [node-cli/template.js]
#!/usr/bin/env node
const fs = require('fs');
const path = require('path');

const type = process.argv[2];
const name = process.argv[3];
const directory = process.argv[4] || '.';
// 생성할 html 코드, 백틱(`)은 줄바꿈
const htmlTemplate = `
<!DOCTYPE html>
<html>
    <head>
        <meta charset="utf-8" />
        <title>Template</title>
    </head>
    <body>
        <h1>Hello</h1>
        <p>CLI</p>
    </body>
</html>
`;
// 생성할 js 코드
const routerTemplate = `
const express = require('express');
const router = express.Router();

router.get('/', (req, res, next) => {
    try {
        res.send('ok');
    } catch (error) {
        console.error(error);
        next(error);
    }
});

module.exports = router;
`;

const exist = (dir) => { // 폴더 존재 확인 함수
    try {
        fs.accessSync(dir, fs.constants.F_OK | fs.constants.R_OK | fs.constants.W_OK); // fs.accessSync 메서드를 통해 파일이나 폴더가 존재하는지 검사
        return true;
    } catch (e) {
        return false;
    }
};
const mkdirp = (dir) => { // 경로 생성 함수, 리눅스 명령어인 mkdir-p에서 이름을 따온 함수
                          // 예) dir값이 public/html이면 public 폴더를 만들고 html 폴더를 순차적으로 만듦

    const dirname = path
        .relative('.', path.normalize(dir)) // '.': 현재 경로, normalize: public\as
        .split(path.sep) // path.sep: 경로의 구분자(windows는 \, posix는 /)으로 구분
        .filter(p => !!p); // 정확도를 높히기 위해 사용, !!는 "", undefined, 0인경우에는 false, 나머지는 true 반환, 간접적 형변환을 위해 사용
        dirname.forEach((d, idx) => {
            const pathBuilder = dirname.slice(0, idx+1).join(path.sep); // 현재 경로와 입력한 경로의 상대적인 위치를 파악한 후 순차적으로 상위 폴더부터 만들어 나감
            console.log(pathBuilder);
            if(!exist(pathBuilder)) {
                fs.mkdirSync(pathBuilder);
            }
        });
};

const makeTemplate = () => { // 템플릿 생성 함수
    mkdirp(directory);
    if (type === 'html') {
        const pathToFile = path.join(directory, `${name}.html`);
        if(exist(pathToFile)) {
            console.error('이미 해당 파일이 존재합니다');
        } else {
            fs.writeFileSync(pathToFile, htmlTemplate);
            console.log(pathToFile, '생성 완료');
        }
    } else if (type === 'express-router') {
        const pathToFile = path.join(directory, `${name}.js`);
        if (exist(pathToFile)) {
            console.error('이미 해당 파일이 존재합니다');
        } else {
            fs.writeFileSync(pathToFile, routerTemplate);
            console.log(pathToFile, '생성 완료');
        }
    } else {
        console.error('html 또는 express-router 둘 중 하나를 입력하세요.');
    }
};

const program = () => {
    if (!type || !name) {
        console.error('사용 방법: cli html|express-router 파일명 [생성 경로]');
    } else {
        makeTemplate();
    }
};

program(); // 프로그램 실행부- 실행(console) -
"cli": "./template.js"
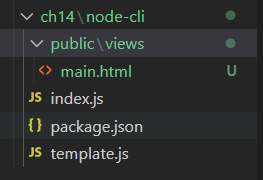
cli html main./public/views
- 실행 결과(파일 생성)

Git [node-cli/template2.js]
#!/usr/bin/env node
const fs = require('fs');
const path = require('path');
const readline = require('readline');

let type = process.argv[2];
let name = process.argv[3];
let directory = process.argv[4] || '.';

// 생성할 html 코드, 백틱(`)은 줄바꿈
const htmlTemplate = `
<!DOCTYPE html>
<html>
    <head>
        <meta charset="utf-8" />
        <title>Template</title>
    </head>
    <body>
        <h1>Hello</h1>
        <p>CLI</p>
    </body>
</html>
`;
// 생성할 js 코드
const routerTemplate = `
const express = require('express');
const router = express.Router();

router.get('/', (req, res, next) => {
    try {
        res.send('ok');
    } catch (error) {
        console.error(error);
        next(error);
    }
});

module.exports = router;
`;

const exist = (dir) => { // 폴더 존재 확인 함수
    try {
        fs.accessSync(dir, fs.constants.F_OK | fs.constants.R_OK | fs.constants.W_OK); // fs.accessSync 메서드를 통해 파일이나 폴더가 존재하는지 검사
        return true;
    } catch (e) {
        return false;
    }
};
const mkdirp = (dir) => { // 경로 생성 함수, 리눅스 명령어인 mkdir-p에서 이름을 따온 함수
                          // 예) dir값이 public/html이면 public 폴더를 만들고 html 폴더를 순차적으로 만듦

    const dirname = path
        .relative('.', path.normalize(dir)) // '.': 현재 경로, normalize: public\as
        .split(path.sep) // path.sep: 경로의 구분자(windows는 \, posix는 /)으로 구분
        .filter(p => !!p); // 정확도를 높히기 위해 사용, !!는 "", undefined, 0인경우에는 false, 나머지는 true 반환, 간접적 형변환을 위해 사용
        dirname.forEach((d, idx) => {
            const pathBuilder = dirname.slice(0, idx+1).join(path.sep); // 현재 경로와 입력한 경로의 상대적인 위치를 파악한 후 순차적으로 상위 폴더부터 만들어 나감
            console.log(pathBuilder);
            if(!exist(pathBuilder)) {
                fs.mkdirSync(pathBuilder);
            }
        });
};

const makeTemplate = () => { // 템플릿 생성 함수
    mkdirp(directory);
    if (type === 'html') {
        const pathToFile = path.join(directory, `${name}.html`);
        if(exist(pathToFile)) {
            console.error('이미 해당 파일이 존재합니다');
        } else {
            fs.writeFileSync(pathToFile, htmlTemplate);
            console.log(pathToFile, '생성 완료');
        }
    } else if (type === 'express-router') {
        const pathToFile = path.join(directory, `${name}.js`);
        if (exist(pathToFile)) {
            console.error('이미 해당 파일이 존재합니다');
        } else {
            fs.writeFileSync(pathToFile, routerTemplate);
            console.log(pathToFile, '생성 완료');
        }
    } else {
        console.error('html 또는 express-router 둘 중 하나를 입력하세요.');
    }
};

// 템플릿 종류에 대해 사용자 입력을 받음
const typeAnswer = (answer) => { // 템플릿 종류 설정
    if (answer !== 'html' && answer !== 'express-router') {
        console.clear();
        console.log('html 또는 express-router만 지원합니다.');
        return rl.question('어떤 템플릿이 필요하십니까?', typeAnswer);
    }
    type = answer;
    return rl.question('파일명을 설정하세요. ', nameAnswer);
};


// 파일명에 대해 사용자 입력을 받음
const nameAnswer = (answer) => { // 파일명 설정
    if (!answer || !answer.trim()) {
        console.clear();
        console.log('name을 반드시 입력하셔야 합니다.');
        return rl.question('파일명을 설정하세요.', nameAnswer);
    }
    name = answer;
    return rl.question('저장할 경로를 설정하세요.(설정하지 않으면 현재 경로)', dirAnswer);
};

// 디렉터리 종류에 대해 사용자 입력을 받음
const dirAnswer = (answer) => { // 경로 설정
    directory = (answer && answer.trim()) || '.';
    rl.close();
    makeTemplate();
};


const program = () => {
// 명령어에서 템플릿 종류나 파일 명을 입력하지 않았을 때 상호작용할 수 있는 입력 창을 띄움
    if (!type || !name) {
        rl = readline.createInterface({
            input: process.stdin,
            output: process.stdout,
        });
        console.clear();
        rl.question('어떤 템플릿이 필요하십니까? ', typeAnswer);
    } else {
        makeTemplate();
    }
};

program(); // 프로그램 실행부- 실행2(console) -
"cli": "./template2.js"
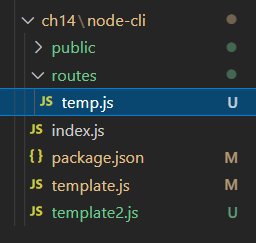
cli 또는 node template2.js
- 실행2 결과(파일 생성)

CLI 프로그램 삭제 명령어
npm rm -g node-cli
+CLI npm 라이브러리
- yargs
- commander
- meow
2. commander 사용하기
commander 패키지
기본적으로 제공하는 옵션 버전 확인
여기서는 직관적인 것이 장점인 commander을 이용한다.
npm 설치(console)
npm i commander@5 commander의 program객체의 메서드
- version: 프로그램의 버전 설정
- usage: 명령어의 사용법 설정
- name: 명령어의 이름 넣음
- command: 명령어를 설정
- <>: 필수
- *: 와일드카드
- description: 명령어에 대한 설명 설정
- alias: 명령어의 별칭 설정
- option: 명령어에 대한 부가적인 옵션 설정
- requiredOption: 필수 옵션
- action: 명령어에 대한 실제 동작 정의
- help: 설명서를 보여줌
- parse: 객체의 마지막에 붙이는 메서드, process.argv를 ㄹ인수로 받아 명령어와 옵션 파싱
+해당 메서드 사용법은 검색 또는 책의 627p을 확인해보자!
package.json 설정 후, npm을 다시 전역 설치해준다.
책에서는 전역 설치하라고 하지만 꼭 여기서 전역 설치해야하는 이유는 잘 모르겠다(..)
Git [node-cli2/package.json]
{
  "name": "node-cli2-delay100",
  "version": "1.0.0",
  "description": "",
  "main": "index.js",
  "author": "delay100",
  "license": "ISC",
  "bin": {
    "cli": "./command.js"
  },
  "dependencies": {
    "chalk": "^3.0.0",
    "commander": "^5.1.0",
    "inquirer": "^8.2.1"
  }
}
npm 전역 설치
npm i -gGit [node-cli2/command.js]
#!/usr/bin/env node
const { program } = require('commander');

program
  .version('0.0.1', '-v, --version')
  .name('cli');

program
  .command('template <type>')
  .usage('<type> --filename [filename] --path [path]')
  .description('템플릿을 생성합니다.')
  .alias('tmpl')
  .option('-f, --filename [filename]', '파일명을 입력하세요.', 'index')
  .option('-d, --directory [path]', '생성 경로를 입력하세요', '.')
  .action((type, options) => {
    makeTemplate(type, options.filename, options.directory);
  });

program
	.command('*', { noHelp: true})
	.action(() => {
  		console.log('해당 명령어를 찾을 수 없습니다.');
  		program.help();
});

program
	.parse(process.argv);
실행(console)
cli -v
실행2(console)
cli -h
3. inquirer 사용하기
inquirer 패키지
프로그램과 사용자 간의 상호작용을 도움
설치
npm i chalk inquirerGit [node-cli2/command.js] - inquirer 예
program
    .action((cmd, args) => { // argss: cli를 입력했는지 입력하지 않았는지 구별할 수 있음
                             // 명령어가 cli copy면 ['copy']가 들어있음, 명령어가 cli면 undefined임
        if(args) {
            console.log(chalk.bold.red('해당 명령어를 찾을 수 없습니다.'));
            program.help();
        } else {
            inquirer.prompt([{
                type: 'list',
                name: 'type', // name이 type이므로 answers.type === 'html'
                message: '템플릿 종류를 선택하세요.',
                choices: ['html', 'express-router'],
            }, {
                type: 'input',
                name: 'name',
                message: '파일의 이름을 입력하세요.',
                default: 'index',
            }, {
                type: 'input',
                name: 'directory',
                message: '파일이 위치할 폴더의 경로를 입력하세요.',
                default: '.',
            }, {
                type: 'confirm',
                name: 'confirm',
                message: '생성하시겠습니까?',
            }])
            .then((answers) => { // console에 입력한 답변들은 answers 객체에 저장되어 프로미스를 통해 반환됨
                                 // 질문 객체에 넣어줬떤 name 속성과 질문의 답변이 각각 키와 값이 됨
                if (answers.confirm) {
                    makeTemplate(answers.type, answers.name, answers.directory);
                    console.log(chalk.rgb(128, 128, 128)('터미널을 종료합니다.')); // chalk.rgb(12, 34, 56)(텍스트)
                                                                                  // 또는 chalk.hex('#123456')(텍스트)
                }
            });
        }
    })
    .parse(process.argv);
실행(console)
cli실행 결과
-
실행 화면1

-
실행화면 2

-
실행화면 3

4. chalk 적용하기
chalk 패키지
콘솔 텍스트에 스타일을 추가함
설치
npm i chalkGit [node-cli2/command.js] - chalk 사용 예
const chalk = require('chalk');
...
console.error(chalk.bold.red('이미 해당 파일이 존재합니다'));
...
console.log(chalk.green(pathToFile, '생성완료'));
...
console.error(chalk.bold.red('html 또는 express-router 둘 중 하나를 입력하세요.'));
...
console.log(chalk.rgb(128, 128, 128)('터미널을 종료합니다.')); // chalk.rgb(12, 34, 56)(텍스트)
                                                            // 또는 chalk.hex('#123456')(텍스트)
...
실행(console)
cli실행 결과


