
jsp를 기초를 배웠으면 간단한 로그인 페이지를 만들어 보는 것이 도리다. 여기에 DB를 곁들인다면 더 맛있어질 것이다.
여기서 중요한 부분은
- DB
- location.href
DB는 MariaDB를 사용하였고, jdbc를 통해 이미 입력된 회원 아이디와 비밀번호를 맞춰본다. 옳은 정보면 location.href를 통해 성공한 페이지를 보여주고 실패하면 그 다시 로그인 페이지로 돌아간다.
파일은 총 5가지다.
- loginMain.jsp
- 로그인하는 form이고 여기서 submit을 하면 2번인 loginReg로 가게된다.
- loginReg.jpp
- 사용자가 보지 못하는 페이지고 DB 작업과 다음 페이지를 가리킨다.
- logout.jsp
- 로그인 성공했을 때 페이지다.
- InformationDTO
- DB에서 정보를 꺼내올 DTO
- InformationDAO
- DB에서 정보를 꺼내올 DAO
1. 로그인 메인 페이지
- 로그인 페이지의 기본적인 구조를 form과 table, input을 활용해 만들어준다.
action=””에는 submit하고 DB 작업을 할 loginReg.jsp를 넣어준다. submit을 누르면 loginReg.jsp로 이동하는지 확인을 해야한다.
<%@ page contentType="text/html;charset=UTF-8" language="java" %>
<html>
<head>
    <title>logout</title>
    <style type="text/css">
        h1 {
            text-align: center;
        }
        table {
            width: 300px;
            height: 200px;
            margin: auto;
        }
    </style>
</head>
<body>

    <h1>로그인</h1>
    <form action="loginReg.jsp" method="post">
        <table border="">
            <tr>
                <td>
                    <p>아이디</p>
                    <input type="text" name="login_id">
                </td>
            </tr>
            <tr>
                <td>
                    <p>비밀번호</p>
                    <input type="text" name="login_pw">
                </td>
            </tr>
            <tr>
                <td colspan="2">
                    <input type="submit" value="로그인">
                </td>
            </tr>
        </table>

    </form>
</body>
</html>
2. 로그인과 DB
- loginReg.jsp를 만지기 전에 DB를 만지고 옵시다.
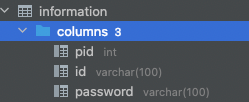
2-1. Information DB 만들기
- table 명 : information
- column : (pid int, id varchar(100), password varchar(100))
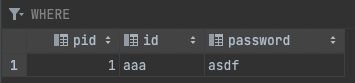
- 테이블과 컬럼을 만들어주고 테스트 용으로 미리 정보 값을 넣어준다.
2-2. InformationDTO
- DB에서 갖고 올 정보를 담을 DTO를 만들어 준다.
package model;

public class InformationDTO {

    Integer pid;
    String id;
    String password;

    public InformationDTO() {
    }

    public InformationDTO(Integer pid, String id, String password) {
        this.pid = pid;
        this.id = id;
        this.password = password;
    }

    public Integer getPid() {
        return pid;
    }

    public void setPid(Integer pid) {
        this.pid = pid;
    }

    public String getId() {
        return id;
    }

    public void setId(String id) {
        this.id = id;
    }

    public String getPassword() {
        return password;
    }

    public void setPassword(String password) {
        this.password = password;
    }
}
2-3. InformationDAO
- 먼저 기본적인 DB 구조를 만들어준다.
- close()는 모든 DB 작업이 끝나면 DB 객체를 닫아주는 메소드다.
public class InformationDAO {

    Connection con = null;
    Statement stmt = null;
    ResultSet rs = null;

    String sql = null;

    public InformationDAO() {
        String url = "jdbc:mariadb://localhost:3306/DB 이름";
        String username = "DB 아이디";
        String password = "DB 비밀번호";

        try {
            // 1. DB driver 로딩
            Class.forName("org.mariadb.jdbc.Driver");

            //2. connection
            con = DriverManager.getConnection(url, username,password);

            stmt = con.createStatement();

        } catch (Exception e) {
            // TODO Auto-generated catch block
            e.printStackTrace();
        }
    }
		void close() {
        //6. 실행객체 해제
        if(rs!=null) try {rs.close(); } catch (SQLException e) {}
        if(stmt!=null) try {stmt.close(); } catch (SQLException e) {}
        if(con!=null) try {con.close(); } catch (SQLException e) {}

    }
}- 이제 사용자가 입력한 아이디가 DB에 있는지, 있다면 비밀번호가 맞는지를 판단할 DTO를 가져올 메소드를 만들면 된다.
- 만약 입력 아이디가 맞다면 정보를 가진 DTO를 반환할 것이고 없다면 null을 던질 것이다.
public InformationDTO detail(String id){
        InformationDTO res =  null;

        sql = "select * from information where id = '" + id + "'";

        try {
            rs = stmt.executeQuery(sql);

            //5. 결과 실행
            if(rs.next()) {

                res = new InformationDTO();
                res.pid = rs.getInt("pid");
                res.id = rs.getString("id");
                res.password = rs.getString("password");
            }

        } catch (SQLException e) {
            // TODO Auto-generated catch block
            e.printStackTrace();
        }finally {
            close();
        }

        return res;
    }
3. loginReg 로그인 로직
-
loginReg에서는 사용자가 제출한 아이디와 비밀번호가 맞다면 성공한 페이지를, 틀리다면 다시 로그인 메인 페이지를 넘겨줘야 한다.
-
먼저 사용자가 제출한 정보를
getParameter()를이용해 받아온다.
<%@ page contentType="text/html;charset=UTF-8" language="java" %>
<%
    String login_id = request.getParameter("login_id");
    String login_pw = request.getParameter("login_pw");
%>- 사용자가 보게 될 알림과 넘겨줄 페이지의 이름을 정해준다.
- 현재는 제출을 하면 “정보가 맞지 않습니다.”라는 알림창을 보게 되고 확인을 누르면 다시 로그인 메인으로 돌아간다. 이제 여기서 DB를 넣어주면 된다.
<%@ page contentType="text/html;charset=UTF-8" language="java" %>
<%
    String login_id = request.getParameter("login_id");
    String login_pw = request.getParameter("login_pw");

    String msg = "정보가 맞지 않습니다.";
    String successLogin = "loginMain.jsp";

%>

<script type="text/javascript">
    alert("<%=msg%>")
    location.href = "<%=successLogin%>";
</script>- DAO에서
detail()을 이용해 사용자가 입력한 값을 넣어주고 없다면 null을 가져오기 때문에 기본 값인 로그인 메인 페이지를 넘겨준다. 비밀번호가 일치하게되면 메시지를 성공했다는 말과 함께 로그인 성공 페이지인 logout.jsp 페이지를 넘겨준다.
<%@ page import="model.InformationDAO" %>
<%@ page import="model.InformationDTO" %>
<%@ page contentType="text/html;charset=UTF-8" language="java" %>
<%
    String login_id = request.getParameter("login_id");
    String login_pw = request.getParameter("login_pw");

    String msg = "정보가 맞지 않습니다.";
    String successLogin = "loginMain.jsp";

    InformationDTO member_info = new InformationDAO().detail(login_id);

    if(!(member_info == null)) {
        if(member_info.getPassword().equals(login_pw)) {
            msg = "로그인 성공했습니다";
            successLogin = "logout.jsp";
        }
    }

%>

<script type="text/javascript">
    alert("<%=msg%>")
    location.href = "<%=successLogin%>";
</script>- logout.jsp는 성공했다는 말로 간단하게 적어줬다.
<%@ page contentType="text/html;charset=UTF-8" language="java" %>
<html>
<head>
    <title>logout</title>
</head>
<body>
    <h1>야호 로그인 성공!</h1>
</body>
</html>
끝
이 아니다..
- 가장 기본적인 부분인 로그아웃, 회원 가입이 남아있다. 이건 차차하는 걸로.
