빌더 패턴이란?
빌더(Builder) 패턴은 어떤 인스턴스를 만들 때 그 인스턴스가 다양한 구성으로 만들어질 수가 있는데, 그 다양한 구성으로 만들어진 인스턴스를 동일한 프로세스를 통해서 만들 수 있게끔 해주는 패턴이다.
예시로 서브웨이를 들 수 있다. 서브웨이에서 샌드위치를 주문할 때 어떤 샌드위치를 골랐는지에 따라서 추가로 들어가는 재료가 있고, 공통적으로 들어가는 재료가 있을 것이다. 다양한 샌드위치를 만드는 과정을 표현하기 위한 유연한 구조가 필요할 것이다.
이처럼 서브웨이(빌더)에서 어떤 샌드위치(구상 빌더)를 먹을 지 선택하고, 고른 샌드위치에 따라서 추가로 들어가는 재료와 공통적으로 들어가는 내용물 중 넣고 싶은 것과 빼고 싶은 것을 선택(필요한 필드만 지정)해서 샌드위치를 받는(객체 반환) 과정이 빌더 패턴과 비슷하다.
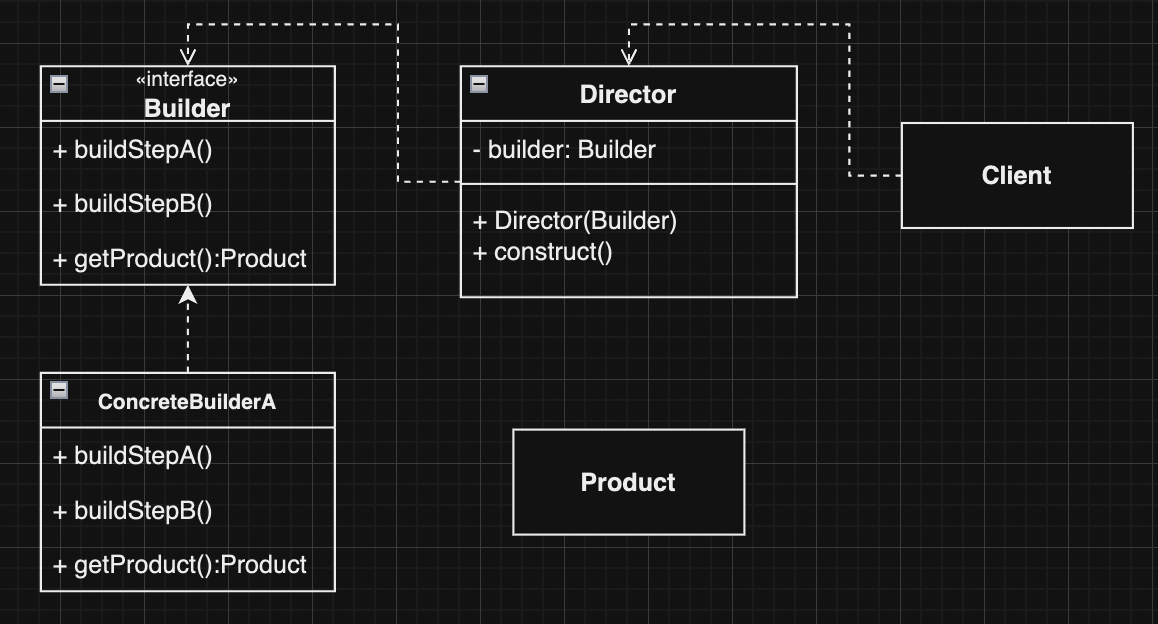
빌더 패턴 구조
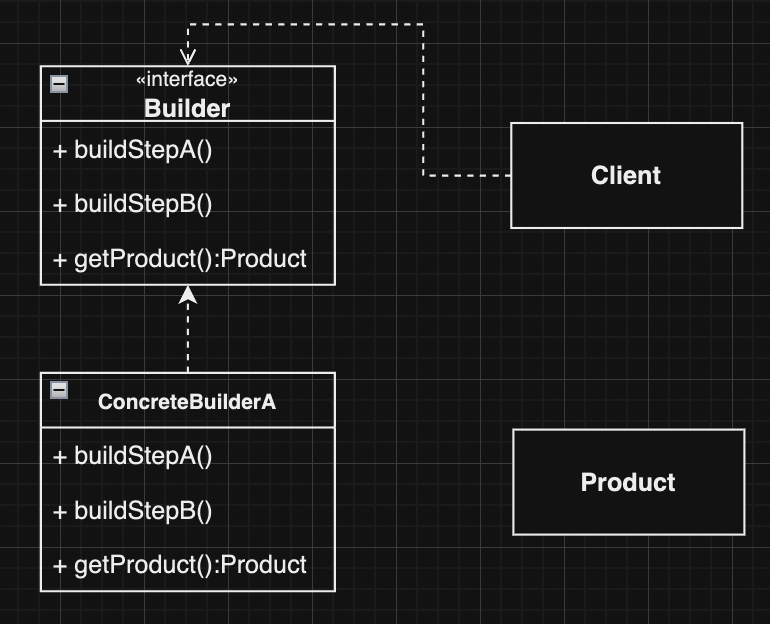
- 클라이언트가 빌더에게
Product를 생성해 달라고 요청 - 클라이언트는 추상 인터페이스를 사용해서 제품 공정을 만듦
- 구상 빌더는 실제 제품을 만들어서
Product에 넣음
이때 만약 만들어지는 프로세스들이 자주 반복이 된다면, 미리 만들어진 하나의 set을 Director에 넣어놓고 재사용할 수도 있다.
빌더 패턴 장단점
장점
- 복합 객체 생성 과정을 캡슐화한다
- 여러 단계와 다양한 절차를 거쳐 객체를 만들 수 있다
- 제품의 내부 구조를 클라이언트로부터 보호할 수 있다
- 클라이언트는 추상 인터페이스만 볼 수 있기에 제품을 구현한 코드를 쉽게 바꿀 수 있다
단점
- 팩토리를 사용할 때 보다 객체를 만들 때 클라이언트에 관해 더 많이 알아야 한다
빌더 패턴 예제
아주 간단한 서브웨이를 만들어보자.
Sandwich 클래스
public class Sandwich {
    private String menuName;
    private int kcal;
    private String description;
    private List<Ingredient> ingredients;

    public Sandwich() {
    }

    public Sandwich(String menuName, int kcal, String description, List<Ingredient> ingredients) {
        this.menuName = menuName;
        this.kcal = kcal;
        this.description = description;
        this.ingredients = ingredients;
    }

    @Override
    public String toString() {
        return "Sandwich{" +
                "menuName='" + menuName + '\'' +
                ", kcal=" + kcal +
                ", description='" + description + '\'' +
                ", ingredients=" + ingredients +
                '}';
    }
}
Ingredient 클래스
public class Ingredient {
    private String bread;
    private String cheese;
    private String extraTopping;
    private String sauce;

    public Ingredient(String bread, String cheese, String extraTopping, String sauce) {
        this.bread = bread;
        this.cheese = cheese;
        this.extraTopping = extraTopping;
        this.sauce = sauce;
    }

    @Override
    public String toString() {
        return "Ingredient{" +
                "bread='" + bread + '\'' +
                ", cheese='" + cheese + '\'' +
                ", extraTopping='" + extraTopping + '\'' +
                ", sauce='" + sauce + '\'' +
                '}';
    }
}
SandwichBuilder 인터페이스
public interface SandwichBuilder {

    SandwichBuilder choosingSandwich(String menuName, int kcal, String description);

    SandwichBuilder addIngredient(String bread, String cheese, String sauce, String extraToppings);

    Sandwich getSandwich();
}
DefaultSandwichBuilder 클래스
public class DefaultSandwichBuilder implements SandwichBuilder {

    private String menuName;
    private int kcal;
    private String description;
    private List<Ingredient> ingredients;

    @Override
    public SandwichBuilder choosingSandwich(String menuName, int kcal, String description) {
        this.menuName = menuName;
        this.kcal = kcal;
        this.description = description;
        return this;
    }

    @Override
    public SandwichBuilder addIngredient(String bread, String cheese, String sauce, String extraToppings) {
        if (this.ingredients == null) {
            ingredients = new ArrayList<>();
        }
        this.ingredients.add(new Ingredient(bread, cheese, sauce, extraToppings));
        return this;
    }

    @Override
    public Sandwich getSandwich() {
        return new Sandwich(menuName, kcal, description, ingredients);
    }
}
여기서 중요한 부분은 값을 세팅한 뒤
return this로SandwichBuilder객체 자신을 반환하는 것이다. 이로 인해 메서드 호출 후 연속적으로 빌더 메서드들을 체이닝(Chaining)하여 호출할 수 있게 된다.
마지막으로 Sandwich 타입의 getSandwich()를 통해 빌더에서 만들었던 필드들을 실제 제품 객체의 생성자에 인자로 넣어 구성이 완료된 제품 객체를 얻을 수 있는 것이다.
실행 클래스(Subway)와 실행 결과
public class Subway {
    public static void main(String[] args) {
        SandwichBuilder sandwichBuilder = new DefaultSandwichBuilder();
        Sandwich sandwich = sandwichBuilder.choosingSandwich(
                "이탈리안 비엠티",
                        388,
                        "페퍼로니, 살라미 그리고 햄이 만들어내는 최상의 조화! 전세계가 사랑하는 써브웨이의 베스트셀러!")
                .addIngredient(
                        "허니 오트",
                        "슈레드 치즈",
                        "올리브 오일",
                        "아보카도"
                ).getSandwich();

        System.out.println(sandwich);
    }
}
Sandwich{menuName='이탈리안 비엠티', kcal=388, description='페퍼로니, 살라미 그리고 햄이 만들어내는 최상의 조화! 전세계가 사랑하는 써브웨이의 베스트셀러!', ingredients=[Ingredient{bread='허니 오트', cheese='슈레드 치즈', extraTopping='올리브 오일', sauce='아보카도'}]}