이전 글(파이썬 10줄로 손글씨 숫자 인식 모델 만들기)에서 손글씨 숫자 인식 모델 학습까지 마쳤으니, 이제 학습된 모델을 실제 사용자가 브라우저에서 써볼 수 있는 형태로 연결하는 과정을 안내해보겠습니다.
결론적으로는 아래의 흐름을 거쳐서 서빙을 할 수 있습니다.
- FastAPI 서버에서 모델 로드
- 예측 API 구성
- 입력 이미지 전처리
- Vue 캔버스 UI 구현
- 프론트엔드와 백엔드 연결
- 로컬에서 실행하고 테스트
1. 이번 글의 범위
이번 글은 아래와 같이 저번 글에서 학습해둔 모델을 가지고 있다는 전제로 출발합니다.
- 학습된 모델 파일이 이미 존재함
- 예:
backend/models/digit_model_28.joblib
이제 목표는 학습된 모델을 웹 서비스로 연결하는 것 으로 생각하고, 아래와 같은 생각을 할 수 있을 것 같습니다.
- 모델 파일을 FastAPI에서 어떻게 불러오나?
- 브라우저에서 그린 숫자를 어떻게 서버로 보내나?
- 서버는 그 이미지를 어떻게 모델 입력 형태로 바꾸나?
- 예측 결과를 화면에 어떻게 보여주나?
위 궁금증을 해결하기 위해서 하나하나 설명을 시작해보겠습니다.
2. 프로젝트 구조
서빙 관점에서 핵심 구조만 보면 아래와 같습니다.
digit-recognition/
├─ backend/
│  ├─ app/
│  │  ├─ api/routes/predict.py
│  │  ├─ core/config.py
│  │  ├─ schemas/prediction.py
│  │  └─ services/
│  │     ├─ image_preprocessing.py
│  │     └─ inference.py
│  ├─ models/
│  ├─ requirements.txt
│  └─ main.py
└─ frontend/
   ├─ src/
   │  ├─ components/DigitRecognizer.vue
   │  ├─ views/HomeView.vue
   │  ├─ router/index.ts
   │  └─ main.ts
   ├─ package.json
   ├─ vite.config.ts
   └─ .env.local
구조를 역할 기준으로 나누면 아래처럼 이해할 수 있습니다.
backend/app/services/inference.py: 모델 로드와 예측backend/app/services/image_preprocessing.py: 입력 이미지 전처리backend/app/api/routes/predict.py: 예측 APIfrontend/src/components/DigitRecognizer.vue: 사용자가 숫자를 그리는 UI
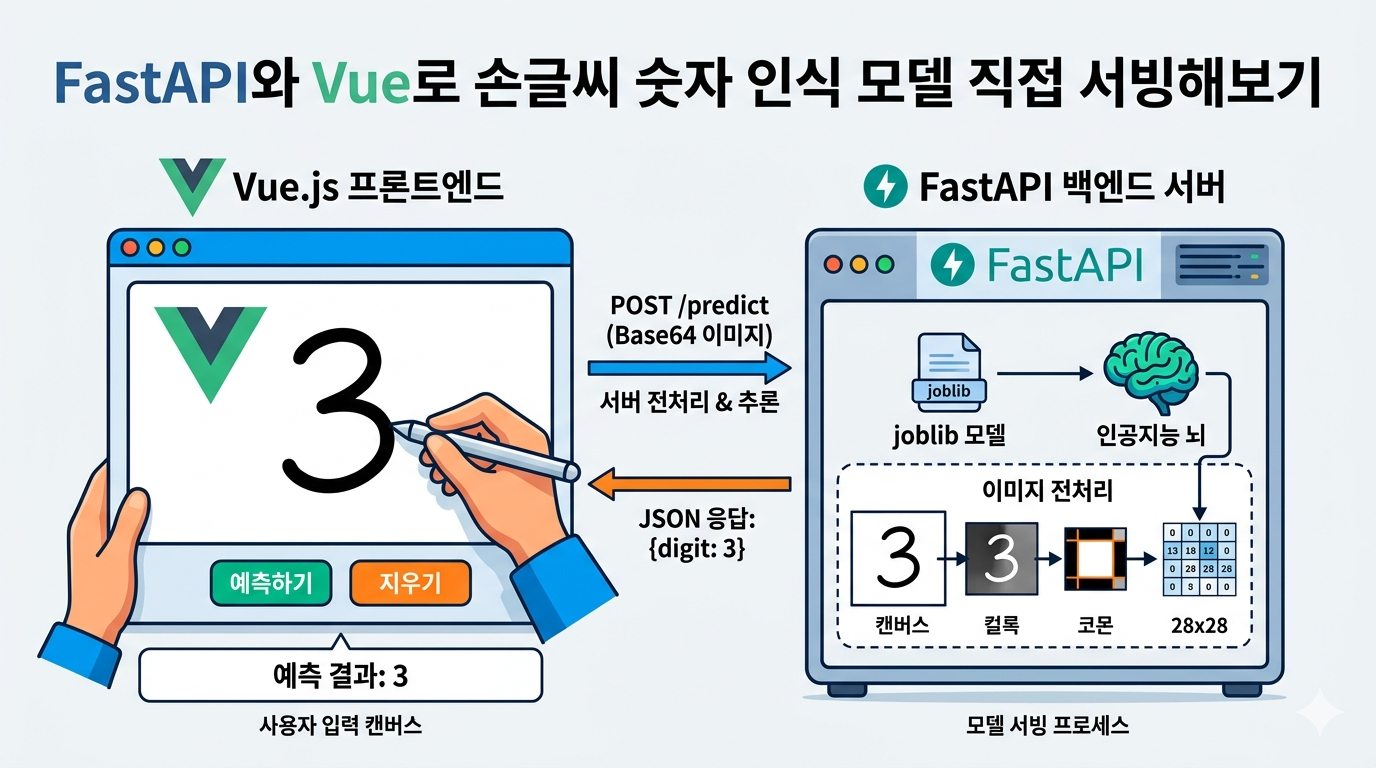
3. 전체 서빙 흐름
모델 서빙 흐름은 아래의 내용으로 설명할 수 있습니다.
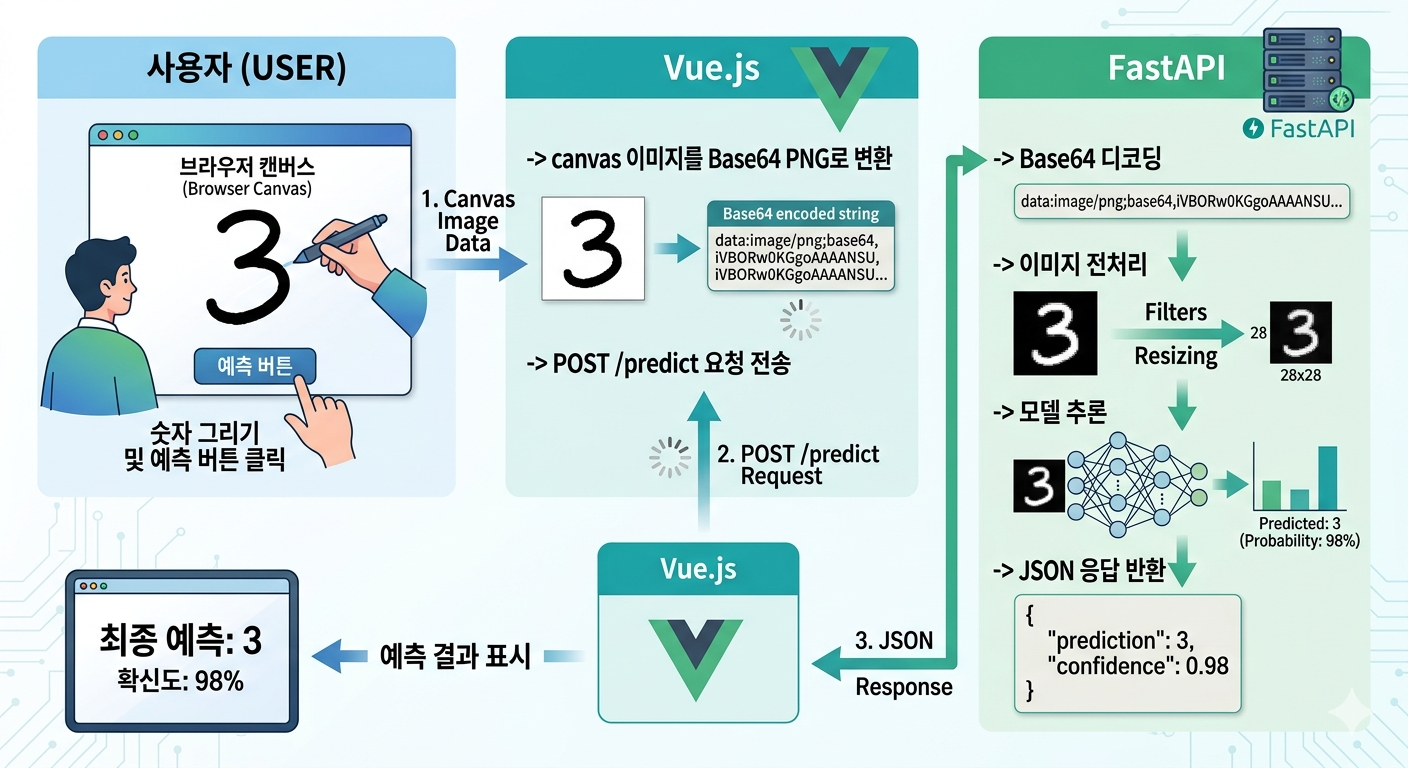
(Gemini 생성)
[사용자]
  -> 브라우저 캔버스에 숫자 그리기
  -> 예측 버튼 클릭

[Vue.js]
  -> canvas 이미지를 Base64 PNG로 변환
  -> POST /predict 요청 전송

[FastAPI]
  -> Base64 디코딩
  -> 이미지 전처리
  -> 모델 추론
  -> JSON 응답 반환

[Vue.js]
  -> 예측 결과 표시
핵심은 모델 파일 자체보다 입력 형식을 모델이 기대하는 형태로 잘 맞춰주는 것입니다.
브라우저에서 그린 자유로운 이미지를 28x28 숫자 배열로 바꾸는 과정이 실제 서빙 품질을 좌우합니다.
4. 백엔드: FastAPI 서버 구성
4-1. 진입점
# backend/main.py

from app.main import app

if __name__ == "__main__":
    import uvicorn
uvicorn.run("app.main:app", host="127.0.0.1", port=8000, reload=True)backend/main.py는 핵심 로직이 있는 파일이 아니라, 기존 실행 방식이나 편의성을 위해 남겨둔 파일입니다. 실제 앱은 backend/app/main.py에 있습니다.
서버 실행은 아래처럼 하면 됩니다.
cd backend
uvicorn app.main:app --reload
4-2. FastAPI 앱 초기화
# backend/app/main.py

from fastapi import FastAPI
from fastapi.middleware.cors import CORSMiddleware

from app.api.routes.predict import router as predict_router


app = FastAPI()

app.add_middleware(
    CORSMiddleware,
    allow_origins=["*"],
    allow_methods=["*"],
    allow_headers=["*"],
)

app.include_router(predict_router)backend/app/main.py에서는 FastAPI 앱을 생성하고, CORS와 라우터를 등록합니다.
여기서 중요한 포인트는 두 가지입니다.
- 프론트엔드에서 API를 호출할 수 있도록
CORSMiddleware추가 /predict라우터 등록
개발 환경에서는 프론트엔드와 백엔드가 서로 다른 포트에서 실행되므로 CORS 설정이 필요합니다.
현재는 모든 Origin을 허용하고 있어 개발 중 연결이 쉽습니다.
5. 모델 파일 경로 관리
# backend/app/core/config.py

from pathlib import Path


BACKEND_DIR = Path(__file__).resolve().parents[2]
MODELS_DIR = BACKEND_DIR / "models"
MODEL_FILENAME = "digit_model_28.joblib"
MODEL_PATH = MODELS_DIR / MODEL_FILENAME
LEGACY_MODEL_PATH = BACKEND_DIR / MODEL_FILENAME
모델 파일 위치는 backend/app/core/config.py에서 관리합니다.
핵심 값은 다음과 같습니다.
MODELS_DIRMODEL_FILENAMEMODEL_PATHLEGACY_MODEL_PATH
이렇게 경로를 별도 설정 파일로 분리해 두면 좋은 점이 있습니다.
- 추론 코드에서 경로 문자열을 하드코딩하지 않아도 됩니다.
- 모델 저장 위치가 바뀌어도 수정 지점이 줄어듭니다.
- 레거시 경로 fallback도 깔끔하게 처리할 수 있습니다.
즉, 서빙 코드에서 중요한 "모델 파일을 어디서 읽을 것인가"라는 문제를 한 곳에서 관리하는 구조입니다.
6. 모델 로드 (서버 시작 시 한 번만)
# backend/app/services/inference.py

import base64
import io
from pathlib import Path

import joblib
import numpy as np
from PIL import Image

from app.core.config import LEGACY_MODEL_PATH, MODEL_PATH
from app.services.image_preprocessing import preprocess_canvas_png_to_28x28


def _resolve_model_path() -> Path:
    for candidate in (MODEL_PATH, LEGACY_MODEL_PATH):
        if candidate.exists():
            return candidate

    raise RuntimeError(
        "Model file not found. Run `python scripts/train_model_28.py` to create "
        f"`{MODEL_PATH.name}`."
    )


def load_model():
    model_path = _resolve_model_path()

    try:
        return joblib.load(model_path)
    except Exception as exc:
        raise RuntimeError(f"Error loading model from {model_path}: {exc}") from exc


model = load_model()


def debug_print_image_28(data_28: np.ndarray) -> None:
    """
    28x28 데이터를 터미널에 대략 시각화.
    """
    print("\n[AI가 인식한 28x28 이미지 데이터]\n")
    for row in data_28:
        line = ""
        for value in row:
            if value > 180:
                line += "##"
            elif value > 50:
                line += ".."
            else:
                line += "  "
        print(line)
    print("\n" + "-" * 40)


def predict_digit_from_data_url(data_url: str) -> int:
    _, encoded = data_url.split(",", 1)
    image_data = base64.b64decode(encoded)
    img = Image.open(io.BytesIO(image_data))

    data_28 = preprocess_canvas_png_to_28x28(img)
    debug_print_image_28(data_28)

    values = data_28.flatten().reshape(1, -1)
    print(
        "X range:",
        float(values.min()),
        float(values.max()),
        "mean:",
        float(values.mean()),
    )

    try:
        scores = model.decision_function(values)[0]
        top = np.argsort(scores)[::-1][:3]
        print("top3 scores:", [(int(i), float(scores[i])) for i in top])
    except Exception:
        pass

    prediction = model.predict(values)[0]
    return int(prediction)
실제 모델 로드 로직은 backend/app/services/inference.py에 있습니다.
이 파일은 크게 아래 역할을 맡습니다.
- 모델 파일 찾기
joblib로 모델 로드- 입력 이미지 예측
6-1. 모델 파일 찾기
_resolve_model_path()는 먼저 표준 경로를 확인하고, 없으면 레거시 경로까지 확인합니다.
즉, 다음 두 위치를 순서대로 탐색합니다.
backend/models/digit_model_28.joblibbackend/digit_model_28.joblib
6-2. 서버 시작 시 미리 로드
중요한 부분은 이 코드입니다.
model = load_model()이 구문이 모듈 레벨에 있기 때문에, FastAPI 서버가 시작될 때 모델이 메모리에 한 번 올라갑니다.
이 방식의 장점은 명확합니다.
- 요청마다 모델 파일을 다시 읽지 않아도 됩니다.
- 응답 속도가 빨라집니다.
- 추론 API 구조가 단순해집니다.
AI 서빙에서는 "요청이 올 때마다 모델을 다시 로드하지 않는 것"이 기본입니다.
7. 예측 API 만들기
# backend/app/api/routes/predict.py

from fastapi import APIRouter, HTTPException

from app.schemas.prediction import ImageRequest, PredictionResponse
from app.services.inference import predict_digit_from_data_url

router = APIRouter()

@router.post("/predict", response_model=PredictionResponse)
async def predict_digit(request: ImageRequest) -> PredictionResponse:
    try:
        digit = predict_digit_from_data_url(request.image)
        return PredictionResponse(digit=digit)
    except Exception as exc:
        raise HTTPException(status_code=400, detail=str(exc)) from exc
예측 엔드포인트는 backend/app/api/routes/predict.py에 있습니다.
API는 매우 단순합니다.
- 경로:
POST /predict - 요청: Base64 이미지 문자열
- 응답: 예측 숫자
요청 예시
{
  "image": "data:image/png;base64,...."
}
응답 예시
{
  "digit": 7
}
이 구조가 좋은 이유는 프론트엔드와 백엔드의 계약이 간단하기 때문입니다.
캔버스에서 만든 이미지를 그대로 보내고, 서버는 숫자 하나만 반환하면 됩니다.
또한 예측 중 에러가 나면 HTTPException으로 400 응답을 내려주기 때문에, 프론트엔드에서 실패 상황도 처리할 수 있습니다.
8. 요청/응답 스키마 설계
# backend/app/schemas/prediction.py

from pydantic import BaseModel

class ImageRequest(BaseModel):
    image: str

class PredictionResponse(BaseModel):
digit: intbackend/app/schemas/prediction.py에는 Pydantic 모델이 정의되어 있습니다.
ImageRequestPredictionResponse
역할은 단순하지만 매우 중요합니다.
- 요청 JSON 구조를 명확하게 고정합니다.
- 응답 타입을 일관되게 유지합니다.
- FastAPI 자동 문서화에 도움을 줍니다.
작은 프로젝트라도 이런 식으로 요청/응답을 명시적으로 나누면 API가 훨씬 읽기 쉬워집니다.
9. Base64 이미지 처리와 추론
프론트엔드에서 보내는 값은 파일 업로드가 아니라 Data URL 문자열입니다.
예시
data:image/png;base64,iVBORw0K...inference.py에서는 이 값을 아래 순서로 처리합니다.
- 콤마 기준으로 메타데이터와 Base64 본문 분리
base64.b64decode()로 디코딩Pillow의Image.open()으로 이미지 객체 생성- 전처리 함수 호출
- 모델 입력으로 변환 후 예측
전처리 결과는 28x28 배열이고, 이 값을 flatten() 해서 (1, 784) 형태로 바꾼 뒤 model.predict()에 넣습니다.
즉, 서빙의 핵심 로직은 사실 아래 한 줄로 압축됩니다.
브라우저 이미지 -> 전처리 -> 784차원 벡터 -> 모델 예측
10. 이미지 전처리(서빙 품질의 핵심)
# backend/app/services/image_preprocessing.py

import numpy as np
from PIL import Image, ImageFilter, ImageOps

def center_by_mass_np(data: np.ndarray) -> np.ndarray:
    """
    질량 중심(centroid)을 이미지 중앙(13.5, 13.5)에 가깝게 이동.
    SciPy 없이 numpy만으로 shift 구현.
    """
    ys, xs = np.indices(data.shape)
    total = float(data.sum())
    if total <= 0:
        return data

    cy = float((ys * data).sum() / total)
    cx = float((xs * data).sum() / total)

    target = (data.shape[0] - 1) / 2.0
    shift_y = int(round(target - cy))
    shift_x = int(round(target - cx))

    out = np.zeros_like(data)
    height, width = data.shape

    y0_src = max(0, -shift_y)
    y1_src = min(height, height - shift_y)
    x0_src = max(0, -shift_x)
    x1_src = min(width, width - shift_x)

    y0_dst = max(0, shift_y)
    y1_dst = min(height, height + shift_y)
    x0_dst = max(0, shift_x)
    x1_dst = min(width, width + shift_x)

    out[y0_dst:y1_dst, x0_dst:x1_dst] = data[y0_src:y1_src, x0_src:x1_src]
    return out

def preprocess_canvas_png_to_28x28(img: Image.Image) -> np.ndarray:
    """
    캔버스 PNG를 MNIST 스타일 28x28 grayscale 배열로 전처리.
    """
    img = img.convert("L")
    img = ImageOps.invert(img)

    arr = np.asarray(img)
    mask = arr > 30

    if mask.any():
        ys, xs = np.where(mask)
        x0, x1 = xs.min(), xs.max()
        y0, y1 = ys.min(), ys.max()

        box_width = int(x1 - x0 + 1)
        box_height = int(y1 - y0 + 1)
        pad = int(0.35 * max(box_width, box_height))

        x0 = max(0, x0 - pad)
        y0 = max(0, y0 - pad)
        x1 = min(arr.shape[1] - 1, x1 + pad)
        y1 = min(arr.shape[0] - 1, y1 + pad)

        img = img.crop((x0, y0, x1 + 1, y1 + 1))

    width, height = img.size
    side = max(width, height)
    square = Image.new("L", (side, side), 0)
    square.paste(img, ((side - width) // 2, (side - height) // 2))
    img = square

    img = img.resize((56, 56), Image.Resampling.LANCZOS)
    img = img.filter(ImageFilter.MaxFilter(size=3))
    img = img.filter(ImageFilter.MinFilter(size=3))
    img = img.filter(ImageFilter.GaussianBlur(radius=0.4))
    img = img.resize((28, 28), Image.Resampling.LANCZOS)

    data = np.asarray(img).astype(np.float32)
    return center_by_mass_np(data)
backend/app/services/image_preprocessing.py는 서빙 정확도를 결정하는 핵심 파일입니다.
모델은 28x28 흑백 숫자 입력을 기대하지만, 실제 브라우저 입력은 아래처럼 제각각입니다.
- 숫자 크기가 다름
- 위치가 치우쳐 있음
- 여백이 많음
- 획이 거칠거나 두꺼움
그래서 바로 모델에 넣지 않고 전처리를 수행합니다.
10-1. grayscale 변환
이미지를 L 모드로 변환해 흑백 이미지로 만듭니다.
10-2. 색 반전
캔버스는 흰 배경에 검은 숫자이므로, 이를 MNIST 스타일에 가깝게 맞추기 위해 반전합니다.
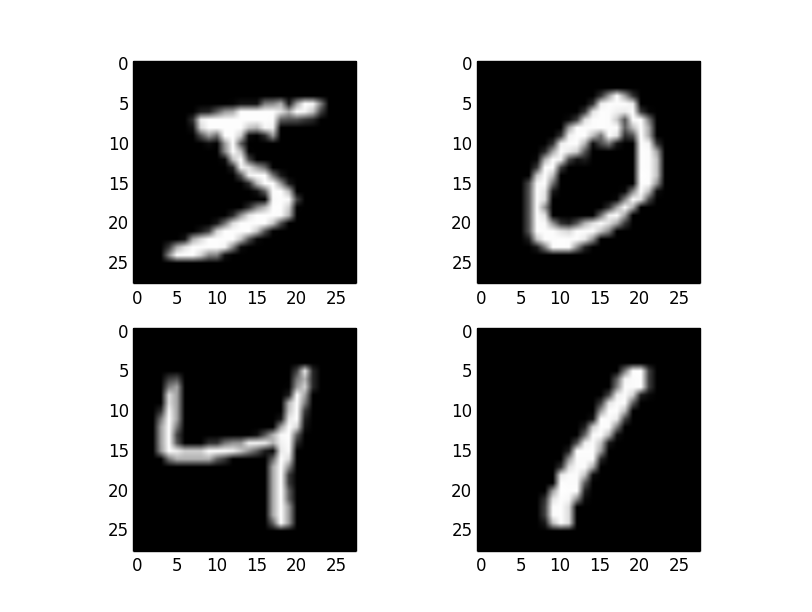
(MNIST 데이터 예시)
10-3. 숫자 영역 탐지
임계값보다 큰 픽셀만 남겨 숫자가 있는 실제 영역을 찾습니다.
10-4. bounding box 크롭
숫자 영역을 잘라내되, 너무 타이트하지 않게 패딩을 추가합니다.
10-5. 정사각형 보정
가로세로 비율이 달라도 정사각형 배경 위에 중앙 정렬합니다.
10-6. 리사이즈와 필터
코드는 아래 흐름으로 이미지를 다듬습니다.
56x56확대MaxFilterMinFilterGaussianBlur28x28축소
10-7. 질량 중심 정렬
center_by_mass_np()는 숫자의 질량 중심을 계산해 중앙으로 이동시킵니다.
이 단계가 중요한 이유는 사용자가 숫자를 약간 치우치게 그려도 모델이 더 안정적으로 받아들일 수 있기 때문입니다.
결국 전처리의 목적은 하나입니다.
사용자 입력을 학습 데이터와 최대한 비슷한 분포로 맞추는 것
서빙에서는 모델 성능만큼 전처리 품질도 중요합니다.
11. 프론트엔드: Vue.js 입력 화면 구성
<script setup lang="ts">
import { computed, onMounted, ref } from 'vue'
type PredictResponse = {
digit?: number
}
const CANVAS_SIZE = 280
const BRUSH_SIZE = 25
const DEFAULT_API_BASE_URL = 'http://127.0.0.1:8000'
const canvas = ref<HTMLCanvasElement | null>(null)
const context = ref<CanvasRenderingContext2D | null>(null)
const isDrawing = ref(false)
const prediction = ref<number | null>(null)
const loading = ref(false)
const apiBaseUrl = computed(
() => import.meta.env.VITE_API_BASE_URL?.trim() || DEFAULT_API_BASE_URL,
)
const getContext = () => {
if (!context.value) {
throw new Error('Canvas context is not initialized.')
}
return context.value
}
const getCanvas = () => {
if (!canvas.value) {
throw new Error('Canvas element is not available.')
}
return canvas.value
}
const clearCanvas = () => {
const canvasElement = getCanvas()
const ctx = getContext()
ctx.fillStyle = 'white'
ctx.fillRect(0, 0, canvasElement.width, canvasElement.height)
prediction.value = null
}
const beginStroke = (x: number, y: number) => {
const ctx = getContext()
isDrawing.value = true
ctx.beginPath()
ctx.moveTo(x, y)
}
const continueStroke = (x: number, y: number) => {
if (!isDrawing.value) {
return
}
const ctx = getContext()
ctx.lineTo(x, y)
ctx.stroke()
}
const stopDrawing = () => {
isDrawing.value = false
}
const startDrawing = (event: MouseEvent) => {
beginStroke(event.offsetX, event.offsetY)
}
const draw = (event: MouseEvent) => {
continueStroke(event.offsetX, event.offsetY)
}
const getTouchPosition = (event: TouchEvent) => {
const canvasElement = getCanvas()
const rect = canvasElement.getBoundingClientRect()
const touch = event.touches[0]
if (!touch) {
return null
}
return {
x: touch.clientX - rect.left,
y: touch.clientY - rect.top,
}
}
const handleTouchStart = (event: TouchEvent) => {
const position = getTouchPosition(event)
if (!position) {
return
}
beginStroke(position.x, position.y)
}
const handleTouchMove = (event: TouchEvent) => {
const position = getTouchPosition(event)
if (!position) {
return
}
event.preventDefault()
continueStroke(position.x, position.y)
}
const predict = async () => {
const canvasElement = getCanvas()
loading.value = true
try {
const response = await fetch(`${apiBaseUrl.value}/predict`, {
method: 'POST',
headers: {
'Content-Type': 'application/json',
},
body: JSON.stringify({
image: canvasElement.toDataURL('image/png'),
}),
})
if (!response.ok) {
throw new Error(`Prediction request failed with ${response.status}.`)
}
const result: PredictResponse = await response.json()
prediction.value = typeof result.digit === 'number' ? result.digit : null
} catch (error) {
console.error('Prediction error:', error)
window.alert('서버에 연결할 수 없습니다. FastAPI 서버가 실행 중인지 확인하세요.')
} finally {
loading.value = false
}
}
onMounted(() => {
const canvasElement = getCanvas()
const ctx = canvasElement.getContext('2d')
if (!ctx) {
throw new Error('2D canvas context is not supported in this browser.')
}
context.value = ctx
ctx.lineWidth = BRUSH_SIZE
ctx.lineCap = 'round'
ctx.lineJoin = 'round'
ctx.strokeStyle = 'black'
clearCanvas()
})
</script>
<template>
<section class="flex min-h-screen items-center justify-center bg-slate-100 px-4 py-8">
<div class="w-full max-w-md rounded-2xl bg-white p-8 text-center shadow-2xl">
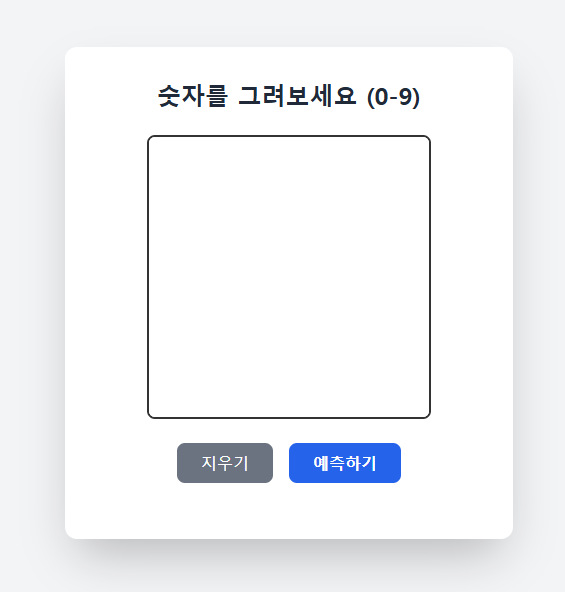
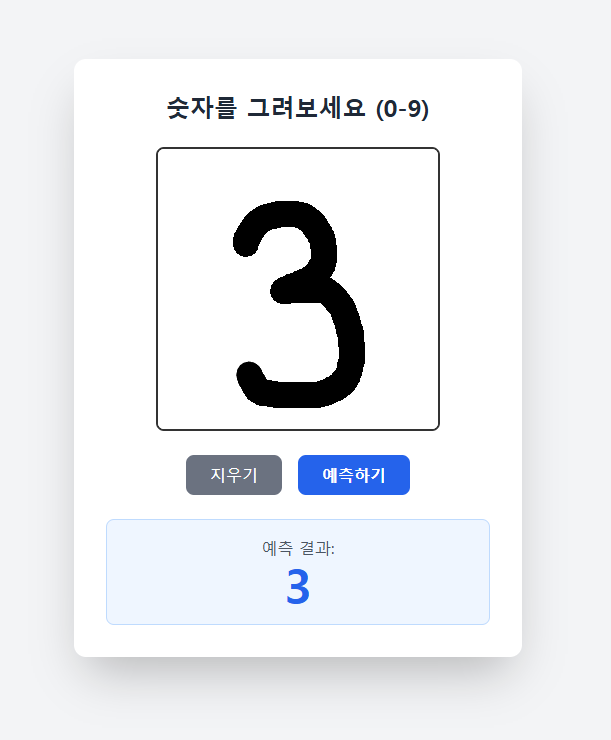
<h1 class="mb-3 text-2xl font-bold text-slate-800">숫자를 그려보세요 (0-9)</h1>
<p class="mb-6 text-sm text-slate-500">
캔버스에 숫자를 그린 뒤 예측하기 버튼을 눌러보세요.
</p>
<div class="mb-6 flex justify-center">
<canvas
ref="canvas"
:width="CANVAS_SIZE"
:height="CANVAS_SIZE"
class="touch-none cursor-crosshair rounded-lg border-2 border-slate-700 bg-white shadow-inner"
@mousedown="startDrawing"
@mousemove="draw"
@mouseup="stopDrawing"
@mouseleave="stopDrawing"
@touchstart="handleTouchStart"
@touchmove="handleTouchMove"
@touchend="stopDrawing"
/>
</div>
<div class="mb-6 flex justify-center gap-4 border border-black pt-1">
<button
type="button"
class="rounded-lg bg-slate-500 px-6 py-2 font-medium text-white transition hover:bg-slate-600"
@click="clearCanvas"
>
지우기
</button>
<button
type="button"
class="rounded-lg bg-blue-600 px-6 py-2 font-bold text-white transition hover:bg-blue-700 disabled:cursor-not-allowed disabled:bg-blue-300"
:disabled="loading"
@click="predict"
>
{{ loading ? '분석 중...' : '예측하기' }}
</button>
</div>
<div v-if="prediction !== null" class="rounded-lg border border-blue-200 bg-blue-50 p-4">
<p class="text-sm text-slate-600">예측 결과:</p>
<p class="text-5xl font-black text-blue-600">{{ prediction }}</p>
</div>
</div>
</section>
</template>
프론트엔드의 핵심은 frontend/src/components/DigitRecognizer.vue입니다.
이 컴포넌트는 아래 기능을 모두 담당합니다.
- 캔버스 생성
- 마우스 드로잉
- 터치 드로잉
- 캔버스 초기화
- 예측 API 호출
- 결과 표시
앱 구조는 간단합니다.
main.ts: Vue 앱 생성router/index.ts:/라우트 등록HomeView.vue:DigitRecognizer.vue렌더링
즉, 실제 사용자 경험은 거의 전부 DigitRecognizer.vue에 모여 있습니다.
12. 캔버스 입력 구현
이 컴포넌트는 280x280 크기의 HTML canvas를 사용합니다.
const CANVAS_SIZE = 280
const BRUSH_SIZE = 25
이렇게 큰 캔버스에서 사용자가 편하게 숫자를 그리고, 서버에서는 이를 28x28로 줄입니다.
캔버스 관련 구현 포인트는 아래와 같습니다.
12-1. 초기화
clearCanvas()에서 캔버스를 흰색으로 채우고 예측 결과를 초기화합니다.
12-2. 마우스 드로잉
mousedownmousemovemouseupmouseleave
이 이벤트를 이용해 선을 이어 그립니다.
12-3. 터치 드로잉
touchstarttouchmovetouchend
모바일에서도 그릴 수 있도록 터치 이벤트를 별도로 처리합니다.
즉, 단순 데스크톱 데모가 아니라 모바일 입력까지 고려한 구현입니다.
13. 프론트엔드에서 예측 요청 보내기
예측 버튼을 누르면 프론트엔드는 캔버스 이미지를 Data URL로 직렬화합니다.
canvasElement.toDataURL('image/png')그 다음 fetch()로 아래 요청을 보냅니다.
{
  "image": "data:image/png;base64,..."
}
서버 응답을 받은 뒤, digit 값이 숫자이면 화면에 그대로 렌더링합니다.
이 방식의 장점은 다음과 같습니다.
- 파일 업로드 UI가 필요 없습니다.
- 구현이 단순합니다.
- 브라우저 캔버스와 자연스럽게 연결됩니다.
14. API 주소를 환경 변수로 분리하기
DigitRecognizer.vue는 API 주소를 하드코딩하지 않고 환경 변수에서 읽습니다.
우선순위는 아래와 같습니다.
VITE_API_BASE_URL- 없으면 기본값
http://127.0.0.1:8000
frontend/.env.local 예시는 다음과 같습니다.
VITE_API_BASE_URL=http://127.0.0.1:8000이렇게 하면 개발 환경, 스테이징 환경, 배포 환경에서 같은 프론트엔드 코드를 그대로 재사용할 수 있습니다.
15. 로컬에서 실행하기
이번 글은 학습 이후 단계만 다루므로, 모델 파일이 이미 있다고 가정합니다.
15-1. 백엔드 실행
cd backend
python -m venv venv
venv\Scripts\activate
pip install -r requirements.txt
uvicorn app.main:app --reload
백엔드는 기본적으로 http://127.0.0.1:8000에서 실행됩니다.
15-2. 프론트엔드 실행
cd frontend
npm install
npm run dev
15-3. 환경 변수 확인
frontend/.env.local
VITE_API_BASE_URL=http://127.0.0.1:8000이제 브라우저에서 프론트엔드에 접속한 뒤 숫자를 그리고 예측하기 버튼을 누르면 됩니다.
16. 실제 요청/응답 예시
요청
POST /predict
Content-Type: application/json

{
  "image": "data:image/png;base64,iVBORw0KGgoAAAANSUhEUgAA..."
}
응답
{
  "digit": 3
}
이 응답 구조는 매우 단순하지만, 프론트엔드 입장에서는 가장 다루기 쉬운 형태입니다.
17. 서빙 단계에서 자주 만나는 문제
17-1. 모델 파일을 찾지 못하는 경우
원인 후보
- 모델 파일 경로가 다름
- 기대한 위치에 모델 파일이 없음
확인 포인트
backend/models/digit_model_28.joblib존재 여부config.py의 경로 설정
17-2. 프론트엔드에서 서버 연결 실패
원인 후보
- FastAPI 서버가 꺼져 있음
- API 주소가 잘못 설정됨
- CORS 설정 문제
확인 포인트
http://127.0.0.1:8000접속 가능 여부VITE_API_BASE_URL값 확인- 백엔드 CORS 설정 확인
17-3. 예측이 불안정한 경우
원인 후보
- 전처리 결과가 학습 데이터 형식과 다름
- 숫자가 너무 작거나 한쪽에 치우쳐 있음
- 획 굵기와 입력 스타일 차이
해결 방향
- 전처리 파라미터 조정
- 캔버스 브러시 크기 조정
- 더 강한 모델로 교체
18. 마무리
모델 학습이 끝났다고 해서 서비스가 완성되는 것은 아닙니다.
실제로 사용자가 써볼 수 있으려면 API, 전처리, 입력 UI, 프론트엔드-백엔드 연결이 모두 맞물려야 합니다.
이번 프로젝트의 서빙 파트는 바로 그 최소 구성을 잘 보여줍니다.
- FastAPI가 모델을 메모리에 로드하고
- Vue.js가 사용자의 입력을 만들고
- 전처리 로직이 입력을 모델 형식에 맞추고
- 예측 결과를 다시 사용자에게 반환합니다
한 줄로 정리하면 이렇습니다.
AI 모델 서빙은 모델 파일을 올리는 작업이 아니라, 사용자의 입력을 모델과 연결되는 서비스 흐름으로 바꾸는 작업이다.