
NestJs filter (with Java)
예제코드는 github에 있습니다:)
Goal
-
NestJs의 filter에 대해 알아보기. -
CustomException을 구현한 후 해당Exception을Catch하는filter만들기.
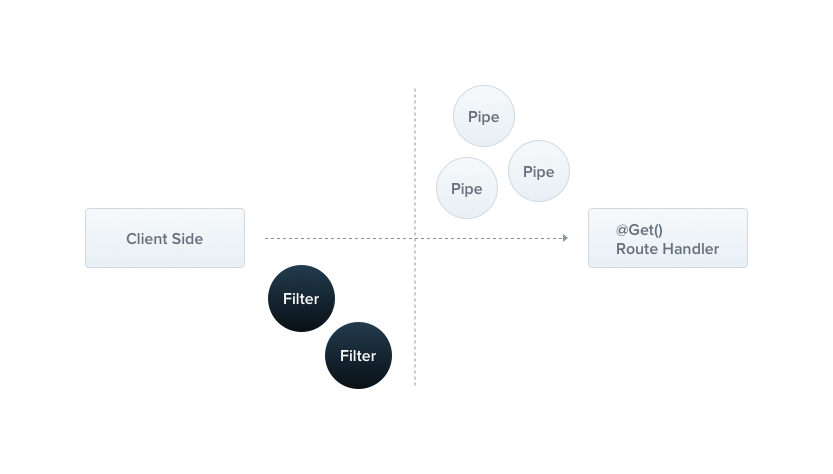
filter란?
NestJs에서는 애플리케이션 전체에서 처리되지 않은 모든 예외(Exception)를 처리하는 예외 레이어가 내장되어 있다.
애플리케이션 코드에서 처리되지 않는 예외는 예외 레이어계층에서 예외를 포작한 다음 자동으로 적절한 사용자 친화적인 응답을 보낸다.
기본적으로 이 동작은 내장 된 전역 예외 필터에 의해 수행되게 되는데, 이 예외는 HttpException유형의 예외를 처리한다.
예외가 unrecognized인 경우(HttpException혹은 HttpException을 상속 받는 class가 아닌 경우) Client는 다음과 같은 기본 JSON을 받게 된다.
{
  "statusCode": 500,
  "message": "Internal server error"
}
Base Exception
내장된 HttpException class는 @nestjs/common에서 제공을 한다.
먼저 HttpException의 구조를 확인해보자면 아래와 같다.
export declare class HttpException extends Error {
    private readonly response;
    private readonly status;

    constructor(response: string | Record<string, any>, status: number);
    initMessage(): void;
    initName(): void;
    getResponse(): string | object;
    getStatus(): number;
    static createBody(objectOrError: object | string, description?: string, statusCode?: number): object;
}Error를 상속받고 있으며 프로퍼티로는 response와 status를 가지고 있다. response의 역할과 status의 역할은 다음과 같다.
-
response: Client에게 응답이 되는 JSON의 본문을 정의하는 곳이다.
-
status: HTTP 통신의 상태값을 결정한다.
기본적으로 Client에게 응답이 되는 JSON은 두 가지의 기본속성을 가지고 있다.
{
    "statusCode": ,
    "message" :
}
만약 기본 응답에서 message 부분만 변경하고자 하면 HttpException을 생성할 때 string을 넣어주면 된다.
throw new HttpException('BadRequest', HttpStatus.BAD_REQUEST);

// output
{
    "statusCode": 400,
    "message": "BadRequest"
}message말고 응답이 되는 JSON 전체를 재정의하고 싶으면 객체를 넣어주면 된다.
//2
const response: Record<string, any> = {
    'status': HttpStatus.BAD_REQUEST,
    'errorMessage': 'BadRequest'
}
throw new HttpException(response, HttpStatus.BAD_REQUEST);

// output
{
  	// key 값이 바뀐 것을 확인할 수 있다.
    "status": 400,
    "errorMessage": "BadRequest"
}
Exception hierarchy
예외 계층 구조를 직접 만드는 것이 좋다. 예외 계층 구조를 만든다는 것은 HttpException을 상속받아 Exception을 Custom하는 것을 이야기 한다. 직접 만들어 보면 아래와 같다.
export class CustomHttpException extends HttpException {
  // 여기서 생성자로 미리 정의해둔 상수 혹은 객체를 받아 부모의 생성자에 넣어준다.
  constructor(response: string | Record<string, any>, status: HttpStatus) {
    super(response, status);
  }
}
이전에 Java를 이용하여 CustomHttpException을 작성했을 때와 크게 다르지 않음을 볼 수 있다. Java에서는 RuntimeException을 상속받아 CustomException을 작성했었다.
@Getter
public class CustomHttpException extends RuntimeException{
    private final ErrorCode errorCode;

    public CustomHttpException(ErrorCode errorCode){
        super(errorCode.getMessage());
        this.errorCode = errorCode;
    }
}
Nest에서 제공해주는 built-in HttpException
Nest에서는 상용구 코드를 작성할 필요성을 줄이기 위해 @nestjs/common에서 여러가지 HttpException의 종류들을 제공해준다.
종류는 Built-in HttpException에서 확인할 수 있다.
Exception filter 만들기
내장 예외 필터를 이용하여도 많은 경우를 자동으로 처리할 수 있지만 우리가 원하는 것은 자동으로 처리되는 것이 아니라 커스텀하기를 원한다!
이번 경우 또한 이전에 Java에서는 @RestControllerAdvice와 @ExceptionHandler() 어노테이션을 이용하여 Exception Handler를 만들었다.
@RestControllerAdvice
public class CustomExceptionHandler {
    @ExceptionHandler(CustomHttpException.class)
    public ResponseEntity<ErrorResponse> handleCustomException(CustomHttpException e) {
        //...
    }
}NestJs에서 Java의 ExceptionHandler와 같이 지정한 exception이 발생할 때 해당 Exception에 대한 응답을 커스텀 할 수 있도록 Exception Filter를 정의할 수 있다.
Exception Filter를 만들려면 ExceptionFilter 인터페이스를 구현하여 catch()안에서 해당 Exception에 대한 응답을 처리할 수 있다.
// ExceptionFilter interface
// 제네릭을 통해 `Exception`의 타입을 지정해 줄 수 있다.
export interface ExceptionFilter<T = any> {
    catch(exception: T, host: ArgumentsHost): any;
}

// Custom Exception Filter Ex
@Catch(CustomHttpException)
export class CustomHttpExceptionFilter implements ExceptionFilter<CustomHttpException> {
  catch(exception: CustomHttpException, host: ArgumentsHost) {
    const httpArgumentHost = host.switchToHttp();
    const request = ctx.getRequest<Request>();
    const response = ctx.getResponse<Response>();
    const status = exception.getStatus();

    response
      .status(status)
      .send();
  }
}
@Catch() 데코레이터는 필요한 메타 데이터를 예외 필터에 바인딩하여 필터가 해당하는 Exception을 처리하고 있음을 NestJs에게 알려준다. (@Catch() 안에는 여러 개의 예외를 ,를 이용하여 넣을 수 있다.)
ArgumentHost
ArgumentHost는 orginal요청 핸들러(예외가 발생한 곳)에 전달된 인수를 감싸는 래퍼이다. 여기서 애플리케이션에서 사용하는 프로토콜에 맞게 스위칭 할 수 있는 method를 지원한다.
위의 예제에서와 같이 현재는 Http프로토콜을 이용하기 때문에 switchToHttp()를 호출했고 return된 httpArgumentHost에서 Request와 Response를 얻어와 Client에게 응답을 커스텀 할 수 있게 된다.
filter 적용하기
이전 NesJs pipe에서 pipe를 적용했던거와 같이 filter를 적용하는 것도 크게 다르지 않다.
filter를 사용할 수 있는 level은 총 세가지로 나눠질 수 있다.
-
Controller-level filter
-
Handler-level filter
-
Global-level filter
Controller-level filter
컨트롤러 레벨에서 @UseFilters 데코레이터를 이용하여 현재 컨트롤러에서 발생하는 Exception에 대한 filter를 적용할 수 있다.
@Controller()
@UseFilters(CustomHttpExceptionFilter)
export class AppController {
    //...
}
Handler-level filter
핸들러 레벨에서 @UseFilters 데코레이터를 이용하여 사용할 수 있으며 해당 핸들러에서 발생하는 Exception에 대한 filter를 적용할 수 있다.
@Get()
@UseFilters(CustomHttpException)
getHello(): string {
    throw new CustomHttpException('customException', HttpStatus.BAD_REQUEST);
}
Global-level filter
애플리케이션이 bootstrap되는 main.ts에서 설정이 가능하다.
async function bootstrap() {
  const app = await NestFactory.create(AppModule);
  app.useGlobalFilters(new CustomHttpExceptionFilter());
  await app.listen(3000);
}
bootstrap();
혹은 root Module에서 custom Provider를 이용하여 global filter를 적용할 수 있다.
@Module({
  providers: [
    {
      provide: APP_FILTER,
      useClass: CustomHttpExceptionFilter
    }
  ],
})
export class AppModule { }
공식문서에 따르면 filter를 적용할 때 인스턴스를 이용하는 것이 아닌 클래스를 사용하여 필터를 적용하는 것을 권장하고 있다. 그 이유는 메모리 사용량을 줄이기 위해서이다. (싱글톤으로 유지하여 해당 필터의 인스턴스를 동일하게 사용하기 때문이다.)
Catch everything
커스텀하여 예외를 처리할 수 있는 방법을 알아봤다. 그 외적으로 발생하는 모든 예외를 처리할 수 있는 Exception Filter 또한 지정할 수 있다.
그 방법은 @Catch()데코레이터의 argument를 아무것도 지정해주지 않는 것이다.
@Catch()
export class CustomAllExceptionFilter implements ExceptionFilter {
  catch(exception: unknown, host: ArgumentsHost) {
    const ctx = host.switchToHttp();
    const response = ctx.getResponse();
    const request = ctx.getRequest();

    const status =
      exception instanceof HttpException
        ? exception.getStatus()
        : HttpStatus.INTERNAL_SERVER_ERROR;

    response.status(status).json({
      statusCode: status,
      timestamp: new Date().toISOString(),
      path: request.url,
    });
  }
}
위와 같이 설정을 하게 되면 처리되지 않은 Exception에 대하여 커스텀하게 처리할 수 있게 된다.
Reference