NestJs의 pipe란?
예제코드는 github에 있습니다 :)
Goal
-
NestJs에서의 pipe에 대한 이해 및 사용
-
Custom Pipe 작성
Pipe란?
공식 문서에서는 pipe란 @Injectable 데코레이터를 가지고 있으며 PipeTransfrom을 구현한 class라고 설명하고 있다.

pipe는 두 가지의 일반적인 사례를 가지게 된다.
-
변환: Client에게 입력받은 데이터 형식을 원하는 형식으로 변환(예를들어 문자열을 정수로)
-
검증: Client에게 입력받은 데이터의 유효성을 체크하고 데이터가 올바르지 않으면 예외를 던진다.
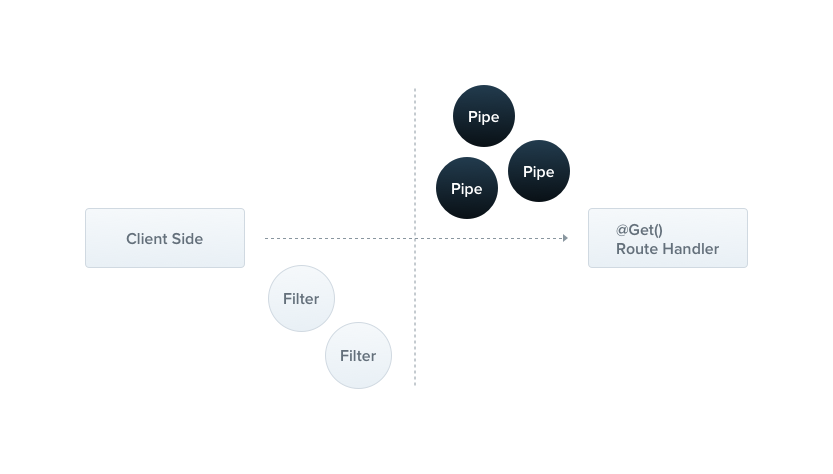
두 경우 모두 controller의 핸들러에 들어오는 인수에 대해 작동을 하게 된다. NestJs의 핸들러가 호출되기 전에 pipe에서 핸들러에 들어오는 인수를 받게 되고 정의한 pipe가 동작하게 된다.
간단하게 설명하자면 Client에게서 받은 요청에 대해 pipe에서 먼저 변환 혹은 검증 을 진행 후 유효하면 핸들러가 호출되고 그렇지 않다면 exception | error 을 발생시킨다.
Nest에서 제공하는 Built-in pipes
NestJs에서는 바로 사용할 수 있는 Built-in파이프 들을 제공해준다. 해당 pipe들은 @nestjs/common 안에 들어있다.
Build-in으로 제공해주는 pipe들의 종류는 built-in pipes에서 확인할 수 있다.
Binding pipes
pipe를 사용되는 level은 네가지로 나눠질 수 있다.
-
controller-level pipe
-
Handler-level pipe
-
parameter-level pipe
-
Global-level pipe
Controller-level Pipe
컨트롤러 레벨에서 @UsePipes() 데코레이터를 이용하면 현재 컨트롤러에 정의되어 있는 모든 핸들러에 pipe가 적용된다.
@Controller('cats')
@UsePipes(ValidationPipe)
export class CatsController {
  //...
}
Handler-level Pipe
핸들러 레벨에서 @UesPipes() 데코레이터를 이용하여 사용할 수 있다. 핸들러 레벨에서 pipe를 사용하게 될 경우 핸들러의 모든 파라미터에 적용이 된다.
@Post()
@UsePipes(ValidationPipe)
saveCatInfo(@Body() req: CreateCatDto) {
    //...
}
parameter-level pipe
파라미터 레벨의 pipe이기 대문에 특정한 파라미테에만 적용이 되는pipe이다.
@Get('/:id')
findById(@Param('id', ParseIntPipe) id: number) {
    //...
}
Global-level pipe
애플리케이션이 bootstrap되는 main.ts에서 설정이 가능하다.
@filename(main.ts)
async function bootstrap() {
  const app = await NestFactory.create(AppModule);
  app.useGlobalPipes(new ValidationPipe())
  await app.listen(3000);
}
bootstrap();
위와 같이 app.useGlobalPipes에 ValidationPipe를 생성하여 인스턴스를 넣어주면 된다.
하지만 위의 code의 경우 의존성 주입관점에서 main.ts에 직접 선언해주기 때문에 code가 유연하지 않다. 추 후 GlobalPipes가 변경될 경우 main.ts를 수정해주어야 한다.
NestJs에서는 위와 같은 방법 말고 root Module에서 Custom Provider를 이용하여 GlobalPipes를 등록할 수 있는 방법을 제공해준다.
@filename(app.module.ts)
@Module({
  imports: [CatsModule],
  controllers: [],
  providers: [
    {
      provide: APP_PIPE,
      useClass: ValidationPipe
    }
  ],
})
export class AppModule { }
이렇게 CustomProvider로 정의를 해주게 되면 GlobalPipes로 사용할 pipe가 변경되더라도 유연하게 대채할 수 있게 된다.
pipe를 통과하지 못하면 어떻게 될까?
parameter-level pipe를 예로 살펴보자. 먼저 pipe를 정의하지 않고 id값에 number가 아닌 string값을 보내보겠다.
@Get('/:id')
findById(@Param('id') id: number) {
    console.log(id); // output = leewoooo
    console.log(typeof id); // output = string
}

// curl
curl -XGET http://localhost:3000/leewoooo
결과는 어떻게 되었을까? 콘솔에는 leewoooo가 찍히게 된다. 파라미터의 타입을 number로 정의하였지만 넘어오는 값은 string 타입의 leewoooo라는 값이 넘어오게된다.
이렇게 되면 나는 해당 값이 맞게 들어왔는지 검증하는 로직을 추가로 작성해야 할 것이다.
이번에는 pipe를 정의하여 동일하게 요청을 보내보자.
@Get('/:id')
findById(@Param('id', ParseIntPipe) id: number) {
    console.log(id); // output = leewoooo
    console.log(typeof id); // output = string
}

// curl
curl -XGET http://localhost:3000/leewoooo
{
    "statusCode":400,
    "message":"Validation failed (numeric string is expected)",
    "error":"Bad Request"
}
이와 같이 핸들러가 호출되기 전에 pipe에서 검증 후 발생한 예외에 대해 response를 받게된다. (추 후 Exception filter를 다룰 때 pipe에 대한 예외처리도 같이 정리하겠다.)
custom pipe 만들기
PipeTransform알아보기
글 초장에도 작성을 했지만 NestJs는 pipe를 @Injectable 데코레이터를 가지고 있으며 PipeTransfrom을 구현한 class라고 설명하고 있다.
즉 PipeTransfrom을 구현한 Provider라고 생각할 수 있다. PipeTransfrom는 아래와 같은 method를 가지고 있다.
//PipeTransfrom
export interface PipeTransform<T = any, R = any> {
    transform(value: T, metadata: ArgumentMetadata): R;
}

// ArgumentMetadata
export interface ArgumentMetadata {
    readonly type: Paramtype; // 'body' | 'query' | 'param' | 'custom';
    readonly metatype?: Type<any> | undefined;
    readonly data?: string | undefined;
}transfrom()에서 value는 Client에서 보낸 data가 아직 핸들러에 전달 되기 전의 data이며 metadata는 value에 대한 metaData를 가지고 있다.
| 프로퍼티 명 | 정의 |
|---|---|
type | @body(), @query(), @param() 또는 사용자 정의 매개변수인지 나타낸다. |
metatype | value의 metaType을 제공한다. |
data | 데코레이터에 전달된 문자열에 해당된다. @Param('id')인 경우 'id'가 넘어온다. |
ParseIntPipe를 만들어보기
class를 하나 만들고 PipeTransform interface를 구현하기만 하면 pipe로 사용할 수 있는 class가 된다.
사용을 할 때는 class의 인스턴스를 이용하여 pipe를 정의하면 된다.
@filename(parse-int.pipe.ts)
@Injectable()
export class ParseIntPipe implements PipeTransform {
  transform(value: string, metadata: ArgumentMetadata) {
    // data transform
    const val = parseInt(value, 10);
    if (isNaN(val)) {
      // validation
      throw new BadRequestException('Validation failed');
    }
    return val;
  }
}

// controller
@Get('/:id')
findById(@Param('id', new ParseIntPipe()) id: number) {
    //...
}
Class validator
NestJs는 class-validator 라이브러리를 이용하여 데코리에터 기반 유효성 검사를 사용할 수 있다.
필요한 패키지는 아래와 같다.
yarn add class-validator class-transformer위의 두 개의 패키지와 Nesjs의 pipe가 결합될 때 Client가 요청하는 RequestBody에 대한 validate가 강력해진다.
Usage
먼저 Client가 보내는 RequestBody에 해당하는 dto class를 정의한 후 class-validator 패키지의 데코레이터를 이용하여 validate할 프로퍼티 위에 선언해준다.
import { IsInt, IsString } from "class-validator";

export class CreateCatDto {
  @IsString()
  name: string;

  @IsInt()
  age: number;
}
데코레이터의 이름에서 알 수 있듯이 해당 데코레이터가 무슨 역할을 하는지 직관적으로 보여준다. 예를 들어 @IsString()에 해당하는 데코레이터는 해당 프로퍼티가 string인지 validate하는 역할을 한다.
이 후 pipe를 작성하여 class-validator를 이용하여 validate한 프로퍼티에 대한 error가 발생하였는지 확인해준다.
@Injectable()
export class ClassValidation implements PipeTransform<any> {
  async transform(value: any, { metatype }: ArgumentMetadata) {
    // 1
    if (!metatype || !this.toValidate(metatype)) {
      return value;
    }

    // 2
    const object = plainToClass(metatype, value);
    // 3
    const errors = await validate(object);

    // 4
    if (errors.length > 0) {
      errors.forEach((e) => console.log(e.toString()))
      throw new BadRequestException('Validation failed');
    }

    return value;
  }

  private toValidate(metatype: Function): boolean {
    const types: Function[] = [String, Number, Boolean, Array, Object];
    return !types.includes(metatype);
  }
}
위의 code를 정리하자면 다음과 같다.
-
class-validator이기 때문에 사용자 정의 타입 (class)가 아닌 경우value를 그대로return해준다.
RequestBody가value로 넘어올 때Controller에서 정의해준type으로metaType이 들어오게 된다. -
공식문서에 따르면
RequestBody로 들어온pure javascript object를type object로 변환해주는 과정이다.
이 과정을 통해class-validator를 이용하여validate를 할 수 있는 상태가 되는 것이다. -
async가 붙은 이유는NestJs가 동기 및 비동기 파이프를 모두 지원하기 때문이다. 일부의class를validate할 때 비동기 일 수 있기 때문이다. -
마지막으로
validate()를 호출하면ValidationError[]가 return되는데error가 존재하면 배열에error가 담겨있고 그렇지 않으면 빈 배열이return된다.
사실 위에 작성한 ClassValidation은 NestJs에서 built-in으로 제공해주는 ValidationPipe의 내부 구조와 거의 비슷하다.
확인을 해보고 싶다면 ValidationPipe에서 확인이 가능하다.
정리
pipe의 사용법 및 Custom Pipe를 작성하는 방법을 알아봤다.
pipe를 알기 전까지는 Client에서 넘어오는 Data들에 대한 validation하는 부분들에 대해 Controller나 Service 레이어에서 처리를 한 후 비지니스 로직에서 값을 사용했었다.
하지만 NestJs에서 pipe를 이용하여 validation하는 부분의 관심사를 분리할 수 있게 되었다. 그렇기 때문에 controller나 service 레이어에서 각 해당하는 역할에만 집중할 수 있게 되었다.

