1차 프로젝트를 진행할 때에는 Spring Security를 사용하지 않았기 때문에 모든 페이지에 세션 체크를 진해아는 방식을 사용했었다.
하지만! Security를 알게 되었기 때문에 이번 프로젝트에서는 Security를 사용한 보안성 높은 처리 과정을 구현해보려고 공부를 시작했다.
하지만 처음 보는 내용들에 머리가 아파왔다..
그래서 공부의 내용을 기록해보고자 한다! 나랑 비슷한 사람들에게 조금이나마 도움이 되기를..
먼저 프로젝트의 프레임워크는 다음과 같다.
- Spring Boot 2.7.17
- MyBatis
- Security 5.7.11
1. Spring Security 란
스프링 시큐리티는 스프링 기반 어플리케이션의 보안을 담당하는 스프링 하위 프레임워크이다.
- 인증 (Authentication) : 해당 사용자가 본인인지 확인하는 절차
- 인가 (Authorization) : 인증된 사용자가 요청한 자원에 접근 가능한지 결정하는 절차
- 권한 : 인증된 주체가 어플리케이션의 동작을 수행할 수 있는지 결정
→ 인증 과정을 통해 주체가 증명된 후 권한을 부여할 수 있고,
→ 웹 요청 권한과, 메서드 호출 / 도메일 인스턴스에 대한 접근 권한 부여가 있다.
2. Spring Security 동작 원리
-
요청 수정
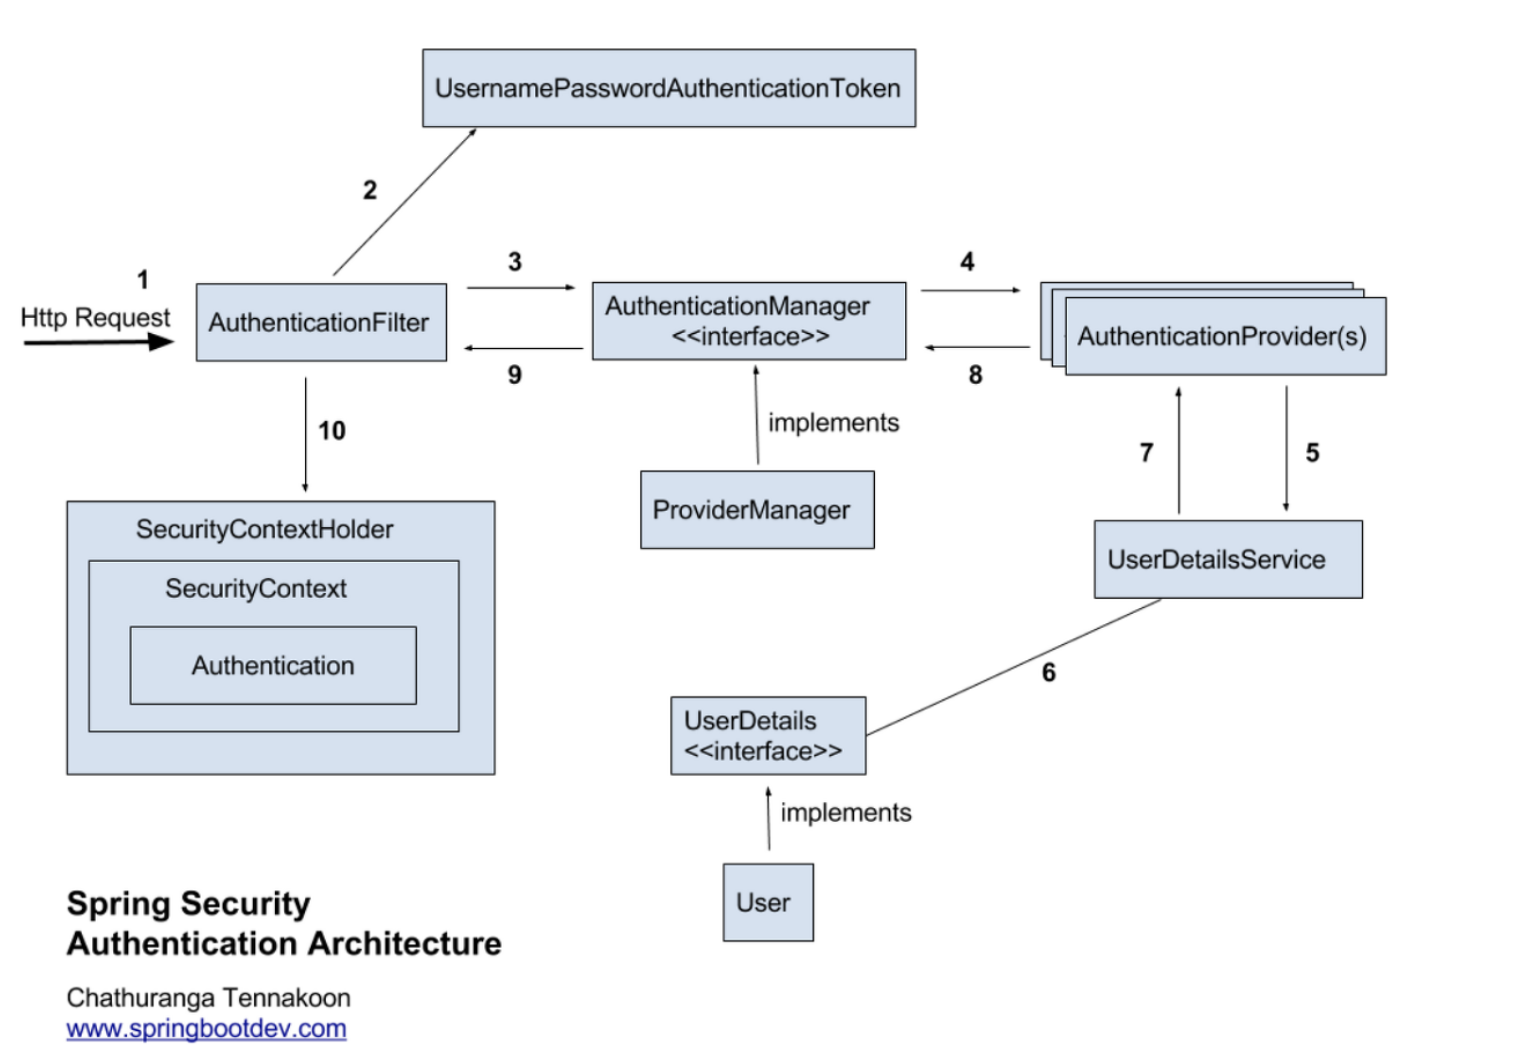
- 사용자가 form을 사용해 로그인 정보가 담긴 Http Request를 보냄
-
유저 자격을 기반으로 인증 토큰 생성
- AuthenticationFilter가 요청을 받아 가로채고, 가로챈 정보를 통해 UsernamePasswordAuthenticationToken 의 인증용 객체를 생성
→ UsernamePasswordAuthentication 은 해당 요청을 처리할 수 있는 Provider을 찾는데 사용함
- AuthenticationFilter가 요청을 받아 가로채고, 가로챈 정보를 통해 UsernamePasswordAuthenticationToken 의 인증용 객체를 생성
-
Filter 를 통해 AuthenticationToken을 AuthenticationManager 로 위임
- ProviderManager 에게 생성한 UsernamePasswordToken 객체를 전달
-
Token 을 처리할 수 있는 Authentication Provider 선택해 인증 시도
- AutenticationManager 는 등록된 AuthenticationProvider 들을 조회하며 인증을 요구
즉, 실제 인증할 AuthenticationProvider 에게 인증용 객체를 전달
- AutenticationManager 는 등록된 AuthenticationProvider 들을 조회하며 인증을 요구
-
UserDetailsService 에 요구
- 실제 DB에서 사용자 인증정보를 가져오는 UserDetailsService 에 사용자 정보를 넘김
-
UserDetails를 이용해 User 객체 정보 탐색
- 넘겨받은 사용자 정보를 사용해 DB에서 찾아낸 사용자 정보인 UserDetails 객체 생성
-
User 객체 정보를 UserDetails 가 UserDetailsService 로 전달
- AuthenticationProvider 들은 UserDetails 를 넘겨받아 사용자 정보를 비교
-
인증이 완료되면 사용자 정보를 담은 Authentication 객체를 반환
-
인증이 끝나면 최초의 AuthenticationFilter에 Authentication 객체가 반환
-
SecurityContext에 인증 객체를 설정
- Authentication 객체는 SecurityContext 에 저장해 SecurityContextHolder 는 세션 영역에 있는 SecurityContext에 Authentication 객체를 저장
✔ UsernamePasswordAuthenticationFilter
- 아이디와 비밀번호를 사용하는 form 기반 인증
- 설정된 로그인 URL 로 오는 요청을 감시하고, 유저 인증 처리인 AuthenticationManager를 통한 인증을 실행
- 인증이 성공하면 인증용 객체는 SecurityContext 에 저장 후 AuthenticationSuccessHandler 실행
→ 실패 시 AuthenticationFailurdHandler 실행
✔ AuthenticationProvider
- 사용자가 화면으로 입력한 로그인 정보와 DB 정보를 비교
- Spring Security의AuthenticationProvider을 구현한 클래스로, securitycontext에 provider로 등록 후 인증절차 구현
✔ UserDetalsService
- DB에서 유저의 정보를 가져오는 역할
✔ UserDetails
- 사용자의 정보를 담는 인터페이스로 상속받아 사용
구조
-
Authentication 요청 흐름
- 클라이언트 → AnthenticationFilter → AuthenticationManager → AuthenticationProvider → UserDetailsService
-
응답 흐름
- UserDetailsService → AuthenticationProvider → AuthenticationManager → SecurityContext
-
인증 저장 및 사용
- 인증된 Authentication 객체를 SecurityContextHolder 에 저장해 이후 보안 컨텍스트에서 인증 상태를 유지
여러 블로그를 참고하며, 공부한 내용을 정리해보았는데..
아직도 너무 어렵다..!
그래도 실제로 구현해보면서 조금씩 익혀봐야겠다!
[참고] https://velog.io/@kyungwoon/Spring-Security-%EB%8F%99%EC%9E%91-%EC%9B%90%EB%A6%AC