전 포스팅을 통해 스프링 시큐리티의 구조에 대해 공부를 해보았으니,
이번에는 직접 구현한 과정을 작성할 예정이다.
개발 환경
- Spring Boot 2.7.17
- Spring Boot Starter Security 2.7.17 (Spring Security 5.7.11)
- Spring Boot Starter JPA 2.7.17
- Java 11
- MariaDB
구현 기능
- 로그인
- 페이지별 접근 권한 설정
❗ 로그인 구현만 할 것이기 때문에 DB는 id, pw, role(권한) 으로만 구성
기능 구현
- Spring Security 사용을 위해 pom.xml 에 추가
<dependency>
	<groupId>org.springframework.boot</groupId>
	<artifactId>spring-boot-starter-security</artifactId>
</dependency>

<dependency>
	<groupId>org.springframework.boot</groupId>
    <artifactId>spring-boot-starter-data-jpa</artifactId>
</dependency>
- SecurityConfig 코드 작성
import org.springframework.context.annotation.Bean;
import org.springframework.context.annotation.Configuration;
import org.springframework.security.authentication.AuthenticationProvider;
import org.springframework.security.authentication.dao.DaoAuthenticationProvider;
import org.springframework.security.config.annotation.web.builders.HttpSecurity;
import org.springframework.security.config.annotation.web.configuration.EnableWebSecurity;
import org.springframework.security.crypto.bcrypt.BCryptPasswordEncoder;
import org.springframework.security.crypto.password.PasswordEncoder;
import org.springframework.security.web.SecurityFilterChain;

@Configuration
@EnableWebSecurity
public class SecurityConfig {

    // 비밀번호 암호화를 위한 Bean 생성
	@Bean
	public PasswordEncoder getPasswordEncoder() {
		return new BCryptPasswordEncoder();
	}

    // AuthenticationProvider 설정
	@Bean
	public AuthenticationProvider authenticationProvider(CustomUserDetailService userDetailService, PasswordEncoder passwordEncoder) {

		DaoAuthenticationProvider authProvider = new DaoAuthenticationProvider();
		authProvider.setUserDetailsService(userDetailService); // 사용자 정보를 로드하는 서비스
        authProvider.setPasswordEncoder(passwordEncoder); // 비밀번호 암호화 방식 설정

		return authProvider;
	}

	@Bean
	public SecurityFilterChain filterChain(HttpSecurity http, AuthenticationProvider authenticationProvider) throws Exception {


		http.authorizeHttpRequests()
		.antMatchers("/").permitAll()
		.antMatchers("/sa/**").hasRole("superadmin")
		.antMatchers("/a/**").hasAnyRole("superadmin", "admin")
		.antMatchers("/m/**").hasAnyRole("superadmin", "admin", "manager")
		.antMatchers("/u/**").hasAnyRole("superadmin", "admin", "manager", "user")
		.anyRequest().authenticated();

		http.formLogin()
        .loginPage("/") // 메인 페이지를 로그인 페이지로 설정
        .loginProcessingUrl("/login") // 로그인 요청 처리 URL
        .defaultSuccessUrl("/loginTestView") // 로그인 성공 시 이동할 페이지
        .failureUrl("/?error=true") // 로그인 실패 시 이동할 페이지
        .usernameParameter("username")
        .passwordParameter("password");

		http.csrf().disable();

		http.authenticationProvider(authenticationProvider);

		return http.build();
	}
}.antMatchers("/").permitAll():/로 들어오는 모든 요청 허용.antMatchers("/sa/**").hasRole("superadmin"):/sa/**로 들어오는 요청은 superadmin Role을 가진 사용자만 허용.antMatchers("/m/**").hasAnyRole("superadmin", "admin", "manager"):/m/**으로 들어오는 요청은 superadmin, admin, manager Role을 가진 사용자만 허용
AuthenticationProvider
- 사용자 인증을 수행하는 핵심 컴포넌트로,
- 로그인 요청 시
AuthenticationManager가 등록된AuthenticationProvider목록에서 적절한 프로바이더를 선택해 인증을 수행 - 사용자 정보(username, password) 확인
- 비밀번호가 올바른지 검증
- 인증 성공 시 인증 정보를 담은 Authentication 객체 반환
http.authenticationProvider(authenticationProvider)의 역할
-
Spring Security는 내부적으로 AuthenticationManager를 통해 인증 로직을 처리하며,
-
AuthenticationProvider를 이 AuthenticationManager에 등록한다.
-
http.authenticationProvider(authenticationProvider)를 사용하면 커스텀 AuthenticationProvider를 추가할 수 있다.
-
기본 제공되는 DaoAuthenticationProvider를 사용하거나, 특별한 인증 로직이 필요할 경우 커스텀 구현체를 등록할 수 있다.
- 회원 Entity 정의
import javax.persistence.Entity;
import javax.persistence.Id;
import javax.persistence.Table;

@Entity
@Table(name = "empl")
public class Empl {

	@Id
	private String username; // 사용자 id (기본키)
	private String password; // 사용자 pw
	private String role;


	public String getUsername() {
		return username;
	}

	public void setUsername(String username) {
		this.username = username;
	}

	public String getPassword() {
		return password;
	}

	public void setPassword(String password) {
		this.password = password;
	}

	public String getRole() {
		return role;
	}

	public void setRole(String role) {
		this.role = role;
	}
}
- Repository 생성
import java.util.Optional;

import org.springframework.data.jpa.repository.JpaRepository;
/**
 * EmplRepository는 empl 테이블과 상호작용하기 위한 JPA Repository 인터페이스
 * Spring Data JPA가 이 인터페이스를 구현체로 자동 생성하여 CRUD 작업을 지원
 */
public interface EmplRepository extends JpaRepository<Empl, Long> {

	 /**
     * 사용자 이름(username)으로 empl 테이블에서 사용자 정보를 조회하는 메서드.
     * @param username 사용자 아이디
     * @return username에 해당하는 Empl 객체를 Optional로 반환.
     *         만약 데이터가 없으면 Optional.empty() 반환.
     */
	Optional<Empl> findByUsername(String username);

}
- UserDetailsService
import org.springframework.security.core.userdetails.User;
import org.springframework.security.core.userdetails.UserDetails;
import org.springframework.security.core.userdetails.UserDetailsService;
import org.springframework.security.core.userdetails.UsernameNotFoundException;
import org.springframework.stereotype.Service;

@Service
public class CustomUserDetailService implements UserDetailsService {

	private final EmplRepository emplRepository;

	public CustomUserDetailService(EmplRepository emplRepository) {
		this.emplRepository = emplRepository;
	}

	@Override
	public UserDetails loadUserByUsername(String username) throws UsernameNotFoundException {

		Empl empl = emplRepository.findByUsername(username)
				.orElseThrow(() -> new UsernameNotFoundException("User not found: " + username));

		String role = empl.getRole();

		return User.builder()
				.username(empl.getUsername())
				.password(empl.getPassword()) // 암호화 된 비밀번호 그대로 사용
				.roles(role) // 기본 권한
				.build();
	}
}
이렇게 설정해주면 이제 로그인이 성공하고, 등록된 권한별로 접근을 막아줄 수 있게 된다.
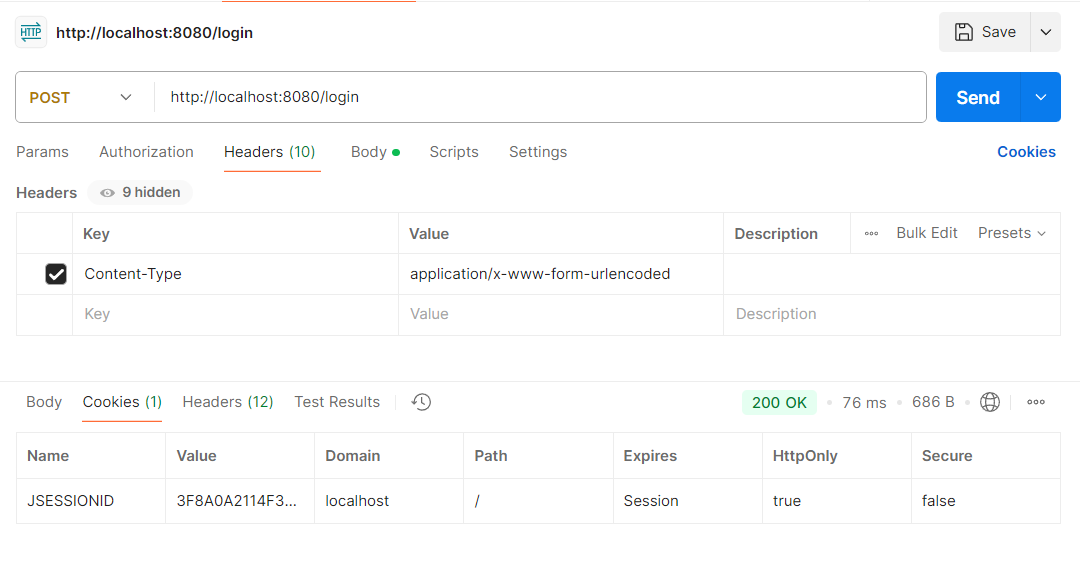
포스트맨으로 테스트 했을 때에도 성공!
로그인 구현을 위해 기나긴 공부의 시간이었다..
하지만 프로젝트를 만들어 가면서 아마 더 공부하고 수정해야 하는 부분이 많을 것이다.. 우리 모두 화이팅 🔥🔥🔥

개발자가 되어보자