xml에 ConstraintLayout 있고, compose에도 ConstraintLayout이 있다.
xml에서는 ConstraintLayout을 사용할 경우 중첩을 줄이고, 복잡한 UI를 효율적으로 배치할 수 있으며, 다양한 화면 크기와 해상도에 적응하는 동적인 레이아웃을 구현할 수 있기 때문에 xml에서 constraintLayout이 권장되었다.
하지만 compose는 이미 compose의 기본 레이아웃(Column, Row, Box)이 강력하며, 중첩된 구조를 통해 다양한 배치를 쉽게 구현할 수 있기 때문에 필수 사항은 아니다.
compose에서 ConstraintLayout은 더 복잡한 정렬 요구사항이 있거나 더 큰 레이아웃을 구현할 때 유용하다.
사용법
- build.grale에 추가하기
implementation "androidx.constraintlayout:constraintlayout-compose:1.0.1"- createRefs() 설정하기
val (redBox, magentaBox, greenBox, yellowBox) = createRefs()
다음과같이 createRefs()는 컴포넌트를 16개까지 지원한다 16개 넘게 사용할 경우에는 createRefs()를 추가 생성하면 된다.
- constrainAs, linkTo 설정하기
        Box(modifier = Modifier
            .size(40.dp)
            .background(Color.Magenta)
            .constrainAs(magentaBox) {
                start.linkTo(parent.start)
                end.linkTo(parent.end)
            })
constrainAs 괄호 안에는 해당 박스에 이름을 넣어주었고
start.linkTo(parent.start) 라는 뜻은 내 start 라인을 parent의 start라인에 붙이겠단 뜻이다
- centrtTo(), centerHorizontallyTo(), centerVerticallyTo()
괄호 안에 레퍼런스를 넣어주면 그 레퍼런스를 기준으로 중앙 배치가 된다.
어떻게 중앙 배치가 되는지는 뜻을 그대로 해석해서 사용하면 된다.
그렇게 테스트해본 constraintLayout 샘플 코드를 올려놓겠다..
class MainActivity : ComponentActivity() {
override fun onCreate(savedInstanceState: Bundle?) {
super.onCreate(savedInstanceState)
setContent {
MyApplicationTheme {
// A surface container using the 'background' color from the theme
Surface(modifier = Modifier.fillMaxSize(),
color = MaterialTheme.colorScheme.background) {
ConstraintLayoutEx()
}
}
}
}
}
@Composable
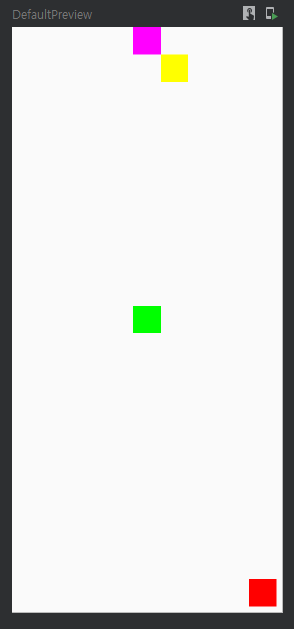
fun ConstraintLayoutEx() {
ConstraintLayout(modifier = Modifier.fillMaxSize()) {
val (redBox, magentaBox, greenBox, yellowBox) = createRefs()
Box(modifier = Modifier
.size(40.dp)
.background(Color.Red)
.constrainAs(redBox) {
bottom.linkTo(parent.bottom, margin = 8.dp)
end.linkTo(parent.end, margin = 8.dp)
})
Box(modifier = Modifier
.size(40.dp)
.background(Color.Magenta)
.constrainAs(magentaBox) {
start.linkTo(parent.start)
end.linkTo(parent.end)
})
Box(modifier = Modifier
.size(40.dp)
.background(Color.Green)
.constrainAs(greenBox) {
centerTo(parent)
})
Box(modifier = Modifier
.size(40.dp)
.background(Color.Yellow)
.constrainAs(yellowBox) {
start.linkTo(magentaBox.end)
top.linkTo(magentaBox.bottom)
})
}
}
@Preview(showBackground = true)
@Composable
fun DefaultPreview() {
MyApplicationTheme {
ConstraintLayoutEx()
}
}ConstraintSet도 알아보자
ConstraintSet을 이용해 constraintLayout을 밖으로 빼내보자
위 코드에서는 modifier 안에 모든 제약들이 있었다.
그 제약들을 별도로 설정하는 방법을 지금부터 알아보자.
- ConstraintSet 안에 레퍼런스를 만들어주자.
    val constraintSet = ConstraintSet{
        val redBox = createRefFor("redBox")
        val magentaBox = createRefFor("magentaBox")
        val greenBox = createRefFor("greenBox")
        val yellowBox = createRefFor("yellowBox")
}- constrian으로 제약을 옮겨주자
    val constraintSet = ConstraintSet {
        val redBox = createRefFor("redBox")
        val magentaBox = createRefFor("magentaBox")
        val greenBox = createRefFor("greenBox")
        val yellowBox = createRefFor("yellowBox")

        constrain(redBox) {
            bottom.linkTo(parent.bottom, margin = 8.dp)
            end.linkTo(parent.end, margin = 8.dp)
        }
        constrain(magentaBox) {
            start.linkTo(parent.start)
            end.linkTo(parent.end)
        }
        constrain(greenBox) {
            centerTo(parent)
        }
        constrain(yellowBox) {
            start.linkTo(magentaBox.end)
            top.linkTo(magentaBox.bottom)
        }
}-
layoutId 설정하기
ConstraintLayout(modifier = Modifier.fillMaxSize()) { Box(modifier = Modifier .size(40.dp) .background(Color.Red) .layoutId("redBox") ) Box(modifier = Modifier .size(40.dp) .background(Color.Magenta) .layoutId("magentaBox") ) Box(modifier = Modifier .size(40.dp) .background(Color.Green) .layoutId("greenBox") ) Box(modifier = Modifier .size(40.dp) .background(Color.Yellow) .layoutId("yellowBox") ) } -
ConstraintLayout과 ConstarintSet을 연결 시키자
    ConstraintLayout(
       constraintSet,
       modifier = Modifier.fillMaxSize()) {

       Box(modifier = Modifier
           .size(40.dp)
           .background(Color.Red)
           .layoutId("redBox")
       )
       Box(modifier = Modifier
           .size(40.dp)
           .background(Color.Magenta)
           .layoutId("magentaBox")
       )
       Box(modifier = Modifier
           .size(40.dp)
           .background(Color.Green)
           .layoutId("greenBox")
       )

       Box(modifier = Modifier
           .size(40.dp)
           .background(Color.Yellow)
           .layoutId("yellowBox")
       )
   }
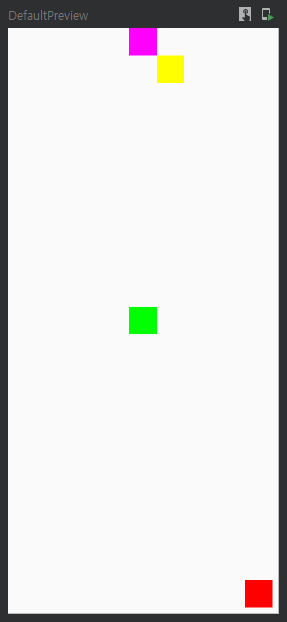
전체 코드를 보고 ConstraintSet을 쓰기 전과 쓴 후 어떻게 다른지 비교해 봅시다!
class MainActivity : ComponentActivity() {
    override fun onCreate(savedInstanceState: Bundle?) {
        super.onCreate(savedInstanceState)
        setContent {
            MyApplicationTheme {
                // A surface container using the 'background' color from the theme
                Surface(modifier = Modifier.fillMaxSize(),
                    color = MaterialTheme.colorScheme.background) {
                    ConstraintLayoutEx()
                }
            }
        }
    }
}

@Composable
fun ConstraintLayoutEx() {
    val constraintSet = ConstraintSet {
        val redBox = createRefFor("redBox")
        val magentaBox = createRefFor("magentaBox")
        val greenBox = createRefFor("greenBox")
        val yellowBox = createRefFor("yellowBox")

        constrain(redBox) {
            bottom.linkTo(parent.bottom, margin = 8.dp)
            end.linkTo(parent.end, margin = 8.dp)
        }
        constrain(magentaBox) {
            start.linkTo(parent.start)
            end.linkTo(parent.end)
        }
        constrain(greenBox) {
            centerTo(parent)
        }
        constrain(yellowBox) {
            start.linkTo(magentaBox.end)
            top.linkTo(magentaBox.bottom)
        }
    }
    ConstraintLayout(
        constraintSet,
        modifier = Modifier.fillMaxSize()) {

        Box(modifier = Modifier
            .size(40.dp)
            .background(Color.Red)
            .layoutId("redBox")
        )
        Box(modifier = Modifier
            .size(40.dp)
            .background(Color.Magenta)
            .layoutId("magentaBox")
        )
        Box(modifier = Modifier
            .size(40.dp)
            .background(Color.Green)
            .layoutId("greenBox")
        )

        Box(modifier = Modifier
            .size(40.dp)
            .background(Color.Yellow)
            .layoutId("yellowBox")
        )
    }
}


@Preview(showBackground = true)
@Composable
fun DefaultPreview() {
    MyApplicationTheme {
        ConstraintLayoutEx()
    }
}
끝으로 이런 의문이 들 수도 있다.
아니, ConstraintLayout으로 구현 가능한데 왜 굳이 ConstraintSet을 사용하지?
이러한 이유 때문에 ConstraintSet을 사용한다
- 레이아웃 변경을 동적으로 처리
- ConstraintSet은 앱 실행 중에 레이아웃의 제약 조건을 동적으로 업데이트할 수 있도록 해줍니다.
- 예시: 버튼 클릭 시 뷰의 위치를 변경하거나, 특정 이벤트에 따라 레이아웃을 조정해야 할 때.
- 제약 조건의 재사용 가능
- 반복적으로 사용되는 제약 조건을 하나의 ConstraintSet으로 정의하고 재사용할 수 있습니다.
- 예시: 다수의 화면에서 동일한 제약 조건을 적용해야 할 경우, 코드 중복을 줄이고 유지보수성을 높일 수 있습니다.
- 애니메이션과 전환 구현
- ConstraintSet은 애니메이션과 전환을 구현할 때도 유용합니다.
- 예시: 두 개의 ConstraintSet을 정의하고, 이를 TransitionManager와 함께 사용하면 자연스러운 애니메이션 효과를 줄 수 있습니다.
- ConstraintLayout 대비 코드 간결화
- ConstraintLayout에 직접 제약 조건을 정의하면 코드가 길고 가독성이 떨어질 수 있습니다.
- ConstraintSet은 제약 조건을 구조적으로 정의하므로, 코드가 더 읽기 쉽고 유지보수가 간편합니다.
결론
ConstraintSet은 다음과 같은 경우 유용하다.
- 실행 중 레이아웃 변경이 필요한 경우
- 제약 조건을 재사용하려는 경우
- 애니메이션이나 전환 효과를 구현할 때.
단순한 제약 조건이라면 ConstraintLayout만으로도 충분하지만, 복잡한 레이아웃 변경이나 재사용성이 중요한 경우 ConstraintSet이 더 효율적입니다.
질문은 언제나 환영입니다!! 👍💚