1.학습한 내용
DOM
- 웹 요소에서 스타일 가져와서 수정하기
-DOM으로 CSS속성에 접근하고 수정하기
-style 속성 다음에 속성 이름 작성
document.querySelector("#heading").style.color = "white"document.querySelector("#heading").style.backgroundColor = "white"
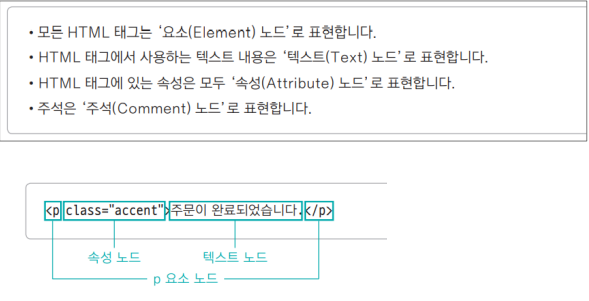
- DOM 트리와 노드
console 창에서 순서대로 다음과 같이 작성하기
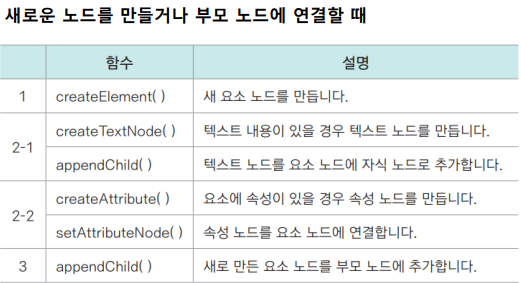
1. 요소 노드 만들기
var newP = document.createElement("p")
2. 텍스트 노드 만들기
var newText = document.createTextNode("주문이 완료되었습니다.")
3. 자식노드로 추가하기
newP.appendChild(newText)
4. 자식노드로 추가하기
document.body.appendChild(newP)
5. 속성 노드 만들기
var attr = document.createAttribute("class")
attr.value = "accent"
6. 속성 노드 연결하기
newP.setAttributeNode(attr) 또는
5, 6 단계 대신: 텍스트 노드를 만들어 웹 문서에 추가해 놓은 경우 setAttribute()함수 사용하면 더 간단.
newP.setAttribute("class", "accent")- 노드 추가 & 표시(참가 신청 프로그램)
function newRegister(){
    // 1. 새로운P요소 만들기
    var newP = document.createElement("P");

    //2. 텍스트 노드 만들기
    var userName = document.querySelector("#userName");
    var newText = document.createTextNode(userName.value);

    //3. 텍스트 노드를 P요소에 append
    newP.appendChild(newText);

    //4. nameList에 자식요소로 P요소를  append
    var nameList = document.querySelector("#nameList");
    // nameList.appendChild(newP);
    nameList.insertBefore(newP, nameList.childNodes[0]); //최근이름이 위로 오도록 변경(14라인 대신)
    userName.value = "";

    //5. 삭제를 위해서  X  를 만든다 .
    var delBttn = document.createElement("span");
    var delText = document.createTextNode("X");
    delBttn.setAttribute("class", "del");
    delBttn.appendChild(delText);
    newP.appendChild(delBttn);

    //6. 실제로 삭제를 한다.
    var removeBttns = document.querySelectorAll(".del");
    for (var i=0; i < removeBttns.length; i++){
        removeBttns[i].addEventListener("click", function(){
            if(this.parentNode.parentNode){//현재 노드(this)의 부모노드의 부모노드가 있을 경우 실행
                this.parentNode.parentNode.removeChild(this.parentNode);
                //현재노드(this)의 부모 노드의 부모 노드를 찾아서 '현재 노드(this)의 부모 노드(p)를 삭제
            }
        });
    }
}
hasChildNodes()함수
특정 노드에 자식 노드가 있는지 확인하는 함수, 자식 노드가 있다면 true, 없다면 false 반환
childNodes 속성
현재 노드의 자식 노드를 가지고 있는 속성, 요소 노드뿐만 아니라 빈 텍스트 노드도 자식으로 인식
children 속성
현재 노드의 자식 노드 중 요소 노드만 가지고 있는 속성
insertBefore()함수
부모 노드에 자식 노드를 추가할 때 기준 노드를 지정하고 그 앞에 자식 노드 추가
removeChild()함수와 parentNode 속성
노드는 스스로 자신을 삭제할 수 없기 때문에 부모 노드에 접근한 후 부모 노드에서 삭제해야함
parentNode 속성 - 현재 노드의 부모 노드 정보를 가지고 있는 속성
removeChild()함수 - 부모 노드에서 자식노드를 삭제하는 함수폼
- 배송정보 자동 입력하기 프로그램
<div id="container">
<form name="order">
<fieldset>
<legend> 주문 정보 </legend>
<ul>
<li>
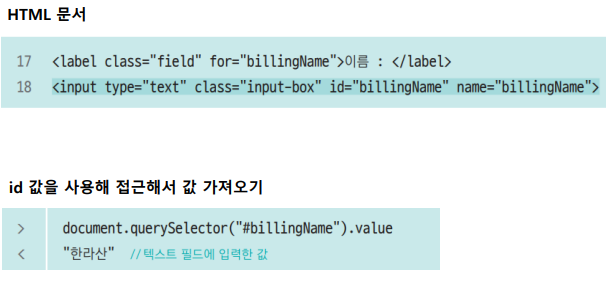
<label class="field" for="billingName">이름 : </label>
<input type="text" class="input-box" id="billingName" name="billingName">
</li>
<li>
<label class="field" for="billingTel">연락처 : </label>
<input type="text" class="input-box" id="billingTel" name="billingTel">
</li>
<li>
<label class="field" for="billingAddr">주소 : </label>
<input type="text" class="input-box" id="billingAddr" name="billingAddr">
</li>
</ul>
</fieldset>
</form>
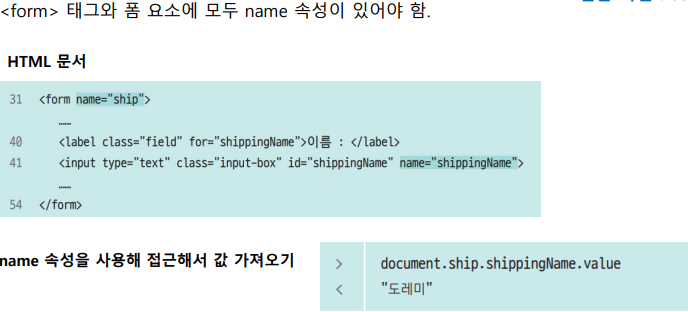
<form name="ship">
<fieldset>
<legend> 배송 정보 </legend>
<ul>
<li>
<input type="checkbox" id="shippingInfo" name="shippingInfo">
<label for="bill_info" class="check">주문 정보와 배송 정보가 같습니다</label>
</li>
<li>
<label class="field" for="shippingName">이름 : </label>
<input type="text" class="input-box" id="shippingName" name="shippingName">
</li>
<li>
<label class="field" for="shippingTel">연락처 : </label>
<input type="text" class="input-box" id="shippingTel" name="shippingTel">
</li>
<li>
<label class="field" for="shippingAddr">주소 : </label>
<input type="text" class="input-box" id="shippingAddr" name="shippingAddr">
</li>
</ul>
</fieldset>
<button type="submit" class="order">결제하기</button>
</form>
</div>var check = document.querySelector("#shippingInfo"); //체크 상자의 id
check.addEventListener("click", function(){ //체크가 클릭되었다면 실행
if(check.checked == true){ //체크 표시가 나온다면
document.querySelector("#shippingName").value
= document.querySelector("#billingName").value; // 주문 정보(이름)을 배송 정보(이름)에 복사
document.querySelector("#shippingTel").value
= document.querySelector("#billingTel").value; // 주문 정보(전화번호)을 배송 정보(전화번호)에 복사
document.querySelector("#shippingAddr").value
= document.querySelector("#billingAddr").value; // 주문 정보(주소)을 배송 정보(주소)에 복사
}else{ // 체크가 해제된다면 배송 정보 필드를 지움
document.querySelector("#shippingName").value = "";
document.querySelector("#shippingTel").value = "";
document.querySelector("#shippingAddr").value = "";
}
});- 폼 요소에 접근하는 방법
- CSS선택자 사용
- name 속성 사용
- 배열 사용
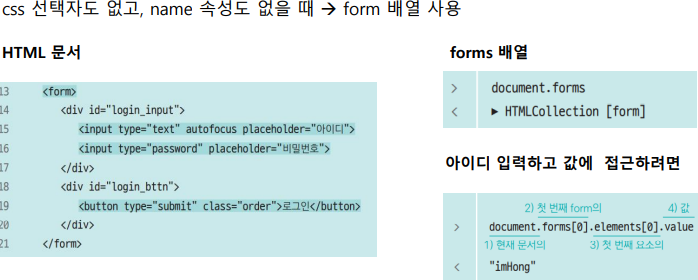
- 로그인 프로그램
<div id="container">
    <h3>로그인</h3>
    <form>
      <div id="login_input">
        <input type="text" autofocus placeholder="아이디">
        <input type="password" placeholder="비밀번호">
      </div>
      <div id="login_bttn">
        <button type="submit" class="order">로그인</button>
      </div>
    </form>
</div>- 회원가입 프로그램
<div id="container">
		<h1>회원 가입</h1>
		<form action="#" id="register">
			<ul id="user-info">
				<li>
					<label for="user-id" class="field">아이디</label>
					<input type="text" id="user-id" placeholder="4~15자리의 영문과 숫자로 입력" required>
				</li>
				<li>
					<label for="email" class="field">이메일</label>
					<input type="email" id="email" required>
				</li>
				<li>
					<label for="user-pw1" class="field">비밀번호</label>
					<input type="password" id="user-pw1" placeholder="8자리 이상" required>
				</li>
				<li>
					<label for="user-pw2" class="field">비밀번호 확인</label>
					<input type="password" id="user-pw2" required>
				</li>
				<li>
					<label class="field">메일링 수신</label>
					<label class="r"><input type="radio" value="yes" name="mailing">예</label>
					<label class="r"><input type="radio" value="no" name="mailing">아니오</label>
				</li>
			</ul>
			<ul id="buttons">
				<li>
					<button type="submit" class="btn btnBlack">가입하기</button>
				</li>
				<li>
					<button type="reseet" class="btn btnGray">취소</button>
				</li>
			</ul>
		</form>
	</div>
var userId = document.querySelector("#user-id"); //아이디 필드 가져오기
var pw1 = document.querySelector("#user-pw1"); //비밀번호 필드
var pw2 = document.querySelector("#user-pw2"); //비밀번호 확인 필드
//아래: change 이벤트 발생 시 각각의 함수를 실행하도록 설정
userId.onchange = checkId;
pw1.onchange = checkPw;
pw2.onchange = comparePw;
function checkId(){
if (userId.value.length < 4 || userId.value.length > 15 ){
alert("4~15자리의 영문과 숫자를 사용하세요.");
userId.select(); // 다시 입력할 수 있도록 userId 필드 선택
}
}
function checkPw(){
if(pw1.value.length < 8){
alert("비밀번호는 8자리 이상이어야 합니다."); // 오류 메시지
pw1.value = ""; // '비밀번호'필드 지움
pw1.focus(); // 비밀번호 다시 입력할 수 있게 포커싱
}
}
function comparePw(){
if(pw1.value != pw2.value){
alert("암호가 다릅니다. 다시 입력하세요.");
pw2.value=""; // '비밀번호 확인'필드 지움
pw2.focus(); // 비밀번호 다시 입력할 수 있게 포커싱
}
}- 간단한 수강신청 프로그램
<div id="container">
		<h1>수강신청</h1>
		<form name="testForm">
			<fieldset>
				<legend>신청인</legend>
				<ul>
					<li>
						<label class="reg" for="userName">이름</label>
						<input type="text" id="userName" name="userName" maxlength="50">
					</li>
					<li>
						<label class="reg" for="class">학과</label>
						<select name="major" id="major" onchange="displaySelect()">
							<option>---- 학과 선택 ----</option>
							<option value="archi">건축공학과</option>
							<option value="mechanic">기계공학과</option>
							<option value="indust">산업공학과</option>
							<option value="elec">전기전자공학과</option>
							<option value="computer">컴퓨터공학과</option>
							<option value="chemical">화학공학과</option>
						</select>
					</li>
				</ul>
			</fieldset>
			<fieldset>
				<legend>신청 과목</legend>
				<p>이 달에 신청할 과목을 선택하세요.</p>
				<label><input type="radio" name="subject" value="speaking">회화</label>
				<label><input type="radio" name="subject" value="grammar">문법</label>
				<label><input type="radio" name="subject" value="writing">작문</label>
			</fieldset>
			<fieldset>
				<legend>메일링</legend>
				<p>메일로 받고 싶은 뉴스 주제를 선택해 주세요</p>
				<label><input type="checkbox" name="mailing1" value="news">해외 단신</label>
				<label><input type="checkbox" name="mailing2" value="dialog">5분 회화</label>
				<label><input type="checkbox" name="mailing3" value="pops">모닝팝스</label>
			</fieldset>
		</form>
</div>
// 학과 선택시 알림창 띄워 알려주기
var selectMenu = document.testForm.major; //셀렉트 메뉴 가져오기
function displaySelect(){
var selectedText = selectMenu.options[selectMenu.selectedIndex].innerText;
alert("<" +selectedText+">를 선택했습니다." );
}- 피자 주문 합계 프로그램
<div id="container">
    <h1>피자 주문</h1>
		<form>
      <fieldset>
        <legend>사이즈</legend>
        <p>Large - 24000 원 </p>
      </fieldset>
      <fieldset>
        <legend>추가 주문 </legend>
          <label><input type="checkbox" name="pickle" class="checkbx" value="800">피클(800원)</label>
          <label><input type="checkbox" name="chilly" class="checkbx" value="300">칠리 소스(300원)</label>
          <label><input type="checkbox" name="deeping" class="checkbx" value="200">디핑 소스(200원)</label>
          <label><input type="checkbox" name="stick" class="checkbx" value="4800">치즈스틱(4개, 4800원)</label>
          <label><input type="checkbox" name="salad" class="checkbx" value="2400">콘 샐러드(2400원)</label>
      </fieldset>
      <fieldset>
        <legend>합계</legend>
        <input type="text" id="total" name="total" class="price" readonly>
      </fieldset>
		</form>
</div>
var price = 24000;
var sideMenu = document.querySelectorAll(".checkbx");
var total = document.querySelector("#total");
total.value = price + "원";
for(var i=0; i <sideMenu.length; i++){
sideMenu[i].onclick = function(){
if (this.checked == true){
price += parseInt(this.value);
}else{
price -= parseInt(this.value);
}
total.value = price + "원";
}
}- 원 둘레 반지름 구하는 프로그램
<html>
<h1>원 둘레과 넓이 계산</h1>
	<div id="container">
		<form>
			<div id="calc">
				<p>반지름 : <br>
					<input type="text" id="radius" name="radius">
					<span id="start">계산</span>
				</p>
				<hr>
				<p>원둘레 : <br>
					<input type="text" id="round">
				</p>
				<p>원넓이 : <br>
					<input type="text" id="area">
				</p>
			</div>
		</form>
</div><css>
h1 {
text-align: center;
}
#calc {
width:300px;
margin:50px auto;
}
#start {
border:1px solid #222;
background-color:#eee;
border-radius:5px;
margin-left:10px;
padding:15px 30px;
}
hr {
width:300px;
margin-left:0;
margin-top:30px;
margin-bottom:40px;
}
input[type="text"] {
height:50px;
border:2px solid #222;
border-radius:10px;
padding-left:20px;
}
#radius{
width:150px;
}
#round, #area {
width:300px;
}
#calc > p {
line-height:40px;
} <js>
var radius = document.querySelector("#radius");
var start = document.querySelector("#start");
start.addEventListener("click", function() {
document.querySelector("#round").value = Number(radius.value) * Math.PI * 2;
document.querySelector("#area").value = Math.PI * Number(radius.value) * Number(radius.value);
});2.학습한 내용 중 어려웠던 점
하루만에 뭔가 우수수 지나간 느낌이다. 배운량도 그렇고 엄청 스피디하게 지나가면서 솔직히 이해가 어려운 부분이 많아서 주말에 시간을 투자해서 좀 더 공부해야봐야 할 것 같다. 노드라던가 아직 쉽게 접근이 안되서 어려운 것 같다.
3.해결방법
원 계산 프로그램 같은 경우엔 한번 해보니 다시 이해하기가 쉬웠다. 자바스크립트 쪽보단 지나간 css부분이나 html부분이 더 헷갈렸던 것 같아서 다시 한 번 찾아보았다. 다른 이해하기 어려운 부분들도 몇 번 해보고나면 그래도 좀 이해가 가지 않을까 싶다.
4. 학습소감
오늘은 뭔가 진도가 폭풍같이 지나간 느낌이라 많이 흘리고 지나 온 것 같다. 오늘은 유독 코딩 실수도 많아서 따라가기 쉽지 않았는데 체력이 좀 떨어진 느낌이다. 다시 운동도 좀 하면서 앉아서 집중할 수 있는 체력을 쌓아야겠다.

코딩공부중