fetch 함수란?
fetch 함수는 XMLHttpRequest 객체보다 최근에 나온, HTTP 요청 전송 기능을 제공하는 Web API다.
fetch('https://jsonplaceholder.typicode.com/posts/1')
  .then(res => console.log(res))
fetch 함수로 받은 Response 객체에는 HTTP 응답을 나타내는 프로퍼티들이 있다.
그 중 json() 내장 함수가 있는데, res.json 메서드 사용 시 HTTP 응답 body 텍스트를 JSON 형식으로 바꾼 프로미스를 반환한다
HTTP error가 발생하더라도 reject 되지 않기 때문에 response의 status code나 ok 체크 필요하다.
fetch 함수로 HTTP 요청하기
fetch('https://jsonplaceholder.typicode.com/posts/1')
  .then(res => console.log(res))
단순히 원격 API에 있는 데이터를 가져올 때 쓰인다.
fetch함수는 디폴트로 GET 방식으로 작동하고, 옵션 인자가 필요 없다.
 응답(response) 객체는 json() 메서드를 제공하고, 이 메서드를 호출하면 응답(response) 객체로부터 JSON 형태의 데이터를 자바스크립트 객체로 변환하여 얻을 수 있다.
요청하기
GET: 존재하는 자원을 요청
POST: 새로운 자원 생성 요청
PUT: 존재하는 자원 변경 요청
DELETE: 존재하는 자원 삭제 요청
참고자료
실습 - s19.html
위 url을 사용한다.
주석으로 설명..
<!DOCTYPE html>
<html lang="en">
<head>
<meta charset="UTF-8">
<meta name="viewport" content="width=device-width, initial-scale=1.0">
<title>Document</title>
</head>
<body>
<script>
// 통신용 메서드
// fetch함수를 실행하고
// 뒤에 then catch finally를 선택해서 입력
// then catch finally는 콜백함수를 매개변수로 받는다
// Response 날라온거 응답하는거
fetch("https://jsonplaceholder.typicode.com/posts/1")
// json데이터를 받는 주소이면
// .then(Response => reponse.json()) 코드 고정
// json()을 사용하면 응답 내용에서
// json데이터를 자스 객체로 바꿔준다
.then((response) => {
console.log(response);
return response.json();
})
.then((result) => {
console.log(result);
document.querySelector("#first").innerHTML = result.title;
});
</script>
</body>
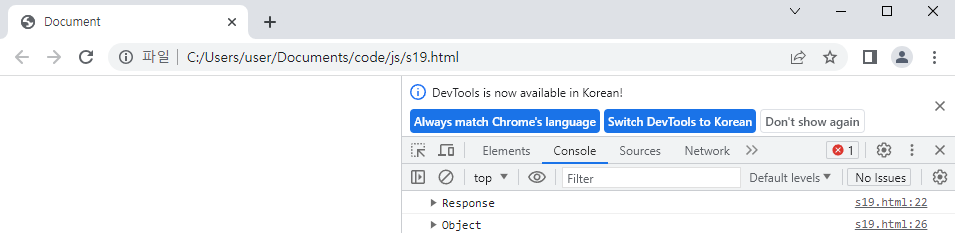
</html>실행결과
F12를 눌려 콘솔을 확인해보면 아래와 같이 나온다.
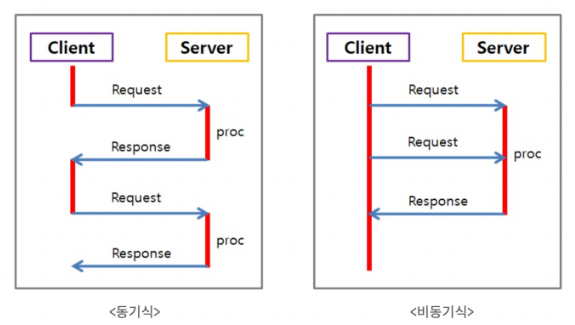
비동기 통신
요청을 보낸 후 응답과는 상관없이 동작하는 방식이다.
실습 - s20.html
주석으로 설명..
<!DOCTYPE html>
<html lang="en">
<head>
<meta charset="UTF-8">
<meta name="viewport" content="width=device-width, initial-scale=1.0">
<title>Document</title>
</head>
<body>
<button onclick="getData()">랜덤</button>
<h1 id="first"></h1>
<script>
// console.log(Math.floor(Math.random() * 100));
// 버튼을 누르면 getData함수 실행
// id가 first인 태그에 title을 넣기
// 1~100번의 랜덤한 post가져와서 사용
// 비동기 통신
// 언제 들어올지 모르는 데이터를 다룰 때 사용
// 순차적으로 실행되는 것이 아니라
// 결과가 들어오면 실행 되도록 만들어져 있음
const getData = () => {
const randomNum = Math.floor(Math.random() * 100);
fetch("https://jsonplaceholder.typicode.com/posts/" + randomNum)
.then((response) => response.json())
.then((result) => {
console.log(result);
document.querySelector("#first").innerHTML = '제목 : ' + result.title;
console.log("fetch함수 내부");
});
console.log("fetch함수 이후");
};
</script>
</body>
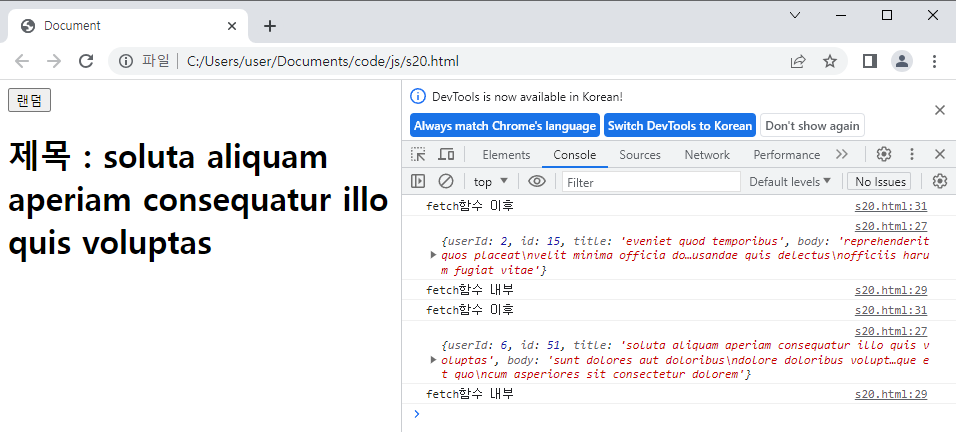
</html>실행결과
title을 랜덤으로 가져온다.
실습 - s21.html(문제풀기)
주석으로 설명..
<!DOCTYPE html>
<html lang="en">
<head>
<meta charset="UTF-8">
<meta name="viewport" content="width=device-width, initial-scale=1.0">
<title>Document</title>
</head>
<body>
<ul id="titleList">
</ul>
<script>
fetch("https://jsonplaceholder.typicode.com/posts")
.then((response) => response.json())
.then((result) => {
// foreach 또는 for 써서 titleList에 제목 li 넣기
// // 내가 풀어본거
// const list = document.querySelector("#titleList");
// for (let i = 0; i < result.length; i++) {
// const li = document.createElement("li");
// li.innerText = list[i];
// list.appendChild(list[i].title);
// }
// 강사님이 해준거
for (let i = 0; i < result.length; i++) {
document.querySelector("#titleList").insertAdjacentHTML(
"beforeend",
`<li>${result[i].title}</li>`
)};
// // 강사님이 해준거
// array.forEach((value) => {
// document.querySelector("#titleList").insertAdjacentHTML("beforeend", `<li>${value.title}<li>`)
// })
});
</script>
</body>
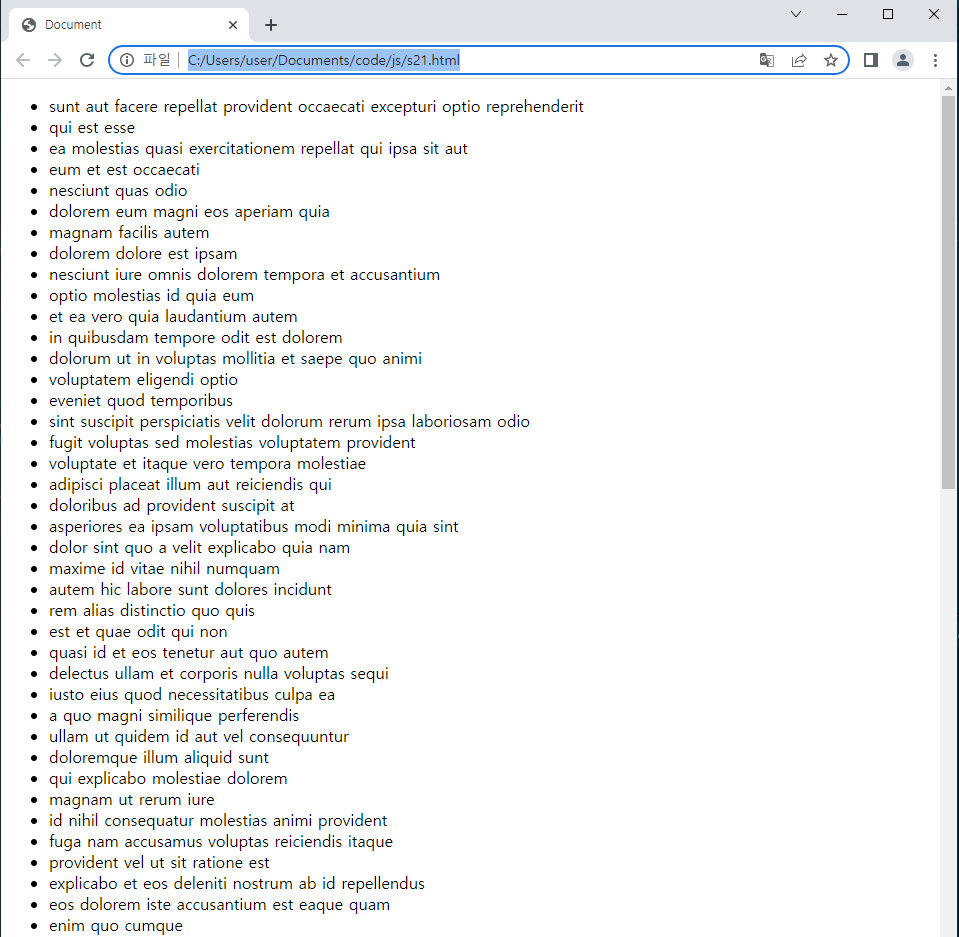
</html>실행결과
100개의 title이 나온다.
실습 - s21.html(문제풀기)
주석으로 설명..
<!DOCTYPE html>
<html lang="en">
<head>
<meta charset="UTF-8">
<meta name="viewport" content="width=device-width, initial-scale=1.0">
<title>Document</title>
</head>
<body>
<ul id="movieList">
</ul>
<script>
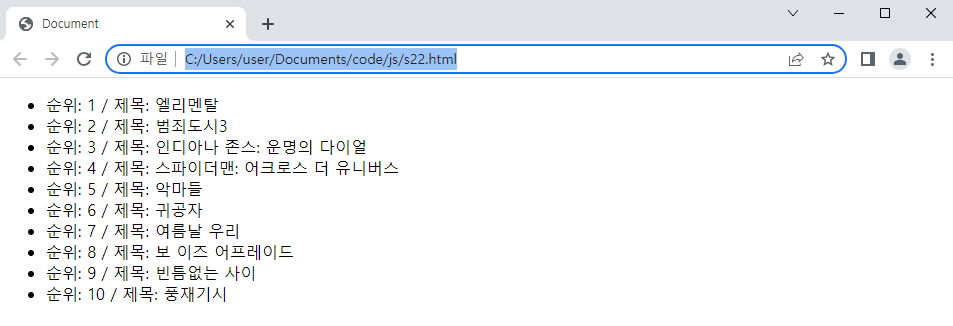
fetch("http://kobis.or.kr/kobisopenapi/webservice/rest/boxoffice/searchDailyBoxOfficeList.json?key=f5eef3421c602c6cb7ea224104795888&targetDt=20230707")
.then((r)=>r.json())
.then((result)=>{
// console.log(result);
// console.log(result.boxOfficeResult.dailyBoxOfficeList);
result.boxOfficeResult.dailyBoxOfficeList.forEach((value) => {
document.querySelector("#movieList").insertAdjacentHTML(
"beforeend",
`<li>순위: ${value.rank} / 제목: ${value.movieNm}</li>`
)
});
});
</script>
</body>
</html>실행결과

미래가 기대되는 풀스택개발자 공부 이야기~~
가치 있는 정보 공유해주셔서 감사합니다.