westagram를 javascript로 구현하고 react로 옮기는 작업을 하였다.
Westagram CRA Setting
CRA 초기세팅은 정말 중요한 세팅이다. 1차 프로젝트 대비 Team 단위로 react 프로젝트를 만들고 CRA 초기세팅을 하고 git & github에 올리는 작업을 하였다.
npx create-react-app 16-React-Westagram-1다음으로는 Router와 Sass를 사용해야 하기 때문에 설치를 하였다.
npm install react-router-dom --save
npm install node-sass --save
다음으로는 폴더 구성은 다음과 같이 세팅하였다.
public
images 디렉토리
data 디렉토리
/src
Routes.js
config.js
/src/Pages/Main
Main.js, Main.scss
/src/Pages/Login
Login.js, Login.scss
/src/styles
common.scss
reset.scss

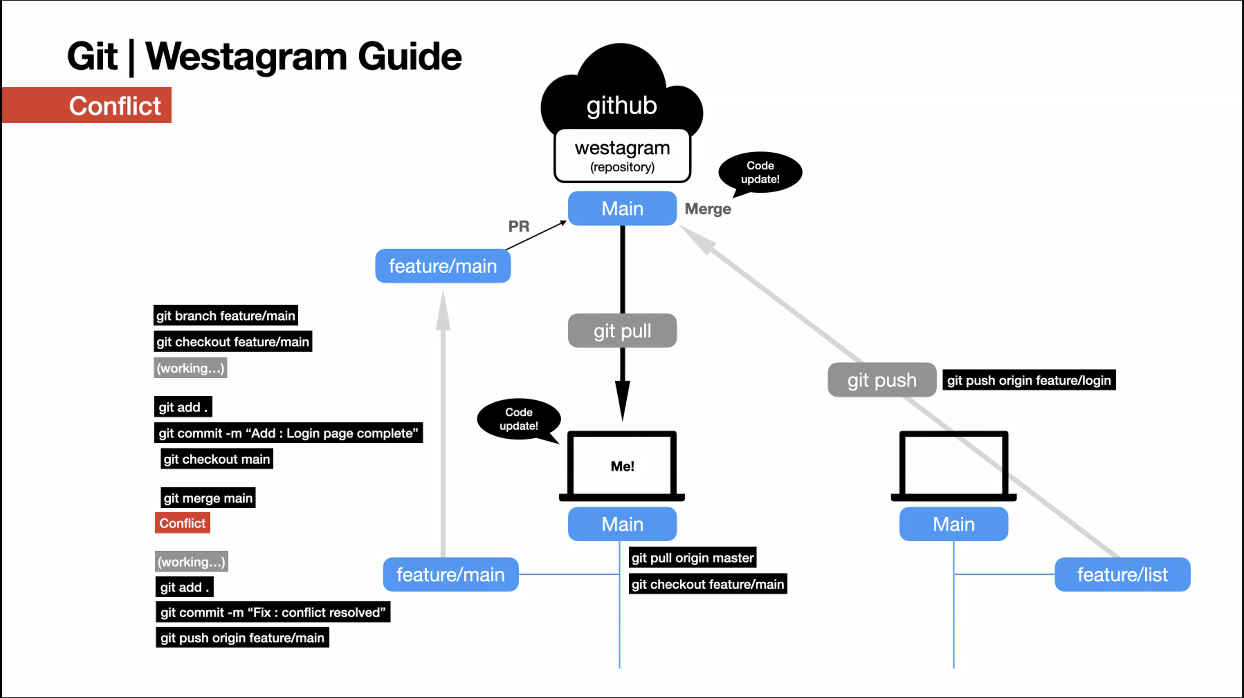
* github Team 단위로 사용할 때, Conflict가 났을 때의 해결 순서 방법이다.
Westagram Login
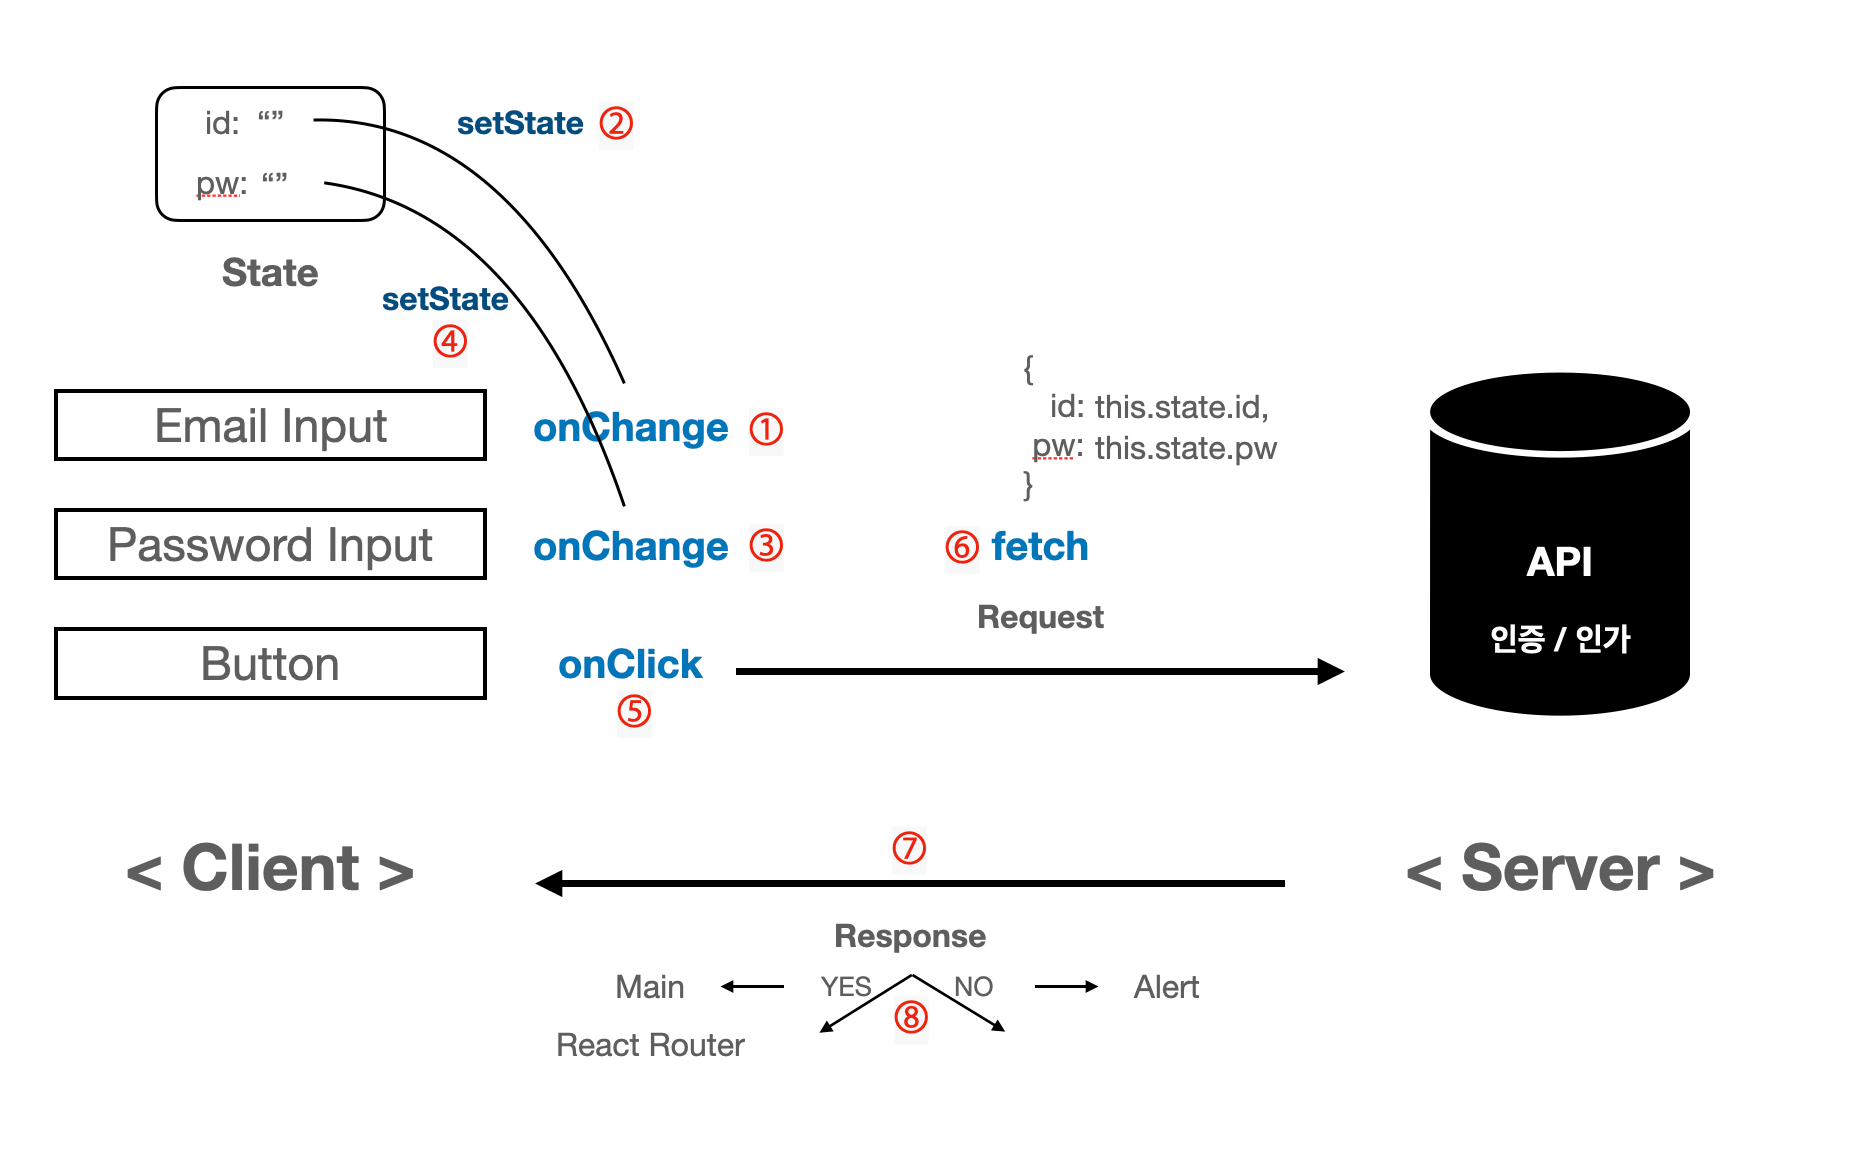
e.target.value 을 이용해 id, value를 setState 시켜주는 부분
[id]는 id가 될수도 있고 password가 될 수 있다.
  handleLoginInfo = (e) => {
    const { id, value } = e.target;
    this.setState({ [id]: value });
  };
Validation '@'와 비밀번호가 5자리 이상 들어가야 하는 handleValidation 함수 부분
 handleValidation = (e) => {
    e.preventDefault();
    const { id, pw } = this.state;

    const checkValue = id.includes("@") && pw.length >= 5;
    if (!checkValue) {
      alert("@를 포함하고, 비밀번호를 5자리 이상 입력해주세요!");
      return;
    }
로그인 버튼 활성화 & 비활성화 및 버튼 색깔 변환
const isVaildBtn = id.includes("@") && pw.length >= 5;
<button
	type="submit"
	disabled={!isVaildBtn}
	className={isVaildBtn ? "active" : ""}
	onClick={handleValidation}
/>
Westagram Main
handleCommentInfo 함수는 commentValue에 유저가 쓴 value값을 저장한다.
 handleCommentInfo = (e) => {
   this.setState({ commentValue: e.target.value });
 };
handleCommentCreate 함수는 댓글을 추가하는 함수로, user 객체를 따로 선언해서 commentList에서 ...commentList를 복사한것에 user를 따로 추가해서 댓글을 삽입하고 Value 값을 초기화 시키는 함수이다.
 handleCommentCreate = (data) => {
    const { commentList, commentValue } = this.state;

    const user = {
      id: commentList.length + 1,
      userName: "ky_day",
      content: commentValue,
    };

    this.setState({
      commentList: [...commentList, user],
      commentValue: "",
    });
  };
handleKeyCommentCreate 함수는 엔터를 클릭했을때 댓글을 생성하는 함수이다.
  handleKeyCommentCreate = (e) => {
    e.key === "Enter" && this.handleCommentCreate();
  };
Westagram Mock data
{
  "CommentData": [
    {
      "id": 1,
      "userName": "wecode",
      "content": "Welcome to world best coding bootcamp!"
    },
    {
      "id": 2,
      "userName": "hong",
      "content": "Hi there."
    },
    {
      "id": 3,
      "userName": "code",
      "content": "Hey."
    }
  ],

  "RecommendData": [
    {
      "id": 1,
      "userName": "recommend friend01",
      "follower": "friend02"
    },
    {
      "id": 2,
      "userName": "recommend friend02",
      "follower": "friend01"
    },
    {
      "id": 3,
      "userName": "recommend friend03",
      "follower": "friend04"
    },
    {
      "id": 4,
      "userName": "recommend friend04",
      "follower": "friend03"
    }
  ],

  "StoryData": [
    {
      "id": 1,
      "userName": "smile01"
    },
    {
      "id": 2,
      "userName": "smile02"
    },
    {
      "id": 3,
      "userName": "smile03"
    },
    {
      "id": 4,
      "userName": "smile04"
    },
    {
      "id": 5,
      "userName": "smile05"
    }
  ]
}
componentDidMount에 json fetch로 목데이터를 이용해 request -> reseponse 데이터를 받아와서 setState를 이용해 변환시켜주는 부분이다. 현재는 fetch로 get 방식이기 때문에 생략을 하였다.
  componentDidMount() {
    fetch("/data/data.json")
      .then((res) => res.json())
      .then((res) => {
        this.setState({
          commentList: res.CommentData,
          recommendList: res.RecommendData,
          storyList: res.StoryData,
        });
      });
  }
Westagram request,response

실제로 서버에 fetch 함수로 요청을 POST 방식으로 body에 담아서 요청한다. JSON.stringify -> JSON 문자열로 보내고,
요청한 데이터를 받아와서 MESSAGE가 성공하면 토큰을 localStorage.setItem에 저장하고 나서 main으로 이동한다.
    fetch(SIGNIN_API, {
      method: "POST",
      body: JSON.stringify({
        email: id,
        password: pw,
      }),
    })
      .then((res) => res.json())
      .then((res) => {
        if (res.message === "SUCCESS") {
          localStorage.setItem("token", res.Authorization);
          this.props.history.push("/main-kiyeol");
        }
        if (res.message === "UNAUTHORIZED") {
          alert("아이디나 비밀번호를 확인해주세요.");
        }
      });
  };
Westagram README.md
🤔 프로젝트 소개
기간: '20.12.29(화) ~ '21.1.7(목)
내용: Instagram 로그인 및 메인 페이지 React 클론. 로그인/회원가입 및 댓글추가 등 기능 구현.
🧑💻 기술 Stack
HTML5
Sass(SCSS)
Javascript
React.js
React-Router
👨👨👦 협업 Tool
slack
git & github

