HTML(Hyper Text Markup Language)
<!DOCTYPE html>
<html>
<head>
<title>Page Title</title>
</head>
<body>

<h1>My First Heading</h1>
<p>My first paragraph.</p>

</body>
</html>
!DOCTYPE html: 이 문서가 HTML5 문서임을 정의
html: HTML page의 근본 요소
head: 해당 HTML 페이지에 대한 상위의 정보를 제공
title: HTML 페이지의 제목
body: 페이지를 이용하는 사람에게 보이는 부분
HTML은 p 태그를 'P'태그로 적더라도 이해한다.
hn, p, br, pre 태그
- h 뒤에 붙는 n의 숫자가 커질 수록 글자의 수는 작아진다
<h1>Heading 1</h1>
<h2>Heading 2</h2>
<h3>Heading 3</h3>
<h4>Heading 4</h4>
<h5>Heading 5</h5>
<h6>Heading 6</h6>
Heading 1
Heading 2
Heading 3
Heading 4
Heading 5
Heading 6
- p에서 시작해서 /p 가 나올 때까지 줄바꿈이나 스페이스가 통하지 않는다
<p>This is a paragraph.</p>
<p>This is
a paragraph.</p>
<p>This is        a paragraph.</p>
This is a paragraph.
This is a paragraph.
This is a paragraph.
- br을 넣어야 줄 바뀜이 실행된다
<p>This is<br>a paragraph<br>with line breaks.</p>This is
a paragraph
with line breaks.
- pre 태그는 br 이 없어도 줄바뀜과 스페이스바를 모두 인식한다.
<pre>
    'pre'태그는 br을 쓰지 않아도
    이렇게 줄바꿈이 된답니다.
</pre>
a, img, title 태그
- a로 열어서 /a로 닫는다
- 여는 a 안에 'href'로 링크를 건다
<a href="https://www.w3schools.com">Visit W3Schools</a>- img 태그 안에 src="(링크)"를 적는다 (닫는 태크 없음)
- alt="" : 이미지가 깨질 때 사진 설명이 들어간다
<img src="img_girl.jpg" width="500" height="600" alt="a girl">
- title="" : ""에 들어간 내용이 해당 태그 위에 마우스 커서를 올리면 내용이 나온다
<p title="I'm a test">test</p>test
style
* <tagname style="css property:css value;">- background-color: 배경색
- color: 글자 색
- font-family: 폰트
- font-size: 글자 크기
- text-align: 글자 정렬
<p>I am normal</p>
<p style="color:red; font-family:courier;">I am red</p>
<p style="color:blue;background-color:powderblue;">I am blue</p>
<p style="font-size:50px; text-align:center;">I am big</p>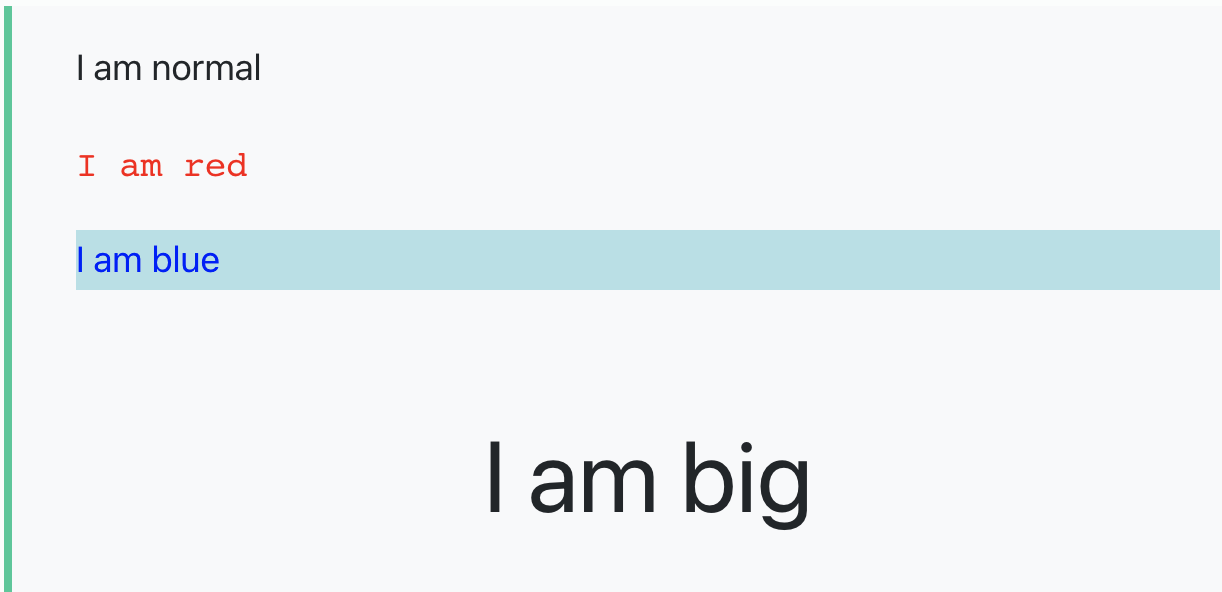
HTML Text Formatting
- b: 볼드체
- em: 강조체
- i: 이탈릭체
- small: 글씨 작게
- strong: 글씨 두껍게
- sub: 보통 글씨보다 밑쪽으로
- sup: 보통 글씨보다 위쪽으로
- ins: 밑줄
- del: 글씨 중간에 줄 긋기
- mark: 글씨에 마킹하기
<p><b>This text is bold</b></p>
<p><strong>This text is important!</strong></p>
<em>This text is emphasized</em>
<p><i>This text is italic</i></p>
<small>This is some smaller text.</small>
<p>Do not forget to buy <mark>milk</mark> today.</p>
<p>My favorite color is <del>blue</del> red.</p>
<p>My favorite color is <ins>red</ins>.</p>
<p>This is<sub> subscript</sub> and <sup>superscript</sup></p>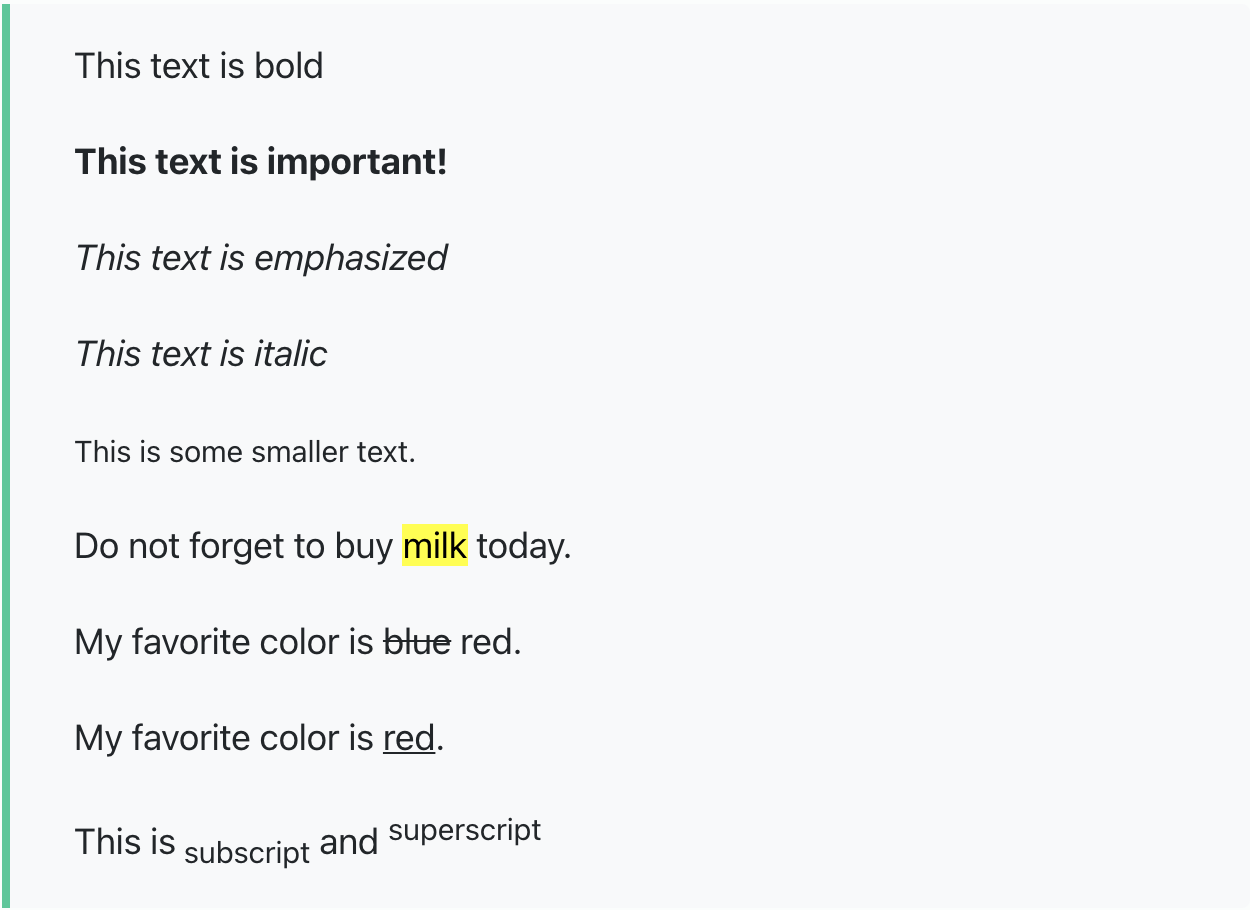
HTML 인용
- q: 짧을 때
- blockquote: 어느 부분을 정해서 그 안에 인용한 것을 쓸때 사용한다.
- abbr: 약칭이나 준말을 설명할 때 많이 사용
- address: 개인 정보 인용시 사용 (italic체)
- cite: 보통 고유명사 쓸 때 사용(italic체)
- bdo: 글씨 쓰는 방향 조정 (원래 default 값은 ltr으로 왼쪽에서 오른쪽이고, dir="rtl"로 하면 오른쪽에서 왼쪽으로 써진다.)
<p>WWF's goal is to: <q>Build a future where people live in harmony with nature.</q></p>
<p>Here is a quote from WWF's website:</p>
<blockquote cite="http://www.worldwildlife.org/who/index.html">
For 50 years, WWF has been protecting the future of nature.
The world's leading conservation organization,
WWF works in 100 countries and is supported by
1.2 million members in the United States and
close to 5 million globally.
</blockquote>

<p>The <abbr title="World Health Organization">WHO</abbr> was founded in 1948.</p>

<address>
Written by John Doe.<br>
Visit us at:<br>
Example.com<br>
Box 564, Disneyland<br>
USA
</address>

<p><cite>The Scream</cite> by Edvard Munch. Painted in 1893.</p>

<bdo dir="rtl">This line will be written from right to left</bdo>
WWF's goal is to: Build a future where people live in harmony with nature.
Here is a quote from WWF's website:
For 50 years, WWF has been protecting the future of nature. The world's leading conservation organization, WWF works in 100 countries and is supported by 1.2 million members in the United States and close to 5 million globally.The WHO was founded in 1948.
Written by John Doe.
Visit us at:
Example.com
Box 564, Disneyland
USAThe Scream by Edvard Munch. Painted in 1893.
This line will be written from right to left
주석달기
주석 달기는 !-- -- 로 합니다.
<!-- 주석입니다. -->CSS 종류
- inline: 태그 안에 스타일을 입힘
- internal: head안에 스타일을 구분하여 작성
- external: 외부에서 끌어와서 스타일을 적용
Link
- target: 해당 링크가 어디에 새로 열려야하는지
- _blank: 새로운 탭에 열린다
- _self: 기존 탭에 열린다
- _parent: 부모창에서 열림
- _top: 가장 상위의 창에서 열림
   <a href="https://velog.io/@dhffkvm_718" target="_blank" style="color:Violet">_blank로 링크걸기</a><br>
    <a href="https://velog.io/@dhffkvm_718" target="_self" style="color:Violet">_self로 링크걸기</a><br>
    <a href="https://velog.io/@dhffkvm_718" target="_parent" style="color:Violet">_parent로 링크걸기</a><br>
<a href="https://velog.io/@dhffkvm_718" target="_top" style="color:Violet">_top로 링크걸기</a><br>div vs span
div입니다
span은 이렇게 부분적으로 하는 것입니다
HTML table
- table: 표
- tr: table row- td: table data 값
<table style="width:100%">
  <tr>
    <th>Name</th>
    <th colspan="2">Telephone</th>
  </tr>
  <tr>
    <td>Bill Gates</td>
    <td>55577854</td>
    <td>55577855</td>
  </tr>
</table>
list
- ul
- ol
- li
- dl
- dt
- dd
-순서 없는 리스트
<ul>
  <li>Coffee</li>
  <li>Tea</li>
  <li>Milk</li>
</ul>
- Coffee
- Tea
- Milk
-순서 있는 리스트
<ol>
  <li>Coffee</li>
  <li>Tea</li>
  <li>Milk</li>
</ol>
- Coffee
- Tea
- Milk
-설명 리스트
<dl>
  <dt>Coffee</dt>
  <dd>- black hot drink</dd>
  <dt>Milk</dt>
  <dd>- white cold drink</dd>
</dl>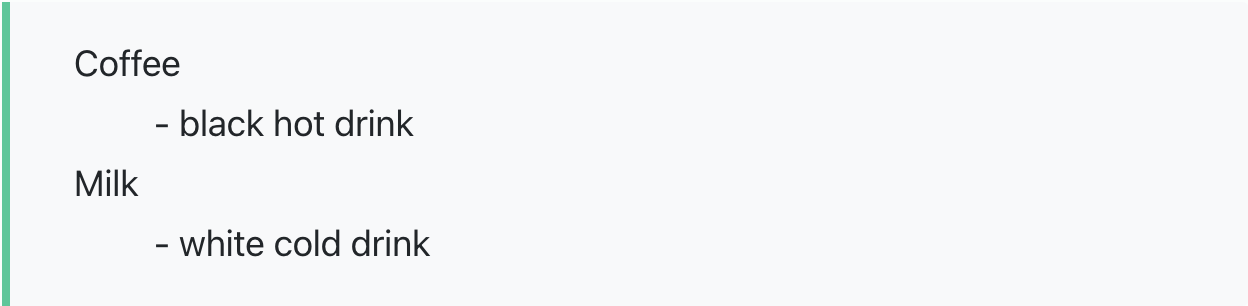
Block & Inline
- div: 컨텐츠를 필요에 따라 하나도 묶을 때 사용
- span: div와 의미는 같음
- div vs span : div는 “block level element(줄 바꿈o)”/ span은 “inline level element(줄 바꿈 x)”

class, id
- class: 한 페이지에 반복적으로 사용되는 스타일을 적용하기 위해
- id: 특정 부분을 스타일을 입히려고 할 때 사용
iframe
- 웹페이지 안에 웹사이트를 따로 보여줄 때 사용
<iframe src="https://velog.io/@dhffkvm_718/" name="myvelog" height="300px" width="100%" title="myvelog"></iframe>Javascript
<p>JavaScript can change the content of an HTML element:</p>

<button type="button" onclick="myFunction()">Click Me!</button>

<p id="demo">This is a demonstration.</p>

<script>
function myFunction() {
  document.getElementById("demo").innerHTML = "Hello JavaScript!";
}
</script>
- 'This is a demonstration.'이 버튼을 클릭하면 'Hello JavaScript!' 로 바뀐다.
<button type="button" onclick="document.getElementById('demo').innerHTML = Date()">
    Click me to display Date and Time.</button>
    <p id="demo"></p>
Click me to display Date and Time.
- 원래는 버튼을 클릭하면 날짜와 시각이 나온다.
Responsive web
<meta name="viewport" content="width=device-width, initial-scale=1.0">veiwport를 통해 화면을 보는 사용자의 기기에 맞게 너비를 조절한다.

초보자가 기록하는 곳