Byte Code
바이트 코드는 Nodejs Engine이 해석하고 실행할 수 있도록 추상화된 기계어 코드이다.
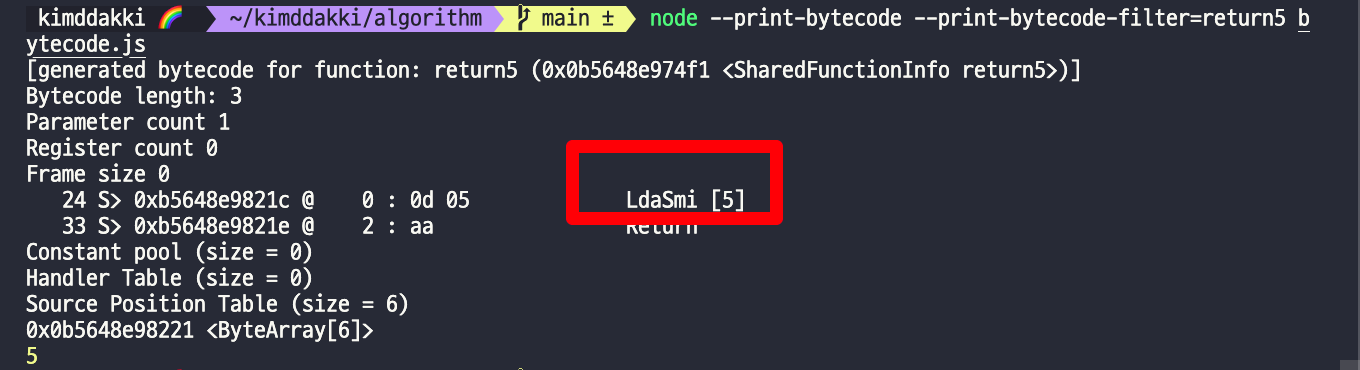
🔥 ByteCode를 한 번 찍어보자
// bytecode.js
function return5 () {
  return 5;
}

console.log(return5());
위와 같은 JS코드를 작성하고 아래 명령어를 실행해보자
node --print-bytecode --print-bytecode-filter=return5 bytecode.js

이 바이트 코드는 Nodejs의 엔진에 전달 되게 된다.
Nodejs의 엔진은 바이트코드를 해석하고 각각의 다른 지시어를 가지고 있는 CPU가 실행될 수 있도록 해석하는 interpreter이다.
바이트 코드는 NodeJs VM Interpreter가 해석할 수 있는 변환된 코드인 것이다!
node --print-bytecode bytecode.js
위의 CLI를 입력하면 전체 바이트 코드가 출력된다 😁
VM(Virtual Machine)
VM 모듈은 가상 머신 컨텍스트에서 코드를 컴파일하고 실행할 수 있도록 도와주는 모듈이다.
Nodejs Docs에서 설명하는 V8 VM Module에 대한 설명을 한번 보자
The node:vm module enables compiling and running code within V8 Virtual Machine contexts.
The node:vm module is not a security mechanism. Do not use it to run untrusted code.
JavaScript code can be compiled and run immediately or compiled, saved, and run later.
A common use case is to run the code in a different V8 Context. This means invoked code has a different global object than the invoking code.
One can provide the context by contextifying an object. The invoked code treats any property in the context like a global variable. Any changes to global variables caused by the invoked code are reflected in the context object.
VM 모듈은 V8 가상 머신 컨텍스트에서 코드를 컴파일하고 실행할 수 있는 모듈이다. 이는 즉시 컴파일 한 후 실행하거나, 컴파일 한 후 나중에 실행시킬 수 있다.
VM 모듈을 사용하는 케이스는 다른 V8 맥락(Context)에서 코드를 실행하고 싶을 때 활용할 수 있다.
-> 즉, V8 VM 모듈을 통해 호출된 코드는 호출한 코드와 다른 전역 객체를 가지게 된다.
const vm = require('node:vm');
const x = 1;

const context = { x: 2 };
vm.createContext(context);

const code = 'x += 40; var y = 17;';

// context 객체 내에서 x와 y는 전역 변수이다.
console.log(context); // {x: 2}
console.log(context.x); // 2
vm.runInContext(code, context);

console.log(context); // {x: 42, y: 17}
console.log(context.x); // 42
console.log(context.y); // 17

console.log(x); // 1;
console.log(y); // ReferenceError: y is not defined
📝 Nodejs의 vm.js의 코드를 조금만 보자.
// lib/vm.js
const {
  ContextifyScript,
  makeContext,
  constants,
  measureMemory: _measureMemory,
} = internalBinding('contextify');
//...
class Script extends ContextifyScript {
  constructor(code, options = kEmptyObject) {
    code = `${code}`;
    if (typeof options === 'string') {
      options = { filename: options };
    } else {
      validateObject(options, 'options');
    }
//...
Script Class는 ContexifyScript를 상속 받고 있다.
code와 options를 생성자 지시어의 매개변수로 전달받고 있는데 code라는 변수를 선언하고,options 타입이 strgin이라면 객체 내 filename 프로퍼티에 options를 값으로 할당하는 것을 볼 수 있다.
📌 추가로 ContexifyScript를 Export하는 node_contextify.cc 파일을 한 번 보자!
// node_contextify.cc

BaseObjectPtr<ContextifyContext> ContextifyContext::New(
    Environment* env, Local<Object> sandbox_obj, ContextOptions* options) {
  HandleScope scope(env->isolate());

  // 1. ObjectTemplate 가져오기
  Local<ObjectTemplate> object_template = env->contextify_global_template();
  DCHECK(!object_template.IsEmpty());
  const SnapshotData* snapshot_data = env->isolate_data()->snapshot_data();

  // 2. 현재 컨텍스트의 MicrotaskQueue 가져오기
  MicrotaskQueue* queue =
      options->own_microtask_queue
          ? options->own_microtask_queue.get()
          : env->isolate()->GetCurrentContext()->GetMicrotaskQueue();

  // 3. v8_context 생성하기
  Local<Context> v8_context;
  if (!(CreateV8Context(env->isolate(), object_template, snapshot_data, queue)
            .ToLocal(&v8_context))) {
    // Allocation failure, maximum call stack size reached, termination, etc.
    return BaseObjectPtr<ContextifyContext>();
  }
  return New(v8_context, env, sandbox_obj, options);
}
위 코드를 보면 V8 컨텍스트를 생성하고 마이크로 테스크 큐를 가져오는 것을 확인 할 수 있다.
✅ -> 즉 현재의 Context가 아닌 독립된 새로운 Context를 생성하는 것이다!
더하여 CreateV8Context 메서드의 주석을 보면 조금 더 흥미로운데 아래 코드를 한 번 보자
MaybeLocal<Context> ContextifyContext::CreateV8Context(
    Isolate* isolate,
    Local<ObjectTemplate> object_template,
    const SnapshotData* snapshot_data,
    MicrotaskQueue* queue) {
  EscapableHandleScope scope(isolate);

  Local<Context> ctx;
  if (snapshot_data == nullptr) {
    ctx = Context::New(
        isolate,
        nullptr,  // extensions
        object_template,
        {},                                       // ✅ global object
        v8::DeserializeInternalFieldsCallback(),  // deserialization callback
        queue);
    if (ctx.IsEmpty() || InitializeBaseContextForSnapshot(ctx).IsNothing()) {
      return MaybeLocal<Context>();
    }
    ...
우리가 Node의 전역 global 객체가 CreateV8Context함수 내에서 생성되는 것을 확인할 수 있었다.
이 VM.js는
1. Parser를 통해 생성된 AST가 Ignition을 통해 바이트 코드로 변환되고
2. 변환된 바이트 코드는 자바스크립트의 VM을 통해 해석(Interprete) 되고
3. CPU의 지시어에 맞게 변환되어 실행되는 것이 아닐까 싶다 :)
다시 vm.js로 돌아가서 구현되어 있는 함수들을 조금 더 살펴보자.
module.exports = {
  Script,
  createContext,
  createScript,
  runInContext,
  runInNewContext,
  runInThisContext,
  isContext,
  compileFunction,
  measureMemory,
  constants: vmConstants,
};runInContext, Run~~ 등을 보면 새로운 Context를 생성하여 구현한 코드들을 실행할 수 있는 기능을 제공해 주고 있다.
이는 -> 우리가 실행하는 코드들이 하나의 맥락 내에서 실행된다는 것을 알려주고 global this와 같은 전역 객체가 어떻게 생성되고 활용되는 지 보여주는 것이라 생각된다 :)
🤔
우리의 자바스크립트 코드는 Scanner, Parser, Ignition을 통해 ByteCode로 변환된다.
바이트 코드는 기계어의 추상화이다. 즉 CPU와 동일한 계산 모델들로 설계되어 기계어 코드로 컴파일하는 데 더 쉽게 추상화된 코드인 것이다.
bytecoes.h에서 바이트코드의 전체 목록을 확인할 수 있는데 아래
LdaSmi는 위의 사진에서 확인한 바이트 코드임을 볼 수 있다.

🤔 바이트 코드는 기계어로 누가 변환할까? 가 궁금하여 찾아 보았다.
how Byte code is converted to Machine code in term of JavaScript?
위 스택오버플로우의 답변을 보면 기계어로 변환한 뒤 실행하는 것이 아니라 바이트 코드를 만났을 때Engine이 해당 바이트 코드를 핸들링할 수 있는 지시어를 호출한다고 되어 있다.LdaSmi 5 when the Ignition sees that bytecode it will actually call a function from the engine which handles that instruction.
🤔 VM?
Nodejs는 새로운 Context를 만들고, 코드를 실행하는 모듈을 VM 이라고 이름 지었다.
그럼 우리가 구현하는 자바스크립트 코드가 변환된 ByteCode를 실행하는 주체도 VM이라고 생각해도 될까?
지금 읽고 있는 책 컴퓨터 밑바닥의 비밀 내의 내용을 공유하고 마무리하려고 한다!
이번에도 여러분은 '이해 불가능 원칙'에 따라서 CPU 시뮬레이션 프로그램에 가상머신(Virtual Machine)이라는 이름을 붙였습니다.
이 가상 머신에는 인터프리터(Interpreter)라는 별명도 붙어 있습니다.
참고 자료