Supertest
Supertest는 Node.js HTTP 서버를 테스트하기 위한 SuperAgent 기반의 라이브러리이다.
supertest 테스트 코드의 예시를 먼저 보자
import * as request from 'supertest';

it('should return a list of users with a valid API key', async () => {
  const response = await request(app)
  // get Method + url
  .get('/api/users')
  // header setting
  .set('X-API-Key', 'valid-api-key')
  // expect
  .expect(200);

  expect(response.body).toBeInstanceOf(Array);
});
서버는 어떻게 실행될까?
request/index.js 에서 exports하는 함수를 살펴보자
let http2
try {
  http2 = require('http2');
} catch (_) {
	//
}
const methods = require('methods');
/**
 * Test against the given `app`,
 * returning a new `Test`.
 *
 * @param {Function|Server|String} app
 * @return {Test}
 * @api public
 */
module.exports = function(app, options = {}) {
  const obj = {};

  if (typeof app === 'function') {
    if (options.http2) {
      if (!http2) {
        throw new Error(
          'supertest: this version of Node.js does not support http2'
        );
      }
      // 1. http2가 있으면 http2로 서버를 생성하고 없다면 http 내장 모듈로 서버를 실행한다.
      app = http2.createServer(app);
    } else {
      app = http.createServer(app);
    }
  }

  // 2. 빈 객체 obj에 nodejs에 존재하는 method를 key, Test 객체를 생성하는 함수를 Value로 할당한다.
  methods.forEach(function(method) {
    obj[method] = function(url) {
      var test = new Test(app, method, url);
      if (options.http2) {
        test.http2();
      }
      return test;
    };
  });

  // Support previous use of del
  obj.del = obj.delete;

  return obj;
};
📝 `await request(app)`을 실행하면 아래와 같이 Nodejs에서 제공하는 Method들에 Test를 실행할 수 있는 함수가 매핑되어 있는 object를 반환하게 된다.
{
	get: function(url) { ... },
    post: function(url) { ... },
    put: function(url) { ... },
    delete: function(url) { ... },
	...
}
📝 `.get('/api/users)` 코드가 실행되면 Test 클래스의 인스턴스가 생성된다!
var test = new Test(app, 'get', '/api/users');
// ...
return test;
📝 이 후 `.set('X-API-Key', 'valid-api-key').expect(200)` 와 같이 호출되는 코드는 모두 `Test` 클래스 내의 메소드가 호출될 것이다!
Test Class
Test 클래스를 보면 superagent의 Request Class를 상속 받고 있는 것을 확인 되고 생성자 함수를 보면 테스트 된 _asserts 배열을 멤버 변수로 만들고 테스트를 실행할 URL을 등록한다.
const { Request } = require('superagent');

class Test extends Request {
  /**
   * Initialize a new `Test` with the given `app`,
   * request `method` and `path`.
   *
   * @param {Server} app
   * @param {String} method
   * @param {String} path
   * @api public
   */
  constructor (app, method, path) {
    super(method.toUpperCase(), path);

    this.redirects(0);
    this.buffer();
    this.app = app;
    // 1. 테스트 된 배열
    this._asserts = [];
    // 2. URL 등록
    // string 주소가 들어오면 그대로 사용하고 <- 아마 도메인일지도
    // 아니라면 url 주소를 생성한다.
    this.url = typeof app === 'string'
      ? app + path
      : this.serverAddress(app, path);
  }
  ...
📝 serverAddress
- URL 등록
  /**
   * Returns a URL, extracted from a server.
   *
   * @param {Server} app
   * @param {String} path
   * @returns {String} URL address
   * @api private
   */
  serverAddress(app, path) {
    const addr = app.address();
	// 1. 주소가 없으면 서버를 실행한다.
    if (!addr) this._server = app.listen(0);
    // 2. 주소의 포트를 가져온다.
    const port = app.address().port;
    // 3. protocol을 가져온다.
    const protocol = app instanceof Server ? 'https' : 'http';
    // 4. localhost(127.0.0.1:port/path) <- 앞서 실행한 로컬 호스트 주소를 완성한다.
    return protocol + '://127.0.0.1:' + port + path;
  }
📝 expect(a, b, c)
- 유효성 검사
expect 함수 위에 주석으로 테스트할 예시 코드가 나와 있다.
전달되는 매개 변수의 개수와 타입에 따라 Header, Body, Status 등 결과의 어떤 부분을 검사하고 싶은지 분기처리 한 후 검사하는 것을 볼 수 있다!
이 후 결과물은 asserts 배열에 담게 된다!
/**
   * Expectations:
   *
   *   .expect(200)
   *   .expect(200, fn)
   *   .expect(200, body)
   *   .expect('Some body')
   *   .expect('Some body', fn)
   *   .expect(['json array body', { key: 'val' }])
   *   .expect('Content-Type', 'application/json')
   *   .expect('Content-Type', 'application/json', fn)
   *   .expect(fn)
   *   .expect([200, 404])
   *
   * @return {Test}
   * @api public
   */
expect(a, b, c) {
    // callback
    if (typeof a === 'function') {
      this._asserts.push(wrapAssertFn(a));
      return this;
    }
    if (typeof b === 'function') this.end(b);
    if (typeof c === 'function') this.end(c);

    // status
    if (typeof a === 'number') {
      this._asserts.push(wrapAssertFn(this._assertStatus.bind(this, a)));
      // body
      if (typeof b !== 'function' && arguments.length > 1) {
        this._asserts.push(wrapAssertFn(this._assertBody.bind(this, b)));
      }
      return this;
    }

    // multiple statuses
    if (Array.isArray(a) && a.length > 0 && a.every(val => typeof val === 'number')) {
      this._asserts.push(wrapAssertFn(this._assertStatusArray.bind(this, a)));
      return this;
    }

    // header field
    if (typeof b === 'string' || typeof b === 'number' || b instanceof RegExp) {
      this._asserts.push(wrapAssertFn(this._assertHeader.bind(this, { name: '' + a, value: b })));
      return this;
    }

    // body
    this._asserts.push(wrapAssertFn(this._assertBody.bind(this, a)));

    return this;
  }
More
Supertest의 package.json을 보면 supertestagent, methods라이브러리에 의존하고 있는 것을 확인할 수있다.
// packages.json
{
  "name": "supertest",
  "description": "SuperAgent driven library for testing HTTP servers",
  "version": "6.3.4",
  "author": "TJ Holowaychuk",
  "contributors": [],
  "dependencies": {
    "methods": "^1.1.2", // ✅ methods
    "superagent": "^8.1.2" // ✅ superagent
  },
  "devDependencies": {
    "body-parser": "^1.20.2",
    "cookie-parser": "^1.4.6",
    "eslint": "^8.32.0",
    "eslint-config-airbnb-base": "^15.0.0",
    "eslint-plugin-import": "^2.27.5",
    "express": "^4.18.2",
    "mocha": "^10.2.0",
    "nock": "^13.3.0",
    "nyc": "^15.1.0",
    "proxyquire": "^2.1.3",
    "should": "^13.2.3"
  },
methods
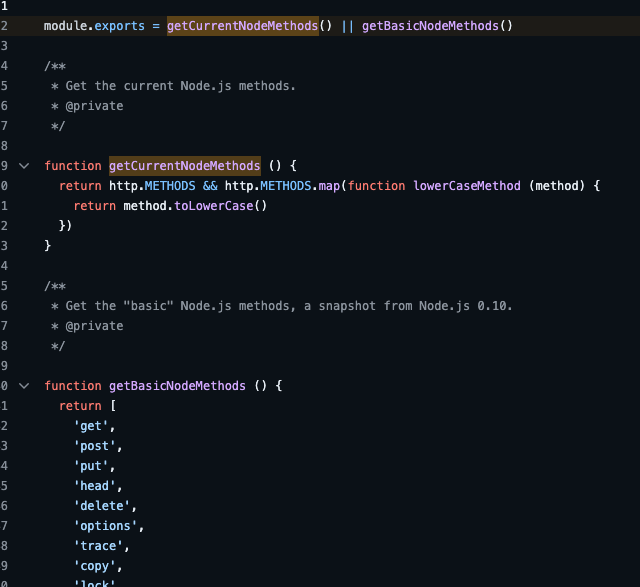
methods는 간단한 라이브러리이다.
현재 HTTP 요청에 Methods가 있으면 해당 Method를 반환하고 아니면 Nodejs의 기본 메서드 배열을 반환해주는 라이브러리이다!
superagent
SuperAgent는 유연성, 가독성 및 낮은 학습 곡선을 위해 만들어진 경량의 진보적인 ajax API이다! axios, fetch 같은 HTTP 요청 라이브러리 같은 것이다.
- 유연성: superagent는 체이닝 가능한 메서드로 HTTP 요청을 유연하게 구성할 수 있다.
- 가독성: 간결한 API 구조로 인해 코드의 가독성이 높다.
- 낮은 학습 곡선: 직관적이고 단순한 API로 인해 학습하기가 쉽다.
- 경량: 다른 의존성 없이 작은 크기의 라이브러리이다.
- 진보적인 ajax API: 최신 웹 기술을 반영하여 만들어진 AJAX 라이브러리이다.
request
  .get('/search')
  .set('API-Key', 'foobar')
  .set('Accept', 'application/json')
  .then(callback);
request
  .get('/search')
  .query({ query: 'Manny' })
  .query({ range: '1..5' })
  .query({ order: 'desc' })
  .then(res => {

});
위와 같이 superagent를 활용하여 HTTP API 요청을 할 수 있는데, superagent가 매핑된 supertest는 superagent 코드 뒤에 expect 메서드를 활용하여 통합 테스트를 편하게 할 수 있도록 도와주는 라이브러리 인 것이다!
🤔 axios를 사용하면 axiostest일까?
찾아보니 axios-test-instance가 있긴 했다!!
superagent에 대한 설명은 superagent를 참고하면 좋을 것 같다 :)
참고 자료