🗒 Table View Cell
Style
- custom: 셀 디자인을 직접 구성할 때 사용합니다.
- Basic: 하나의 텍스트를 출력할 때 사용합니다.
- Right Detail: 텍스트를 셀 양쪽에 하나씩 출력할 때 사용합니다.
- Left Detail: 텍스트 정렬 방식이 반대로 설정됩니다.
- Subtitle: 텍스트가 수직으로 배치됩니다.
Separator
컬러 설정, 좌우 여백을 설정할 수 있습니다.
하지만 높이가 고정되어 있기 때문에 원하는 높이로 설정할 수 없습니다.
- Default: 회색 실선이 표시됩니다.
- None: Separator가 표시되지 않습니다. 커스텀 Separator를 구현할때 사용합니다.
- Single Line: 기본 옵션과 동일합니다.
- 기본값은 회색입니다.
Separator Inset -> 여백 조절
Selection
셀을 선택했을 때 시각적으로 강조하는 방법을 설정합니다.
- Default: 회색 배경이 표시됩니다.
- None: 셀을 선택했을 때 강조 효과가 표시되지 않습니다.
- Blue, Gray: iOS7부터 Default와 결과가 같습니다.
identifier
셀을 식별할 수 있는 식별자를 입력해야합니다. 이것을 Reuse Identifier라고 합니다.
테이블 뷰는 델리게이트 패턴을 통해서 필요한 데이터를 요청합니다.
Data Source -> 데이터를 공급하는 데이터를 Data Sourece입니다.
Data Source에 필요한 메소드는 UITableViewDataSource 프로토콜에 선언되어 있습니다.
extension DelegatePetternViewController: UITableViewDataSource {
    func tableView(_ tableView: UITableView, numberOfRowsInSection section: Int) -> Int {
        <#code#>
    }

    func tableView(_ tableView: UITableView, cellForRowAt indexPath: IndexPath) -> UITableViewCell {
        <#code#>
    }
}
필수 Method
-
첫 번째 메소드에서는 섹션에 표시할 셀 수를 리턴해야 합니다.
-
두 번째 메소드에서는 셀을 생성하고 셀에 표시할 데이터를 설정한 다음 리턴해야 합니다.
구현 순서
- 테이블 뷰 추가
- 프로토타입 셀을 추가
- Reuse Identifier 설정
- 테이블 뷰 데이터 소스 지정, 델리게이트 지정
- 필수 메소드 구현

import UIKit
class ViewController: UIViewController {
@IBOutlet weak var listTableView: UITableView!
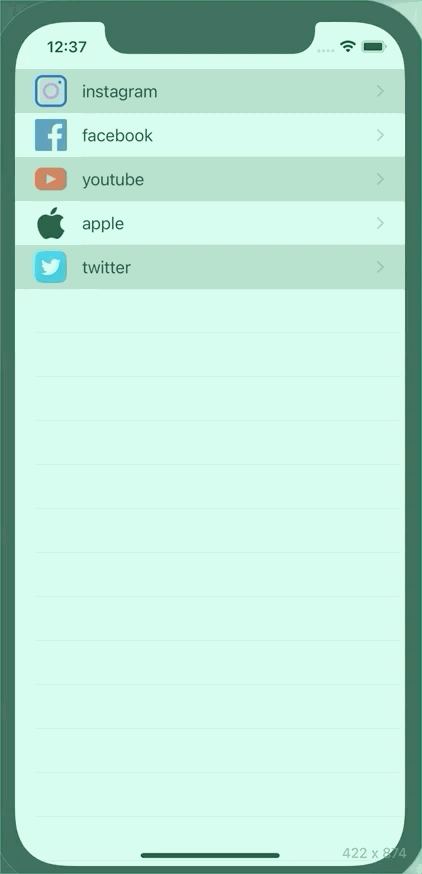
let list = ["instagram", "facebook", "youtube", "apple", "twitter"]
override func viewDidLoad() {
super.viewDidLoad()
// Do any additional setup after loading the view.
}
override func prepare(for segue: UIStoryboardSegue, sender: Any?) {
if let cell = sender as? UITableViewCell {
if let indexPath = listTableView.indexPath(for: cell) {
if let vc = segue.destination as? DetailViewController {
vc.value = list[indexPath.row]
}
}
}
}
}
extension ViewController: UITableViewDataSource {
func tableView(_ tableView: UITableView, numberOfRowsInSection section: Int) -> Int {
return list.count
}
func tableView(_ tableView: UITableView, cellForRowAt indexPath: IndexPath) -> UITableViewCell {
let cell = tableView.dequeueReusableCell(withIdentifier: "cell", for: indexPath)
let img = UIImage(named: "\(list[indexPath.row]).png")
cell.textLabel?.text = list[indexPath.row]
cell.imageView?.image = img
return cell
}
}
extension ViewController: UITableViewDelegate {
func tableView(_ tableView: UITableView, didSelectRowAt indexPath: IndexPath) {
print("\(indexPath.row)")
}
func tableView(_ tableView: UITableView, willDisplay cell: UITableViewCell, forRowAt indexPath: IndexPath) {
if indexPath.row % 2 == 0 {
cell.backgroundColor = UIColor(white: 0.6, alpha: 0.5)
} else {
cell.backgroundColor = UIColor.white
}
}
}

iOS Develpoer