Udemy - RESTful Web Services, Java, Spring Boot, Spring MVC and JPA강좌를 수강하며 정리
로그인 기능을 만들자. 먼저 com.appdeveloperblog.app.ws.ui.model.request패키지에 UserLoginRequestModel라는 클래스를 만들었다.
package com.appdeveloperblog.app.ws.ui.model.request;

public class UserLoginRequestModel {
private String email;
private String password;
public String getEmail() {
	return email;
}
public void setEmail(String email) {
	this.email = email;
}
public String getPassword() {
	return password;
}
public void setPassword(String password) {
	this.password = password;
}


}
그리고 전에 만들었던 WebSecurity클래스에 오버라이드했던 configure메서드 두개중 AuthenticationManagerBuilder를 인자로 받는 메서드에 내용을 추가해준다.
package com.appdeveloperblog.app.ws.security;

import org.springframework.http.HttpMethod;
import org.springframework.security.config.annotation.authentication.builders.AuthenticationManagerBuilder;
import org.springframework.security.config.annotation.web.builders.HttpSecurity;
import org.springframework.security.config.annotation.web.configuration.EnableWebSecurity;
import org.springframework.security.config.annotation.web.configuration.WebSecurityConfigurerAdapter;

import org.springframework.security.crypto.bcrypt.BCryptPasswordEncoder;

import com.appdeveloperblog.app.ws.service.UserService;

@EnableWebSecurity
public class WebSecurity extends WebSecurityConfigurerAdapter{
	private final UserService userDetailsService;
	private final BCryptPasswordEncoder bCryptPasswordEncoder;

	public WebSecurity(UserService userDetailsService, BCryptPasswordEncoder bCryptPasswordEncoder) {
		this.userDetailsService = userDetailsService;
		this.bCryptPasswordEncoder = bCryptPasswordEncoder;
	}

	@Override
	protected void configure(HttpSecurity http) throws Exception {
		// TODO Auto-generated method stub
//		super.configure(http);
		http.csrf().disable().authorizeRequests()
		.antMatchers(HttpMethod.POST, "/users")
		.permitAll().anyRequest().authenticated();
	}

	@Override
	protected void configure(AuthenticationManagerBuilder auth) throws Exception {
		// TODO Auto-generated method stub
//		super.configure(auth);
		auth.userDetailsService(userDetailsService).passwordEncoder(bCryptPasswordEncoder);
		//userDetailsService Interface 는 helps spring framework to load user details from our database and to help it load
		//user details from the database we've also provided the password encoder that we use to encode the user provided password
		//and the password encoding class is decrypt password controller.

	}

}
주석으로 userDetailsService가 무슨 역할을 하는 지 달아놨다. 대략 말해보면 DB에서 유저정보를 가져오는 역할을 하는 인터페이스이다.Spring Security - 인증 절차 인터페이스 구현 (1) UserDetailsService, UserDetails
그리고 또 전에 만들었던 UserServiceImpl클래스의 loadUserByUsername메서드를 고쳐준다.
package com.appdeveloperblog.app.ws.service.impl;

import java.util.ArrayList;

import org.springframework.beans.BeanUtils;
import org.springframework.beans.factory.annotation.Autowired;
import org.springframework.security.core.userdetails.User;
import org.springframework.security.core.userdetails.UserDetails;
import org.springframework.security.core.userdetails.UsernameNotFoundException;
import org.springframework.security.crypto.bcrypt.BCryptPasswordEncoder;
import org.springframework.stereotype.Service;

import com.appdeveloperblog.app.ws.UserRepository;
import com.appdeveloperblog.app.ws.io.entity.UserEntity;
import com.appdeveloperblog.app.ws.service.UserService;
import com.appdeveloperblog.app.ws.shared.Utils;
import com.appdeveloperblog.app.ws.shared.dto.UserDto;

@Service
public class UserServiceImpl implements UserService {

	@Autowired
	UserRepository userRepository;

	@Autowired
	Utils utils;

	@Autowired
	BCryptPasswordEncoder bCryptPasswordEncoder;

	@Override
	public UserDto createUser(UserDto user) {

		if(userRepository.findByEmail(user.getEmail()) != null) throw new RuntimeException("Record already exist");


		UserEntity userEntity = new UserEntity();
		BeanUtils.copyProperties(user, userEntity);

		String publicUserId = utils.generateUserId(30);
		userEntity.setUserId(publicUserId);
		userEntity.setEncryptedPassword(bCryptPasswordEncoder.encode(user.getPassword()));

		UserEntity storedUserDetails = userRepository.save(userEntity);

		UserDto returnValue = new UserDto();
		BeanUtils.copyProperties(storedUserDetails, returnValue);


		return returnValue;
	}

	@Override
	public UserDetails loadUserByUsername(String email) throws UsernameNotFoundException {
		// TODO Auto-generated method stub
		// by implementing this method, we will help bring a framework to load user details from our database by username.
		// And in the case of our application, the user name is email address.
		UserEntity userEntity = userRepository.findByEmail(email);

		if(userEntity == null) throw new UsernameNotFoundException(email);
		return new User(userEntity.getEmail(), userEntity.getEncryptedPassword(),new ArrayList<>());
	}

}
We are about to start working with the authentication filter, which will be used to authenticate user with the provider username and password, and if authentication is successful, our authentication filter will issue, and access token. And that authentication filter uses some constants like token expiration time, token prefix header and sign up URL. So, we 're going to create a seperate class which will hold those details. But later on, I also show you how to keep some information and the property file and how to read the information from a property file. So now I will go into my security package and I will add one more class Security Constants.
package com.appdeveloperblog.app.ws.security;

public class SecurityContants {
	public static final long EXPIRATION_TIME = 864000000;	//10 days
	public static final String TOKEN_PREFIX = "BEARER ";
	public static final String HEADER_STRING = "Authorization";
	public static final String SIGN_UP_URL = "/users";
	public static final String TOKEN_SECRET = "jf9i4jgu83nf10";
}
EXPIRATION_TIME은 만료시간.
TOKEN_PREFIX is going to be passed on together with the header stream in HTTP request. So your HTTP post request will have an authorization header and that header will contain 'bearer' which is a string value, and then after the bearer, you'll provide a token value. So the header stream, which is authorization, and they sign up URL, which is public and is used to configure that public access to the sign up URL. We have already used sign up URL, but we have hardcoded it into our WebSecurityClass. So, what I can do, I can go back to my WebSecurityClass and instead of hardcoded value, use security constants.
WebSecurity Class
...
@Override
	protected void configure(HttpSecurity http) throws Exception {
	// TODO Auto-generated method stub

	http.csrf().disable().authorizeRequests()
	.antMatchers(HttpMethod.POST, SecurityContants.SIGN_UP_URL)	//이부분. 원래 ("/users")로 하드코딩 되어있던 부분을 바꿔줬다.
	.permitAll().anyRequest().authenticated();
	}
And later on, I can also move to a property file so that if I need to change Sign up URL, I can do it in SecurityConstantsClass.
Then, we have the token secret and this value will be used in the encryption of the value of our access token. And again, later on, I'll also show you how to move these value(TOKEN_SECRET) into property file so that if you need to change the value of the tokens, you do not have to do it in your java code.
Implementing Authentication Filter
We're going to create an authentication filter and that will be used when an http request is sent for user to sign in into our application. So I will go to a security package and I will create a new class and I will call it AuthenticationFilter.(security패키지에서 AuthenticationFilter클래스를 만든다.)
First of all, this authentication filter will need to extend one class and it is username and password authentication filter, which comes from spring framework. And I will need to import authentication manager, all these classes come from spring framework. These classes are part of the framework. All we need to do is tu use them properly so that user authentication works.
여기까지의 AuthenticationFilter클래스
public class AuthenticationFilter extends UsernamePasswordAuthenticationFilter{
private final AuthenticationManager authenticationManager;

public AuthenticationFilter(AuthenticationManager authenticationManager) {
		this.authenticationManager = authenticationManager;
	}
And now because we have extended username password authentication filter, there are a couple of methods that will need to override. And the first one is attemptAuthentication.
override해주고 난 후의 AuthenticationFilter클래스. (attemptAuthentication메서드만 override해줬다.)
package com.appdeveloperblog.app.ws.security;

import java.io.IOException;
import java.util.ArrayList;

import javax.servlet.http.HttpServletRequest;
import javax.servlet.http.HttpServletResponse;

import org.springframework.security.authentication.AuthenticationManager;
import org.springframework.security.authentication.UsernamePasswordAuthenticationToken;
import org.springframework.security.core.Authentication;
import org.springframework.security.core.AuthenticationException;
import org.springframework.security.web.authentication.UsernamePasswordAuthenticationFilter;

import com.appdeveloperblog.app.ws.ui.model.request.UserLoginRequestModel;
import com.fasterxml.jackson.databind.ObjectMapper;

public class AuthenticationFilter extends UsernamePasswordAuthenticationFilter{
	private final AuthenticationManager authenticationManager;

	public AuthenticationFilter(AuthenticationManager authenticationManager) {
		this.authenticationManager = authenticationManager;
	}

	@Override
	public Authentication attemptAuthentication(HttpServletRequest request, HttpServletResponse response)
			throws AuthenticationException {
		try {
			UserLoginRequestModel creds = new ObjectMapper().readValue(request.getInputStream(), UserLoginRequestModel.class);

			return authenticationManager.authenticate(
					new UsernamePasswordAuthenticationToken(
							creds.getEmail(),
							creds.getPassword(),
							new ArrayList<>())
					);
		}catch(IOException e) {
			throw new RuntimeException(e);
		}
	}


}
(이 메서드에 대한 설명)UserLoginRequestModel is our class, we have created it, and this is the class into which json payload containing username and password gets converted when a request for login is sent.
So, what's going to happen when our Web Services receive a request to authenticate user. Spring frame work will be used to authenticate our user with the user name and password that were provided by the user. And this method(attemptAuthentication) will be triggered. And the json payload that was included in the request body will be used to create userLoginRequestModel Java class, which we have created. It contains email and password and email is being used as a username in our case.
(UserLoginRequestModel은 이렇게 생겼다.
package com.appdeveloperblog.app.ws.ui.model.request;

public class UserLoginRequestModel {
private String email;
private String password;
public String getEmail() {
	return email;
}
public void setEmail(String email) {
	this.email = email;
}
public String getPassword() {
	return password;
}
public void setPassword(String password) {
	this.password = password;
}


}
)
Next, we'll use authenticationManager, which comes from spring(생성자에서 initialized되고있는 authenticationManager). So authentication manager will be used to authenticate user and it will use email and password which are being read from the user login and request model.
(ObjectMapper를 이용해서 http request를 자바객체로 바꾸고, UserLoginRequestModel의 인스턴스인 creds에 넣어준다.[jackson]ObjectMapper를 이용하여 java Object를 json문자열로 변환하기 그리고 그걸 다시 UsernamePasswordAuthenticationToken의 생성자로 넣어주는 것이다.)
Now the spring framework wil do all the work that it needs. It will look up user in our database and for that we have implemented a method loadUserByUsername(userServiceImpl클래스의 메서드).It will find the user. It will authenticate the user using username and password and the username and password match the record that we have -> A new method will be triggered. It's called successfulAuthentication.
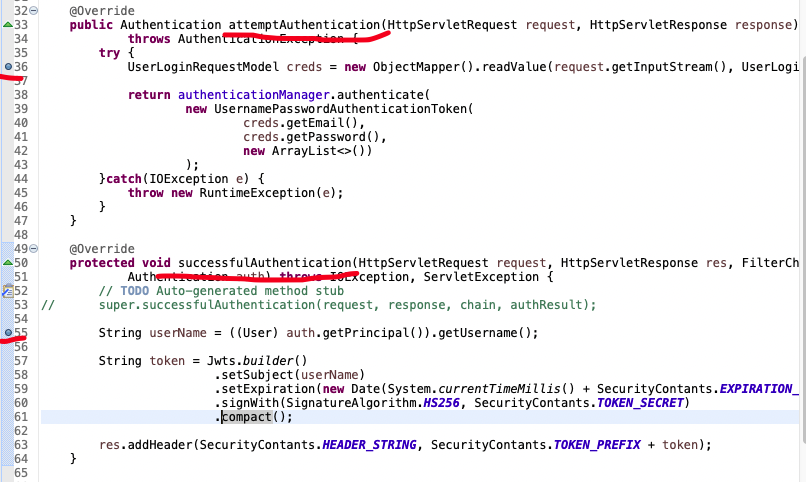
AuthenticationFilter 클래스에 다음과 같이 successfultAuthentication메서드를 오버라이드해주고 내용을 작성해준다.
@Override
	protected void successfulAuthentication(HttpServletRequest request, HttpServletResponse res, FilterChain chain,
			Authentication auth) throws IOException, ServletException {
		// TODO Auto-generated method stub
//		super.successfulAuthentication(request, response, chain, authResult);

		String userName = ((User) auth.getPrincipal()).getUsername();

		String token = Jwts.builder()
						.setSubject(userName)
						.setExpiration(new Date(System.currentTimeMillis() + SecurityContants.EXPIRATION_TIME))
						.signWith(SignatureAlgorithm.HS256, SecurityContants.TOKEN_SECRET)
						.compact();

		res.addHeader(SecurityContants.HEADER_STRING, SecurityContants.TOKEN_PREFIX + token);
	}
So once our request containing user password is successfully authenticated, the successful authentication is called. If username or password are not correct, then this method successful authentication will not be called.
So once it authentication is successful, this method will be called by the spring framework and we have date that we need import from java.util.date. OK, and the user name will be read from the authentication object. And then we will use JSON Web Token, a library that we have included in our POM.xml. At this moment, We need to know, is that this JSON Web Token will then be used in authorization filter. Once it is generated, it will be included into the header.(메서드를 보면 알 수 있다. res.addHeader로 헤더에 추가해주고 있다.) And the client that receives this response will need to extract this web token and it will need to store it. And if it is, for example, iOS mobile application, then there's Jason Web Token and will most likely be stored in iOS keychain. And then every time the mobile application will need to communicate with protected resources, for example, get a list of all users or update user details or delete user details when it needs to communicate with our API, it will need to include this chase and work token as a header into the request. Otherwise the request will not be authorized. So we are using JSON Web Tool Kit Library and we are building these Jason Web Token will contain the user name and then it will contain the expiration. 그리고 SignatureAlgorithm.HS512는SHA256해시함수로 암호화 한다는 거고, SecurityConstants.TOKEN_SECRET은 Salt Key이다.
And last step is for us to take this authentication filter and added to Web Security. So here when we configure the Web Security, we have configured that the sign up your URL is the public. URL and that all other URLs need to be authenticated.And we will continu here(WebSecurity클래스의 httpSecurity를 인자로 받는 configure메서드.). And we will add filter, which is for authenticating our user. So that's going to be new authentication filter that we have just created. And that will need to give it an argument, authenticationManager(). And now this filter, they will participate in Web security, and when the request is sent to authenticate user, it will be used by spring framework and we don't really have to do anything extra.
WebSecurity클래스
...
@Override
	protected void configure(HttpSecurity http) throws Exception {
		// TODO Auto-generated method stub
//		super.configure(http);
		http.csrf().disable().authorizeRequests()
		.antMatchers(HttpMethod.POST, SecurityContants.SIGN_UP_URL)
		.permitAll().anyRequest().authenticated().and().addFilter(new AuthenticationFilter(authenticationManager()));
	}
Trying how user Sign-in works
OK, so we've implemented authentication filter and we have added it to our Web Security configuration and now let's run this application and see if authentication filter gets triggered and if we can generate JSON Web Token.
아래와 같이 AuthenticationFilter클래스의 attemptAuthentication메서드, successfulAuthentication메서드 두군대에 브레이크포인트를 찍고 디버그해보자.
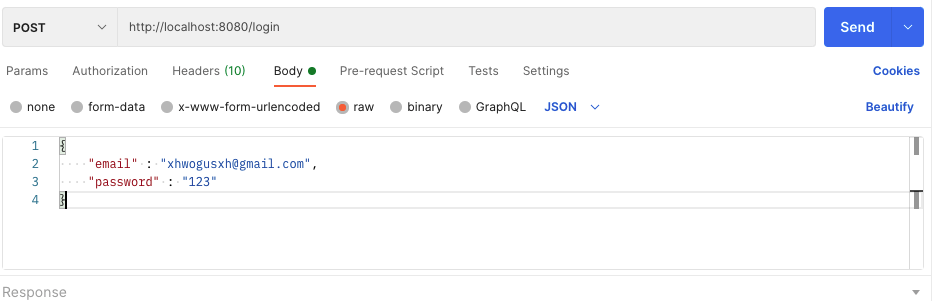
그리고 POSTMAN에 http://localhost:8080/login으로 POST 요청을 보내는 데, 여기서 /login부분은 우리가 만들어준 어플리케이션 엔드포인트가 아니고, It is just a default value that spring framework uses. Header에 "Content-Type" : "application/json"설정을 해주고 로그인 정보를 담아 요청을 보내준다.
그리고 아이디와 비밀번호가 올바른 정보를 보냈다면, 200 status code와 함께 Authorization에 jwt가 담겨서 오게된다.
만약 틀린 이메일과 패스워드를 보냈을 경우 :

403 Forbidden Status Code와 함께 Authorization이 안온다.
But there is one more piece of information that we still need to include in this headers. And this is userID and this is because the Jason Web Token is needed only to authorize user request. For example, next time when we send the request to get user details, we will need to provide an authorization header containing the JSON Web Token generated during login for the get user details to be authorized. If we don't have this token, the request will not be authorized. But then to actually get user details, we need to know userID, which we will use to query user detail from DB. So I will add one more header to this HTTP response, and that header will be userID,public userID, which we can use to identify, uniquely identify this user.