Udemy - RESTful Web Services, Java, Spring Boot, Spring MVC and JPA강좌를 수강하며 정리
지난글에 이어
Add pubic User ID to a Response Header
We will continue working with the authentications filter and additionally to ID Jason Web Token to the response header what will userID to the response Header. To be able to access userID, we need to some how access the database and for access and database we have a method in UserServiceImpl.
그리고 잠깐, 현재 UserRepository클래스가 그냥 제일 처음 만들어지는 기본 패키지(com.appdeveloperblog.app.ws)에 있는데 이걸 옮겨주자. 새롭게 com.appdeveloperblog.app.ws.io.repositories패키지를 만들어주고 여기로 옮겨주자.
//그리고 다시 AuthenticationFilter클래스를 보자.
//And For us, to be able to access the UserServiceImpl, we could alwo wire it to authenticationFilter
그리고 다시 기본 패키지에 SpringApplicationContext클래스를 만들어주고, ApplicationContextAware 인터페이스를 implements해주고, 다음과 같이 작성한다.
package com.appdeveloperblog.app.ws;

import org.springframework.beans.BeansException;
import org.springframework.context.ApplicationContext;
import org.springframework.context.ApplicationContextAware;

public class SpringApplicationContext implements ApplicationContextAware{

	private static ApplicationContext CONTEXT;

	@Override
	public void setApplicationContext(ApplicationContext context) throws BeansException {
		// TODO Auto-generated method stub
		CONTEXT = context;
	}

	public static Object getBeat(String beanName) {
		return CONTEXT.getBean(beanName);
	}


}
We're then exposing one mthod here which is getbean.
And we will be calling this method and will be giving a bean name, so that it can return the already created by spring frame work bean. For example, when our userServiceImpl is created when spring framework creates beans(@Service) for us. It will be available to us from that application context and we can get access to this userServiceImpl from anywhere in our application if we have access to this spring application context Object.
그리고 이거를 메인메서드에 빈으로 추가해준다.
package com.appdeveloperblog.app.ws;

import org.springframework.boot.SpringApplication;
import org.springframework.boot.autoconfigure.SpringBootApplication;
import org.springframework.context.annotation.Bean;
import org.springframework.security.crypto.bcrypt.BCryptPasswordEncoder;

@SpringBootApplication
public class MobileAppWsApplication {

	public static void main(String[] args) {
		SpringApplication.run(MobileAppWsApplication.class, args);
	}

	@Bean
	public BCryptPasswordEncoder bCryptPasswordEncoder() {
		return new BCryptPasswordEncoder();
	}

	@Bean
	public SpringApplicationContext springApplicationContext() {
		return new SpringApplicationContext();
	}


}
AuthenticationFilter클래스로 돌아가서, successfulAuthentication메서드에 다음과 같이 추가해준다.
UserService userService = SpringApplicationContext.getBean("userServiceImpl");When UserServiceImpl gets created by spring framework, the name of the bean will be the name of the class but with the lower case u and this is why inside of my authenticationFilter and getting that bean the userServiceImpl lower case u. 그리고 UserService로 cast도 해줘야한다.
UserService userService = (UserService)SpringApplicationContext.getBean("userServiceImpl");이제 userService 안에 들어있는 메서드들을 사용할 수 있다.
For example I could call create user or load user by username nad then specify username. But the problem with the two methods that we have there is that none of them we can actually use. We cannot get user details used and create user and we cannot use load user by username because it returns as a different data type. If we goback to userServiceImpl, this method returns user details and user details come from Spring framework and that will not contain the publicID of our user and that will return us a User object that contains email and password. We don't need that. So we need to create a new method and it will work very similar to the methods that we have here but it will return back user data transfer object(userDTO). UserService인터페이스로 가서 UserDto getUser(String email);메서드를 추가해준다.
package com.appdeveloperblog.app.ws.service;

import org.springframework.security.core.userdetails.UserDetailsService;

import com.appdeveloperblog.app.ws.shared.dto.UserDto;

public interface UserService extends UserDetailsService{
	UserDto createUser(UserDto user);
	UserDto getUser(String email);
}
그리고 userService인터페이스에 메서드를 추가해줬으니깐 이를 implement하고있는 userServiceImpl클래스에 오버라이드 해줘야한다.
UserServiceImpl클래스
...
@Override
	public UserDto getUser(String email) {


		//first of all, we will need to call findByEmail from user repository.
		UserEntity userEntity = userRepository.findByEmail(email);

		if(userEntity == null) throw new UsernameNotFoundException(email);
//		And once we have this entity will create a return value of userDto data type and then
		UserDto returnValue = new UserDto();
		BeanUtils.copyProperties(userEntity, returnValue);
		return returnValue;
	}
그리고 다시 AuthenticationFilter로 가서 successfulAuthentication메서드에 내용을 추가해준다.
@Override
	protected void successfulAuthentication(HttpServletRequest request, HttpServletResponse res, FilterChain chain,
			Authentication auth) throws IOException, ServletException {
		// TODO Auto-generated method stub
//		super.successfulAuthentication(request, response, chain, authResult);

		String userName = ((User) auth.getPrincipal()).getUsername();

		String token = Jwts.builder()
						.setSubject(userName)
						.setExpiration(new Date(System.currentTimeMillis() + SecurityContants.EXPIRATION_TIME))
						.signWith(SignatureAlgorithm.HS256, SecurityContants.TOKEN_SECRET)
						.compact();

		UserService userService = (UserService)SpringApplicationContext.getBean("userServiceImpl");
		UserDto userDto = userService.getUser(userName);


		res.addHeader(SecurityContants.HEADER_STRING, SecurityContants.TOKEN_PREFIX + token);
		res.addHeader("UserId", userDto.getUserId());
	}
그리고 다시 포스트맨으로 요청을 보내보면 userID가 헤더에 담겨 온 것을 볼 수 있다.

Customize User Authentication URL
We're going to customize the login URL or the path which triggers user authentication, because if we do not customize by default spring framework, we use the /login and it's fine. You don't really need to customize it if you're fine with this URL, but if you need to, there is a way to do it. So, go back to WebSecurityClass, to the configure function where I add new authentication filter, and I will actually create a separate function which creates this authentication filter and I'll work it through.
WebSecurity클래스에 다음 메서드를 추가해준다.
public AuthenticationFilter getAuthenticationFilter() throws Exception{
	final AuthenticationFilter filter = new AuthenticationFilter(authenticationManager());
	filter.setFilterProcessesUrl("/users/login");
	return filter;
}
So all this new function does is it creates a new instance of authentication filter and it takes as a parameter authentication manager. Once we have this authentication filter, we then said filter process URL and then we provide a path which we want to use as a authentication path. Once we change this to perform user authentication, we will then need to use a new path which we have configured.
그리고 이제 로그인을 하기 위해 /login을 엔드포인트로 잡는 것이 아니라, /users/login을 엔드포인트로 잡기 위해, 새로만든 getAuthenticationFilter를 기존의 httpSecurity를 인자로 받는 configure메서드(
@Override
	protected void configure(HttpSecurity http) throws Exception {
	// TODO Auto-generated method stub
	http.csrf().disable().authorizeRequests()
	.antMatchers(HttpMethod.POST, SecurityContants.SIGN_UP_URL)
	.permitAll().anyRequest().authenticated().and().addFilter(new AuthenticationFilter(authenticationManager()));
	}
)
에 필터로 넣어준다.
그리고 이제 POSTMAN으로 요청을 보내보자. 먼저 기존의 /loginURL
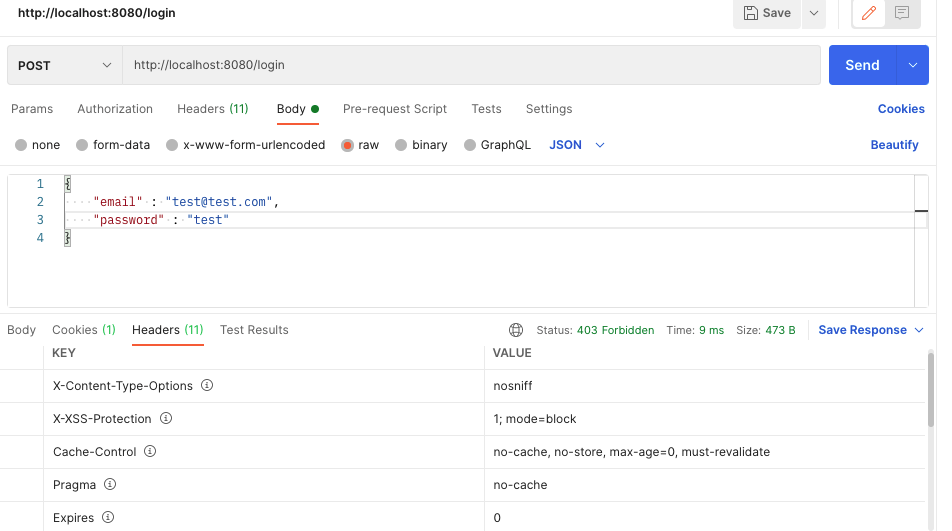
이제 403 Forbidden Status code가 되돌아온다.
그리고 /users/loginURL
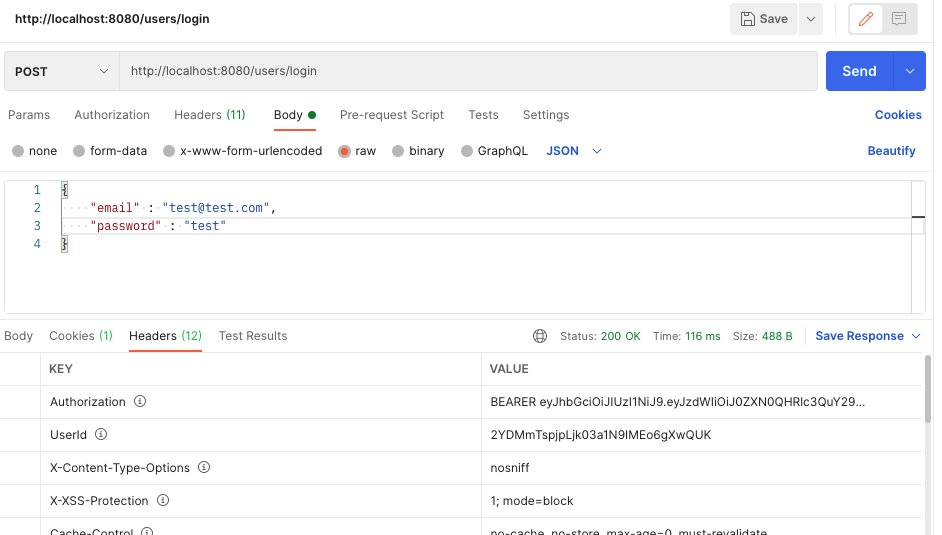
200 OK Status Code와 함께 Authorization에 jwt가 담겨서 오고, UserID도 오는 것을 볼 수 있다!
성공적으로 Login URL을 재설정해줬다!
Implementing Authorization Filter
It's time to implement user authorization and user authorizations performed every time when an API call is made to your protected web service end point, For example, Now, If API call is made to get user details of a particular user, 이런식으로 요청을 보낼것이다.
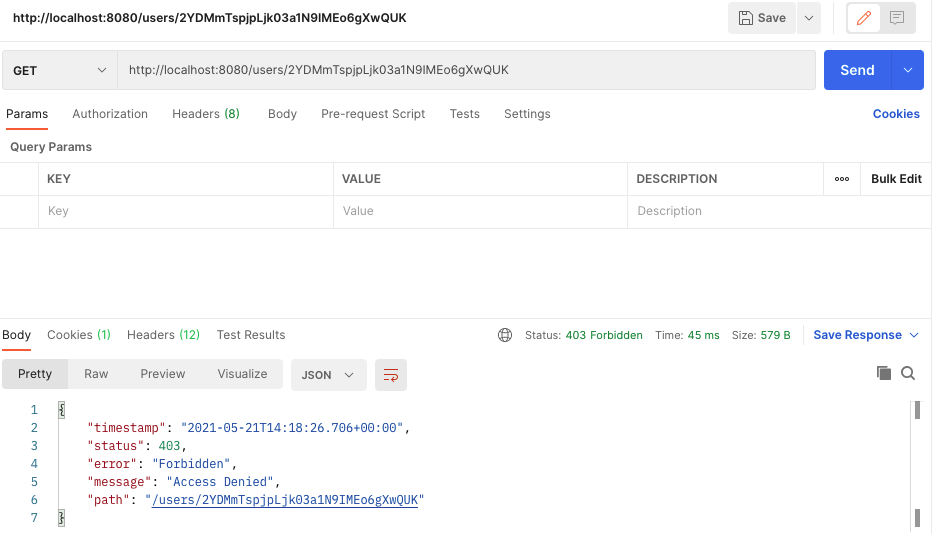
하지만 위 그림처럼 검증되지 않은유저, 그리고 로그인할때 서버에서 주는 jwt토큰이 인증되지 않는다면 위 그림처럼 deny된다.
로그인할 때 받은 userID와 jwt를 header에 담아서 요청을 보낼 때 요청을 제대로 처리해줘야 한다. 그 기능은 아직 만들지 않았기 때문에 이제부터 만들어 보겠다.
Ok, So we'll go back to project and then will have to create a new filter created under the security package. 그리고 AuthorizationFilter클래스를 만들어준다.
인증(Authentication) VS 인가(Authorization)
그리고 BasicAuthenticationFilter를 extends해준다. 그리고 BasicAuthenticationFilter를 extends해줬기 때문에, There is one method that we will need to override.
다음과 같이 작성해준다.
package com.appdeveloperblog.app.ws.security;

import java.io.IOException;

import javax.servlet.FilterChain;
import javax.servlet.ServletException;
import javax.servlet.http.HttpServletRequest;
import javax.servlet.http.HttpServletResponse;

import org.springframework.security.authentication.AuthenticationManager;
import org.springframework.security.authentication.UsernamePasswordAuthenticationToken;
import org.springframework.security.core.context.SecurityContextHolder;
import org.springframework.security.web.authentication.www.BasicAuthenticationFilter;

public class AuthorizationFilter extends BasicAuthenticationFilter{

	public AuthorizationFilter(AuthenticationManager authManager) {
		super(authManager);
		// TODO Auto-generated constructor stub
	}

	@Override
	protected void doFilterInternal(HttpServletRequest req, HttpServletResponse res, FilterChain chain)
			throws IOException, ServletException {
		String header = req.getHeader(SecurityContants.HEADER_STRING);

		if(header == null || !header.startsWith(SecurityContants.TOKEN_PREFIX)) {
			chain.doFilter(req, res);
			return;
		}

		UsernamePasswordAuthenticationToken authentication = getAuthentication(req);
		SecurityContextHolder.getContext().setAuthentication(authentication);
		chain.doFilter(req, res);
	}


}
When the request is made and this filter is triggered, this method will be called and because it accepts httpServletRequest as an argument, we are able to access the request headers and the name of the header we are taking from the security constants class, which we have created.
If token is there and starts with the bearer, then we will need to get user password authentication token object and for that will create a separate function. Once we have the object, we will set and as authentication to the security context holder and we will continue to the next filter and the filter chain. So let me bring in this get authentication function.
그리고 새로운 메서드를 또 정의해준다.(getAuthentication메서드를 추가하면 된다. 여기서는 그냥 전부 보여주겠다.)
package com.appdeveloperblog.app.ws.security;

import java.io.IOException;
import java.util.ArrayList;

import javax.servlet.FilterChain;
import javax.servlet.ServletException;
import javax.servlet.http.HttpServletRequest;
import javax.servlet.http.HttpServletResponse;

import org.apache.tomcat.util.descriptor.web.SecurityConstraint;
import org.springframework.security.authentication.AuthenticationManager;
import org.springframework.security.authentication.UsernamePasswordAuthenticationToken;
import org.springframework.security.core.context.SecurityContextHolder;
import org.springframework.security.web.authentication.www.BasicAuthenticationFilter;

import io.jsonwebtoken.Jwts;

public class AuthorizationFilter extends BasicAuthenticationFilter{

	public AuthorizationFilter(AuthenticationManager authManager) {
		super(authManager);
		// TODO Auto-generated constructor stub
	}

	@Override
	protected void doFilterInternal(HttpServletRequest req, HttpServletResponse res, FilterChain chain)
			throws IOException, ServletException {
		String header = req.getHeader(SecurityContants.HEADER_STRING);

		if(header == null || !header.startsWith(SecurityContants.TOKEN_PREFIX)) {
			chain.doFilter(req, res);
			return;
		}

		UsernamePasswordAuthenticationToken authentication = getAuthentication(req);
		SecurityContextHolder.getContext().setAuthentication(authentication);
		chain.doFilter(req, res);
	}

	private UsernamePasswordAuthenticationToken getAuthentication(HttpServletRequest request) {
		String token = request.getHeader(SecurityContants.HEADER_STRING);

		if(token != null) {
			token = token.replace(SecurityContants.TOKEN_PREFIX, "");

			String user = Jwts.parser()
					.setSigningKey(SecurityContants.TOKEN_SECRET)
					.parseClaimsJws(token)
					.getBody()
					.getSubject();

			if(user != null) {
				return new UsernamePasswordAuthenticationToken(user, null, new ArrayList<>());
			}


		}
		return null;
	}


}
We are sending over to this function the request object. And because we have the request object, we have access to request headers. So we are reading the token from the authorization and then we check if this token is not null, we will get rid of the 'Bearer' value, because we do not actually need it. All we need is pure jwt. And then we're using Jason Web Token parser, to actually pass that token value decrypted and to get user details from that Web Token and all this process is not done by us, is done by the framework. So you don't have to worry about, all we need to do is to provide the token value into this function(parseClaimsJws) and we will need to provide a correct token secret with which that token was created.
So the usernamePasswordAuthenticationToken object will be returned back to our doFilterInternalMethod, and then it will be set to security context holder.Spring Security (4) - Authentication, SecurityContextHolder의 이해 So now when they have this filter created, WebSecurity클래스로 가서, configure에 방금 만든 filter를 추가해줘야한다.
@Override
	protected void configure(HttpSecurity http) throws Exception {
		// TODO Auto-generated method stub
//		super.configure(http);
		http.csrf().disable().authorizeRequests()
		.antMatchers(HttpMethod.POST, SecurityContants.SIGN_UP_URL)
		.permitAll().anyRequest().authenticated().and().
		addFilter(getAuthenticationFilter())
		.addFilter(new AuthorizationFilter(authenticationManager()));
	}
Trying how User Authorization works
So we have implemented user authorization filter and we have added it to our filter chain in the WebSecurity class. Now let's run this application and http request and see if the authorization filter is working.
확인하기에 앞서 먼저 고쳐줘야 할 것이 있다. 전에 security패키지에서 SecurityContants클래스의
public static final String TOKEN_PREFIX = "BEARER ";이렇게 정의해줬었는데, BEARER이 아니라 Bearer로 정의해줘야한다. 즉,
public static final String TOKEN_PREFIX = "Bearer ";이렇게 해줘야한다.
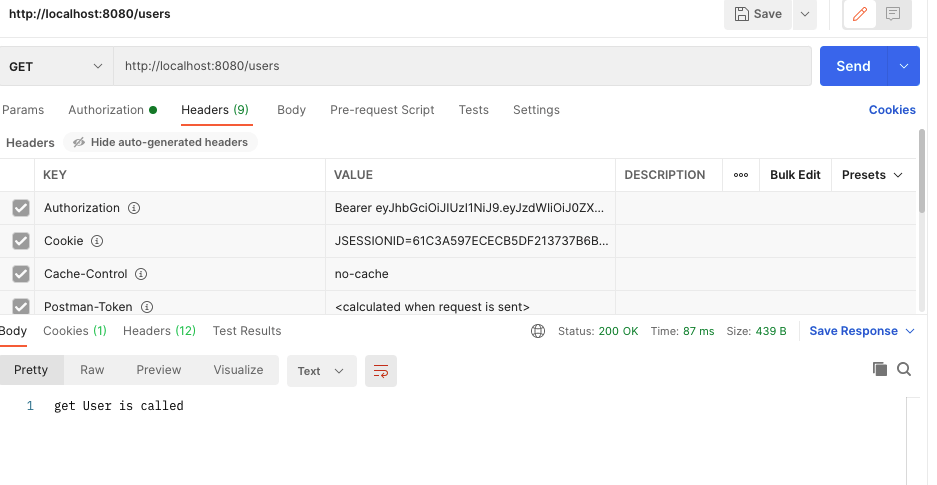
그리고 POSTMAN으로 먼저 users/login으로 로그인해서 얻은 토큰을 가지고 http://localhost:8080/users에 헤더로 Authorization에 Bearer 토큰으로 설정하고 get요청을 보내면 전에 컨트롤러에 정의해 주었던 get User is called 메세지가 나타난다!
Making Your REST API Stateless
If you have experience building service groups and Web pages, then you probably are worried that one client application starts communicating with the server side application. There is a http session that is created and this session will uniquely identify the client application while it's communicating with the server. So if you have five different client applications communicating with your API, then you will have five different http sessions created. And this sessions and cookies, they can cache some of information about request, which can make our authorization header also cached. And then even if we do not se authorization, header in the phone http reqest, the request will still be authorized. And we do now want that to happen because in our rest API, we want most of the http requests to contain authorization, hader, and to be reauthorized. And same was because http requests like, users signup does not neeed to contain authorization header. So to do that, we will need to configure Web Security to tell spring not to create http session. And this will make rest API stateless, which will prevent authorization, header, from being cached. So I will need to add a couple of lines below the authorization filter.
WebSecurity클래스의 Configure메서드에 다음과 같이 해준다.
@Override
	protected void configure(HttpSecurity http) throws Exception {
		// TODO Auto-generated method stub
//		super.configure(http);
//		System.out.println("@@@@@@@@@@@@@");
		http.csrf().disable().authorizeRequests()
		.antMatchers(HttpMethod.POST, SecurityContants.SIGN_UP_URL)
		.permitAll().anyRequest().authenticated().and().
		addFilter(getAuthenticationFilter())
		.addFilter(new AuthorizationFilter(authenticationManager()))
		.sessionManagement()
		.sessionCreationPolicy(SessionCreationPolicy.STATELESS);
	}
.sessionManagement()
.sessionCreationPolicy(SessionCreationPolicy.STATELESS);를 추가해줬다.
And these are to access session management and then to use session creation policy to tell spring security that our Rest API should be stateless and we do not want HTTP session to be created.
Reading Token Secret from property file
Let's study How to read the token secret value from a propery file rather than from a Java class File. AuthorizationFilter클래스의 getAuthentication메서드를 보면 SecurityConstants클래스에서 정의한 TOKEN_SECRET을 사용하고 있다. 이걸 그래도 둬도 어플리케이션은 작동하고 상관없지만, 보안상 properties File로 옮기는 게 좋다. So in the property file that we have in our application is located in the resources folder. application.properties. We have already worked with this file where we configured the username and password to access our database. So I would like to add one more property here and that will be token secret.
and the next step is to learn how to read these properties from the java code that we have in our application, and for then we will create a separate class which will be responsible for reading property files. And since we are reading tokenSecret from that file, and most probably later on, you will want to read other security related properties all created under security package and I will call it app properties. security패키지에 AppProperties클래스를 만든다. AppProperties class will need to be a component so that it can @autowired some objects that we need to read the property file. And there are different ways how we can read properties in spring applications And one way is to use the environment object. So I will define a new class field and the data type of this class field is environment. 그리고 spring core environment에서 임포트해준다. And for environment object to be available in our App properties We will need to @Autowired.
com.appdeveloperblog.app.ws.security패키지의AppProperties클래스
package com.appdeveloperblog.app.ws.security;

import org.springframework.beans.factory.annotation.Autowired;
import org.springframework.core.env.Environment;
import org.springframework.stereotype.Component;

@Component
public class AppProperties {

	@Autowired
	private Environment env;
}
So now we have environment available in our properties, we can use it to read the property values. And I'll create a method that needs to be public String getTokentSecret, and all it needs to do is to return the value that we can read from the propery file.
package com.appdeveloperblog.app.ws.security;

import org.springframework.beans.factory.annotation.Autowired;
import org.springframework.core.env.Environment;
import org.springframework.stereotype.Component;

@Component
public class AppProperties {

	@Autowired
	private Environment env;

	public String getTokenSecret() {
		return env.getProperty("tokenSecret");
	}

}
So now we can use this file to actually read any properties that we can add to the application property file. So now when we have the application properties that can read the tokenSecret, let's go into SecurityConstantsClass where we have hardcoded the tokenSecret value. And use the properties to read the token and secret value.
SecurityContants클래스에 가서 다음과 같이 작성해준다.(기존의 TOKEN_SECRET변수를 없애고, properties에서 가져오는 함수를 만들었다.
package com.appdeveloperblog.app.ws.security;

import com.appdeveloperblog.app.ws.SpringApplicationContext;

public class SecurityContants {
	public static final long EXPIRATION_TIME = 864000000;	//10 days
	public static final String TOKEN_PREFIX = "Bearer ";
	public static final String HEADER_STRING = "Authorization";
	public static final String SIGN_UP_URL = "/users";

	public static String getTokenSecret() {
		AppProperties appProperties = (AppProperties)SpringApplicationContext.getBean("AppProperties");
		return appProperties.getTokenSecret();
	}
}
Because this security constants is not a component, we are not going to @autowired security into our authentication or authorization filter. So for us to be able to access component that were created by spring framework like ApplicationPropertyClass (@Component로 선언되어있다. 하지만 SecurityContants는 @Components처럼 빈으로 등록하지 않았기 때문에, SpringApplicationContext.getBean("AppProperties")를 통해 Bean들을 가져올 수 있다. 그리고 SpringApplicationContext클래스는 기본 패키지 밑에 다음과 같이 정의해놓았었다.
package com.appdeveloperblog.app.ws;

import org.springframework.beans.BeansException;
import org.springframework.context.ApplicationContext;
import org.springframework.context.ApplicationContextAware;

public class SpringApplicationContext implements ApplicationContextAware{

	private static ApplicationContext CONTEXT;

	@Override
	public void setApplicationContext(ApplicationContext context) throws BeansException {
		// TODO Auto-generated method stub
		CONTEXT = context;
	}

	public static Object getBean(String beanName) {
		return CONTEXT.getBean(beanName);
	}


}
And then we use these properties object to get the tokens secured we are simply calling in name.그래서 만약에 SecurityConstants클래스에서
public static String getTokenSecret() {
		AppProperties appProperties = (AppProperties)SpringApplicationContext.getBean("AppProperties");
		return appProperties.getTokenSecret();
	}
에서 커맨드를 누르고 getTokenSecret을 클릭하면(Open Declaration) 원래 getTokenSecret메서드가 선언된 AppProperties클래스로 화면이 이동하는 것이다.
)
Please notice that I have marked this method as static so that I don't have to create a new instance of security constants.
그럼 이제 AuthenticationFilter클래스와 AuthorizationFilter클래스로 가서, 기존에 SecurityConstants.TOKEN_SECRET으로 되어있던 변수들을 바꿔주자. SecurityContants.TOKEN_SECRET => SecurityContants.getTokenSecret();
그리고 MobileAppWsApp클래스로 가서 AppProperties를 bean으로 등록해주자. To do that, I will need to create a public method which returns app properties, and doesn't matter how i call this method, I can call it getAppProperties. But what's important, it needs to return a new instance of our AppProperties.
@Bean(name = "AppProperties")
	public AppProperties getAppProperties() {
		return new AppProperties();
	}
여기서 다른 Bean들과 다르게 @Bean(name = "AppProperties")를 해준 이유는 AppProperties는 @Components로 등록해놨기 때문이다. 그리고 또 메서드이름도 다른 Bean들은 앞에 대문자만 소문자로 바꿔서 짓지만(ex.public SpringApplicationContext springApplicationContext()) getAppProperties로 지은 이유는 앞에서도 말했다시피 @Components로 클래스를 등록해놨기 때문에 다른이름으로 바꿔줘야한다.
이제 기존의 TOKEN_SECRET을 전부 properties에 등록된 걸로 바꿔줬는데, 제대로 작동하나 실험해보자.

잘된다!
++대략적으로 말하자면 /users/login으로 POST요청을 하게 되면 WebSecurity클래스의
public AuthenticationFilter getAuthenticationFilter() throws Exception{
		final AuthenticationFilter filter = new AuthenticationFilter(authenticationManager());
		filter.setFilterProcessesUrl("/users/login");
		return filter;
	}
이 메서드를 통해 필터를 거치고, AuthenticationFilter클래스의
@Override
	public Authentication attemptAuthentication(HttpServletRequest request, HttpServletResponse response)
			throws AuthenticationException {
		try {
			UserLoginRequestModel creds = new ObjectMapper().readValue(request.getInputStream(), UserLoginRequestModel.class);

			return authenticationManager.authenticate(
					new UsernamePasswordAuthenticationToken(
							creds.getEmail(),
							creds.getPassword(),
							new ArrayList<>())
					);
		}catch(IOException e) {
			throw new RuntimeException(e);
		}
	}

	@Override
	protected void successfulAuthentication(HttpServletRequest request, HttpServletResponse res, FilterChain chain,
			Authentication auth) throws IOException, ServletException {
		// TODO Auto-generated method stub
//		super.successfulAuthentication(request, response, chain, authResult);

		String userName = ((User) auth.getPrincipal()).getUsername();

		String token = Jwts.builder()
						.setSubject(userName)
						.setExpiration(new Date(System.currentTimeMillis() + SecurityContants.EXPIRATION_TIME))
						.signWith(SignatureAlgorithm.HS256, SecurityContants.getTokenSecret())
						.compact();

		UserService userService = (UserService)SpringApplicationContext.getBean("userServiceImpl");
		UserDto userDto = userService.getUser(userName);


		res.addHeader(SecurityContants.HEADER_STRING, SecurityContants.TOKEN_PREFIX + token);
		res.addHeader("UserId", userDto.getUserId());
	}
위 두 메서드를 거쳐 id와 토큰을 response 해주는 거다.
주님 감사드립니다!