⚡ 들어가기
이 포스팅은 리액트 앱에서 구글 소셜 로그인을 연동하는 방법에 대해서 설명합니다. 특히, AWS의 Amplify와 Cognito의 User Pool도 함께 사용해서 연동할 예정입니다.
구현하고자 하는 바는 리액트 웹 앱에서 구글 로그인 버튼을 클릭하면, 구글 계정을 선택해서 로그인되고, 로그인 되면서 Cognito User Pool에 사용자 정보가 생성되도록 하는 것입니다.
⚡ 구현하기
🔥 Google Cloud 설정
일단 구글 클라우드에 프로젝트가 생성됐다는 걸 전제하고 진행합니다.
📌 OAuth 동의 화면 설정
OAuth 동의 화면이 설정되어 있다면 할 필요가 없습니다. 최초 실행 시에는 설정해줘야 합니다.
구글 클라우드에서 API 및 서비스에서 OAuth 동의 화면에 들어가줍니다.
User Type에서 외부를 선택합니다. 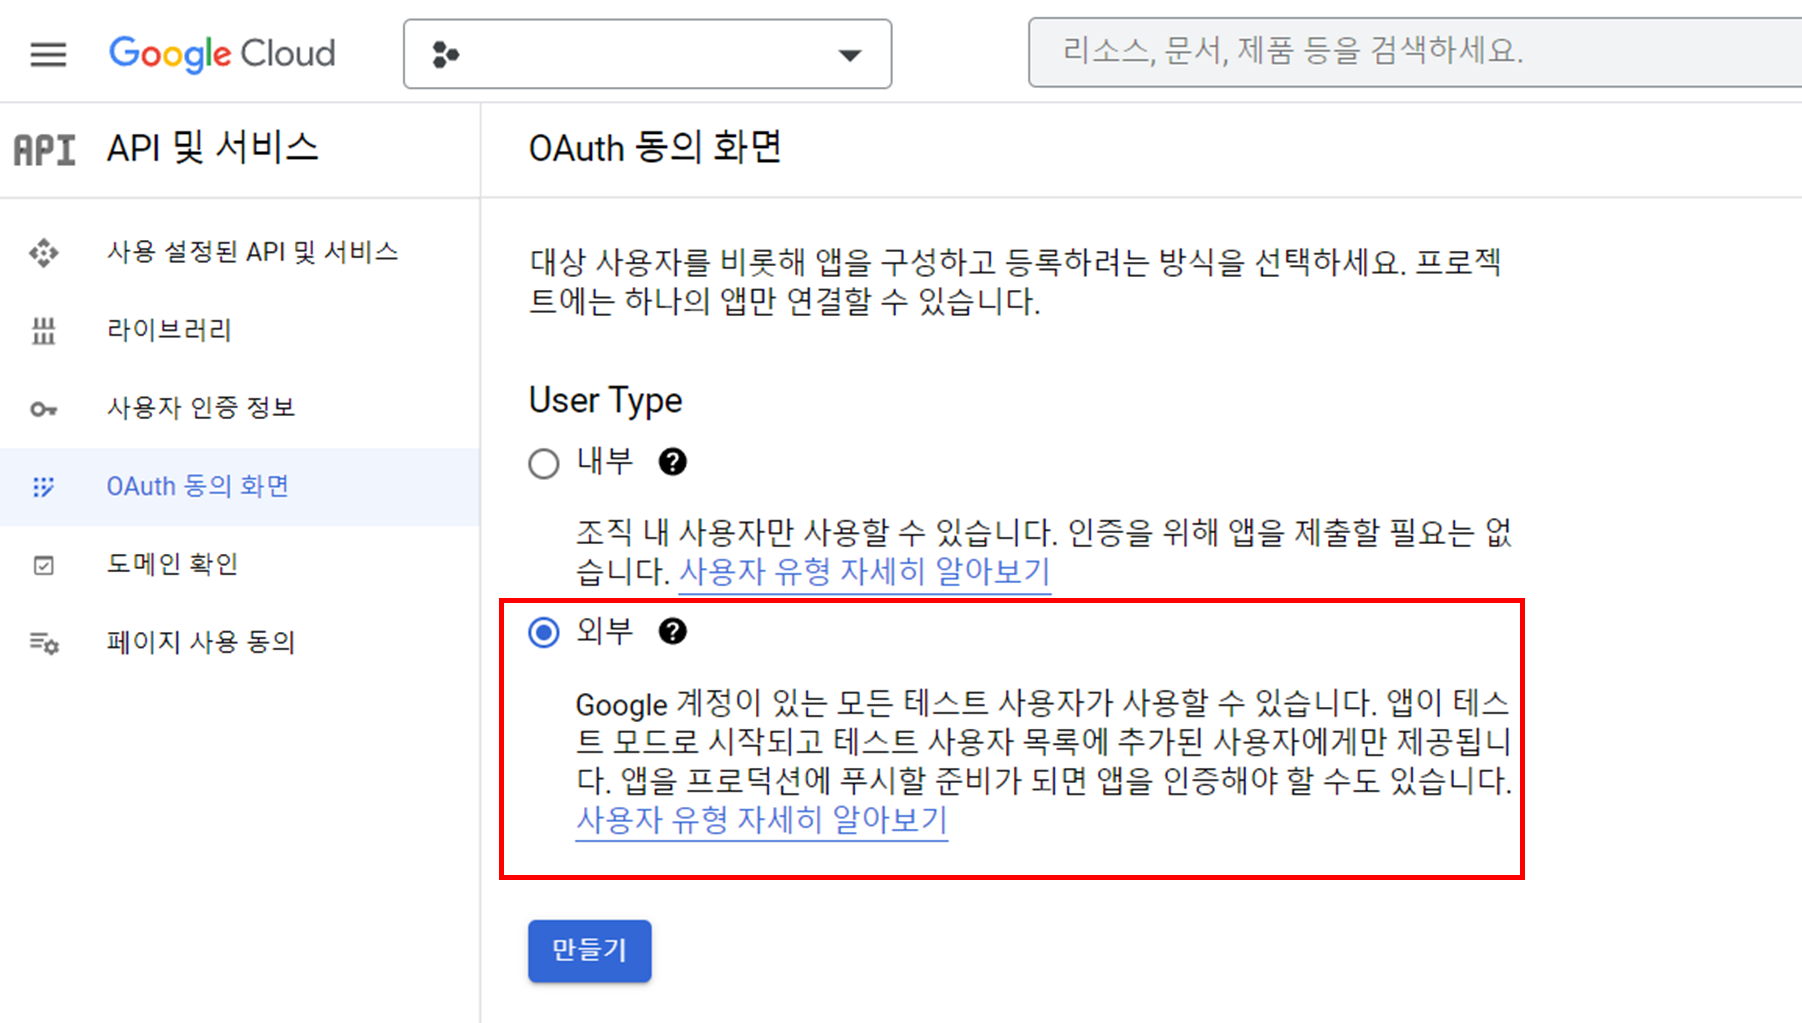
앱 이름은 원하는 이름으로 해주고, 사용자 지원 이메일은 현재 로그인된 구글 계정 이메일이 뜨게 되고, 해당 계정을 선택할 수 있습니다.
1단계에서는 앱 이름, 사용자 지원 이메일, 승인된 도메인, 개발자 연락처 정보 입력합니다.(앱 로고는 선택하지 않아도 되는데 필수가 아닌 걸 몰라서 설정했는데 필수 설정이 아니다.) 승인된 도메인에는 amazoncognito.com 입력합니다. 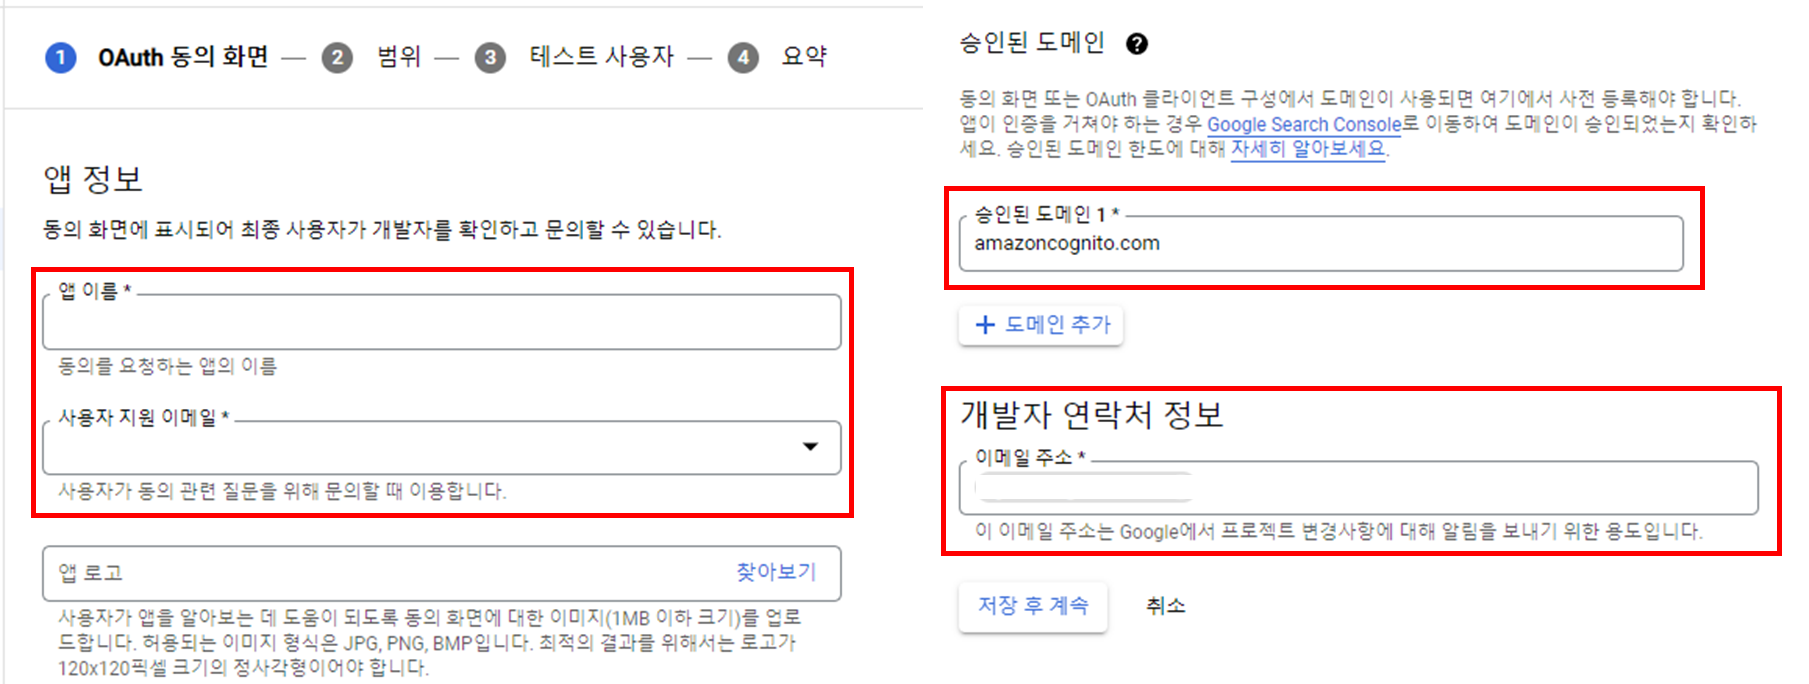
범위를 추가해줍니다. 옵션은 여러 개인데 정확한 의미를 몰라서 AWS 공식 문서에 있는 가이드대로 email, profile, openid 를 추가했습니다.
3단계 테스트 사용자는 필수가 아니라 생략하고, 요약으로 넘어간 후 만들기 버튼을 눌러서 설정을 완료해줍니다.
📌 API 및 서비스에서 OAuth 클라이언트 ID 만들기
사용자 인증 정보 만들기에서 OAuth 클라이언트 ID를 선택합니다. 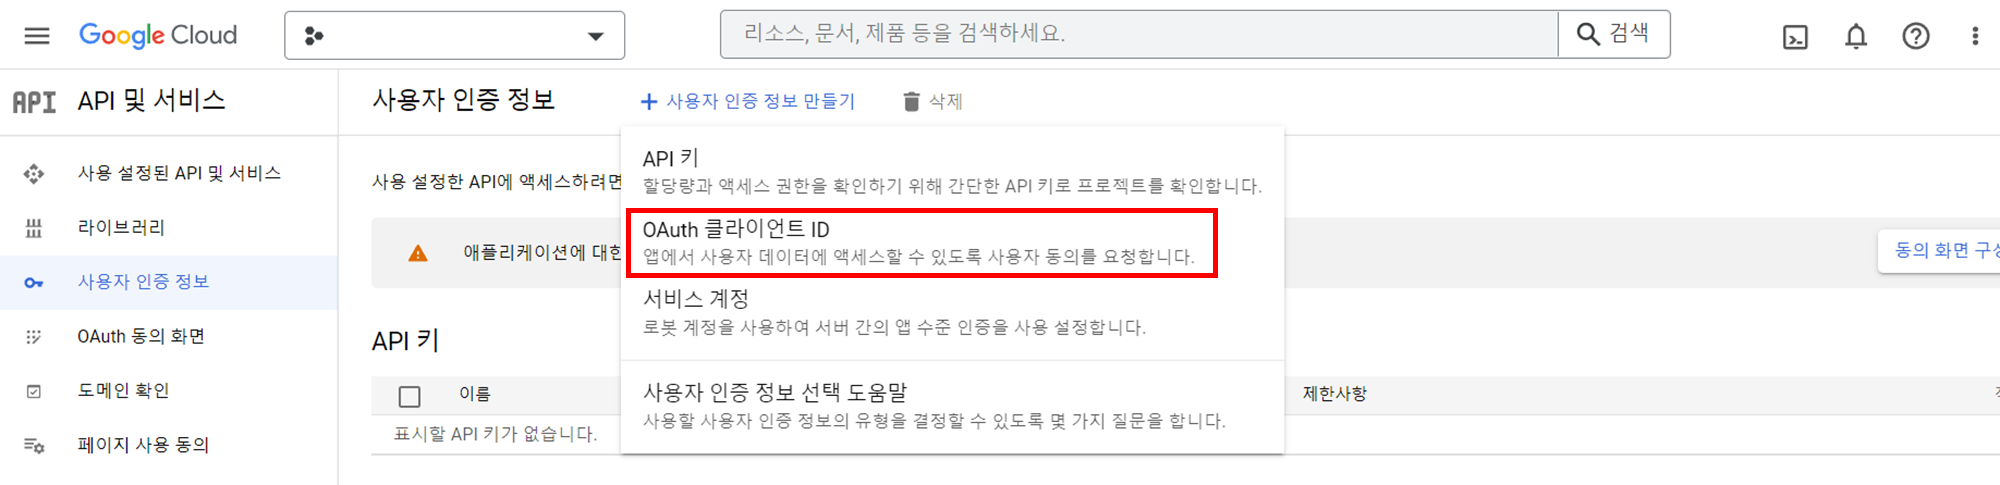
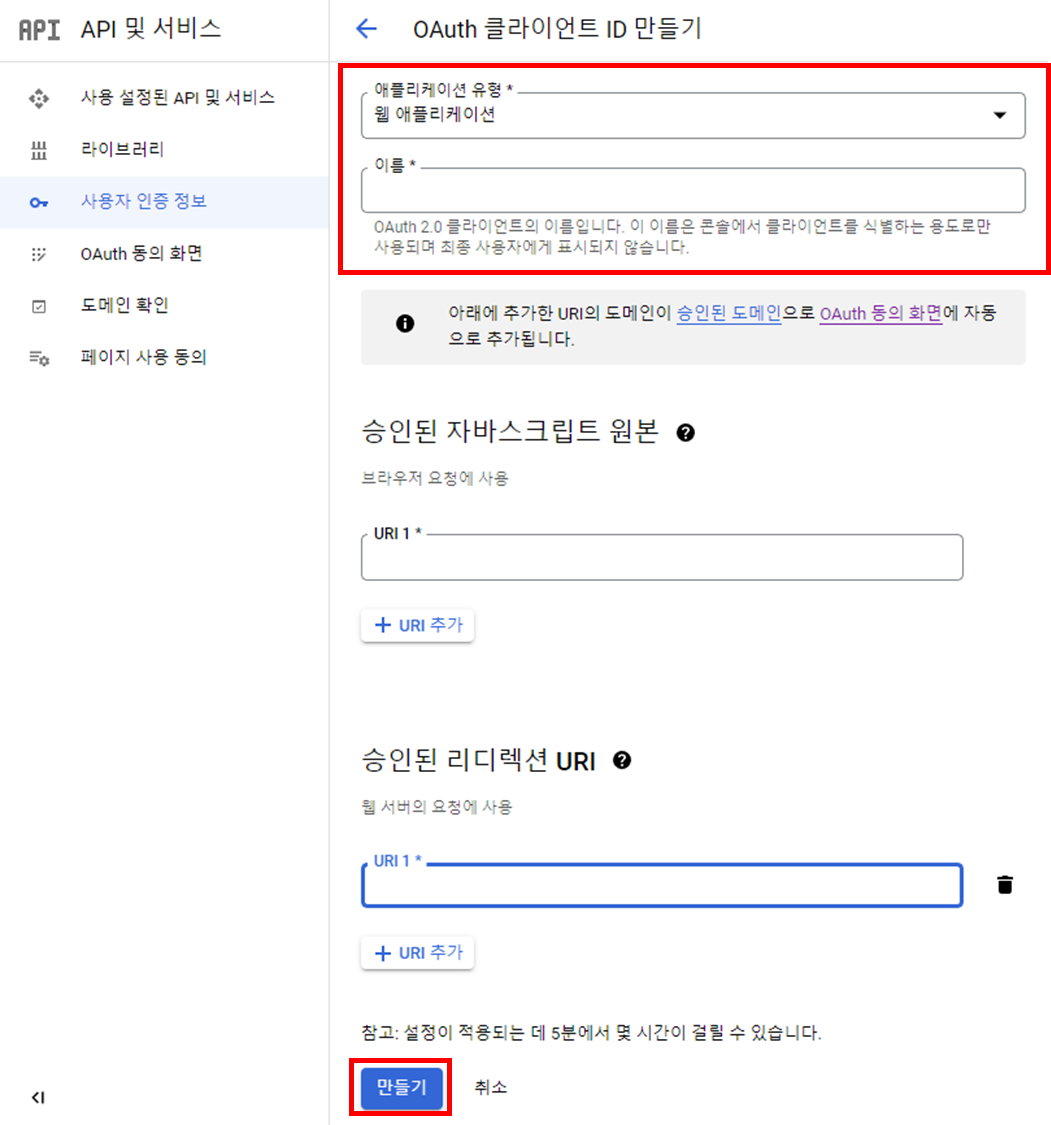
애플리케이션 유형은 웹 애플리케이션 선택하고, 클라이언트 이름을 설정합니다.
승인된 자바스크립트 원본과 아래 URI는 나중에 설정할 예정이므로 여기까지만 입력하고 아래의 만들기 버튼 클릭합니다.
버튼을 클릭하면 클라이언트 생성 완료 창이 뜨고, 클라이언트 생성 완료 창이 뜹니다. 이렇게 해두면 일단 구글 클라우드 준비는 끝입니다.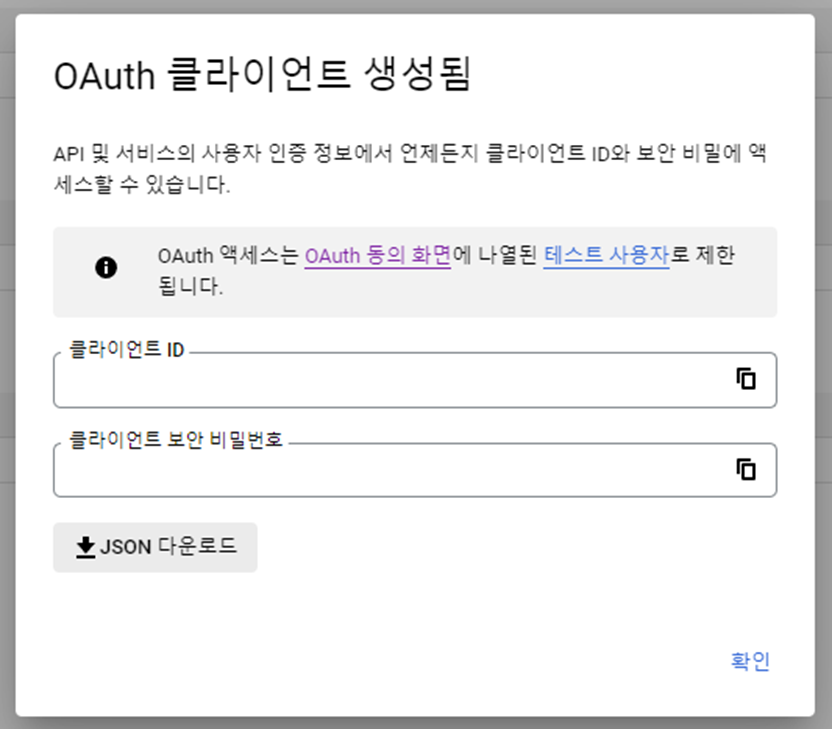
🔥 User pool 설정
리액트 앱에서 Amplify auth를 설정하는 방법은 몇 가지 있습니다. 리액트 앱에서 바로 amplify add auth를 사용해서 유저 풀을 만들고 설정할 수도 있지만, 여기에서는 cognito user pool에 들어가서 미리 설정한 후 리액트 앱에서 import 해서 사용했습니다.
📌 Federated identity provider sign-in 설정
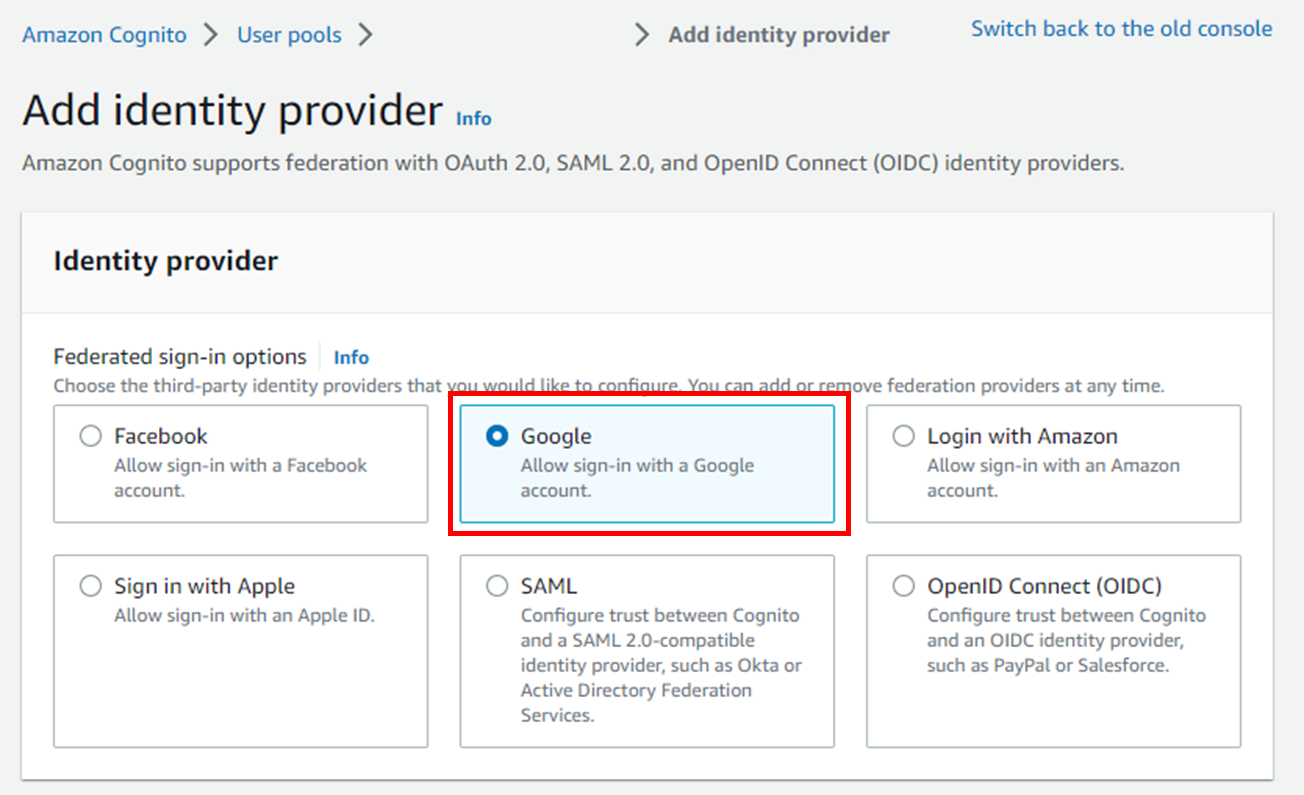
먼저 사용할 User Pool에서 구글 자격증명자를 추가 합니다. Federated identity provider sign-in에 들어가서, 구글을 선택합니다.
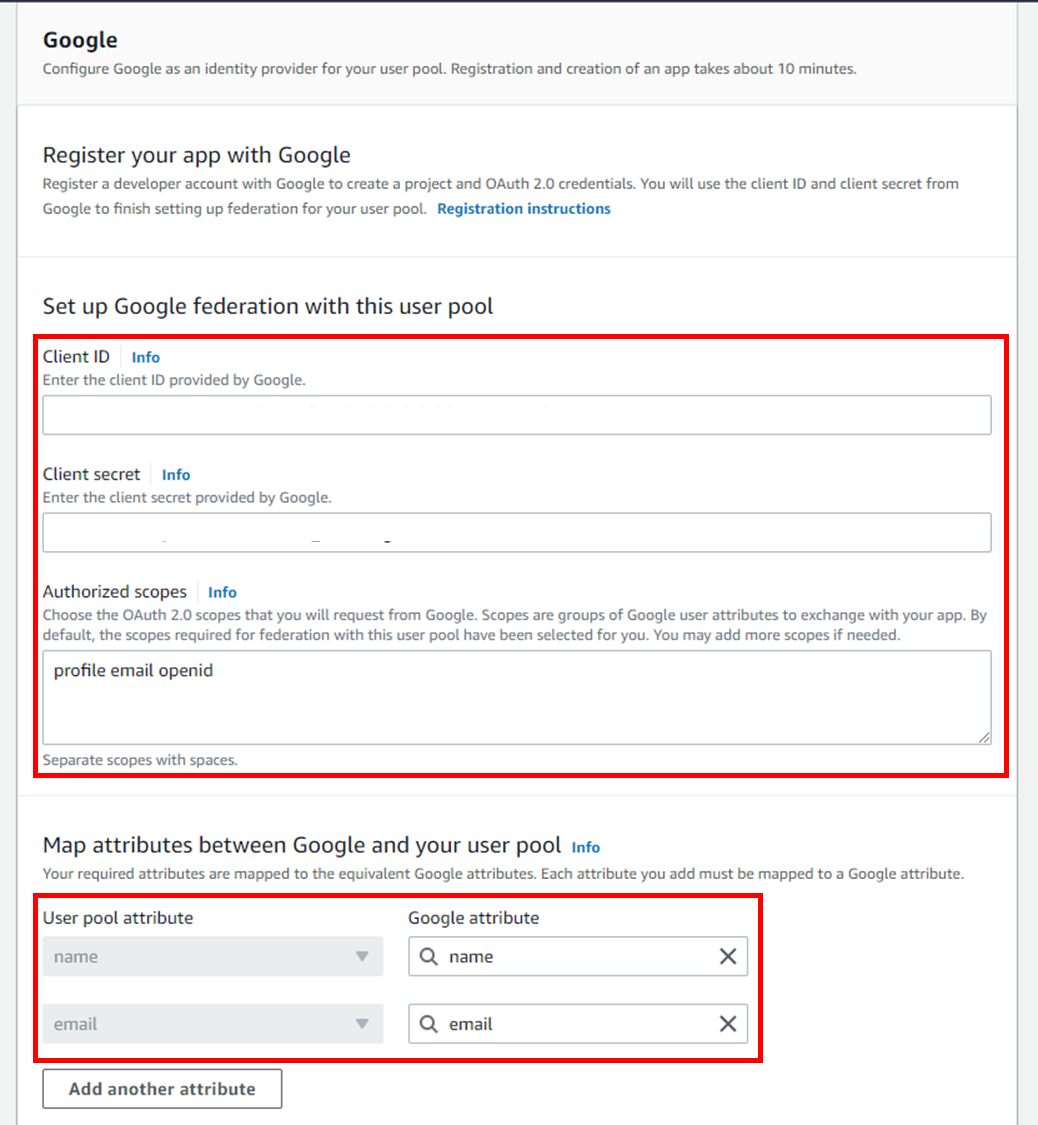
아래에 입력란에 구글 클라우드에서 발급받은 클라이언트 ID와 Secret을 입력합니다. 그 다음 scope를 profile email, openid로 설정합니다. 그 다음 cognito user pool의 attribute와 구글의 attribute를 매핑시켜줍니다.
만약 google에서 제공하는 attribute와 일치하는게 없다면, 구현이 불가능합니다. 구글과 매핑되는 attribute가 없다면 해당 attribute는 custom attribute로 설정해서 user pool을 생성해야 합니다.
📌 Domain 설정
Cognito 도메인을 만들어줍니다. 도메인 이름은 원하는 이름으로 설정합니다.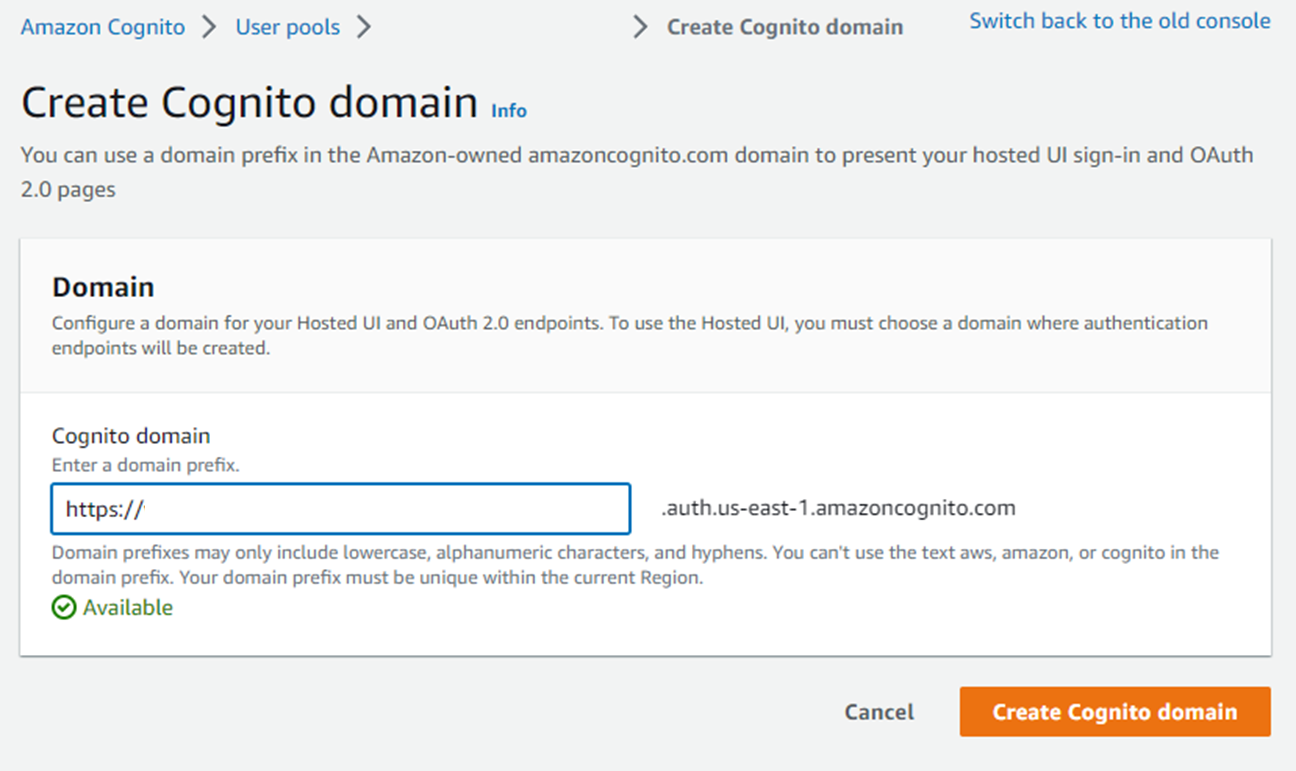
📌 App client 설정
App client - Hosted UI 설정
현재는 로컬에서만 테스트할 것이라 URL에 로컬 호스트만 추가했습니다. 앱이 배포되어 있다면, 도메인을 입력해도 됩니다. 일단은 로컬로 했지만, 추후에는 배포 주소도 추가해서 로컬과 배포 주소 모두 사용할 수 있도록 바꿔서 사용했습니다.
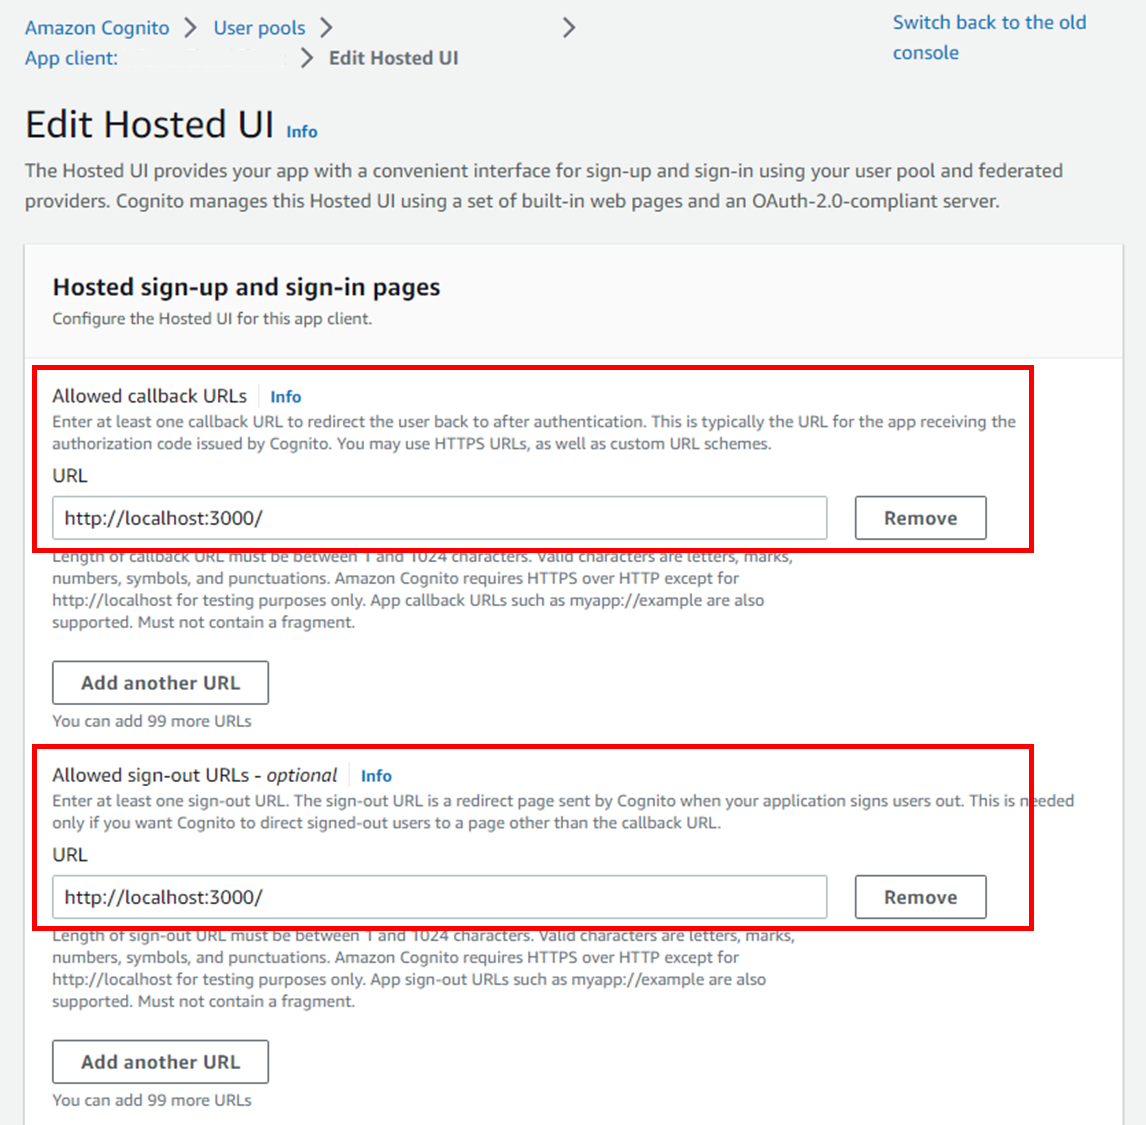
세부 설정은 아래의 이미지처럼 설정합니다.

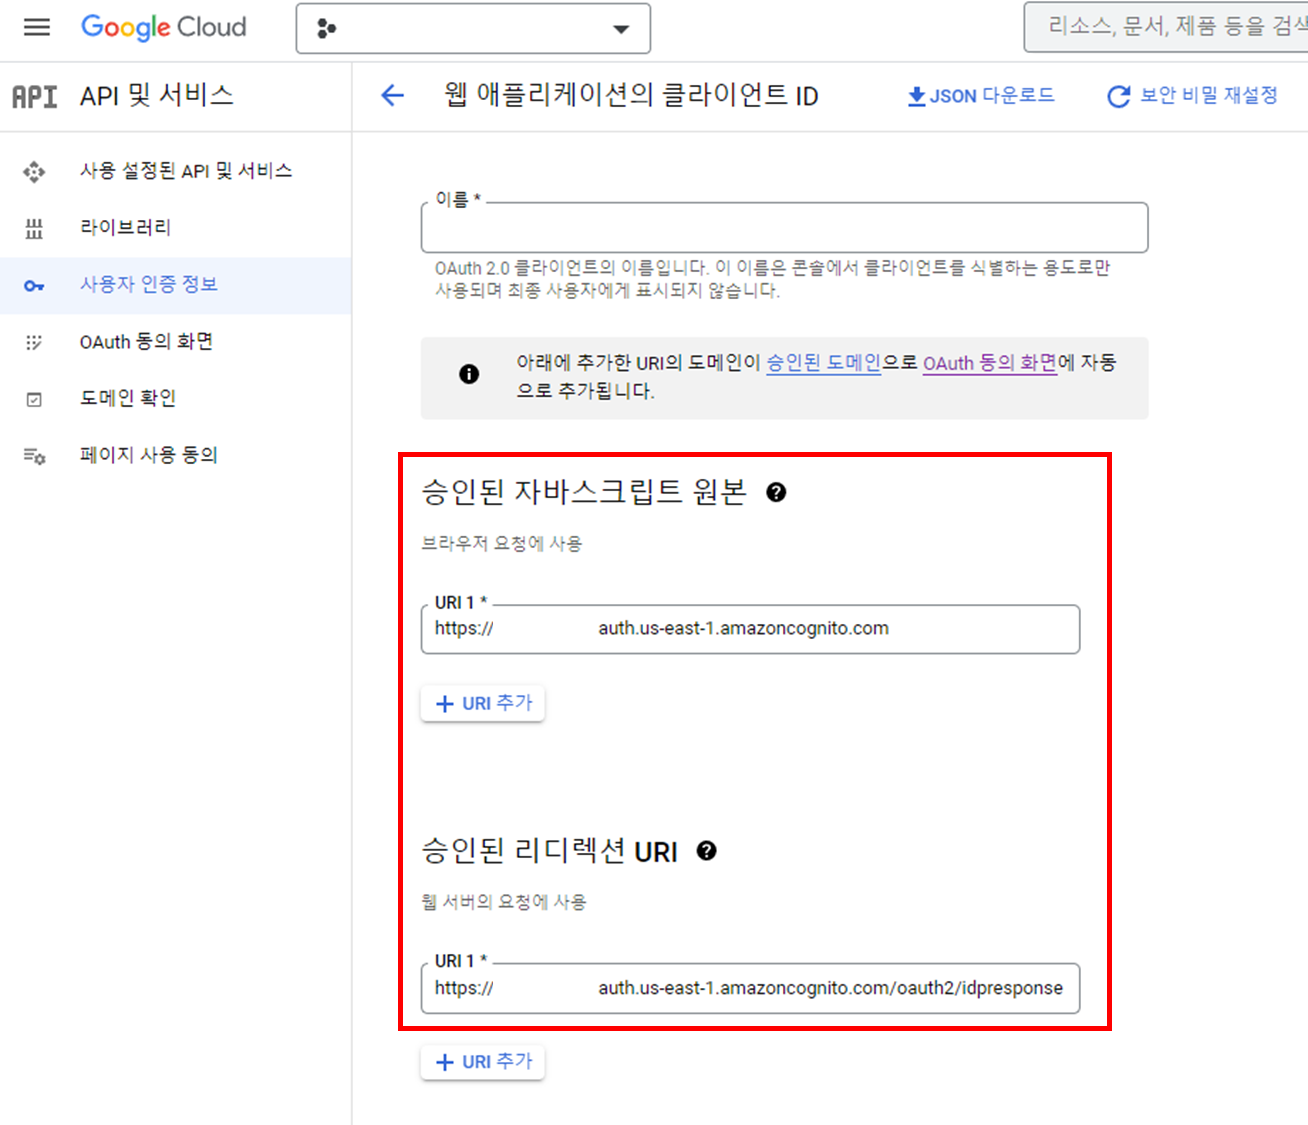
📌 Google 클라우드 클라이언트 정보 수정
User pool 설정을 완료했으면, 구글 클라우드 OAuth 클라이언트 정보를 수정해줍니다. 승인된 자바스크립트 원본에 위에서 만든 cognito의 domain으로 설정하고, 승인된 리디렉션 URI에는 본인 domain/oauth2/idpresponse 로 설정합니다.
🔥 React amplify 설정
react 앱에서 amplify 를 초기화 해줍니다.
amplify init위에서 설정한 cognito user pool을 import 해서 사용합니다. 아래의 명령어를 입력하면 사용할 user pool을 설정할 수 있고, 프로젝트에 aws-exports.js 등 관련 파일이 생성됩니다.
아래의 링크를 참조하면 더 자세한 정보를 확인할 수 있습니다.
https://docs.amplify.aws/cli/auth/import/
amplify import auth설정한 내용을 저장해줍니다.
amplify push🔥 Google Sign-In 시에 lambda 트리거
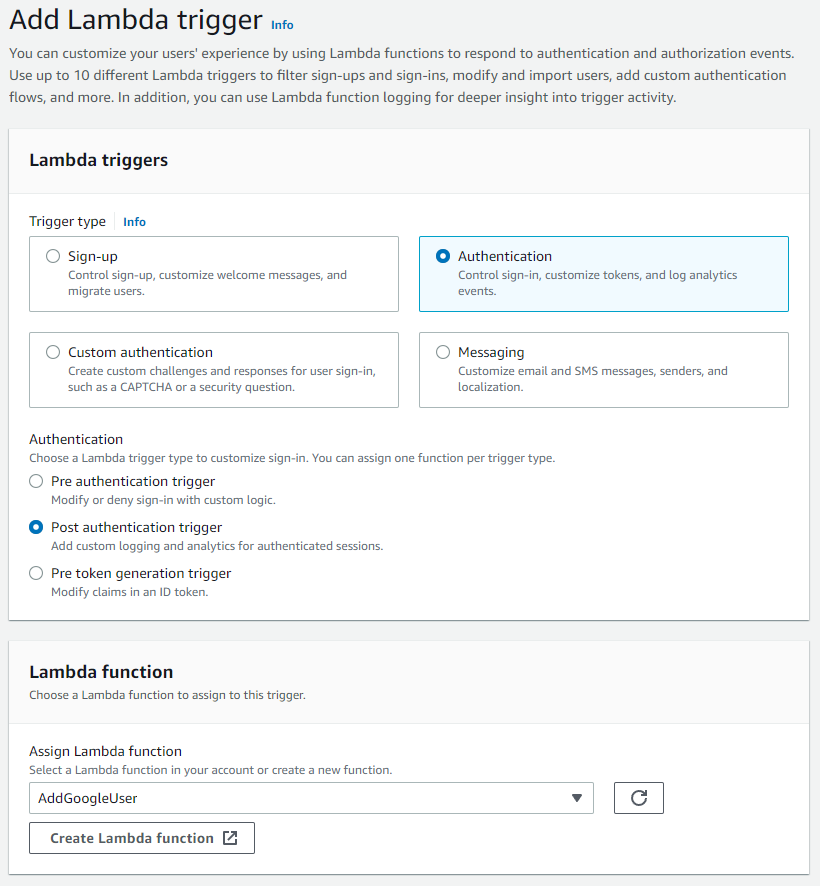
기존에는 회원가입 시에 DB에 User 정보를 저장하는 람다를 트리거해서 사용자 정보를 저장했었는데, 소셜 로그인을 사용할 경우 회원가입 절차가 없어서 로그인 할 경우, DB에 User 정보를 저장하는 lambda를 생성하고 트리거해줬습니다.
이 과정은 생략해도 됩니다.
AddGoogleUser 람다 함수를 작성합니다.
해당 sub를 가진 항목이 없다면 DB 에 추가하고, 있다면 아무 동작도 하지 않도록 설정했습니다.
var aws = require('aws-sdk');
const ddb = new aws.DynamoDB.DocumentClient();

exports.handler = async (event, context) => {
    console.log(event);

    let date = new Date();

    // If the required parameters are present, proceed
    if (event.request.userAttributes.sub) {
        console.log(typeof event.request.userAttributes.sub);
        let user = await getUser(event.request.userAttributes.sub);
        console.log("user====", user);
        console.log("user item===", user.Items[0]);

        // 동일 user 있는지 확인 후 진행
        if (user.Items[0] === undefined) {
            // -- Write data to DDB
            let ddbParams = {
                Item: {
                    'userId': event.request.userAttributes.sub,
                    'userName': event.request.userAttributes.name,
                    'email': event.request.userAttributes.email,
                    'country': "",
                    'tier': "free",
                    'createTime': date.valueOf().toString(),
                    'updateTime': date.valueOf().toString()
                },
                TableName: "test-user-tbl"
            };

            // Call DynamoDB
            try {
                await ddb.put(ddbParams).promise();
                console.log("Success");
            } catch (err) {
                console.log("Error", err);
            }

            console.log("Success: Everything executed correctly");
            context.done(null, event);
        } else {
            console.log("already exist");
            context.done(null, event);
        }
    } else {
        // Nothing to do, the user's email ID is unknown
        console.log("Error: Nothing was written to DDB or SQS");
        context.done(null, event);
    }
};

// 동일 User 있는지 확인
async function getUser (userInfo, email) {
    let body;
    let collection = "test-user-tbl";

    try {
        body = await ddb
              .query({
                TableName: collection,
                KeyConditionExpression: "userId = :u",
                ExpressionAttributeValues: {
                  ":u": userInfo,
                },
              })
              .promise();
    } catch (err) {
        console.log(err);
        body = err.message;
    }
    return body;
}
함수 작성 후 Cognito user pool에서 사후 확인 함수로 설정해줬습니다.
🔥 React Front 설정
이 부분에 대해서는 reference 할 자료들이 제법 있었습니다. 공식 문서나 다른 블로그 글을 참조하는 게 더 도움이 될 수 있습니다. 아래의 참조 링크를 적어두겠습니다.
📌 index.js
기존 index.js 파일에 아래 코드 추가해줬습니다. 아래의 코드는 리다이렉트의 경로를 로컬호스트인지 아닌지 판단하고 aws config를 업데이트 시켜주는 역할을 합니다.
import Amplify from 'aws-amplify'
import awsConfig from '../src/aws-exports'

// check if env is localhost or not
// if you're not developing on localhost, you will need to detect this is another way—the docs linked above give some examples.
const isLocalhost = Boolean(
    window.location.hostname === 'localhost' ||
        // [::1] is the IPv6 localhost address.
        window.location.hostname === '[::1]' ||
        // 127.0.0.1/8 is considered localhost for IPv4.
        window.location.hostname.match(
            /^127(?:\.(?:25[0-5]|2[0-4][0-9]|[01]?[0-9][0-9]?)){3}$/
        )
)

// Assuming you have two redirect URIs, and the first is for localhost and second is for production
const [localRedirectSignIn, productionRedirectSignIn] =
    awsConfig.oauth.redirectSignIn.split(',')

const [localRedirectSignOut, productionRedirectSignOut] =
    awsConfig.oauth.redirectSignOut.split(',')

const updatedAwsConfig = {
    ...awsConfig,
    oauth: {
        ...awsConfig.oauth,
        redirectSignIn: isLocalhost
            ? localRedirectSignIn
            : productionRedirectSignIn,
        redirectSignOut: isLocalhost
            ? localRedirectSignOut
            : productionRedirectSignOut,
    },
}
📌 LandingView.js
이 프로젝트에서는 기본 경로인 / 를 호출하게 되면 LandingView 파일을 보여주게 됩니다. 이 파일에서 User를 감지하고, user가 있다면 /home 경로를 요청하게 되어 화면이 전환되도록 했습니다. user 가 없는 경우에는 기본 화면을 출력하게 됩니다.
...

const navigate = useNavigate()
    const [loading, setLoading] = useState(true)
    const sessionStorage = window.sessionStorage

    // get user
    const getUser = useCallback(async () => {
        try {
            const token = await Auth.currentAuthenticatedUser()
            setLoading(false)
            sessionStorage.setItem('isSession', true)
            sessionStorage.setItem('userId', token.attributes.sub)
            sessionStorage.setItem('userName', token.attributes.name)
            navigate('/home')
        } catch (err) {
            // console.log(err)
            setLoading(false)
        }
    }, [navigate, sessionStorage])

    //listen for sign in + out events, if neither are happening check if user exists
    useEffect(() => {
        Hub.listen('auth', ({ payload }) => {
            if (payload.event === 'signIn') {
                return getUser()
            }
            if (payload.event === 'signOut') {
                return setLoading(false)
            }
        })
        getUser()
    }, [getUser])

    if (loading) return <CircularProgress />

    return (
			<div>
				{*/ 여기에 landing 페이지 코드 입력 */}
			</div>
		)
📌 LoginForm.jsx
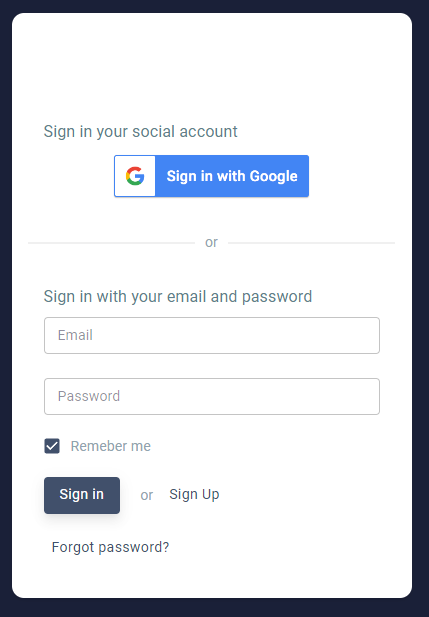
Signin 버튼을 클릭하면 이 파일 로딩하게 되는데, 원래는 기본 로그인 폼만 있었는데 구글 로그인 버튼을 삽입해주었습니다.
구글 로그인 버튼의 이미지는 공식 사이트인 아래의 링크에서 다운받으면 됩니다.
https://developers.google.com/identity/branding-guidelines
<ContentBox justifyContent="center" alignItems="center">
    <TitleTypo>Sign in your social account</TitleTypo>
    <ButtonBase>
        <img
            src={googleSignInBtn}
            alt="Google Sign In Button"
            onClick={() =>
                Auth.federatedSignIn({
                    provider: 'Google',
                })
            }
            width="60%"
        />
    </ButtonBase>
</ContentBox>
⚡ 최종 화면
구글 로그인 버튼을 클릭하면 로그인 할 계정을 선택하는 창이 나오고, 계정을 선택하면 해당 계정으로 로그인됩니다. 로그인 시에는 Cognito User Pool에 사용자가 자동으로 추가되며, AddGoogleUser 람다를 트리거해서 DB에도 사용자 정보가 저장됩니다.
⚡ 참조
https://docs.amplify.aws/lib/auth/social/q/platform/js/#setup-your-auth-provider
https://levelup.gitconnected.com/set-up-an-aws-amplify-app-with-google-sign-in-c738df79d272
https://docs.amplify.aws/lib/auth/emailpassword/q/platform/js/
https://velog.io/@shin6403/React-Aws-Cognito로-구글-로그인-API-연동하기#localhost3000으로-돌아가서-정상-작동-확인하기
https://velog.io/@seunghwa17/Cognito-User-Pool-정보-DynamoDB에-저장하기
https://docs.aws.amazon.com/cognito/latest/developerguide/cognito-user-pools-social-idp.html
