-
이번 포스트에서는 AI 구현에 대한 내용을 중심으로 다룬다.
-
AI는 기계 또는 오브젝트가 경험 또는 코딩을 통해 스스로 학습하여 여러 입력 작용에 따라 갖고 있는 정보 또는 기능을 통해 각종 행동을 수행하는 것을 의미한다.
-
게임이라는 프로그램에서 AI는 NPC, 몬스터 오브젝트들의 매우 중요한 기능을 담당한다.
- AI 오브젝트 구현을 위한 기본적인 변수 선언
public class Spider : MonoBehaviour
{
    [SerializeField]
    private string animalName; // 동물이름
    [SerializeField] private int hp; //동물 체력

    [SerializeField] private float walkSpeed; //걷는 속도
    [SerializeField] private float runSpeed; //달리는 속도
    private float applySpeed;

    private Vector3 direction; // 방향

    private bool isAction;
    private bool isWalking;
    private bool isRunning;
    private bool isDead;
    // 각종 상태 변수

    [SerializeField]
    private float walkTime; // 걷는 시간
    [SerializeField]
    private float waitTime; // 대기 시간
    [SerializeField]
    private float runTime; // 달리는 시간
    private float currentTime; // 현재

    //필요한 컴포넌트
    [SerializeField] private Animator anim;// 오브젝트 애니메이션
    [SerializeField] private Rigidbody rigid; // 오브젝트의 RigidBody
[SerializeField] private BoxCollider bCol; // 오브젝트의 Collider- AI의 각종 움직임과 반응 스크립트 생성 및 구현
private void Move()
    {
        if (isWalking || isRunning)
            rigid.MovePosition(transform.position + (transform.forward * applySpeed * Time.deltaTime));
        // 걷거나 달리는 상태일 시, 일정 시간 동안 적용한 속도만큼 이동한다.
    }

    private void Rotation()
    {
        if (isWalking || isRunning)
        {
            Vector3 _rotation = Vector3.Lerp(transform.eulerAngles, new Vector3(0f, direction.y, 0f), 0.01f);
            rigid.MoveRotation(Quaternion.Euler(_rotation));
            // 몬스터의 위치 변환 값을 통해 RigidBody가 좌우 360도 어느 방향으로든 회전할 수 있도록 한다.
        }
    }

    private void ElapseTime()
    {
        if(isAction)
        {
            currentTime -= Time.deltaTime;
            if (currentTime <= 0)
                ReSet();
            // AI가 움직일 때 나타나는 휴지 시간 및 동작 시간에 대한 감소, 초기화
        }
    }

    private void ReSet()
    {
        isWalking = false;
        isRunning = false;
        isAction = true;
        applySpeed = walkSpeed;
        anim.SetBool("Walking", isWalking);
        anim.SetBool("Running", isRunning);
        direction.Set(0f, Random.Range(0f, 360f), 0f); // 어느방향으로든 랜덤하게 움직인다.
        RandomAction();
    }

    private void RandomAction()
    {
        isAction = true;

        int _random = Random.Range(0 ,2); // 대기, 걷기

        if (_random == 0)
            Wait();
        else if (_random == 1)
            TryWalk();
    }

    private void Wait()
    {
        currentTime = waitTime;
        Debug.Log("대기");
        // 일반적으로 서있는 기본 대기 상태
    }

    private void TryWalk()
    {
        isWalking = true;
        anim.SetBool("Walking", isWalking);
        currentTime = walkTime;
        applySpeed = walkSpeed;
        Debug.Log("걷기");
        // 현재 시간과 적용 속도를 Walk모드로 변경하여 AI의 걷기 구현
    }

    public void Run(Vector3 _targetPos)
    {
        direction = Quaternion.LookRotation(transform.position - _targetPos).eulerAngles;

        currentTime = runTime;
        isWalking = false;
        isRunning = true;
        applySpeed = runSpeed;
        anim.SetBool("Running", isRunning);
        // 현재 시간과 적용 속도를 Run모드로 변경하여 AI의 걷기 구현
        // 타격 시 AI가 도망가고 HP가 감소하도록 하기 위해 _targetPos를 인수로 받도록 설정
    }

    private void Dead()
    {
        isWalking = false;
        isRunning = false;
        isDead = true;
        anim.SetTrigger("Dead"); // AI 죽음
    }

    public void Damage(int _dmg, Vector3 _targetPos)
    {
        if (!isDead)
        { //AI가 아직 죽지않았다면 선언 HP 만큼 체력이 감소하고 0이하가 되면 죽는다.
            hp -= _dmg;

            if (hp <= 0)
            {
                Dead();
                return;
            }
            anim.SetTrigger("Jump");
            Run(_targetPos);
            // 아직 죽지 않은 경우엔 점프를 하며 놀란 뒤 도망간다.
        }
    }
-> 소스 코드 작성 이후 Animator를 통해 AI의 움직임을 반드시 설정해주어야 한다.
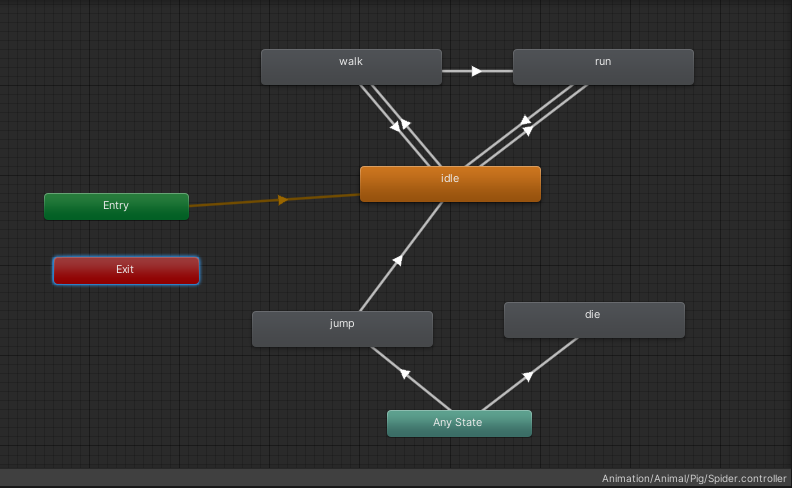
-> 구현된 내용에 따라 AI가 스스로 자신의 움직임을 제어하며 반응한다. Debug.Log를 통해 AI의 움직임이 변화하는 모습을 확인할 수 있다.
- AI의 시야각
- AI가 AI 입장에 바라보는 시야에 대한 인지 기능을 구현한다.
- 시야각이 있어야 AI가 장애물을 피하거나 플레이어를 인지하는 것이 가능하다.
- 시야각 스크립트 생성 후 시야각에 대한 기본 변수 선언
 	[SerializeField] private float viewAngle; // 시야각 (120도)
    [SerializeField] private float viewDistance; // 시야거리 (10미터)
[SerializeField] private LayerMask targetMask; // 타겟 마스크 (플레이어)- AI의 시야각과 플레이어
private Vector3 BoundaryAngle(float _angle)
{
_angle += transform.eulerAngles.y;
return new Vector3(Mathf.Sin(_angle * Mathf.Deg2Rad), 0f, Mathf.Cos(_angle * Mathf.Deg2Rad));
// x좌표값은 Sin값으로, z좌표값은 Cosin값으로 인식
// 현재 거미 AI가 하늘을 날지는 않으므로 y좌표값은 0f
}
private void View()
{
Vector3 _leftBoundary = BoundaryAngle(-viewAngle * 0.5f);
Vector3 _rightBoundary = BoundaryAngle(viewAngle * 0.5f);
// 왼쪽과 오른쪽을 두 부분으로 나누어 시야각 인지
Debug.DrawRay(transform.position + transform.up, _leftBoundary, Color.red);
Debug.DrawRay(transform.position + transform.up, _rightBoundary, Color.red);
// 좌우 시야각을 인지를 위한 레이저를 생성하고 표시한다.
Collider[] _target = Physics.OverlapSphere(transform.position, viewDistance, targetMask);
//AI가 시야각을 통해 인지할 오브젝트들을 스스로 저장할 배열.
for(int i=0; i < _target.Length; i++) //배열에 저장된 항목을 순환
{
Transform _targetTf = _target[i].transform;
if(_targetTf.name == "Player") // 인지한 오브젝트가 플레이어일 경우
{
Vector3 _direction = (_targetTf.position - transform.position).normalized;
float _angle = Vector3.Angle(_direction, transform.forward);
if(_angle < viewAngle * 0.5f)
{
RaycastHit _hit; //레이저를 통해 감지
if(Physics.Raycast(transform.position + transform.up, _direction, out _hit, viewDistance))
{
if(_hit.transform.name == "Player")
{
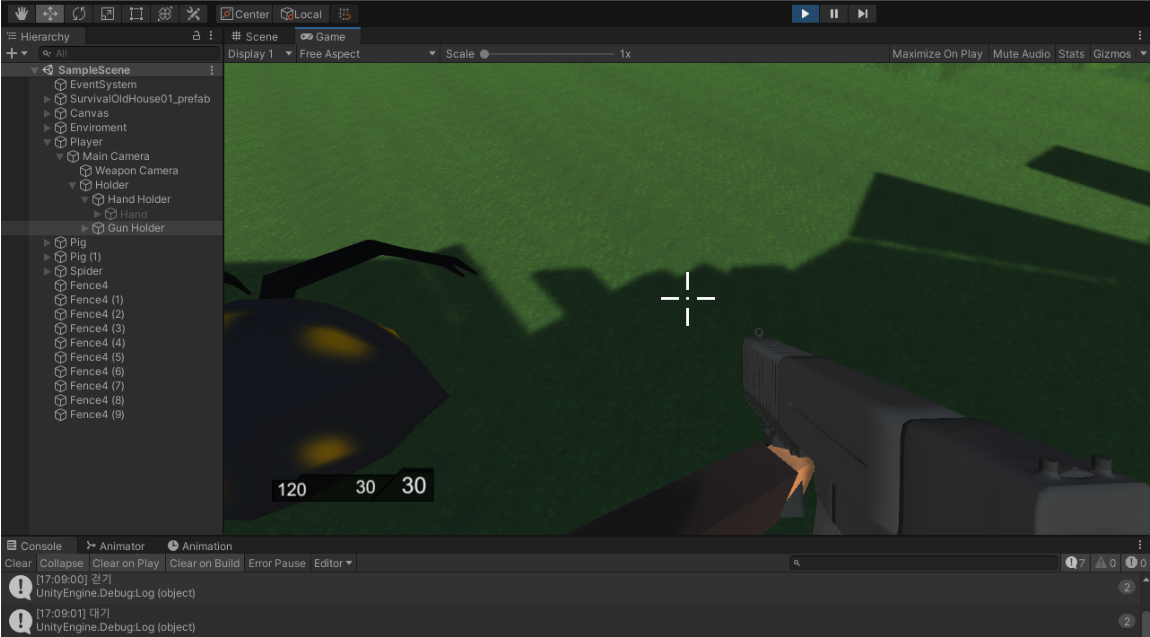
Debug.Log("플레이어가 거미 시야 내에 있습니다.");
Debug.DrawRay(transform.position + transform.up, _direction, Color.blue);
theSp.Run(_hit.transform.position);
// AI가 자신의 시야각 내에 플레이어가 있는 것을 인지하고 도망친다.
}
}
}
}
}
}-
AI 타격
-
AI를 공격할 시 그에 대한 효과를 얻기 위해서는 각 AI 종류별로 tag 속성을 부여해주어야 하고, 그 tag 속성을 통해 무기 스크립트에 반응을 구현할 수 있다.
-
GetComponet<>를 통해 AI의 종류를 GunController - Shoot() 함수에 저장해야한다.
-
private void Shoot() // 발사 후 계산
    {
        theCrosshair.FireAnimation();
        currentGun.currentBulletCount--;
        currentFireRate = currentGun.fireRate; // 연사 속도 재계산
        PlaySE(currentGun.fire_Sound);
        currentGun.muzzleFlash.Play();
        Hit();
       **** if (hitInfo.transform.tag == "NPC")
            hitInfo.transform.GetComponent<Pig>().Damage(1, transform.position);
            // 돼지 NPC을 사격할 경우
        else if(hitInfo.transform.tag == "Monster")
            hitInfo.transform.GetComponent<Spider>().Damage(1, transform.position);
            // 거미 NPC를 사격할 경우 ****
        StopAllCoroutines();
        StartCoroutine(RetroActionCoroutine());
    }
-> 사격당한 AI가 죽어있는 모습(Pig)
- 이후 개발에서는 AI가 시야각을 통해 플레이어를 공격하고 플레이어의 스테이터스에서 HP가 감소하는 시스템을 구현할 계획이다.

A little strange but passionate, sincere hard worker.