기본적으로 Spring에서 RestController를 통해 API를 만들었다. 특정한 입력을 받으면 이를 처리해서 결과를 반환하는 MVC의 Controller의 역할을 수행했다. 하지만 스프링에서 외부의 API를 요청해야 하는 경우도 있는데 오픈 API와 같은 요청에서 응답을 받기 위한 방버에 해당한다.
기상청 API 확인
프로젝트 진행 과정에서 기상청 API를 활용했다. 해당 사이트는 기상청 API 허브와 다르게 공공데이터 포털을 통해 정보를 받는 방법이다. 단기 예보의 경우 데이터 생성 시간으로 부터 6시간 이후까지 시간별로 예보 정보를 확인할 수 있다.
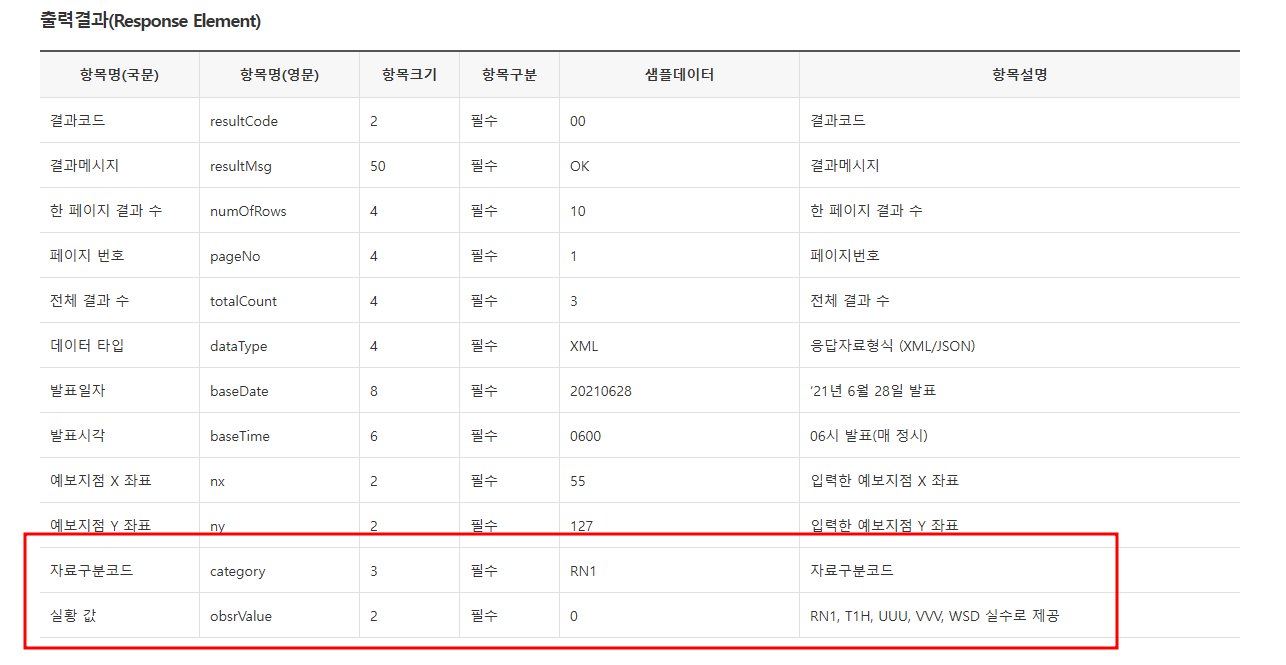
문제점이라고 한다면... 날씨 정보 수치가 한 row로 주는게 아니라 카테고리와 값으로 잘라서 보낸다! 쉽게 데이터를 내어주진 않을 모양이다.
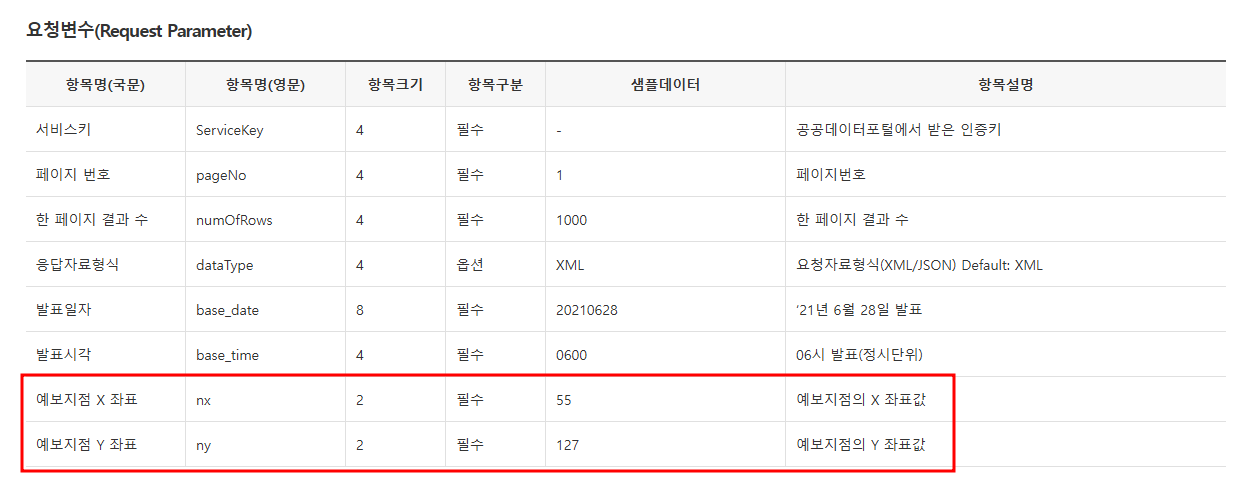
또한 특정 위치의 날씨 정보의 경우 예보 지점이라는 격자에 해당하고 이는 법정동코드와 매핑된다.
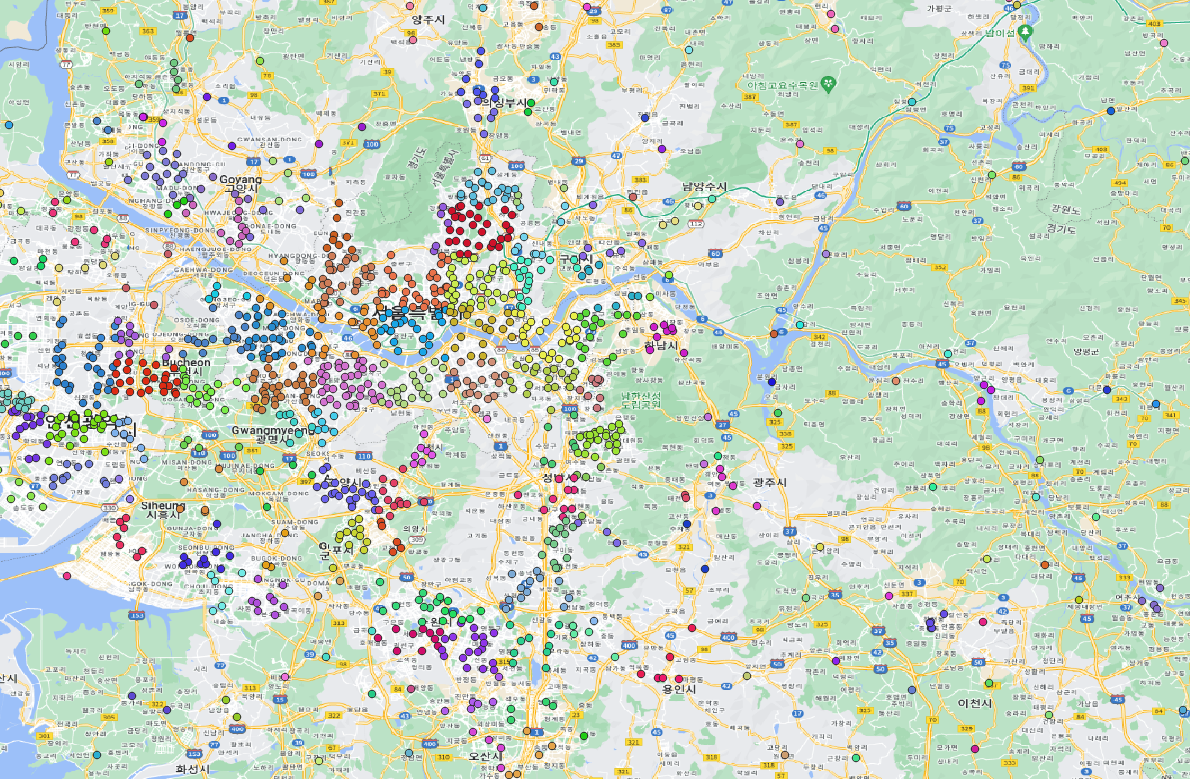
같은 색상이 같은 예보 지점 격자에 해당한다. 그리고 각 점은 법정동 코드와 연결되지만 법정동 코드도 옛날 버전이라 최신 버전이랑 맞지 않는다. (기상청 API에서 제공하는 구버전 법정동 코드와 격자 좌표 정보를 제공해준다.) 만약 지도 API와 함께 사용하기 위해서는 추가적인 작업을 거쳐야한다. 나의 경우 QGIS를 통해서 최신 법정동과 예보 지점을 최근접으로 연결했다. 이를 Address라는 테이블로 만들었다.
API 요청
@RequiredArgsConstructor
@RestController
@RequestMapping("/api")
public class WeatherController {
    private final WeatherService weatherService;

    ...
    @GetMapping("/weathers") // 전체 날씨 조회
    public ResponseEntity<Weather> getWeatherByAddress(@RequestParam(value = "id") Long id) {
        return ResponseEntity.ok(weatherService.getWeatherByAddress(id));
    }
    ...
다음과 같이 weather를 요청할 수 있도록 API를 만들고 서비스에서 상세하게 작업했다.
@Service
@RequiredArgsConstructor
public class WeatherService {

    private static final Logger logger = LoggerFactory.getLogger(WeatherService.class);

    @Value("${weather.api.key}") //기상청 api 키
    private String serviceKey;
    @Value("${weather.api.uri}") // 기상청 api base uri
    private String weatherURi;

    private final WeatherRepository weatherRepository;
    private final AddressRepository addressRepository;

    /* 법정동 코드와 현재 시간으로 DB에서 날씨 정보를 찾아 반환합니다. */
    /* 법정동 코드 -> 날씨 */
    @Transactional
    public Weather getWeatherByAddress(Long id){
        ...
    }

    /* 위치와 날짜를 기반으로 API를 요청하고 날씨 정보를 받아옵니다. */
    /* 출처 : https://www.data.go.kr/data/15084084/openapi.do */
    /* 위치, 시간 -> 날씨 */
    private Weather getWeatherByAPI(Address address, LocalDateTime date) throws IOException {
        ...
    }

    /* URL을 연결해서 받아온 값을 JSONObject로 처리하는 역할을 수행합니다. */
    private static JSONObject getJsonObject(String urlBuilder) throws IOException {
    	...
    }
}WeatherService에서는 크게 세 개의 메소드로 구현했다.
1. getWeatherByAddress : 법정동 코드에서 날씨 정보를 받아온다.
2. getWeatherByAPI : api에 주소와 시간 정보로 날씨 정보를 받아온다.
3. getJsonObject : JSON 응답을 처리한다.
1. getWeatherByAddress
    /* 법정동 코드와 현재 시간으로 DB에서 날씨 정보를 찾아 반환합니다. */
    /* 법정동 코드 -> 날씨 */
    @Transactional
    public Weather getWeatherByAddress(Long id){
        Address address = addressRepository.findById(id).orElseThrow(() -> new RuntimeException("Address not found with the given city and county."));
        /* 현재 시간에 대해 분 값을 제외하여 확인합니다. (1시 24분 -> 1시) */
        LocalDateTime now = LocalDateTime.now().truncatedTo(ChronoUnit.HOURS);
        // Weather 데이터를 조회하고 반환합니다.
        return weatherRepository.findByAddressAndDate(address,Date.from(now.plusHours(1).atZone(ZoneId.systemDefault()).toInstant()))
                // Weather가 없는 경우 기상청 API에 날씨 정보를 요청합니다.
                .orElseGet(() -> {
                    Weather newWeather = null;
                    try {
                        // 기상청 API에 날씨 값을 요청합니다.
                        newWeather = getWeatherByAPI(address, now);
                    } catch (IOException e) {
                        throw new RuntimeException(e);
                    }
                    // 새로운 날씨 값을 서버에 저장합니다.
                    weatherRepository.save(newWeather);
                    return newWeather;
                });
    }
법정동 코드를 전달 받으면 먼저 해당 법정동 코드로 주소값을 찾아낸다. 주소는 nx,ny라는 값으로 예보 구역 정보를 포함하고 있다.
다음 시간 단위로 내림해서 현재 시간을 확인한다.
확인된 주소와 시간을 통해 현재 데이터베이스에 저장되어 있는지 먼저 확인한다. 이는 API 요청을 반복하지 않도록 시간 단위로 데이터를 저장하고 필요에 따라 불러오도록 하는 것이다.
데이터베이스에 없다면 getWeatherByAPI에 요청한다.
2. getWeatherByAPI
    private Weather getWeatherByAPI(Address address, LocalDateTime date) throws IOException {
        /* 현재 시간 값에 따른 API 요청 시간을 생성합니다.*/
        /* 단기 예보의 경우, 2시부터 3시간 간격으로 데이터를 생성합니다. 예보는 생성 시간 기준 +6시간이 생성됩니다. */
        logger.info("date : " + date);
        String baseDate;
        String baseTime;
        /* 현재 시간이 2보다 작을 경우 전날 23시 */
        if (date.getHour() < 2) {
            baseDate = date.minusDays(1).format(DateTimeFormatter.ofPattern("yyyyMMdd"));
            baseTime = "2300";
        /* 시간을 3시간 단위로 조절합니다. */
        } else {
            baseDate = date.format(DateTimeFormatter.ofPattern("yyyyMMdd"));
            int hour = date.getHour();
            int adjustedHour = (hour - 2) % 24; // 2시부터 시작, 24시간 범위로 조정
            adjustedHour = (adjustedHour + 24) % 24; // 음수 시간 보정
            int baseTimeHour = (adjustedHour / 3) * 3 + 2; // 2시부터 3시간 간격
            // baseTimeHour가 24시를 넘는 경우, 24시에서 빼줍니다.
            if (baseTimeHour >= 24) {
                baseTimeHour -= 24;
            }
            baseTime = String.format("%02d00", baseTimeHour);
        }
        /* 요청을 위한 날짜와 시간 확인! */
        logger.info("baseDate: " + baseDate + " | baseTime: " + baseTime);

        try {
            /* URL 생성*/
            String urlBuilder = weatherURi +
                    "?serviceKey=" + serviceKey + /* <- URLEncoder에 키값을 넣으면 변환 발생으로 직접 입력 */
                    "&pageNo=" + URLEncoder.encode("1", StandardCharsets.UTF_8) +
                    "&numOfRows=" + URLEncoder.encode("100", StandardCharsets.UTF_8) +
                    "&dataType=" + URLEncoder.encode("JSON", StandardCharsets.UTF_8) +
                    "&base_date=" + URLEncoder.encode(baseDate, StandardCharsets.UTF_8) +
                    "&base_time=" + URLEncoder.encode(baseTime, StandardCharsets.UTF_8) +
                    "&nx=" + URLEncoder.encode(String.valueOf(address.getNx()), StandardCharsets.UTF_8) +
                    "&ny=" + URLEncoder.encode(String.valueOf(address.getNy()), StandardCharsets.UTF_8);
            logger.info("urlBuilder : " + urlBuilder);

            /* JSONObject를 처리해서 아이템 목록을 가져옵니다.*/
            JSONObject jsonResponse = getJsonObject(urlBuilder);
            JSONArray items = jsonResponse.getJSONObject("response").getJSONObject("body").getJSONObject("items").getJSONArray("item");

            /* 카테고리와 값들을 찾아내서 저장할 Map 선언 */
            Map<String, Double> weatherData = new HashMap<>();

            /* 요청은 현재 시간 기준 다음 정각 (13시 42분 -> 14시)을 기준으로 날씨 값을 찾아 비교합니다. */
            LocalDateTime compareDate = date.plusHours(1);
            String compareDateStr = compareDate.format(DateTimeFormatter.ofPattern("yyyyMMdd"));
            String compareTimeStr = compareDate.format(DateTimeFormatter.ofPattern("HHmm"));
            logger.info("compareDateStr : " + compareDateStr);
            logger.info("compareTimeStr : " + compareTimeStr);


            /* 아이템 목록에서 필요한 데이터만 찾아서 Map에 저장 */
            for (int i = 0; i < items.length(); i++) {
                JSONObject item = items.getJSONObject(i);
                String fcstDate = item.getString("fcstDate");
                String fcstTime = item.getString("fcstTime");
                if (compareDateStr.equals(fcstDate) && compareTimeStr.equals(fcstTime)) {
                    String category = item.getString("category");
                    Double fcstValue = item.optDouble("fcstValue",0.0);
                    weatherData.put(category, fcstValue);
                }
            }
            logger.info("weatherData" + weatherData);
            // Weather 객체에 저장하고 반환합니다.
            return new Weather(compareDateStr,compareTimeStr,address,
                    weatherData.getOrDefault("POP", null),
                    (int)Math.round(weatherData.getOrDefault("PTY", null)),
                    weatherData.getOrDefault("PCP", null),
                    weatherData.getOrDefault("REH", null),
                    weatherData.getOrDefault("SNO", null),
                    (int)Math.round(weatherData.getOrDefault("SKY", null)),
                    weatherData.getOrDefault("TMP", null),
                    weatherData.getOrDefault("TMN", null),
                    weatherData.getOrDefault("TMX", null),
                    weatherData.getOrDefault("UUU", null),
                    weatherData.getOrDefault("VVV", null),
                    weatherData.getOrDefault("WAV", null),
                    weatherData.getOrDefault("VEC", null),
                    weatherData.getOrDefault("WSD", null));
        } catch (Exception e) {
            throw new RuntimeException("Error parsing weather API response", e);
        }
    }
이제 주소 데이터와 시간 데이터를 기반으로 API에 요청을 보내고 이를 데이터베이스에 저장한 후 그 결과를 반환하도록 기상청 API에 요청한다.
	String baseDate;
    String baseTime;
    /* 현재 시간이 2보다 작을 경우 전날 23시 */
    if (date.getHour() < 2) {
    	baseDate = date.minusDays(1).format(DateTimeFormatter.ofPattern("yyyyMMdd"));
    	baseTime = "2300";
    /* 시간을 3시간 단위로 조절합니다. */
    } else {
    	baseDate = date.format(DateTimeFormatter.ofPattern("yyyyMMdd"));
    	int hour = date.getHour();
    	int adjustedHour = (hour - 2) % 24; // 2시부터 시작, 24시간 범위로 조정
    	adjustedHour = (adjustedHour + 24) % 24; // 음수 시간 보정
    	int baseTimeHour = (adjustedHour / 3) * 3 + 2; // 2시부터 3시간 간격
    	// baseTimeHour가 24시를 넘는 경우, 24시에서 빼줍니다.
    	if (baseTimeHour >= 24) {
    		baseTimeHour -= 24;
    	}
    baseTime = String.format("%02d00", baseTimeHour);
    }
주의할점은 날씨 데이터 요청을 위한 API의 규칙이다.
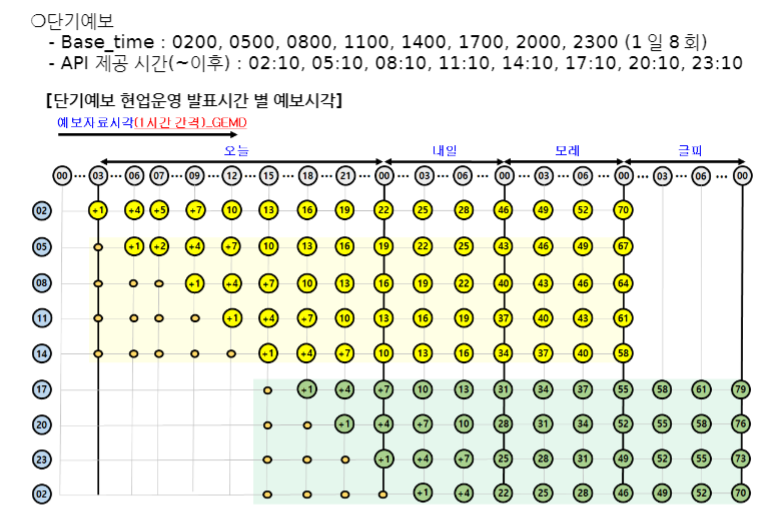
단기 예보의 경우 2시부터 23시까지 3시간 간격으로 데이터가 생성된다. 따라서 07시에 날씨 정보를 확인하기 위해서는 0500의 시간 값을 전달해야 한다. 이를 해결하는 과정이 위의 코드에 해당한다. 만약 02시 전이라면 전날 23시에 요청을 하게 된다.
try {
	/* URL 생성*/
    String urlBuilder = weatherURi +
    	"?serviceKey=" + serviceKey + /* <- URLEncoder에 키값을 넣으면 변환 발생으로 직접 입력 */
        "&pageNo=" + URLEncoder.encode("1", StandardCharsets.UTF_8) +
        "&numOfRows=" + URLEncoder.encode("100", StandardCharsets.UTF_8) +
        "&dataType=" + URLEncoder.encode("JSON", StandardCharsets.UTF_8) +
        "&base_date=" + URLEncoder.encode(baseDate, StandardCharsets.UTF_8) +
        "&base_time=" + URLEncoder.encode(baseTime, StandardCharsets.UTF_8) +
        "&nx=" + URLEncoder.encode(String.valueOf(address.getNx()), StandardCharsets.UTF_8) +
        "&ny=" + URLEncoder.encode(String.valueOf(address.getNy()), StandardCharsets.UTF_8);
        logger.info("urlBuilder : " + urlBuilder);

        JSONObject jsonResponse = getJsonObject(urlBuilder);
        JSONArray items = jsonResponse.getJSONObject("response").getJSONObject("body").getJSONObject("items").getJSONArray("item");
        ...
이제 url을 인코딩하고 요청을 보낸 결과를 받아와 JSONArray에 넣게 된다.
여기서 오류가 났었는데 바로 serviceKey에 대한 encoding 문제다.
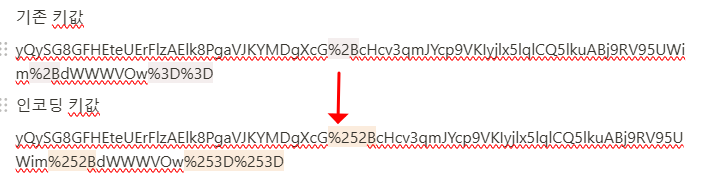
만약 serviceKey를 똑같이 URLEncoder에 넣었을때 변화되는 것을 확인했다. 따라서 문자열에 직접 결합해서 문제를 해결했다.
	/* 카테고리와 값들을 찾아내서 저장할 Map 선언 */
    Map<String, Double> weatherData = new HashMap<>();

    /* 요청은 현재 시간 기준 다음 정각 (13시 42분 -> 14시)을 기준으로 날씨 값을 찾아 비교합니다. */
    LocalDateTime compareDate = date.plusHours(1);
    String compareDateStr = compareDate.format(DateTimeFormatter.ofPattern("yyyyMMdd"));
    String compareTimeStr = compareDate.format(DateTimeFormatter.ofPattern("HHmm"));

	/* 아이템 목록에서 필요한 데이터만 찾아서 Map에 저장 */
    for (int i = 0; i < items.length(); i++) {
    JSONObject item = items.getJSONObject(i);
    String fcstDate = item.getString("fcstDate");
    String fcstTime = item.getString("fcstTime");
    if (compareDateStr.equals(fcstDate) && compareTimeStr.equals(fcstTime)) {
    	String category = item.getString("category");
        Double fcstValue = item.optDouble("fcstValue",0.0);
        weatherData.put(category, fcstValue);
    	}
    }

    // Weather 객체에 저장하고 반환합니다.
    return new Weather(compareDateStr,compareTimeStr,address,
    	weatherData.getOrDefault("POP", null),
    	(int)Math.round(weatherData.getOrDefault("PTY", null)),
    	weatherData.getOrDefault("PCP", null),
    	weatherData.getOrDefault("REH", null),
    	weatherData.getOrDefault("SNO", null),
    	(int)Math.round(weatherData.getOrDefault("SKY", null)),
    	weatherData.getOrDefault("TMP", null),
    	weatherData.getOrDefault("TMN", null),
    	weatherData.getOrDefault("TMX", null),
    	weatherData.getOrDefault("UUU", null),
    	weatherData.getOrDefault("VVV", null),
    	weatherData.getOrDefault("WAV", null),
    	weatherData.getOrDefault("VEC", null),
    	weatherData.getOrDefault("WSD", null));
    } catch (Exception e) {
    	throw new RuntimeException("Error parsing weather API response", e);
    }
        ...
마지막으로 Json 배열에서 현재 시간 기준 올림을 통해 예보 정보를 가져와 카테고리별로 Map에 저장한 다음 Weather 객체의 생성자에 넣음으로써 결과를 처리했다.
결론
API에서 응답 받은 값을 Spring 내부에서 어떻게 처리해야 하는지 어려울 것이라 생각했는데 막상 구현을 해봤더니 받아 오는 것보다 결과를 처리하는게 더 복잡했다. 그래도 외부 API를 사용하는데 큰 문제가 없어 다행이었다.