논리 불륨(Logical Volume) 관리
레거시 환경에서의 볼륨 관리
500기가 볼륨을 c, d 드라이브로 반반 나눴는데,
d 드라이브가 놀아서 d 드라이브의 용량을 줄이고 c 드라이브의 용량을 늘리기 위해 파티셔닝을 다시 하고 싶으면
c 드라이브의 파티션 크기인 250기가를 백업을 다른 저장소에 하고 다시 파티셔닝을 했어야 함
그럼 250기가의 리소스가 또 필요
논리 볼륨
-
유연한 스토리지 관리 기능 제공
-
디스크 파티션의 구조와 상관없이 원하는 크기의 논리 볼륨 생성 가능
- 단일 디스크 크기보다 큰 볼륨을 생성 가능
-
논리 볼륨으로 생성된 볼륨의 사이즈가 부족할 경우 볼륨을 확장 가능
-
데이터를 유지한 상태에서 논리 볼륨을 구성하고 있는 디스크를 제거하는 것이 가능
-
스냅샷 기능 사용 가능. 스냅샷을 통해 특정 시점의 데이터를 보존 가능
볼륨 그룹에서 파일시스템을 생성해서 논리 볼륨 구성?
논리 볼륨 구성
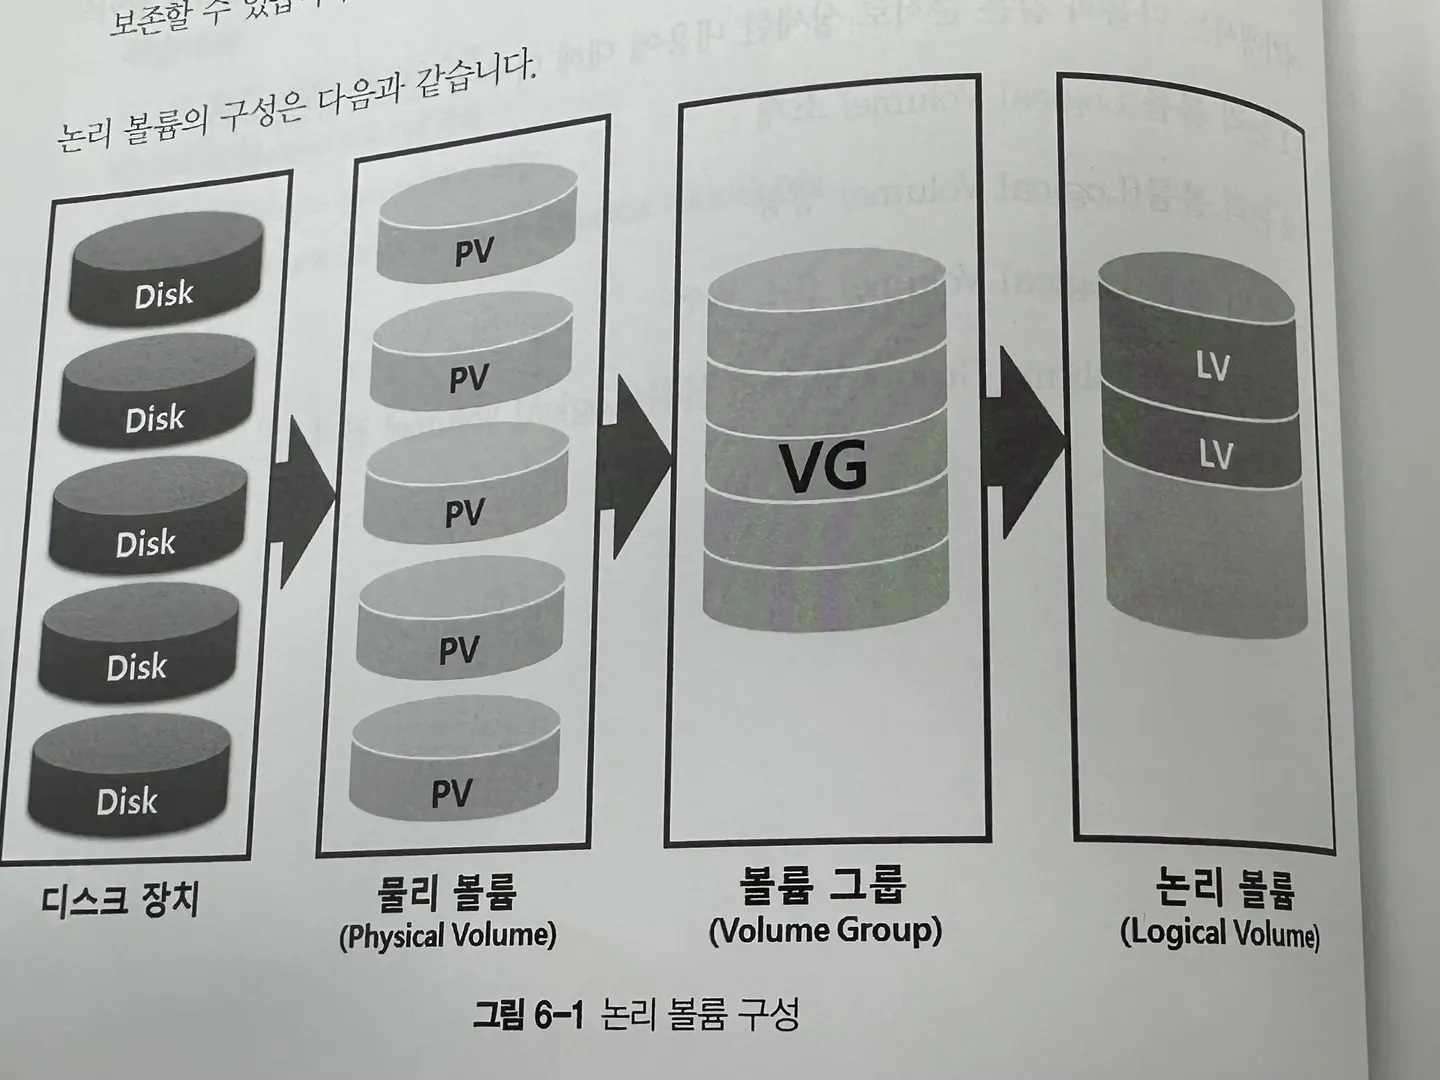
- 물리 볼륨 : 논리 볼륨을 구성하기 위한 가장 기본적인 단계
- 디스크 전체 또는 일부를 파티션으로 지정하고 그 파티션으로 물리 볼륨을 생성
- 볼륨 그룹 : 물리 볼륨의 집합 : 한 시스템에 여러 개의 볼륨 그룹 생성 가능
- 사용할 수 있는 총 사이즈 : 해당 볼륨에 포함된 물리 볼륨 사이즈의 합
- 사용할 수 있는 총 사이즈 : 해당 볼륨에 포함된 물리 볼륨 사이즈의 합
- 논리 볼륨 : 파일시스템에서 데이터를 저장할 수 있는 볼륨을 생성하는 단계
- 논리 볼륨을 생성할 때 이름, 사이즈, 볼륨그룹 지정
**# 논리 볼륨 생성을 위한 파티션 생성
$ sudo fdisk /dev/sdb**

Welcome to fdisk (util-linux 2.37.4).
Changes will remain in memory only, until you decide to write them.
Be careful before using the write command.

**Command (m for help): n**
Partition type
   p   primary (0 primary, 0 extended, 4 free)
   e   extended (container for logical partitions)
Select (default p):

Using default response p.
Partition number (1-4, default 1):
First sector (2048-41943039, default 2048):
Last sector, +/-sectors or +/-size{K,M,G,T,P} (2048-41943039, default 41943039):

Created a new partition 1 of type 'Linux' and of size 20 GiB.
Partition #1 contains a xfs signature.

Do you want to remove the signature? [Y]es/[N]o: y

The signature will be removed by a write command.

**Command (m for help): p**
Disk /dev/sdb: 20 GiB, 21474836480 bytes, 41943040 sectors
Disk model: HARDDISK
Units: sectors of 1 * 512 = 512 bytes
Sector size (logical/physical): 512 bytes / 512 bytes
I/O size (minimum/optimal): 512 bytes / 512 bytes
Disklabel type: dos
Disk identifier: 0xda944e0d

Device     Boot Start      End  Sectors Size Id Type
/dev/sdb1        2048 41943039 41940992  20G 83 Linux

Filesystem/RAID signature on partition 1 will be wiped.

**Command (m for help): t**
Selected partition 1
Hex code or alias (type L to list all): L
        ...
   **lvm            - 8E**
				...
Hex code or alias (type L to list all): **8e**
Changed type of partition 'Linux' to 'Linux LVM'.

**Command (m for help): p**
Disk /dev/sdb: 20 GiB, 21474836480 bytes, 41943040 sectors
Disk model: HARDDISK
Units: sectors of 1 * 512 = 512 bytes
Sector size (logical/physical): 512 bytes / 512 bytes
I/O size (minimum/optimal): 512 bytes / 512 bytes
Disklabel type: dos
Disk identifier: 0xda944e0d

Device     Boot Start      End  Sectors Size Id Type
**/dev/sdb1        2048 41943039 41940992  20G 8e Linux LVM**

Filesystem/RAID signature on partition 1 will be wiped.
# lvm2 패키지 설치 확인
**$ dnf list installed | grep lvm2**
lvm2.x86_64 9:2.03.24-2.el9 @anaconda
lvm2-libs.x86_64 9:2.03.24-2.el9 @anaconda
udisks2-lvm2.x86_64 2.9.4-11.el9 @AppStream
# 논리 볼륨을 구성하기 위해 파티션 정보 확인
**$ sudo lvmdiskscan**
/dev/sda1 [ 600.00 MiB]
/dev/sda2 [ 1.00 GiB]
/dev/sda3 [ 48.41 GiB]
**/dev/sdb1 [ <20.00 GiB]**
0 disks
4 partitions
0 LVM physical volume whole disks
0 LVM physical volumes
# 커널에게 디스크 변경사항을 알림
**$ sudo partprobe /dev/sdb**# 물리 볼륨 생성
**$ sudo pvcreate /dev/sdb1**
Physical volume "/dev/sdb1" successfully created.
Creating devices file /etc/lvm/devices/system.devices
# 논리 볼륨을 구성하기 위해 파티션 정보 확인
**$ sudo lvmdiskscan**
/dev/sdb1 [ <20.00 GiB] LVM physical volume
0 disks
0 partitions
0 LVM physical volume whole disks
1 LVM physical volume
# 생성한 물리 볼륨 정보 확인
**$ sudo pvdisplay /dev/sdb1**
"/dev/sdb1" is a new physical volume of "<20.00 GiB"
--- NEW Physical volume ---
PV Name /dev/sdb1
VG Name
PV Size <20.00 GiB
Allocatable NO
**PE Size 0 # PE Size = 0**
Total PE 0
Free PE 0
Allocated PE 0
PV UUID OucaDn-o7ek-aDjF-vczg-yN9m-vQE1-DB39Rz# 논리 볼륨 생성을 위한 볼륨 그룹 생성
**$ sudo vgcreate vg_data /dev/sdb1**
Volume group "vg_data" successfully created
# 생성한 볼륨 그룹 정보 확인
**$ sudo vgdisplay vg_data**
--- Volume group ---
VG Name vg_data
System ID
Format lvm2
Metadata Areas 1
Metadata Sequence No 1
VG Access read/write
VG Status resizable
MAX LV 0
Cur LV 0
Open LV 0
Max PV 0
Cur PV 1
Act PV 1
VG Size <20.00 GiB
**PE Size 4.00 MiB # PE Size 가 생김**
Total PE 5119
Alloc PE / Size 0 / 0
Free PE / Size 5119 / <20.00 GiB
VG UUID eX4fhK-yOHM-eAB6-sJg4-ve6l-xxDs-hpl0oPPE Size
: Physical Extent
: 논리 볼륨에서의 가장 작은 단위
: VG 내에서 할당 단위가 되는 "블록”
# 논리 볼륨 생성
# 이름: lv_data
# 크기: 10G
**$ sudo lvcreate -n lv_data -L 10G vg_data**
  Logical volume "lv_data" created.

# 생성된 논리 볼륨 정보 확인
# **/dev/vg_data/lv_data 경로에서도 논리 볼륨이 볼륨그룹에서 생성됨을 알 수 있음**
**$ sudo lvdisplay /dev/vg_data/lv_data**
  --- Logical volume ---
  LV Path                /dev/vg_data/lv_data
  LV Name                lv_data
  VG Name                vg_data
  LV UUID                Q2ewC2-fN3o-VCwG-cPPN-X3Ww-ASGQ-OmuZDf
  LV Write Access        read/write
  LV Creation host, time user01, 2025-08-27 01:42:54 +0000
  LV Status              available
  # open                 0
  LV Size                10.00 GiB
  Current LE             2560
  Segments               1
  Allocation             inherit
  Read ahead sectors     auto
  - currently set to     8192
  Block device           253:0

**$ lsblk**
NAME                MAJ:MIN RM  SIZE RO TYPE MOUNTPOINTS
sda                   8:0    0   50G  0 disk
├─sda1                8:1    0  600M  0 part /boot/efi
├─sda2                8:2    0    1G  0 part /boot
└─sda3                8:3    0 48.4G  0 part /
sdb                   8:16   0   20G  0 disk
└─sdb1                8:17   0   20G  0 part
  └─**vg_data-lv_data 253:0    0   10G  0 lvm**
# 파일 시스템 생성
**$ sudo mkfs.xfs /dev/vg_data/lv_data**
meta-data=/dev/vg_data/lv_data isize=512 agcount=4, agsize=655360 blks
= sectsz=512 attr=2, projid32bit=1
= crc=1 finobt=1, sparse=1, rmapbt=0
= reflink=1 bigtime=1 inobtcount=1 nrext64=0
data = bsize=4096 blocks=2621440, imaxpct=25
= sunit=0 swidth=0 blks
naming =version 2 bsize=4096 ascii-ci=0, ftype=1
log =internal log bsize=4096 blocks=16384, version=2
= sectsz=512 sunit=0 blks, lazy-count=1
realtime =none extsz=4096 blocks=0, rtextents=0
# 마운트
# 마운트 포인트 생성
**$ sudo mkdir /mnt/data**
# 마운트 포인트(디렉토리)에 마운트
**$ sudo mount /dev/vg_data/lv_data /mnt/data/**
mount: (hint) your fstab has been modified, but systemd still uses
the old version; use 'systemctl daemon-reload' to reload.
# 정상적으로 마운트됐음을 확인
**$ df -h /mnt/data**
Filesystem Size Used Avail Use% Mounted on
/dev/mapper/vg_data-lv_data 10G 104M 9.9G 2% /mnt/data
# 재부팅 시에도 자동으로 마운트되도록 설정파일 수정
**$ sudo vi /etc/fstab**
...
/dev/vg_data/lv_data /mnt/data xfs defaults 0 0
# 정상적으로 마운트됐음을 확인
**$ df -h /mnt/data**
Filesystem Size Used Avail Use% Mounted on
/dev/mapper/vg_data-lv_data 10G 104M 9.9G 2% /mnt/data
**$ mount | grep /mnt/data**
/dev/mapper/vg_data-lv_data on /mnt/data type xfs (rw,relatime,seclabel,attr2,inode64,logbufs=8,logbsize=32k,noquota)VG = 유연성과 확장성을 위한 "저장소 풀"
- 단일 PV 위에 바로 LV를 만들면, 사실상 기존의 "파티션"과 다를 게 없어짐
- VG를 두는 순간부터 여러 디스크를 합치고, 분리하고, 크기를 조절하는 논리적 관리가 가능해져서 LVM의 장점을 활용할 수 있는 것
# 논리 볼륨 크기 확장
**$ sudo lvextend -L 15G /dev/vg_data/lv_data**
  Size of logical volume vg_data/lv_data changed from 10.00 GiB (2560 extents) to 15.00 GiB (3840 extents).
  Logical volume vg_data/lv_data successfully resized.

# 논리 볼륨 확장된 크기 확인
# $ sudo lvdisplay /dev/vg_data/lv_data 와 동일한 명령어
**$ sudo lvs**
  LV      VG      Attr       LSize  Pool Origin Data%  Meta%  Move Log Cpy%Sync Convert
  lv_data vg_data -wi-ao---- 15.00g

# 그러나 파일시스템 크기는 여전히 10G
**$ df -h**
Filesystem                   Size  Used Avail Use% Mounted on
...
/dev/mapper/vg_data-lv_data   **10G**  104M  9.9G   2% /mnt/data
df : 파일 시스템의 실제 사용 공간
메타데이터가 남음?
# 파일시스템 확장
**$ sudo xfs_growfs /mnt/data**
meta-data=/dev/mapper/vg_data-lv_data isize=512    agcount=4, agsize=655360 blks
         =                       sectsz=512   attr=2, projid32bit=1
         =                       crc=1        finobt=1, sparse=1, rmapbt=0
         =                       reflink=1    bigtime=1 inobtcount=1 nrext64=0
data     =                       bsize=4096   blocks=2621440, imaxpct=25
         =                       sunit=0      swidth=0 blks
naming   =version 2              bsize=4096   ascii-ci=0, ftype=1
log      =internal log           bsize=4096   blocks=16384, version=2
         =                       sectsz=512   sunit=0 blks, lazy-count=1
realtime =none                   extsz=4096   blocks=0, rtextents=0
data blocks changed from 2621440 to 3932160

# 파일 시스템 확장된 것을 확인 가능
# 논리볼륨이 확장되면서 파일시스템과 논리볼륨 사이에 메타데이터가 남아있었다?
**$ df -h | grep /mnt/data**
/dev/mapper/vg_data-lv_data   **15G**  140M   15G   1% /mnt/data
논리 볼륨 제거
: 생성과 역순
(마운트 해제) → 논리 볼륨 제거 → 볼륨 그룹 제거 → 물리 볼륨 제거
# 논리 볼륨 제거
# 마운트 해제
# 재부팅 시에도 마운트되도록 설정 파일 적어놨던 거 지우기
**$ sudo umount /mnt/data**
**$ sudo vi /etc/fstab**

# 논리 볼륨 제거
**$ sudo lvremove /dev/vg_data/lv_data**
Do you really want to remove active logical volume vg_data/lv_data? [y/n]: y
  Logical volume "lv_data" successfully removed.

# 볼륨 그룹 제거
**$ sudo vgremove /dev/vg_data**
  Volume group "vg_data" successfully removed

# 물리 볼륨 제거
**$ sudo pvremove /dev/sdb1**
  Labels on physical volume "/dev/sdb1" successfully wiped.

# 물리 볼륨, 볼륨 그룹, 논리 볼륨 제거됐는지 확인
$ sudo pvs
$ sudo vgs
$ sudo lvs
systemd
: 시스템이 부팅될 때 커널 다음으로 실행되는 프로세스
: PID = 1
: 관리자 혹은 지휘자
: 시스템 관리 데몬(daemon)
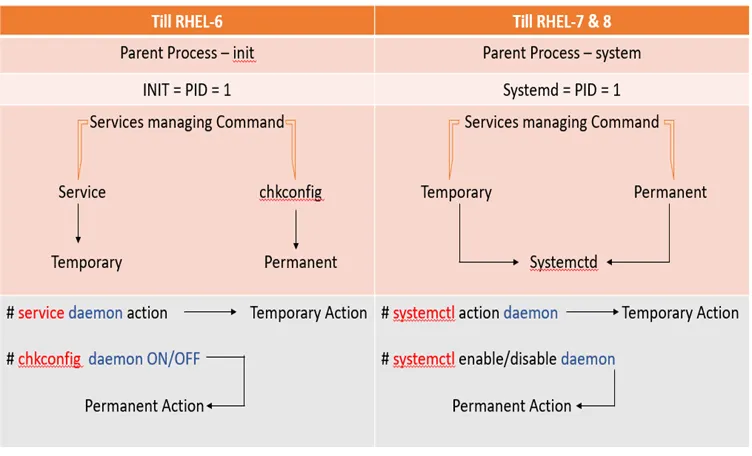
- init 과 systemd 로 리눅스의 역사가 크게 나뉨
- 엔터프라이즈 리눅스 7버전 이상이 현대
init- 직렬 처리
systemd- 병렬 처리
ps -ef : 실행 중인 프로세스 전체 목록
**$ ps -ef | grep systemd**
root           1       0  0 00:05 ?        00:00:39 /usr/lib/systemd/system rhgb --switched-root --system --deserialize 31
root         491       1  0 00:05 ?        00:00:07 /usr/lib/systemd/system-journald
root         509       1  0 00:05 ?        00:00:00 /usr/lib/systemd/system-udevd
root         642       1  0 00:05 ?        00:00:16 /usr/lib/systemd/system-logind
vagrant     1003       1  0 00:05 ?        00:00:02 /usr/lib/systemd/system --user
vagrant     9856    3353  0 03:11 pts/0    00:00:00 grep --color=auto systemd
의존성 기반의 서비스 제어 로직(Service Control Logic) 제공
: 유닛 간의 의존성 관계가 존재하므로 특정 유닛이 실행될 때 함께 실행될 수 있음
CGroup(Control Group) 관리
: 비슷한 프로세스를 그룹화하여 제어하는 기능
: 커널이 관리
: 프로세스 그룹에 자원 제한을 설정할 수 있는 리눅스 “커널” 기능
소켓 기반 활성화(Socket-based activation)
네트워크의 소켓과 다름!!
소켓
: 시스템 부팅 시 systemd 는 모든 서비스에게 전달하기 위한 수신 대기 소켓을 생성
: 서비스가 시작하자마자 생성된 소켓을 서비스에게 전달
: 이 소켓은 특정 서비스가 실행될 때 의존성 관계에 있는 다른 서비스의 소켓으로 메시지를 전달하여 서비스가 병렬로 실행되도록 함
통합 로그 관리
systemd-journald : 통합 로그 관리 데몬
journalctl : 명령
명령 vs. 명령어
:
systemd 유닛
: 관리 대상
: systemd 에서는 systemd 유닛 단위로 시스템을 관리
systemd 유닛 파일 위치
/etc/systemd/system
/run/systemd/system
/usr/lib/systemd/system
순서대로 우선순위가 낮아짐
같은 이름의 파일이라면 맨위에서부터 찾음
systemd 유닛 파일의 구성
$ cat /usr/lib/systemd/system/sshd.service
# 유닛의 일반적 정보
# 다른 유닛과의 의존성
[Unit]
Description=OpenSSH server daemon               # 유닛 설명
Documentation=man:sshd(8) man:sshd_config(5)    # 유닛에 대한 문서를 참고할 uri 리스트
After=network.target sshd-keygen.target         # 이 서비스가 시작된 후에 시작되는 서비스들
Wants=sshd-keygen.target                        # 이것도 있으면 같이 시작해줘

# 유닛의 유형
# 유닛을 활성화할 때 필요함
[Service]
Type=notify
EnvironmentFile=-/etc/sysconfig/sshd
ExecStart=/usr/sbin/sshd -D $OPTIONS
ExecReload=/bin/kill -HUP $MAINPID
KillMode=process
Restart=on-failure
RestartSec=42s

#
[Install]
WantedBy=multi-user.target
systemctl
: 서비스를 시작하고 재시작하고 상태를 확인하는 등의 작업 가능
: 거의 모든 작업에 필요
우분투는 서비스를 설치하면 자동으로 시작이 되지만, 레드햇은 따로 서비스 시작을 시켜줘야 함
**$ sudo systemctl status atd**
● atd.service - Deferred execution scheduler
     Loaded: loaded (/usr/lib/systemd/system/atd.service; enabled; preset: >
     Active: **active (running)** since Wed 2025-08-27 00:05:32 UTC; 5h 22min a>
       Docs: man:atd(8)
...

**$ at now +1min**
warning: commands will be executed using /bin/sh
at> date >> date_log.txt
**$ sudo systemctl status atd.service**
● atd.service - Deferred execution scheduler
     Loaded: loaded (/usr/lib/systemd/system/atd.service; enabled; preset: >
     Active: **active (running)** since Wed 2025-08-27 00:05:32 UTC; 5h 23min a>
       Docs: man:atd(8)
...
# atd 서비스 종료
**$ sudo systemctl stop atd.service**
**$ sudo systemctl status atd.service**
○ atd.service - Deferred execution scheduler
     Loaded: loaded (/usr/lib/systemd/system/atd.service; enabled; preset: >
     Active: **inactive (dead)** since Wed 2025-08-27 05:29:34 UTC; 2s ago
   Duration: 5h 24min 2.170s
...

# atd 서비스를 종료했기에 at 이 동작하지 않는다는 경고문 확인 가능
**$ at now +1min**
warning: commands will be executed using /bin/sh
at> echo test > ~/test1.txt
at> <EOT>
job 3 at Wed Aug 27 05:33:00 2025
Can't open /var/run/atd.pid to signal atd. No atd running?- at ← 1분 후에 test.txt 만들래
- atd ← 1분 후에 test.txt 만들어줌
**$ sudo systemctl status atd.service**
○ atd.service - Deferred execution scheduler
     Loaded: loaded (/usr/lib/systemd/system/atd.service; enabled; preset: >
     Active: inactive (dead) since Wed 2025-08-27 05:29:34 UTC; 8min ago
   Duration: 5h 24min 2.170s
       Docs: man:atd(8)
    Process: 704 ExecStart=/usr/sbin/atd -f $OPTS (code=exited, status=0/SU>
   Main PID: 704 (code=exited, status=0/SUCCESS)
        CPU: 28ms
# 서비스 시작, 중지 등의 과정 로그 확인 가능
Aug 27 00:05:32 user01 systemd[1]: Started Deferred execution scheduler.
Aug 27 05:29:15 user01 atd[13609]: Starting job 2 (a0000201bea4a9) for user>
Aug 27 05:29:15 user01 atd[13609]: pam_unix(atd:session): session opened fo>
Aug 27 05:29:15 user01 atd[13609]: pam_unix(atd:session): session closed fo>
Aug 27 05:29:34 user01 systemd[1]: Stopping Deferred execution scheduler...
Aug 27 05:29:34 user01 systemd[1]: atd.service: Deactivated successfully.
Aug 27 05:29:34 user01 systemd[1]: Stopped Deferred execution scheduler.
# 시스템 부팅 시에 자동으로 시작되는 서비스 리스트
**$ sudo systemctl list-unit-files --state=enabled**
UNIT FILE STATE PRESET
atd.service enabled enabled
...
# 재부팅시 시작되지 않도록 설정을 바꿈
**$ sudo systemctl disable atd**
Removed "/etc/systemd/system/multi-user.target.wants/atd.service".
# 재부팅시 시작되도록 설정함
# 즉시 시작되지 않고 다음 부팅 시에 시작됨
**$ sudo systemctl enable atd**
Created symlink /etc/systemd/system/multi-user.target.wants/atd.service → /usr/lib/systemd/system/atd.service.
# 이러면 즉시 시작되고, 재부팅 시에도 시작되도록 설정
**$ sudo systemctl enable --now atd**sudo systemctl restart
: 시스템을 완전히 껐다 켬
sudo systemctl reload
: 시스템을 중지하지 않고 설정파일만 다시 읽어옴
둘 다 조심히 써야 함!
sudo systemctl start : 즉시 시작
sudo systemctl enable : 다음 부팅 시 시작
로그 관리
로그
: 시스템에서 일어나는 이벤트의 기록
- 운영적 측면
- 보안적 측면
로그 아키텍처
로그 관리 데몬
시간에 따라 발전해옴
syslog → rsyslog → systemd-journald
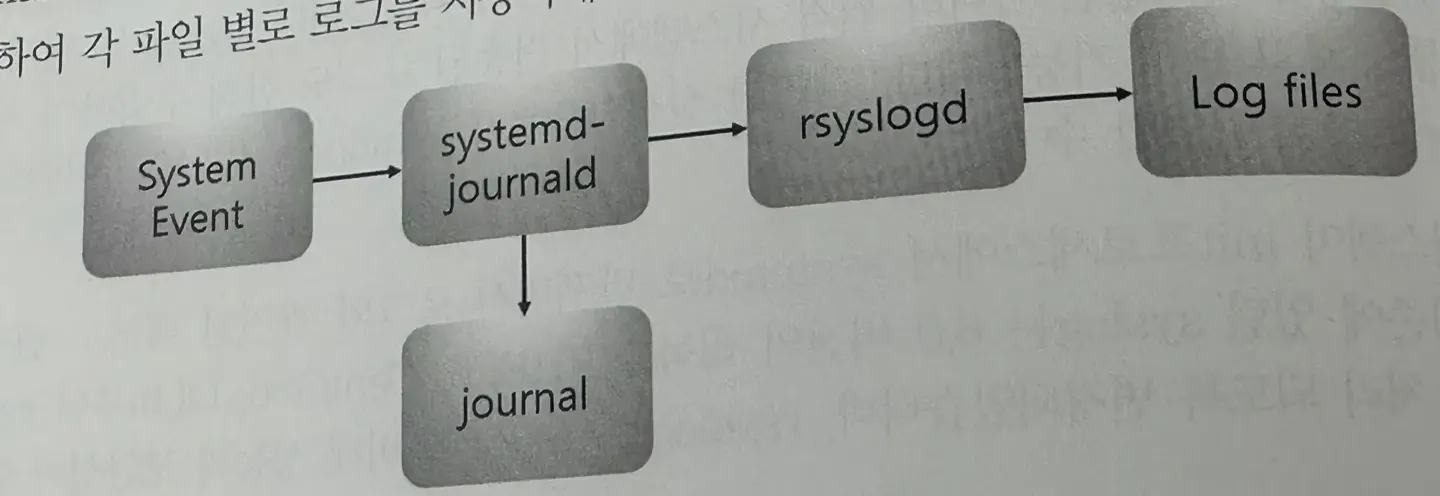
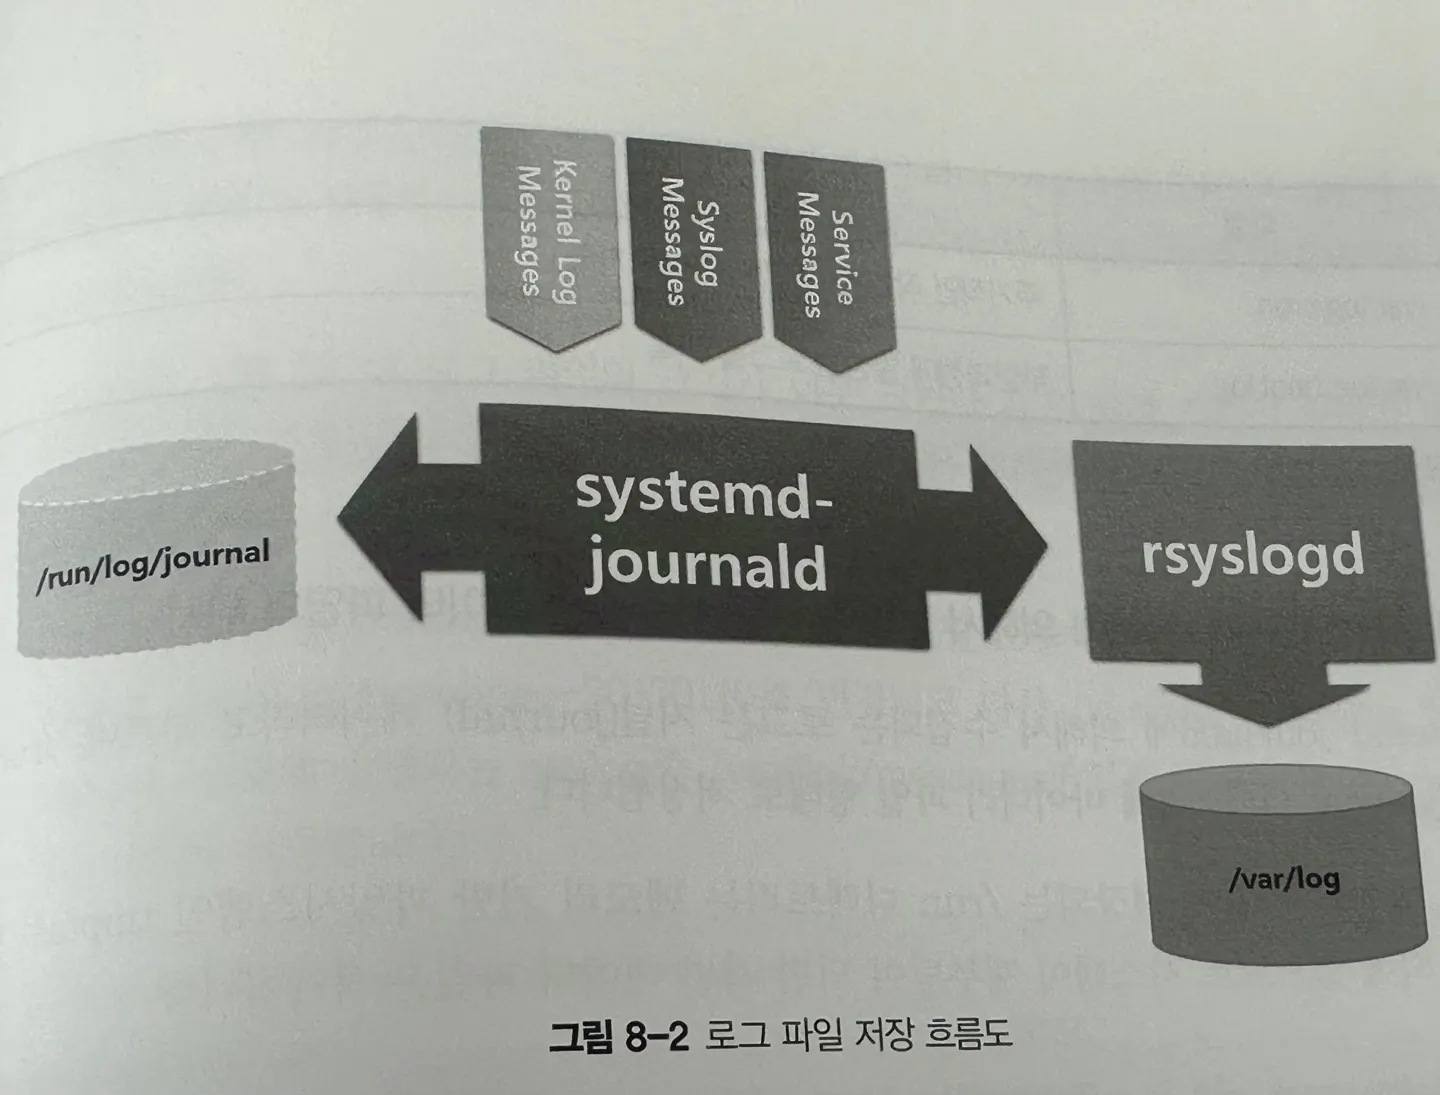
systemd 시스템에서 로그는 rsyslogd와 systemd-journald 두 데몬에 의해서 관리됨
시스템에서 이벤트가 발생하면 모두 systemd-journald 로 전달됨
systemd-journald 는 부팅이 시작되는 순간부터 로그를 수집
이후에 rsyslogd 로 syslog 를 전달하여 각 파일 별로 로그를 저장함
로그 파일 위치
**$ sudo ls /run/log/journal/**
7be5dcf743904b3aa84ec2e5bf7e86ce  ed7122a721af4f4f8cd890e86b5579ce

# 각 파일에 로그에 저장됨
**$ ls /var/log**
anaconda           chrony           firewalld   private  sssd
audit              cron             hawkey.log  README   tallylog
boot.log           dnf.librepo.log  lastlog     samba    tuned
boot.log-20250827  dnf.log          maillog     secure   wtmp
btmp               dnf.rpm.log      messages    spooler
# 에러 로그 확인 가능
# 리눅스는 에러 메세지 친절하게 잘 안띄워주므로 여기서 확인하는 게 좋음
$ sudo tail -n 5 /var/log/messages
Aug 27 06:17:12 user01 systemd[1]: Stopping User Runtime Directory /run/user/0...
Aug 27 06:17:12 user01 systemd[1]: run-user-0.mount: Deactivated successfully.
Aug 27 06:17:12 user01 systemd[1]: user-runtime-dir@0.service: Deactivated successfully.
Aug 27 06:17:12 user01 systemd[1]: Stopped User Runtime Directory /run/user/0.
Aug 27 06:17:12 user01 systemd[1]: Removed slice User Slice of UID 0.
# 인증 관련 로그 저장
$ sudo tail -n 5 /var/log/secure
Aug 27 06:16:02 user01 systemd[15032]: pam_unix(systemd-user:session): session opened for user root(uid=0) by root(uid=0)
Aug 27 06:17:01 user01 systemd[15057]: pam_unix(systemd-user:session): session opened for user root(uid=0) by root(uid=0)
Aug 27 06:17:28 user01 sudo[15077]: vagrant : TTY=pts/0 ; PWD=/home/vagrant ; USER=root ; COMMAND=/bin/tail -n 5 /var/log/messages
Aug 27 06:17:28 user01 sudo[15077]: pam_unix(sudo:session): session opened for user root(uid=0) by vagrant(uid=1000)
Aug 27 06:17:28 user01 sudo[15077]: pam_unix(sudo:session): session closed for user rootsystem-journald
- 바이너리 파일 형태로 저장
로그 파일의 순환
지정된 로그 파일에 계속해서 로그를 저장하게 되면, 로그 파일의 크기가 과도하게 커질 수 있음
로그 파일의 크기가 커지지 않도록 제한할 필요가 있음
로그 파일이 생성된 후 일정 기간이 지나거나 로그 파일의 크기가 일정 크기에 도달할 경우에 로그 파일을 백업하고, 새롭게 로그 파일을 생성하여 새롭게 로그를 저장하도록 해야 함
백업된 파일도 일정 기간이 지나거나, 개수가 많아질 경우 삭제하도록 설정해야 함
로그 파일의 순환 과정은
logrotate유틸리티를 사용
→ 사용자가 수동으로 실행 x, cron 작업에 의해 하루에 한 번씩 실행되도록 등록돼있음
/etc/logrotate.conf 파일을 사용해 logrotate 설정 가능
**$ cat /etc/logrotate.conf**
# see "man logrotate" for details

# global options do not affect preceding include directives

# rotate log files weekly
weekly

# keep 4 weeks worth of backlogs
rotate 4

# create new (empty) log files after rotating old ones
create

# use date as a suffix of the rotated file
dateext

# uncomment this if you want your log files compressed
#compress

# packages drop log rotation information into this directory
include /etc/logrotate.d

# system-specific logs may be also be configured here.
dd
**$ ll /var/log/testlog/testlog.log**
-rw-r--r--. 1 root root 0 Aug 27 06:26 /var/log/testlog/testlog.log
**$ sudo dd if=/dev/zero of=/var/log/testlog/testlog.log bs=512 count=10**
10+0 records in
10+0 records out
5120 bytes (5.1 kB, 5.0 KiB) copied, 0.000693696 s, 7.4 MB/s
**$ ll /var/log/testlog/testlog.log**
-rw-r--r--. 1 root root 5120 Aug 27 06:33 /var/log/testlog/testlog.log
$ cat /var/log/testlog/testlog.log
**$ ls -lh /var/log/testlog/testlog.log**
-rw-r--r--. 1 root root **5.0K** Aug 27 06:33 /var/log/testlog/testlog.log**# testlog 로그** 순환 파일 설정
**$ sudo vi /etc/logrotate.d/testlog**
**$ sudo cat /etc/logrotate.d/testlog**
/var/log/testlog/testlog.log {
size=3k
create 600 root root
rotate 3
nodateext
}# 수동으로 로테이트 돌려줌
**$ sudo logrotate -s /var/lib/logrotate/logrotate.status /etc/logrotate.conf**
# 3k 크기 초과되었으므로 새 파일 생성됨
**$ ls -lh /var/log/testlog/**
total 8.0K
-rw-------. 1 root root 0 Aug 27 06:41 testlog.log
**-rw-r--r--. 1 root root 5.0K Aug 27 06:33 testlog.log.1**
# 또 로그 파일 꽉 채우기
**$ sudo dd if=/dev/zero of=/var/log/testlog/testlog.log bs=512 count=10**
10+0 records in
10+0 records out
5120 bytes (5.1 kB, 5.0 KiB) copied, 0.000278085 s, 18.4 MB/s
# 또 로테이트 수동으로
**$ sudo logrotate -s /var/lib/logrotate/logrotate.status /etc/logrotate.conf**
# 하나 더 추가됐음
**$ ls -lh /var/log/testlog/**
total 16K
-rw-------. 1 root root 0 Aug 27 06:44 testlog.log
-rw-------. 1 root root 5.0K Aug 27 06:43 testlog.log.1
-rw-r--r--. 1 root root 5.0K Aug 27 06:33 testlog.log.2
# 또 채우고 수동으로 로테이트 돌리고 하나 더 추가됐음을 확인 가능
$ sudo dd if=/dev/zero of=/var/log/testlog/testlog.log bs=512 count=10
10+0 records in
10+0 records out
5120 bytes (5.1 kB, 5.0 KiB) copied, 0.000917851 s, 5.6 MB/s
$ sudo logrotate -s /var/lib/logrotate/logrotate.status /etc/logrotate.conf
$ ls -lh /var/log/testlog/
total 24K
-rw-------. 1 root root 0 Aug 27 06:44 testlog.log
-rw-------. 1 root root 5.0K Aug 27 06:44 testlog.log.1
-rw-------. 1 root root 5.0K Aug 27 06:43 testlog.log.2
-rw-r--r--. 1 root root 5.0K Aug 27 **06:33** testlog.log.3
# 로테이트의 최대 개수? 를 3으로 설정했으므로 최대 3개까지만 생성
# 한 번 더 하면 제일 오래 전 것이 삭제되고 생성
**$ sudo dd if=/dev/zero of=/var/log/testlog/testlog.log bs=512 count=10**
10+0 records in
10+0 records out
5120 bytes (5.1 kB, 5.0 KiB) copied, 0.00127523 s, 4.0 MB/s
**$ sudo logrotate -s /var/lib/logrotate/logrotate.status /etc/logrotate.conf**
**$ ls -lh /var/log/testlog/**
total 24K
-rw-------. 1 root root 0 Aug 27 06:44 testlog.log
-rw-------. 1 root root 5.0K Aug 27 06:44 testlog.log.1
-rw-------. 1 root root 5.0K Aug 27 06:44 testlog.log.2
-rw-------. 1 root root 5.0K Aug 27 06:43 testlog.log.3/etc/rsyslog.conf
해당 파일의 룰 부분에는 rsyslogd 에 의해 전달되는 로그의 규칙들이 정의되어 있음
**$ vi /etc/rsyslog.conf**
...
#### RULES ####

# Log all kernel messages to the console.
# Logging much else clutters up the screen.
#kern.*                                                 /dev/console

# Log anything (except mail) of level info or higher.
# Don't log private authentication messages!
<--필터 (기능, 우선순위)-->                              <--행동(action)-->
*.info;mail.none;authpriv.none;cron.none                /var/log/messages

# The authpriv file has restricted access.
authpriv.*                                              /var/log/secure

# Log all the mail messages in one place.
mail.*                                                  -/var/log/maillog

# Log cron stuff
cron.*                                                  /var/log/cron

# Everybody gets emergency messages
*.emerg                                                 :omusrmsg:*

# Save news errors of level crit and higher in a special file.
uucp,news.crit                                          /var/log/spooler

# Save boot messages also to boot.log
local7.*                                                /var/log/boot.log
...
행동
-
로그 파일에 저장
-
사용자에게 전달
-
원격 호스트로 전송
*.info @192.168.56.1
-
폐기
local 틸드
system-journald
: 부팅이 시작할 때부터 발생하는 모든 이벤트를 수집해서 구조화된 바이너리 형태의 저널 데이터로 저장
- 저널 데이터는 /run/log/journal 에 위치하고 있으므로 시스템이 재부팅되면 저널 데이터는 삭제됨 → tmpfs(메모리 기반 파일시스템) → 그러므로 저널 데이터를 영구적으로 보관하기 위해서는 별도의 설정이 필요
# 다 보여줌
**$ sudo journalctl**
Aug 27 00:05:28 localhost kernel: Linux version 5.14.0-503.33.1.el9_5.x86_6>
Aug 27 00:05:28 localhost kernel: The list of certified hardware and cloud >
Aug 27 00:05:28 localhost kernel: Command line: BOOT_IMAGE=(hd0,gpt2)/vmlin>
Aug 27 00:05:28 localhost kernel: BIOS-provided physical RAM map:
Aug 27 00:05:28 localhost kernel: BIOS-e820: [mem 0x0000000000000000-0x0000>
Aug 27 00:05:28 localhost kernel: BIOS-e820: [mem 0x0000000000100000-0x0000>
Aug 27 00:05:28 localhost kernel: BIOS-e820: [mem 0x000000007dea2000-0x0000>
Aug 27 00:05:28 localhost kernel: BIOS-e820: [mem 0x000000007dfb6000-0x0000>
Aug 27 00:05:28 localhost kernel: BIOS-e820: [mem 0x000000007eaed000-0x0000>
Aug 27 00:05:28 localhost kernel: BIOS-e820: [mem 0x000000007ed6d000-0x0000>
Aug 27 00:05:28 localhost kernel: BIOS-e820: [mem 0x000000007ed7f000-0x0000
...

# 최근 로그를 개수만큼 볼 수 있음(기본: 10)
**$ sudo journalctl -n**
Aug 27 07:28:12 user01 systemd[1]: user@0.service: Deactivated successfully.
Aug 27 07:28:12 user01 systemd[1]: Stopped User Manager for UID 0.
Aug 27 07:28:12 user01 systemd[1]: Stopping User Runtime Directory /run/use>
Aug 27 07:28:12 user01 systemd[1]: run-user-0.mount: Deactivated successful>
Aug 27 07:28:12 user01 systemd[1]: user-runtime-dir@0.service: Deactivated >
Aug 27 07:28:12 user01 systemd[1]: Stopped User Runtime Directory /run/user>
Aug 27 07:28:12 user01 systemd[1]: Removed slice User Slice of UID 0.
Aug 27 07:28:14 user01 sudo[17109]: pam_unix(sudo:session): session closed >
Aug 27 07:28:47 user01 sudo[17114]:  vagrant : TTY=pts/0 ; PWD=/home/vagran>
Aug 27 07:28:47 user01 sudo[17114]: pam_unix(sudo:session): session opened >

# 디버깅할 때 실시간으로 로그 체크 가능
**$ sudo journalctl -f**
# systemd 유닛 지정 옵션
**$ sudo journalctl -u sshd**
Aug 27 00:05:32 user01 systemd[1]: Starting OpenSSH server daemon...
Aug 27 00:05:32 user01 sshd[685]: Server listening on 0.0.0.0 port 22.
Aug 27 00:05:32 user01 sshd[685]: Server listening on :: port 22.
Aug 27 00:05:32 user01 systemd[1]: Started OpenSSH server daemon.
Aug 27 00:05:42 user01 sshd[999]: Accepted publickey for vagrant from 10.0.>
Aug 27 00:05:42 user01 sshd[999]: pam_unix(sshd:session): session opened fo>
Aug 27 00:05:55 user01 sshd[1920]: Connection reset by 10.0.2.2 port 58885 >
Aug 27 00:06:05 user01 sshd[3349]: Accepted publickey for vagrant from 10.0>
Aug 27 00:06:05 user01 sshd[3349]: pam_unix(sshd:session): session opened f>
lines 1-9/9 (END)