Canvas api
에브리 타임 클론 코딩 중에 시간표를 구현할 필요가 생겨서 react의 Canvas api를 사용하였다.
시간표 구현 위한 dataset
- 아직 Database를 연결하지 않아서 data는 jsx파일로 하여서 만들었다.
export const TimetableData = [
    { id: 1, subject: "Mathematics", professor: "Prof. Kim", day: "Mon", startTime: "09:00", endTime: "10:00", location: "Room 101", color: "rgb(240, 220, 220)" },
    { id: 2, subject: "Physics", professor: "Prof. Lee", day: "Tue", startTime: "10:00", endTime: "11:00", location: "Room 102", color: "rgb(220, 240, 220)" },
    { id: 3, subject: "Chemistry", professor: "Prof. Park", day: "Wed", startTime: "11:00", endTime: "12:00", location: "Room 103", color: "rgb(220, 220, 240)" },
    { id: 4, subject: "Biology", professor: "Prof. Choi", day: "Thu", startTime: "12:00", endTime: "13:00", location: "Room 104", color: "rgb(240, 240, 220)" },
    { id: 5, subject: "Computer Science", professor: "Prof. Jung", day: "Fri", startTime: "13:00", endTime: "14:00", location: "Room 105", color: "rgb(220, 240, 240)" },
    { id: 6, subject: "History", professor: "Prof. Yoon", day: "Mon", startTime: "14:00", endTime: "15:00", location: "Room 106", color: "rgb(240, 220, 240)" },
    { id: 7, subject: "Geography", professor: "Prof. Kang", day: "Tue", startTime: "15:00", endTime: "16:00", location: "Room 107", color: "rgb(240, 240, 200)" },
    { id: 8, subject: "English", professor: "Prof. Hwang", day: "Wed", startTime: "16:00", endTime: "17:00", location: "Room 108", color: "rgb(200, 240, 240)" },
    { id: 9, subject: "French", professor: "Prof. Kim", day: "Thu", startTime: "17:00", endTime: "18:00", location: "Room 109", color: "rgb(240, 200, 240)" },
    { id: 10, subject: "German", professor: "Prof. Lee", day: "Fri", startTime: "09:00", endTime: "10:00", location: "Room 110", color: "rgb(220, 200, 240)" },
    { id: 11, subject: "Spanish", professor: "Prof. Park", day: "Mon", startTime: "10:00", endTime: "11:00", location: "Room 111", color: "rgb(200, 240, 200)" },
    { id: 12, subject: "Philosophy", professor: "Prof. Choi", day: "Tue", startTime: "11:00", endTime: "12:00", location: "Room 112", color: "rgb(240, 220, 200)" },
    { id: 13, subject: "Psychology", professor: "Prof. Jung", day: "Wed", startTime: "12:00", endTime: "13:00", location: "Room 113", color: "rgb(200, 240, 220)" },
    { id: 14, subject: "Sociology", professor: "Prof. Yoon", day: "Thu", startTime: "13:00", endTime: "14:00", location: "Room 114", color: "rgb(240, 220, 240)" },
    { id: 15, subject: "Economics", professor: "Prof. Kang", day: "Fri", startTime: "14:00", endTime: "15:00", location: "Room 115", color: "rgb(220, 240, 220)" },
    { id: 16, subject: "Political Science", professor: "Prof. Hwang", day: "Mon", startTime: "15:00", endTime: "16:00", location: "Room 116", color: "rgb(200, 240, 240)" },
    { id: 17, subject: "Law", professor: "Prof. Kim", day: "Tue", startTime: "16:00", endTime: "17:00", location: "Room 117", color: "rgb(240, 200, 220)" },
    { id: 18, subject: "Medicine", professor: "Prof. Lee", day: "Wed", startTime: "17:00", endTime: "18:00", location: "Room 118", color: "rgb(220, 240, 200)" },
    { id: 19, subject: "Nursing", professor: "Prof. Park", day: "Thu", startTime: "09:00", endTime: "10:00", location: "Room 119", color: "rgb(240, 240, 240)" },
    { id: 20, subject: "Dentistry", professor: "Prof. Choi", day: "Fri", startTime: "10:00", endTime: "11:00", location: "Room 120", color: "rgb(200, 220, 240)" },
    { id: 21, subject: "Pharmacy", professor: "Prof. Jung", day: "Mon", startTime: "11:00", endTime: "12:00", location: "Room 121", color: "rgb(240, 200, 200)" },
    { id: 22, subject: "Public Health", professor: "Prof. Yoon", day: "Tue", startTime: "12:00", endTime: "13:00", location: "Room 122", color: "rgb(220, 240, 240)" },
    { id: 23, subject: "Veterinary Medicine", professor: "Prof. Kang", day: "Wed", startTime: "13:00", endTime: "14:00", location: "Room 123", color: "rgb(240, 240, 200)" },
    { id: 24, subject: "Agriculture", professor: "Prof. Hwang", day: "Thu", startTime: "14:00", endTime: "15:00", location: "Room 124", color: "rgb(200, 240, 220)" },
    { id: 25, subject: "Forestry", professor: "Prof. Kim", day: "Fri", startTime: "15:00", endTime: "16:00", location: "Room 125", color: "rgb(220, 240, 220)" },
    { id: 26, subject: "Fisheries", professor: "Prof. Lee", day: "Mon", startTime: "16:00", endTime: "17:00", location: "Room 126", color: "rgb(240, 200, 240)" },
    { id: 27, subject: "Home Economics", professor: "Prof. Park", day: "Tue", startTime: "17:00", endTime: "18:00", location: "Room 127", color: "rgb(200, 240, 220)" },
    { id: 28, subject: "Physical Education", professor: "Prof. Choi", day: "Wed", startTime: "09:00", endTime: "10:00", location: "Room 128", color: "rgb(240, 240, 220)" },
    { id: 29, subject: "Art", professor: "Prof. Jung", day: "Thu", startTime: "10:00", endTime: "11:00", location: "Room 129", color: "rgb(240, 220, 240)" },
    { id: 30, subject: "Music", professor: "Prof. Yoon", day: "Fri", startTime: "11:00", endTime: "12:00", location: "Room 130", color: "rgb(240, 240, 200)" }
  ];
구현 코드
함수 및 state, hook과 같은 기능 부분
  const headerCanvasRef = useRef(null); // header 캔버스에 대한 참조
  const bodyCanvasRef = useRef(null); // body 캔버스에 대한 참조
  const [data, setData] = useState(initialdata);
  const [hoveredEntry, setHoveredEntry] = useState(null); //hover된 시간표 값 저장
  const [editingEntry, setEditingEntry] = useState(null); // edit할 시간표 값 저장
  const [addEntry, setaddEntry] = useState(false); // 저장되었는지 아닌지 판별
  const [isAdddivHovered, setIsAdddivHovered] = useState(false);
  const [dimensions, setDimensions] = useState({ cellWidth: 0, cellHeight: 0 });
// cellwidth를 useEffect안에서 지정하였으므로 dimension상태 안에 cell width를 저장- useRef를 통해 canvas의 dom에 직접 접근 하기 위한 준비를 하였다
- 코드의 최적화가 필요하지만 일단 기능적인 부분을 보자.
  useEffect(() => {

    const headerCanvas = headerCanvasRef.current;
    const bodyCanvas = bodyCanvasRef.current;
    const headerCtx = headerCanvas.getContext("2d");
    const bodyCtx = bodyCanvas.getContext("2d");
    // 바디 캔버스 DOM 요소를 가리키며 2D 렌더링 컨텍스트를 Ctx에 지정


    // Set canvas dimensions (전체 캔버스 크기 설정)
    headerCanvas.width = 1300; // header 캔버스 너비 설정
    headerCanvas.height = 50; // header 캔버스 높이 설정
    bodyCanvas.width = 1300; // body 캔버스 너비 설정
    bodyCanvas.height = 1200; // body 캔버스 높이 설정

    // Define constants
    const hours = [
      "09:00 ~ 10:00",
      "10:00 ~ 11:00",
      "11:00 ~ 12:00",
      "12:00 ~ 13:00",
      "13:00 ~ 14:00",
      "14:00 ~ 15:00",
      "15:00 ~ 16:00",
      "16:00 ~ 17:00",
      "17:00 ~ 18:00",
      "18:00 ~ 19:00",
      "19:00 ~ 20:00",
      "20:00 ~ 21:00",
      "21:00 ~ 22:00",
    ]; // 시간대를 나타내는 배열

    const hoursword = [
      "오전 9시",
      "오전 10시",
      "오전 11시",
      "오전 12시",
      "오후 1시",
      "오후 2시",
      "오후 3시",
      "오후 4시",
      "오후 5시",
      "오후 6시",
      "오후 7시",
      "오후 8시",
      "오후 9시",
      "오후 10시",
    ]; // 실제 표기 될 배열
    const days = ["Mon", "Tue", "Wed", "Thu", "Fri"]; // 요일을 나타내는 배열
    const headerHeight = 50; // 헤더 셀의 높이
    const firstColumnWidth = 100; // 첫 번째 열의 너비
    const cellWidth = (headerCanvas.width - firstColumnWidth) / days.length; // 나머지 셀의 너비 계산
    const cellHeight = (bodyCanvas.height - headerHeight) / hours.length; // 셀의 높이 계산
    setDimensions({ cellWidth, cellHeight }); // 셀 크기를 상태로 설정

    // 바디 그리기
    bodyCtx.strokeStyle = "#ddd"; //바디 보더 색상
    for (let i = 0; i <= days.length; i++) {
      // 날짜별로 반복되며 선을 그리기 위한 것
      bodyCtx.moveTo(firstColumnWidth + i * cellWidth, 0);
      //그리기 커서를 매일 수직선의 시작점으로 이동, x 좌표는 첫 번째 열의 너비와 각 후속 열의 너비를 더해 계산됨

      bodyCtx.lineTo(firstColumnWidth + i * cellWidth, bodyCanvas.height);
      //본문 캔버스 하단까지 수직선 그림
    }
    for (let i = 0; i <= hours.length; i++) {
      //시간별로 마다 반복되며 선을 그리기 위해 한 번의 추가 반복이 추가 됨
      bodyCtx.moveTo(0, i * cellHeight + headerHeight);
      bodyCtx.lineTo(bodyCanvas.width, i * cellHeight + headerHeight);
    }
    bodyCtx.stroke(); // 실제로 캔버스에 모든 선 그림

    bodyCtx.fillStyle = "#666"; // 바디 텍스트 색상
    bodyCtx.font = "14px Apple SD Gothic Neo"; // 바디 텍스트 폰트와 크기
    for (let i = 0; i < hours.length; i++) {
      bodyCtx.fillText(hoursword[i], 20, i * cellHeight + headerHeight + 50); // 시간 텍스트 그리기
    }

    // Draw headers
    headerCtx.fillStyle = "#f8f8f8"; // 헤더 배경 색상
    headerCtx.fillRect(0, 0, headerCanvas.width, headerHeight); // 헤더 배경 그리기
    headerCtx.strokeStyle = "#ddd"; // 헤더 보더 색상
    headerCtx.strokeRect(0, 0, headerCanvas.width, headerHeight); // 첫번째 행 헤더 보더 그리기
    //ctx.fillRect(0, 0, cellWidth, canvas.height); // 첫번째 열 헤더 배경 그리기
    headerCtx.fillStyle = "#666"; // 헤더 텍스트 색상
    headerCtx.font = " 14px Apple SD Gothic Neo"; // 헤더 텍스트 폰트와 크기

    for (let i = 0; i < days.length; i++) {
      headerCtx.fillText(
        days[i],
        firstColumnWidth + i * cellWidth + cellWidth / 2 - 20,
        30
      );
      //header 부분에 날짜 이름을 그리는 것
      //x축의 firstColumnWidth + i * cellWidth + cellWidth / 2 - 20, y축의 30에 위치
      // 해당 열의 요일 이름을 중앙에 배치

      // header부분과 body부분이 같은 수직 경계선 가지도록 그려주는 것
      headerCtx.beginPath(); //그리기 위한 새경로 시작
      headerCtx.moveTo(firstColumnWidth + i * cellWidth, 0);
      // 그리기 커서를 수직선의 시작점으로 이동
      //x 좌표는 첫 번째 열의 너비와 각 후속 열의 너비를 더해 계산
      //y좌표는 헤더의 상단인 '0'
      headerCtx.lineTo(firstColumnWidth + i * cellWidth, headerHeight);
      //헤더 하단까지의 수직선
      headerCtx.stroke(); //실제로 캔버스에 선을 그림
    } // 헤더 텍스트 위치 조정
    // 요일 텍스트 그리기

    // 여기까지가 이제 data를 안에 넣기 전 틀을 그려놓은 것


    // Draw timetable data (시간표 데이터 그리기)
    data.forEach((entry) => {
      const dayIndex = days.indexOf(entry.day);
      const startTimeIndex = hours.findIndex((h) =>
        h.startsWith(entry.startTime)
      );
      const endTimeIndex = hours.findIndex((h) => h.endsWith(entry.endTime));
      if (dayIndex !== -1 && startTimeIndex !== -1 && endTimeIndex !== -1) {
        const x = firstColumnWidth + dayIndex * cellWidth;
        const y = startTimeIndex * cellHeight + headerHeight + 0.6; // 수정된 y 계산
        const entryHeight = (endTimeIndex - startTimeIndex + 1) * cellHeight; // +1을 추가하여 마지막 시간도 포함
        bodyCtx.fillStyle = entry.color; // 셀 배경 색상
        bodyCtx.fillRect(x, y, cellWidth, entryHeight);
        bodyCtx.strokeStyle = "#ddd"; // 셀 보더 색상
        bodyCtx.strokeRect(x, y, cellWidth, entryHeight); // 셀 보더 그리기

        bodyCtx.font = "14px Arial"; // 본문 텍스트 폰트와 크기
        bodyCtx.fillStyle = "#000"; // 본문 텍스트 색상
        bodyCtx.fillText(entry.subject, x + 10, y + 20); // 본문 텍스트 위치 조정
        bodyCtx.fillText(entry.professor, x + 10, y + 40); // 본문 텍스트 위치 조정
        bodyCtx.fillText(entry.location, x + 10, y + 60); // 본문 텍스트 위치 조정
      }
    });

    const handleMouseMove = (e) => {
      // 시간표에 호버된 항목에 대한 값을 가지는 것
      // 이것 기반으로 edit
      if (addEntry && isAdddivHovered) {
        //새로 추가하기 하면 addEntry true, isAdddivHovered도 hover해서 위에 있으니까 true되서 hovered값 판별 못하여서 값이 있는 시간표를 호버해도 hoveredEntry가 안보인다.
        // 그런데 저장 버튼을 누르면 addEntry가 false가 되므로 여기 부분 false되서 다시 hovered값 판별하고 isAdddivHovered 도 false가 됨
        // 여기 부분 때문에 맨처음에 저장한 뒤에 hoveredEntry가 null이 되서 수정 삭제가 hover해도 안되었다.

        return;
        // AddModal이 열려있거나 Adddiv가 hover될 때는 아무 동작도 하지 않음
        // 새 수업 추가 부분과 시간표 부분이 겹쳐서 hover 되었을 시에
        // 수업 추가 Modal에 수정, 삭제가 동시에 나타나서 이를 해결하기 위해
      } else {
        const rect = bodyCanvas.getBoundingClientRect();
        const x = e.clientX - rect.left;
        const y = e.clientY - rect.top;

        const hovered = data.find((entry) => {
          const dayIndex = days.indexOf(entry.day);
          const startTimeIndex = hours.findIndex((h) =>
            h.startsWith(entry.startTime)
          );
          const endTimeIndex = hours.findIndex((h) =>
            h.endsWith(entry.endTime)
          );

          if (dayIndex !== -1 && startTimeIndex !== -1 && endTimeIndex !== -1) {
            //항목의 요일과 시간이 유효하면 셀의 왼쪽 상단 위치 (cellX와 cellY)를 계산
            const cellX = firstColumnWidth + dayIndex * cellWidth;
            //첫번째 열의 위치+ 현재 요일에 해당하는 셀의 위치
            const cellY = headerHeight + startTimeIndex * cellHeight;
            //헤더 높이+ 현재 시간대에 해당하는 셀의 위치

            const entryHeight =
              (endTimeIndex - startTimeIndex + 1) * cellHeight;
            return (
              x >= cellX &&
              x <= cellX + cellWidth &&
              y >= cellY &&
              y <= cellY + entryHeight
            );
          }
          return false;
        });

        if (hovered) {
          const dayIndex = days.indexOf(hovered.day);
          const startTimeIndex = hours.findIndex((h) =>
            h.startsWith(hovered.startTime)
          );
          //호버된 항목이 있으면 셀의 hoverX와 hoverY 좌표를 다시 계산
          const hoverX = firstColumnWidth + dayIndex * cellWidth;
          //첫번째 열의 위치+ 현재 요일에 해당하는 셀의 위치
          const hoverY = headerHeight + startTimeIndex * cellHeight;
          //헤더 높이+ 현재 시간대에 해당하는 셀의 위치
          setHoveredEntry({ ...hovered, x: hoverX, y: hoverY });
        } else {
          setHoveredEntry(null);
        }
      }
    };

    bodyCanvas.addEventListener("mousemove", handleMouseMove);

    return () => {
      bodyCanvas.removeEventListener("mousemove", handleMouseMove);
    };
}, [data]);-
data.foreach 부분에서 객체 data의 각각 값을 map으로 하여 entry로 지정해서 테이블에 그리고 있는 부분이다.
-
bodyCtx.fillText 이 부분이 실질적으로 시간표에 적히는 부분이라 할 수 있다.
-
bodyCanvas.addEventListener 부분을 통해서 mousemove할때 bodyCanvas안에서 handleMouseMove 함수가 실행되게 한다.
-
그리고 지금 header,body가 나눠진 것은 각각 따로 header와 body를 각각 따로 나누어서 Canvas로 그리고 싶었기 때문이다.
jsx 부분
     <div
        style={{
          paddingLeft: "100px",
          paddingTop: "90px",
          position: "sticky",
          top: "0",
          zIndex: "100",
        }}
      >
        <canvas ref={headerCanvasRef} />
      </div>
      <div style={{ height: "1000px" }}>
        <canvas
          ref={bodyCanvasRef}
          style={{
            marginTop: "-54.5px",
            marginLeft: "100px",
            border: "1px solid #ddd",
          }}
        />
      </div>
-> header가 고정되게 하고 싶었기에 sticky로 하였다.
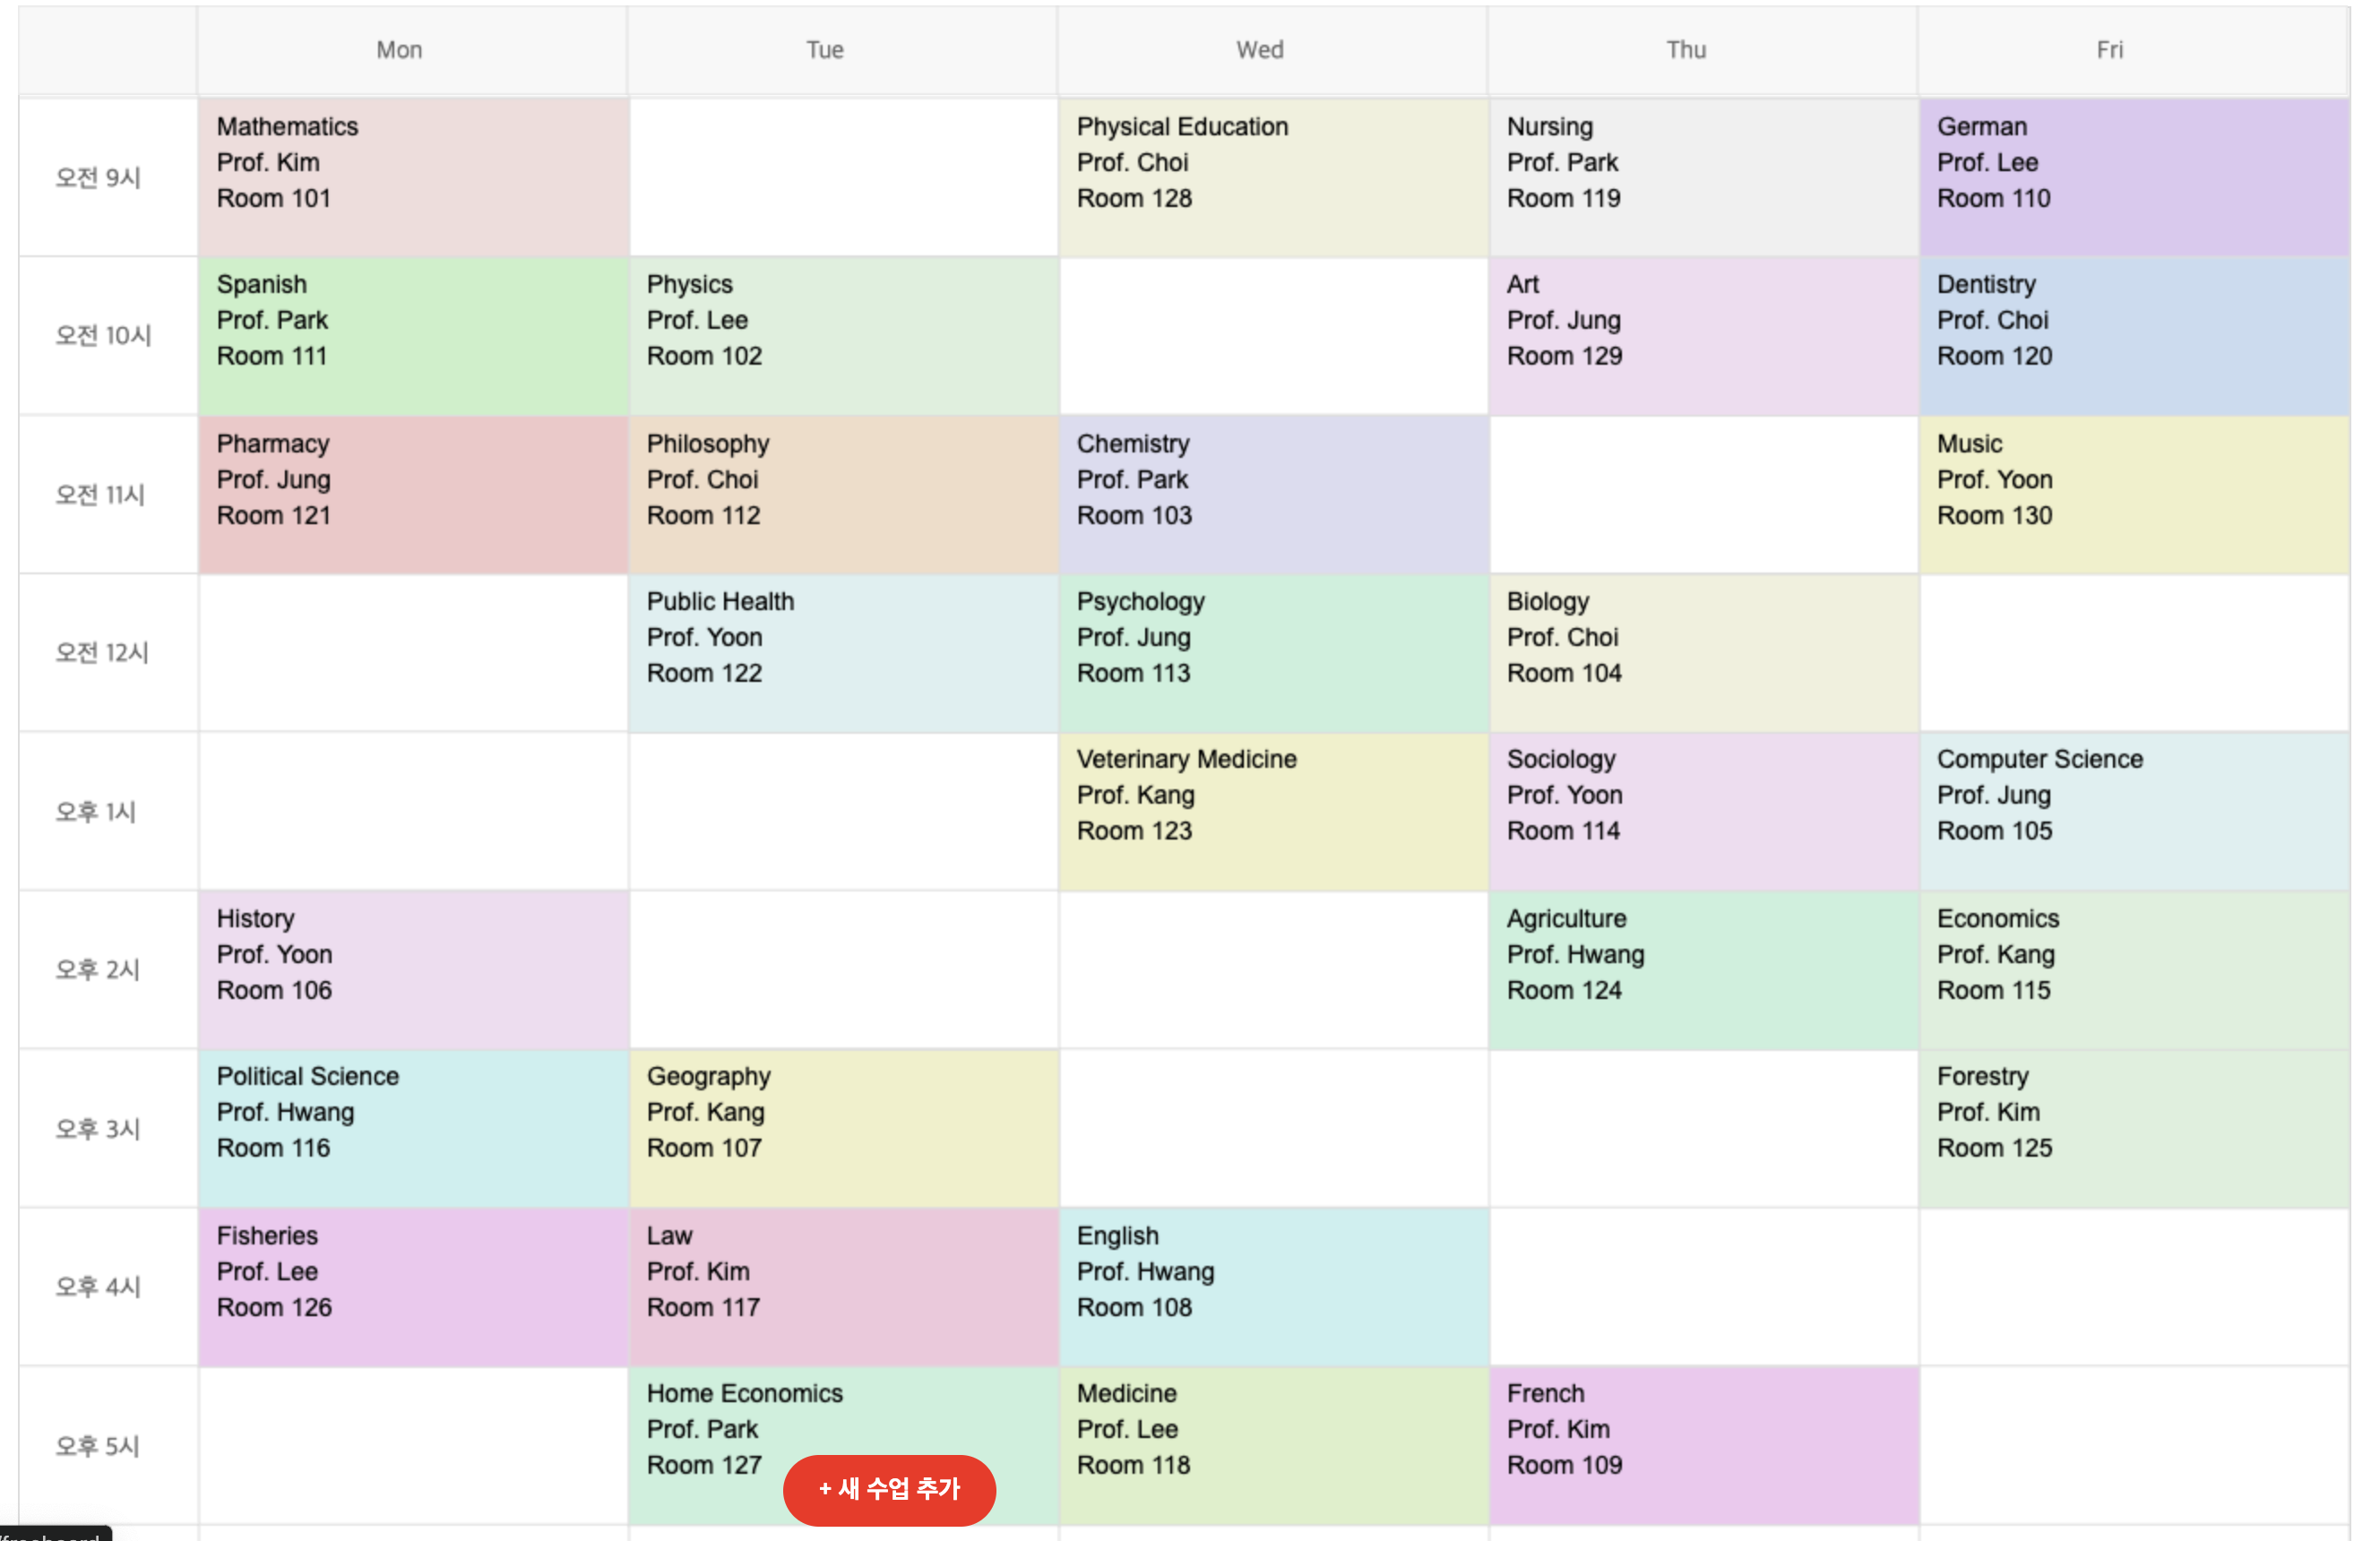
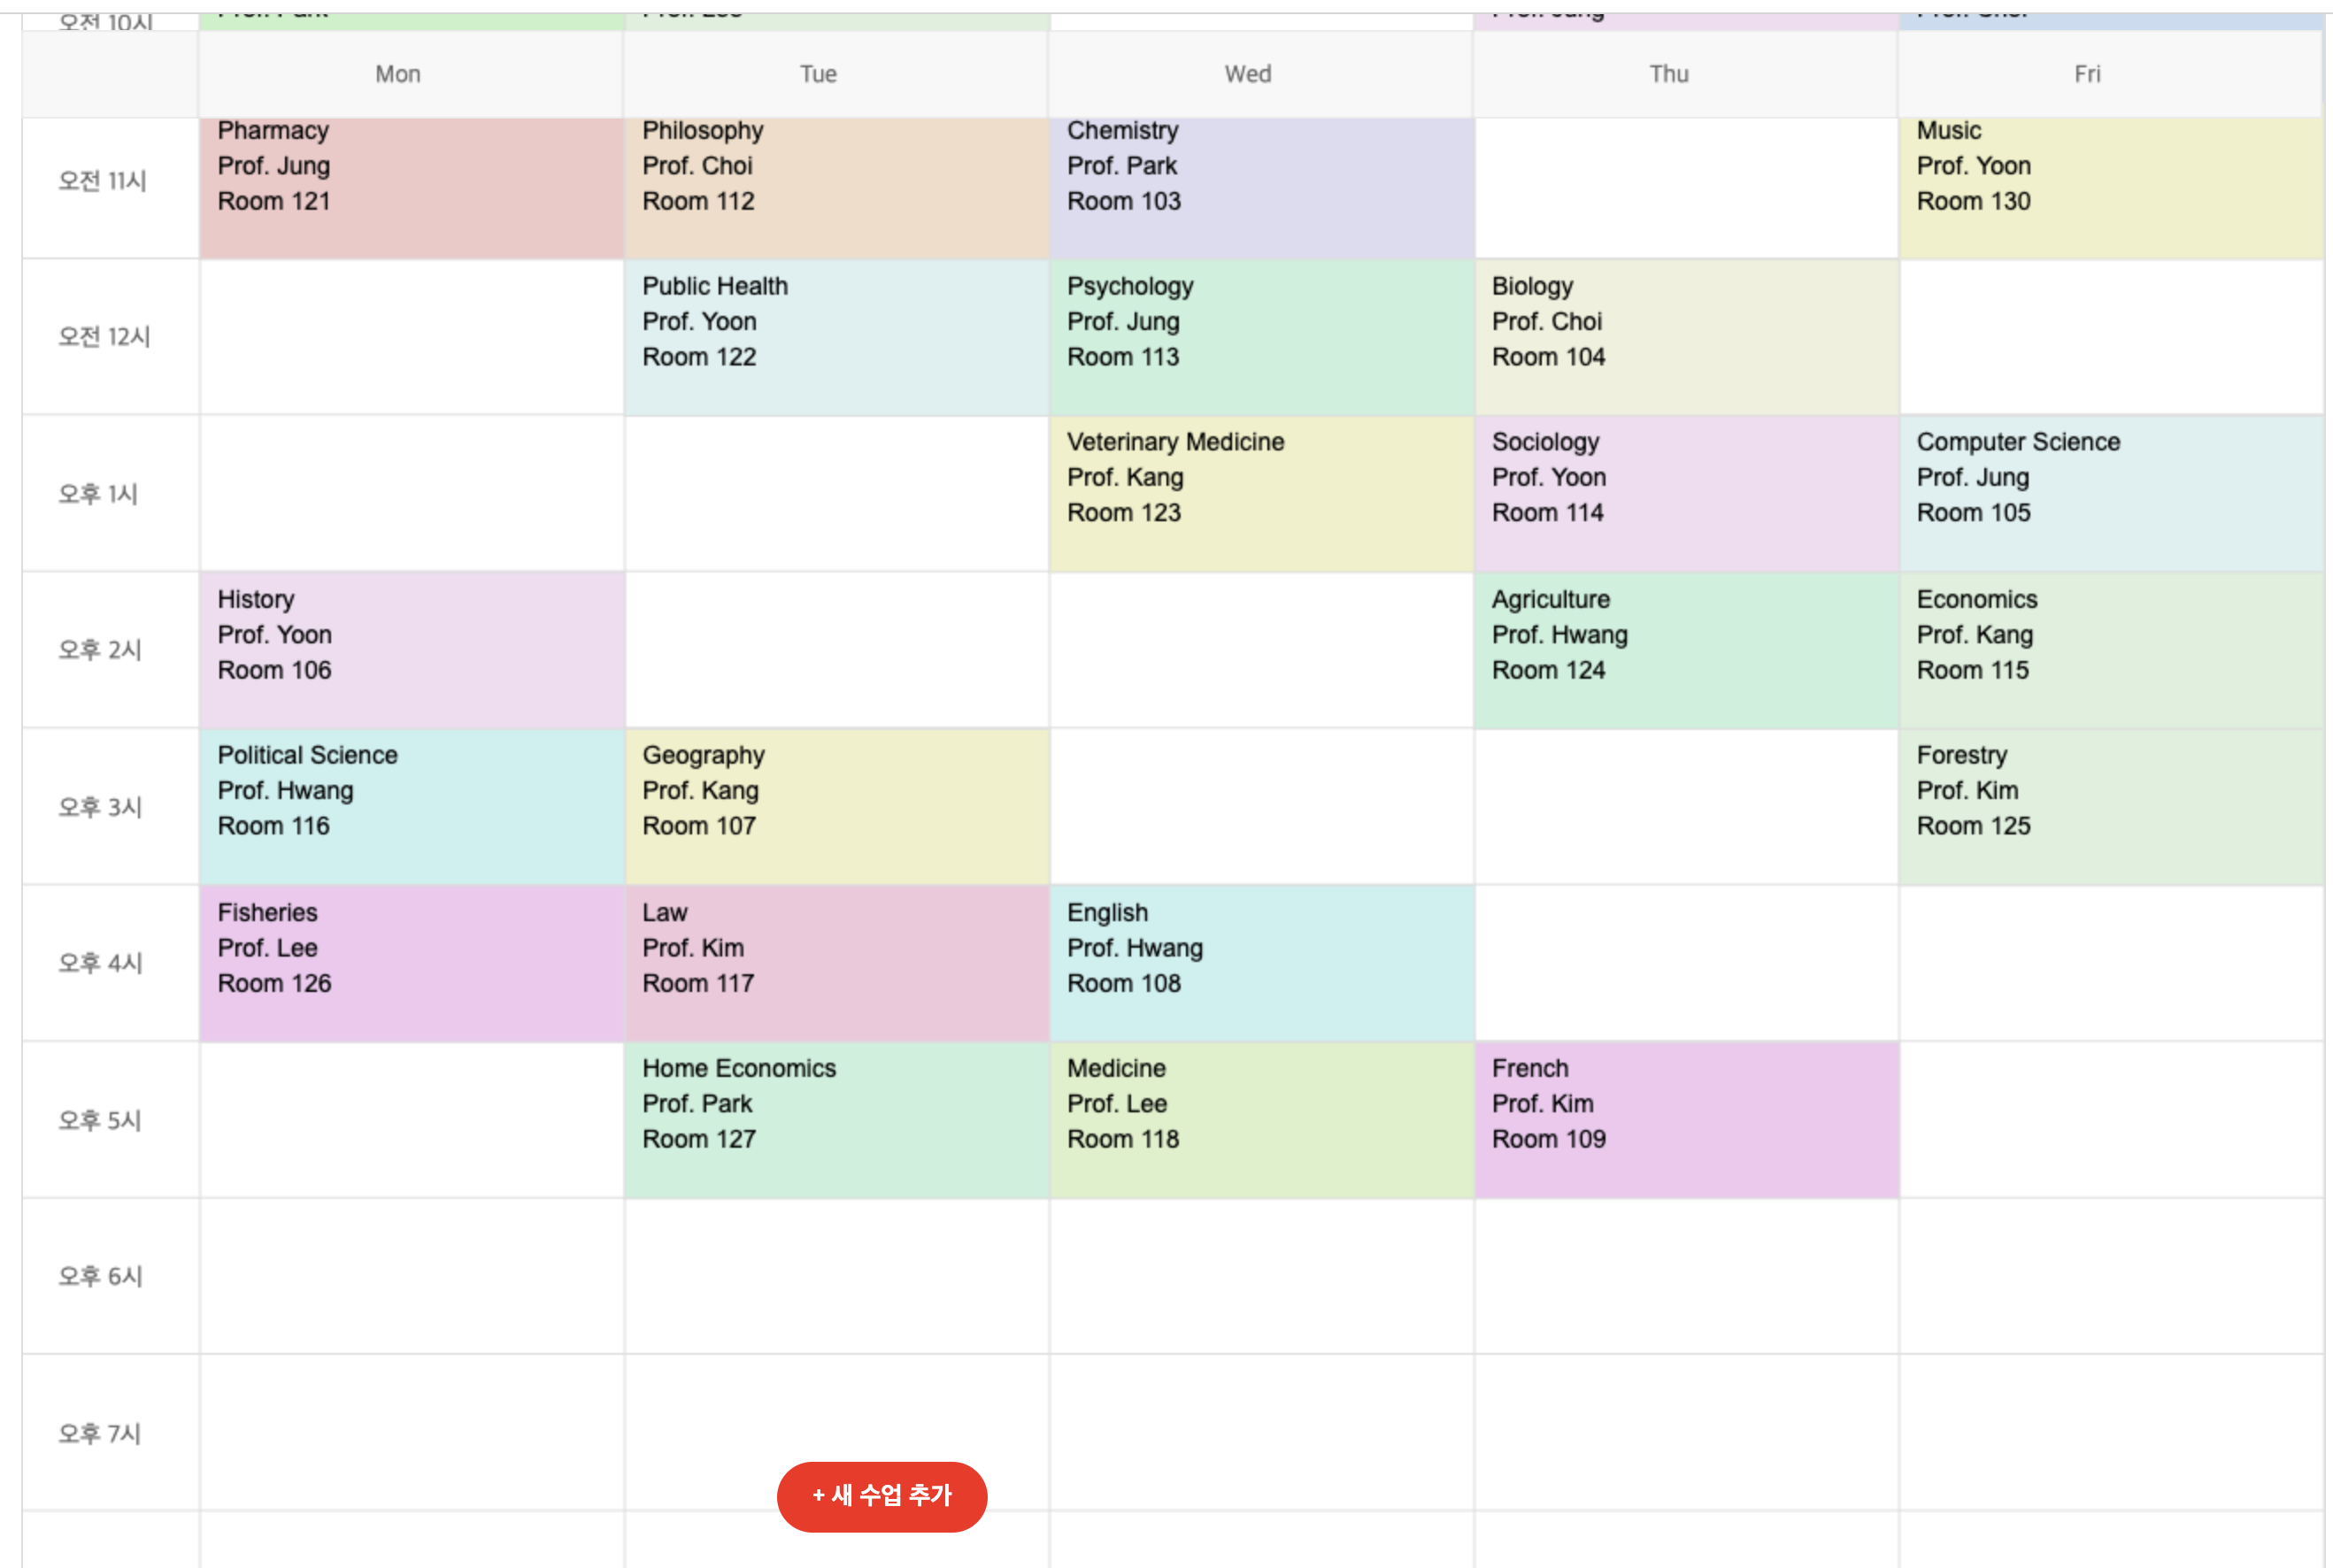
결과 화면

다른 사람들과 소통하는 개발자가 되고 싶습니다.