
01. 나열된 수에서 최솟값과 최댓값 구하기
여러 개의 수가 배열에 있을 때 그 중 가장 큰 값과 가장 작은 값을 찾는다.
배열의 몇 번째에 있는지 순서를 찾는다.
반복문을 한번만 사용하여 문제를 해결한다.
수의 예 : [10, 55, 23, 2, 79, 101, 16, 82, 30, 45]
// O(n)
public class MinMaxProblem {

	public static void main(String[] args) {

		int[] numbers = {10, 55, 23, 2, 79, 101, 16, 82, 30, 45};

		int min = numbers[0];
		int max = numbers[0];
		int minPos = 0;
		int maxPos = 0;

		for(int i=1; i<numbers.length; i++ ) {

			if(min > numbers[i]) {
				min = numbers[i];
				minPos = i+1;
			}

			if(max < numbers[i]) {
				max = numbers[i];
				maxPos = i+1;
			}
		}

		System.out.println("가장 큰 값은 " + max + "이고, 위치는 " + maxPos + "번째 입니다.");
		System.out.println("가장 작은 값은 " + min + "이고, 위치는 " + minPos + "번째 입니다.");
	}

}
02. 정렬된 수에서 하나의 수의 위치 찾기
여러 개의 수가 정렬된 순서로 있을 때 특정한 수를 찾는 방법
단순 반복문을 이용하면 수의 개수에 따라 비교 횟수가 증가하는 O(n)의 수행이 이루어짐
수가 정렬된 상태에서는 이진 탐색(binary search)을 활용하면 매번 비교되는 요소의 수가 절반으로 감소될 수 있으므로 O(logN)의 수행으로 원하는 수를 찾을 수 있음
수의 예 : [12, 25, 31, 48, 54, 66, 70, 83, 95, 108]
83 위치 찾기
package chapter;

public class BinarySearchProblem {

	public static void main(String[] args) {
		int[] numbers = {12,25,31,48,54,66,70,83,95,108};

		int target = 83;

		int left = 0;
		int right = numbers.length - 1;
		int mid = (left+right) / 2;

		int temp = numbers[mid];
		boolean find  = false;

		while(left <= right) {
			if(target == temp) {
            // 수를 찾은 경우
				find = true;
				break;
			} else if( target > temp) {
				left = mid + 1;
			} else {
				right = mid - 1;
			}
			mid = (left+right)/2;
			temp = numbers[mid];

		}

		if(find == true) {
			mid++;
			System.out.println("찾고자하는 숫자는" + mid + "번 째에 있습니다.");
		}
		else System.out.println("찾는 수가 없습니다. ");
	}

}
03. 정렬 알고리즘
평균 수행 시간이 O(n^2)인 알고리즘
버블 정렬(Bubble Sort), 삽입 정렬(Insertion Sort), 선택 정렬(Selection Sort)
각 요소가 다른 요소와 평균 한번 이상씩 비교를 하여 정렬 됨
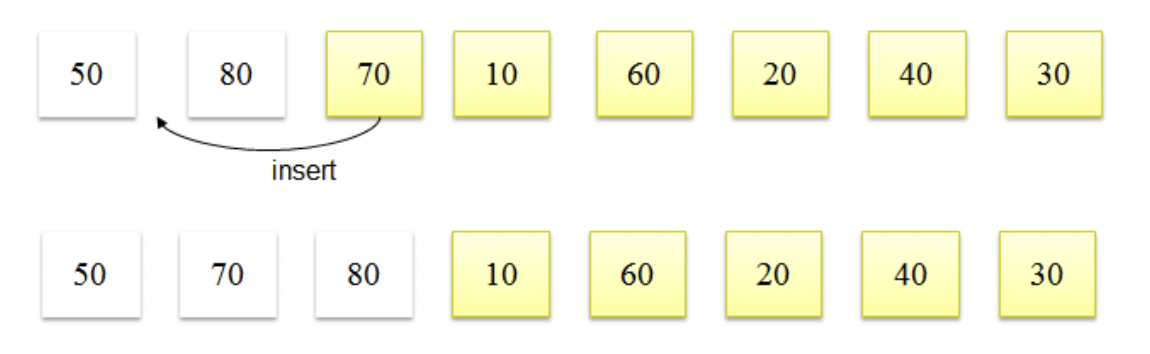
InsertSort 구현해보기
Insertion Sort의 기본 개념은 이미 정렬된 상태의 요소에 새로운 요소를 추가할 때 정렬하여 추가하는 개념이다.(손안의 카드)
두 번째 요소 부터 이전 요소들과 비교하면서 insert 될 위치를 찾아가며 정렬하는 알고리즘
package chapter;

public class InsertionSort {

	public static void insertionSort(int[] arr, int count) {
		int temp = 0;
		int i = 0; int j = 0;

		for(i = 1; i < count; i++)
		{
			temp = arr[i];
			j = i;
			while((j > 0) && arr[j-1] > temp) {
				arr[j] = arr[j-1];
				j = j-1;
			}
			arr[j] = temp;

			System.out.println("반복 -" + i);
			printSort(arr, count);
		}
	}
		public static void printSort(int value[], int count)
		{
			int i = 0;
			for(i = 0; i < count; i++) {
				System.out.print(value[i] + "\t");
			}
			System.out.println();
		}

		public static void main(String[] args) {
			int[] arr = {80, 50, 70, 10, 60, 20, 40, 30 };

			insertionSort(arr, 8);


	}

}
평균 수행 시간이 O(logN)인 알고리즘
- 퀵 정렬(Quick Sort), 병합 정렬(Merge Sort), 힙 정렬(Heap Sort)
- 한번 수행될 때마다 정렬되어야 하는 수의 범위가 1/2로 줄어드는 경우
- 퀵 정렬 이외의 다른 알고리즘은
추가적인 메모리가 필요함
Heap Sort 구현해보기
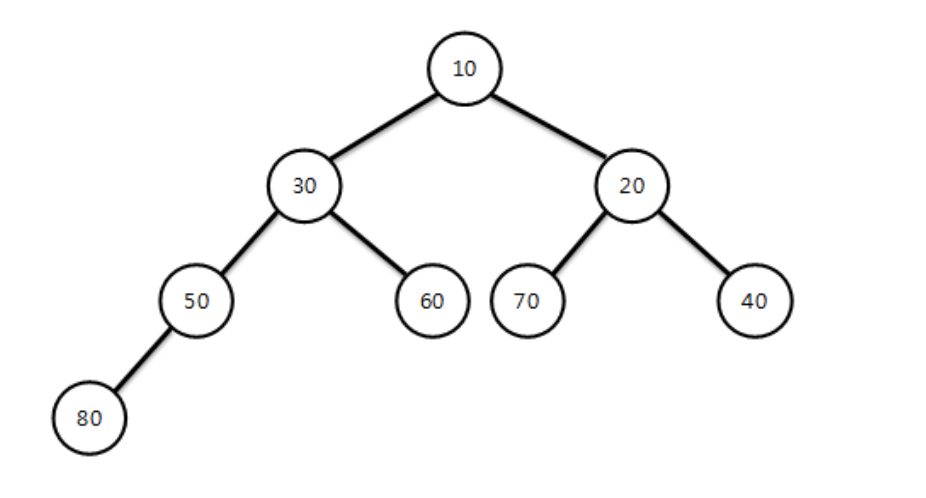
가장 큰놈이 위에 있으면 max heap , 작은 놈이 위에 있으면 min heap
배열로 표현하였을 때 새로운 값을 넣어 reordering 할 시 자기의 parent는 본인 위치 / 2 에 위치한다
package chapter;

public class HeapSort {
	private int SIZE;
	private int heapArr[];

	public HeapSort()
	{
		SIZE = 0;
		heapArr = new int [50];
	}

	public void insertHeap(int input) {
		int i = ++SIZE;
		//while((i != 1) &&  (input < heapArr[i/2])) { // max heap
		while((i != 1) && (input < heapArr[i/2])) { // min heap
			heapArr[i] = heapArr[i/2];
			i = i / 2;
		}
		heapArr[i] = input;
	}

	public int getHeapSize() {
		return SIZE;
	}

	public int deleteHeap() {
		// 힙은 보통 루트에 있는 값을 제거
		int parent,child;
		int data, temp;
		// 루트에 있는 데이터 대입
		data = heapArr[1];

		// 맨마지막 element를 temp
		temp = heapArr[SIZE];
		// 맨 위로 올렸다고 가정
		SIZE -= 1;
		parent = 1; child = 2;

		while(child <= SIZE) {
			//if((child < HEAP_SIZE) && (heapArr[child] < heapArr[child+1])) // max heap
			//더 작은 자식 값을 찾는 과정.
			if((child < SIZE) && (heapArr[child] > heapArr[child + 1])) { // min heap
				child ++;
			}
			//if(temp >= heapArr[child]) break; // max heap
			if(temp <= heapArr[child]) break; // min heap
			heapArr[parent] = heapArr[child];
			parent = child;
			child *= 2;
		}

		heapArr[parent] = temp;
		return data;
	}

	public void printHeap() {
		//System.out.printf("\n Max Heap: ");
		System.out.printf("\n Min Heap");
		for(int i=1; i<=SIZE;i++)
			System.out.printf("[%d] ", heapArr[i]);
	}

	public static void main(String[] args) {
		HeapSort h = new HeapSort();
		h.insertHeap(80);
		h.insertHeap(50);
		h.insertHeap(70);
		h.insertHeap(10);
		h.insertHeap(60);
		h.insertHeap(20);

		h.printHeap();

		int n,data;
		n = h.getHeapSize();
		for(int i = 1; i<=n; i++) {
			data = h.deleteHeap();
			System.out.printf("\n 출력 : [%d]", data);
		}

	}

}
04. DFS(Depth - First Search)와 BFS(Breadth - First Search)
그래프 탐색
DFS : Stack 이용 , BFS : Queue 이용
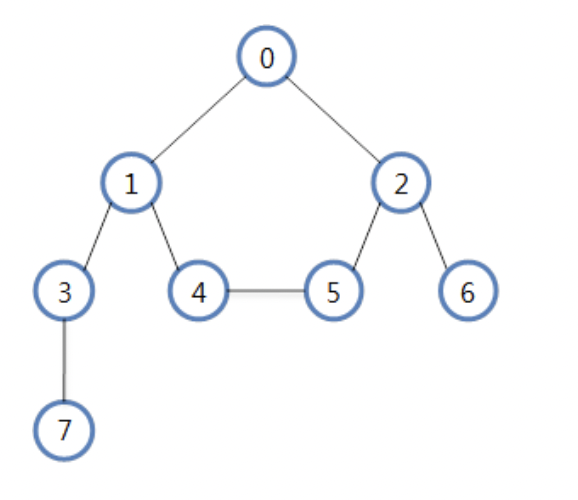
그래프를 matrix로 표현하기
package chapter;

public class UndirectedGraph {
	private int count; // 노드 개수
	private int [] [] vertexMatrix;

	public UndirectedGraph(int count) {
		this.count = count;
		vertexMatrix = new int[count][count]; // count 만큼의 2차원 배열 생성
	}

	public void addEdges(int from, int to, int weight) {
		vertexMatrix[from][to] = weight;
		vertexMatrix[to][from] = weight;
	}

	public int[][] getMatrix(){
		return vertexMatrix;
	}
}
DFS
인접한 노드를 우선 탐색 하는 방식
스택을 활용하여 구현할 수 있음
DFS 탐색 순서 :
0 - 1 - 3 - 7 - 4 - 5 - 2 - 6 or 0 - 2 - 6 - 5 - 4 - 1 - 3 - 7
package chapter;

import java.util.Stack;

public class DfsSearch {

	int count;
	boolean[] visited;
	Stack<Integer> stack;
	int[][] matrix;

	public DfsSearch(int count) {
		this.count = count;
		visited = new boolean[count];
		stack = new Stack<Integer>();
	}

	public void dfsTraversal() {
		stack.push(0);
		visited[0] = true;

		while(stack.isEmpty() == false) {
			int node = stack.pop();

			System.out.print(node + " ");

			for(int j = 0; j < count; j++) {
				if(matrix[node][j] != 0 && !visited[j]) {
					stack.push(j);
					visited[j] = true;
				}
			}
		}

	}

	public static void main(String[] args) {
		int count = 8;
		UndirectedGraph graph = new UndirectedGraph(count);
		DfsSearch dfsSearch = new DfsSearch(count);

		graph.addEdges(0, 1, 1);
		graph.addEdges(0, 2, 1);
		graph.addEdges(1, 3, 1);
		graph.addEdges(1, 4, 1);
		graph.addEdges(2, 5, 1);
		graph.addEdges(2, 6, 1);
		graph.addEdges(4, 5, 1);
		graph.addEdges(3, 7, 1);

		dfsSearch.matrix = graph.getMatrix();
		dfsSearch.dfsTraversal();

	}

}
BFS
한 노들에 모든 인접한 노드를 탐색하는 방식
큐를 활용하여 구현할 수 있음
BFS 탐색 순서 : 0 - 1 - 2 - 3 - 4 - 5 - 6 - 7
Queue에 인접한 애들 넣으면서 순차적으로 출력 되게끔
public class BfsSearch {

	int count;
	boolean[] visited;
	ArrayList<Integer> queue;
	int[][] matrix;

	public BfsSearch(int count){
		this.count = count;
		visited = new boolean[count];
		queue = new ArrayList<Integer>();
	}

	public void bfsTraversal() {

		queue.add(0);
		visited[0] = true;

		while(queue.size() != 0) {
			int node = queue.remove(0);

			System.out.print(node + "  ");

			for(int j = 0; j<count; j++) {
				if(matrix[node][j] != 0 && !visited[j] ) {
					queue.add(j);
					visited[j] = true;
				}
			}

		}
	}

	public static void main(String[] args) {

		int count = 8;
		UndirectedGraph graph = new UndirectedGraph(count);
		BfsSearch bfsSearch = new BfsSearch(count);

		graph.addEdges(0, 1, 1);
		graph.addEdges(0, 2, 1);
		graph.addEdges(1, 3, 1);
		graph.addEdges(1, 4, 1);
		graph.addEdges(2, 5, 1);
		graph.addEdges(2, 6, 1);
		graph.addEdges(4, 5, 1);
		graph.addEdges(3, 7, 1);

		bfsSearch.matrix = graph.getMatrix();
		bfsSearch.bfsTraversal();

	}
}
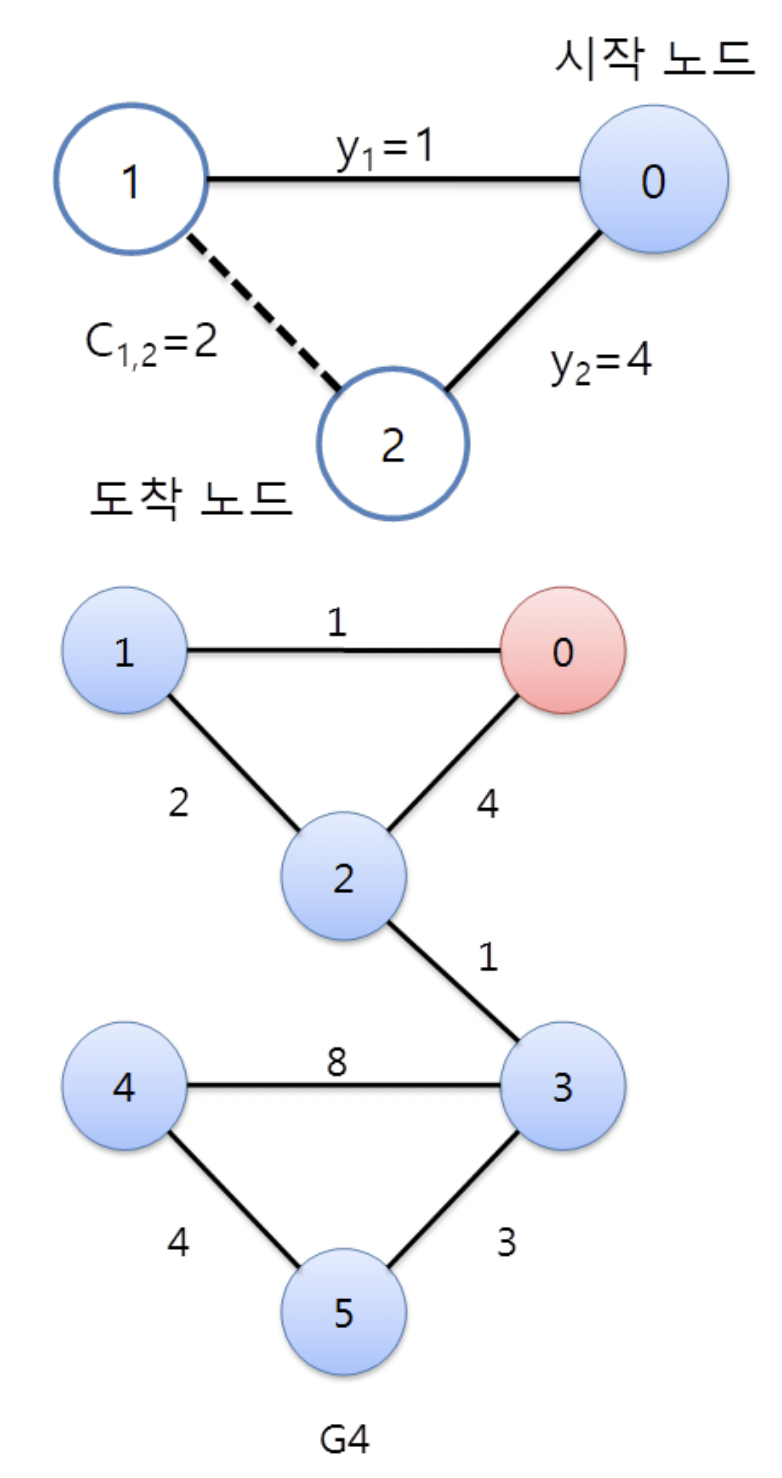
05. 최단거리 구하기 문제
package chapter;

class MyGraph{
    private int count;   //노드 수
    private int[][] vertexMatrix;  // matrix로 그래프 표시
    private int[] distance;        // 특정 노드에 대한 각 노드의 최단 거리
    private boolean[] visited;     // alread visited???
    private static int UNLIMIT = 999999999;  // 초기값

    public MyGraph(int count){
        this.count = count;
        vertexMatrix = new int[count][count];
        distance = new int[count];
        visited = new boolean[count];

    }
    public void addEdges(int from, int to, int weight){
    	vertexMatrix[from][to] = weight;
    	vertexMatrix[to][from] = weight;
    }

    public void calcShotestPath(int from){

        for(int i=0;i<count;i++){
            distance[i] = UNLIMIT;
        }

        visited[from] = true;
        distance[from] = 0;
        //연결노드 distance갱신
        for(int i= 0; i<count; i++){
            if(visited[from] && vertexMatrix[from][i] !=0){
                distance[i] = vertexMatrix[from][i];
            }
        }

        for(int k =0; k<count-1; k++){

            int min=UNLIMIT;
            int minIndex= -1;

            // 거쳐 가지 않았고, 가장 가까운 애를 distance로 선택
            for(int i = 0; i< count ;i++){
                if(!visited[i] && distance[i]!=UNLIMIT){
                    if(distance[i] < min ){
                        min = distance[i];
                        minIndex = i;
                    }
                }
            }

            //거쳐 가는 노드
            visited[minIndex] = true;
            // 다 익스트라 알고리즘
            for(int i=0; i<count; i++){
                if(!visited[i] && vertexMatrix[minIndex][i]!=0){
                	// 원래 가는 길이 더 크면 작은 것으로 업데이트 해주자
                    if(distance[i]>distance[minIndex]+vertexMatrix[minIndex][i]){
                        distance[i] = distance[minIndex]+vertexMatrix[minIndex][i];
                    }
                }
            }

        }
    }

    public void showDistance(int from) {

    	for(int i = 0; i<count; i++) {

    		System.out.println(from + " 노드로부터 " + i + " 노드의 최단 거리는 : " + distance[i]);
    	}
    }
}


public class ShortestPath {

	public static void main(String[] args) {
		MyGraph graph = new MyGraph(6);
		graph.addEdges(0, 1, 1);
		graph.addEdges(0, 2, 4);
		graph.addEdges(1, 2, 2);
		graph.addEdges(2, 3, 1);
		graph.addEdges(3, 4, 8);
		graph.addEdges(3, 5, 3);
		graph.addEdges(4, 5, 4);

		// 0노드 부터의 최단 거리
		graph.calcShotestPath(0);
		graph.showDistance(0);

	}
}