채팅앱 - 로그인 화면 구성
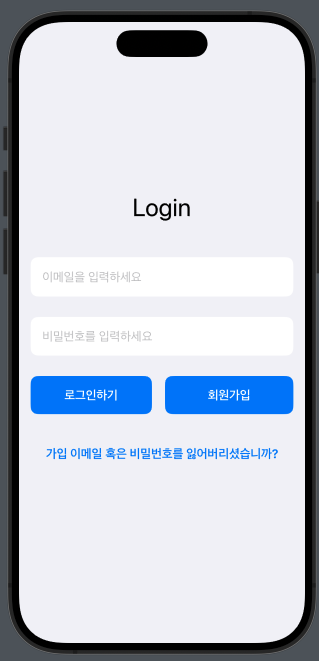
로그인 메인 화면
import SwiftUI

//메인 화면
struct ContentView: View {
    @State private var username: String = ""
    @State private var password: String = ""

    var body: some View {
        NavigationView {
            VStack {
                Spacer()

                Text("Login")
                    .font(.largeTitle)
                    .padding(.bottom, 40)

                TextField("이메일을 입력하세요", text: $username)
                    .padding()
                    .background(Color.white)
                    .cornerRadius(10)
                    .padding(.bottom, 20)
                    .autocapitalization(.none)
                    .disableAutocorrection(true)

                SecureField("비밀번호를 입력하세요", text: $password)
                    .padding()
                    .background(Color.white)
                    .cornerRadius(10)
                    .padding(.bottom, 20)

                HStack {
                    Button(action: {
                        print("Logging in with username: \(username) and password: \(password)")
                    }) {
                        Text("로그인하기")
                            .font(.headline)
                            .foregroundColor(.white)
                            .padding()
                            .frame(maxWidth: .infinity)
                            .background(Color.blue)
                            .cornerRadius(10)
                    }
                    .padding(.trailing, 10)

                    // 회원가입 이동 버튼
                    NavigationLink(destination: RegisterView()) {
                        Text("회원가입")
                            .font(.headline)
                            .foregroundColor(.white)
                            .padding()
                            .frame(maxWidth: .infinity)
                            .background(Color.blue)
                            .cornerRadius(10)
                    }
                }
                .padding(.bottom, 20)

                NavigationLink(destination: RecoveryView()) {
                    Text("가입 이메일 혹은 비밀번호를 잃어버리셨습니까?")
                        .font(.headline)
                        .foregroundColor(.blue)
                        .padding()
                }

                Spacer()
            }
            .padding()
            .background(Color(.systemGray6))
            .edgesIgnoringSafeArea(.all)
        }
    }
}
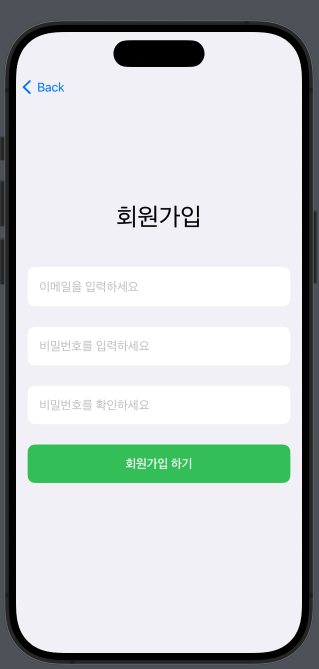
회원가입 화면
// 회원가입 화면
struct RegisterView: View {
    @State private var username: String = ""
    @State private var password: String = ""
    @State private var confirmPassword: String = ""

    var body: some View {
        VStack {
            Spacer()

            Text("회원가입")
                .font(.largeTitle)
                .padding(.bottom, 40)

            TextField("이메일을 입력하세요", text: $username)
                .padding()
                .background(Color.white)
                .cornerRadius(10)
                .padding(.bottom, 20)
                .autocapitalization(.none)
                .disableAutocorrection(true)

            SecureField("비밀번호를 입력하세요", text: $password)
                .padding()
                .background(Color.white)
                .cornerRadius(10)
                .padding(.bottom, 20)

            SecureField("비밀번호를 확인하세요", text: $confirmPassword)
                .padding()
                .background(Color.white)
                .cornerRadius(10)
                .padding(.bottom, 20)

            Button(action: {
                print("Signing up with username: \(username), password: \(password), confirmPassword: \(confirmPassword)")
            }) {
                Text("회원가입 하기")
                    .font(.headline)
                    .foregroundColor(.white)
                    .padding()
                    .frame(maxWidth: .infinity)
                    .background(Color.green)
                    .cornerRadius(10)
            }

            Spacer()
        }
        .padding()
        .background(Color(.systemGray6))
        .edgesIgnoringSafeArea(.all)
    }
}
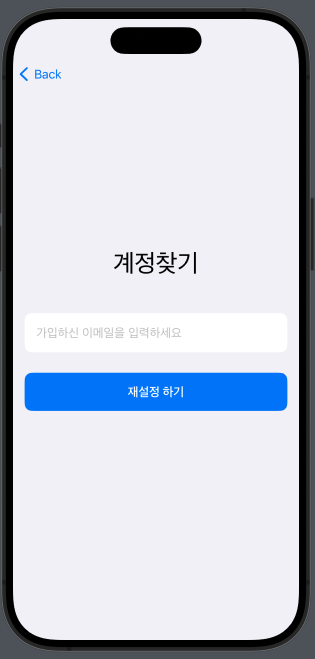
계정 찾는 화면
//계정 찾는 화면
struct RecoveryView: View {
    @State private var username: String = ""
    @State private var email: String = ""

    var body: some View {
        VStack {
            Spacer()

            Text("계정찾기")
                .font(.largeTitle)
                .padding(.bottom, 40)

            TextField("가입하신 이메일을 입력하세요", text: $username)
                .padding()
                .background(Color.white)
                .cornerRadius(10)
                .padding(.bottom, 20)
                .autocapitalization(.none)
                .disableAutocorrection(true)

            Button(action: {
                print("Recovering account for: \(username)")
            }) {
                Text("재설정 하기")
                    .font(.headline)
                    .foregroundColor(.white)
                    .padding()
                    .frame(maxWidth: .infinity)
                    .background(Color.blue)
                    .cornerRadius(10)
            }

            Spacer()
        }
        .padding()
        .background(Color(.systemGray6))
        .edgesIgnoringSafeArea(.all)
    }
}
기능
화면 이동
- NavigationView: 뷰 계층을 감싸서 화면 전환을 가능하게 하는 컨텍스트를 제공합니다.
- NavigationLink: 특정 버튼이나 텍스트와 연결되어 상호작용 시 해당 목적지 뷰로 화면을 전환합니다.
입력
- TextField : 사용자가 키보드로 입력할 수 있는 필드
- SecureField : 비밀번호나 민감한 정보를 입력할때 사용하면 ( * )로 표시되어 사용자의 정보를 보호하는 방법
해야될것
- Firebase 연결해서 로그인 기능 완성하기
- 채팅화면 만들고 채팅기능 구성하기

흠...?