이 글에서는 Spring Boot와 JavaScript, jQuery를 사용하여 대댓글(답글) 기능 구현 방법에 대해 다뤄보겠습니다.
클라이언트 측 구현
1. 댓글 구조 설계
먼저, 댓글과 대댓글을 구분하는 구조를 설계해야 합니다. 각 댓글은 고유한 ID와 부모 댓글 ID(대댓글의 경우)를 가집니다.
{
    feedCommentNo: 1,
    feedCommentContent: "멋진 글이네요!",
    feedCommentEnrolldate: "2024-07-20T10:30:00",
    feedCommentParentNo: 0,  // 0은 최상위 댓글을 의미
    employeeName: "홍길동"
}
2. 댓글 표시 함수
댓글을 화면에 표시하는 함수를 만듭니다. 이 함수는 댓글과 대댓글을 구분하여 표시합니다.
function displayComments(feedNo, comments) {
    const commentsList = $(`#feed-${feedNo} .comments-list`);
    commentsList.empty();

    // 댓글을 부모 댓글과 답글로 분류
    const parentComments = comments.filter(comment => comment.feedCommentParentNo === 0);
    const childComments = comments.filter(comment => comment.feedCommentParentNo !== 0);

    parentComments.forEach(comment => {
        const commentHtml = createCommentHtml(comment, feedNo);
        commentsList.append(commentHtml);

        // 해당 부모 댓글의 답글들을 찾아 표시
        const replies = childComments.filter(reply => reply.feedCommentParentNo === comment.feedCommentNo);
        if (replies.length > 0) {
            const repliesList = $('<div class="replies-list ml-4"></div>');
            replies.forEach(reply => {
                repliesList.append(createCommentHtml(reply, feedNo, true));
            });
            commentsList.append(repliesList);
        }
    });
}
이 함수는 먼저 댓글을 부모 댓글과 대댓글로 분류한 후, 각 부모 댓글 아래에 해당하는 대댓글을 표시합니다.
3. 개별 댓글 HTML 생성
각 댓글의 HTML을 생성하는 함수를 만듭니다. 이 함수는 댓글인지 대댓글인지에 따라 다른 형태의 HTML을 반환합니다.
function createCommentHtml(comment, feedNo, isReply = false) {
    const formattedDate = formatDate(comment.feedCommentEnrolldate);
    const replyButton = !isReply ?
        `<button class="btn btn-sm btn-outline-secondary reply-btn"token interpolation">${feedNo}, ${comment.feedCommentNo})">답글</button>` : '';

    return `
        <div class="comment" data-comment-id="${comment.feedCommentNo}">
            <strong>${escapeHtml(comment.employeeName)}</strong>
            <p>${escapeHtml(comment.feedCommentContent)}</p>
            <small class="text-muted">${formattedDate}</small>
            ${replyButton}
            ${!isReply ? `
                <div class="reply-form" style="display:none;">
                    <input type="text" class="form-control reply-input" placeholder="답글을 입력하세요...">
                    <button class="btn btn-sm btn-primary submit-reply"token interpolation">${feedNo}, ${comment.feedCommentNo})">답글 작성</button>
                </div>
            ` : ''}
        </div>
    `;
}
이 함수는 XSS 공격을 방지하기 위해 escapeHtml 함수를 사용하여 사용자 입력을 이스케이프 처리합니다.
4. 댓글 작성 기능
사용자가 새 댓글을 작성할 수 있는 기능을 구현합니다.
function submitComment(feedNo) {
    const commentInput = $(`#feed-${feedNo} .comment-input`);
    const commentContent = commentInput.val().trim();
    if (commentContent === '') {
        alert('댓글 내용을 입력해주세요.');
        return;
    }

    $.ajax({
        url: '/community/feed/comment',
        method: 'POST',
        contentType: 'application/json',
        data: JSON.stringify({
            feedNo: feedNo,
            feedCommentContent: commentContent,
            feedCommentParentNo: 0 //최상위 댓글 = 0
        }),
        success: function(response) {
            if (response.success) {
                commentInput.val('');
                loadComments(feedNo);
                updateCommentCount(feedNo, 1);
            } else {
                alert('댓글 작성에 실패했습니다: ' + response.message);
            }
        },
        error: function(xhr, status, error) {
            console.error('댓글 작성 오류:', error);
            alert('댓글 작성 중 오류가 발생했습니다.');
        }
    });
}
5. 대댓글 작성 기능
대댓글 작성 기능은 댓글 작성과 유사하지만, 부모 댓글의 ID를 함께 전송합니다.
function submitReply(feedNo, parentCommentNo) {
    const replyInput = $(`#feed-${feedNo} .comment[data-comment-id="${parentCommentNo}"] .reply-input`);
    const replyContent = replyInput.val().trim();
    if (replyContent === '') {
        alert('답글 내용을 입력해주세요.');
        return;
    }

    $.ajax({
        url: '/community/feed/comment',
        method: 'POST',
        contentType: 'application/json',
        data: JSON.stringify({
            feedNo: feedNo,
            feedCommentContent: replyContent,
            feedCommentParentNo: parentCommentNo
        }),
        success: function(response) {
            if (response.success) {
                replyInput.val('');
                loadComments(feedNo);
            } else {
                alert('답글 작성에 실패했습니다: ' + response.message);
            }
        },
        error: function(xhr, status, error) {
            console.error('답글 작성 오류:', error);
            alert('답글 작성 중 오류가 발생했습니다.');
        }
    });
}
6. 스타일링
댓글과 대댓글을 시각적으로 구분하기 위해 CSS 스타일을 적용합니다.
.comments-section {
    margin-top: 1rem;
    border-top: 1px solid #dddfe2;
    padding-top: 1rem;
}

.comment {
    margin-bottom: 0.5rem;
    padding: 0.5rem;
    background-color: #f0f2f5;
    border-radius: 4px;
}

.replies-list {
    margin-left: 1rem;
    border-left: 2px solid #1877f2;
    padding-left: 1rem;
}
서버 측 구현
서버 측에서는 댓글 및 대댓글 기능을 지원하기 위한 API를 구현해야 합니다. 여기서는 Spring Boot를 사용한 Java 구현을 예로 들겠습니다.
1. 컨트롤러 구현
먼저, 댓글 관련 요청을 처리할 컨트롤러를 만듭니다.
@RestController
@RequestMapping("/community/feed")
public class FeedController {

    @Autowired
    private FeedService service;

    @GetMapping("/comments")
    public ResponseEntity<Map<String, Object>> getComments(@RequestParam int feedNo) {
        Map<String, Object> response = new HashMap<>();
        try {
            List<FeedComment> comments = service.getComments(feedNo);
            response.put("success", true);
            response.put("comments", comments);
            return ResponseEntity.ok(response);
        } catch (Exception e) {
            response.put("success", false);
            response.put("message", "댓글 목록을 불러오는 중 오류가 발생했습니다: " + e.getMessage());
            return ResponseEntity.internalServerError().body(response);
        }
    }

    @PostMapping("/comment")
    public ResponseEntity<Map<String, Object>> addComment(@RequestBody FeedComment comment) {
        Map<String, Object> response = new HashMap<>();
        try {
            Authentication auth = SecurityContextHolder.getContext().getAuthentication();
            Employee loginEmployee = (Employee) auth.getPrincipal();
            comment.setEmployeeNo(loginEmployee.getEmployeeNo());

            int result = service.addComment(comment);
            if (result > 0) {
                response.put("success", true);
                response.put("message", "댓글이 성공적으로 추가되었습니다.");
                return ResponseEntity.ok(response);
            } else {
                response.put("success", false);
                response.put("message", "댓글 추가에 실패했습니다.");
                return ResponseEntity.badRequest().body(response);
            }
        } catch (Exception e) {
            response.put("success", false);
            response.put("message", "댓글 추가 중 오류가 발생했습니다: " + e.getMessage());
            return ResponseEntity.internalServerError().body(response);
        }
    }
}
이 컨트롤러는 댓글 조회(getComments)와 댓글 추가(addComment) 기능을 제공합니다. 대댓글도 동일한 addComment 메서드를 사용하며, feedCommentParentNo로 구분합니다.
2. 서비스 계층 구현
비즈니스 로직을 처리할 서비스 계층을 구현합니다.
@Service
public class FeedServiceImpl implements FeedService {

    @Autowired
    private FeedDao dao;

    @Override
    public List<FeedComment> getComments(int feedNo) {
        return dao.getComments(feedNo);
    }

    @Override
    @Transactional
    public int addComment(FeedComment comment) {
        return dao.insertComment(comment);
    }

    // 기타 메서드...
}
3. DAO(Data Access Object) 구현
데이터베이스와의 상호작용을 담당할 DAO를 구현합니다. 여기서는 MyBatis를 사용한 예를 들겠습니다.
@Repository
public class FeedDaoImpl implements FeedDao {

    @Autowired
    private SqlSession sqlSession;

    @Override
    public List<FeedComment> getComments(int feedNo) {
        return sqlSession.selectList("feed.getComments", feedNo);
    }

    @Override
    public int insertComment(FeedComment comment) {
        return sqlSession.insert("feed.insertComment", comment);
    }

    // 기타 메서드...
}
4. MyBatis Mapper 구현
SQL 쿼리를 정의할 MyBatis Mapper XML 파일을 생성합니다.
<?xml version="1.0" encoding="UTF-8"?>
<!DOCTYPE mapper PUBLIC "-//mybatis.org//DTD Mapper 3.0//EN" "http://mybatis.org/dtd/mybatis-3-mapper.dtd">
<mapper namespace="feed">

<select id="getComments" resultType="com.project.hot.feed.model.dto.FeedComment">
        SELECT fc.*, e.EMPLOYEE_NAME
        FROM FEED_COMMENT fc
        JOIN EMPLOYEE e ON fc.EMPLOYEE_NO = e.EMPLOYEE_NO
        WHERE fc.FEED_NO = #{feedNo}
        ORDER BY
            CASE WHEN fc.FEED_COMMENT_PARENT_NO = 0 THEN fc.FEED_COMMENT_NO ELSE fc.FEED_COMMENT_PARENT_NO END,
            fc.FEED_COMMENT_NO
    </select>

    <insert id="insertComment" parameterType="com.project.hot.feed.model.dto.FeedComment">
        INSERT INTO FEED_COMMENT (
            FEED_COMMENT_NO,
            FEED_COMMENT_CONTENT,
            FEED_COMMENT_ENROLLDATE,
            FEED_NO,
            EMPLOYEE_NO,
            FEED_COMMENT_PARENT_NO
        ) VALUES (
            SEQ_FEED_COMMENT.NEXTVAL,
            #{feedCommentContent},
            SYSDATE,
            #{feedNo},
            #{employeeNo},
            #{feedCommentParentNo}
        )
    </insert>

</mapper>
이 매퍼 파일에서 주목할 점은 getComments 쿼리의 ORDER BY 절입니다. 이 정렬 방식은 부모 댓글을 먼저 정렬하고, 그 다음에 해당 부모 댓글의 대댓글을 정렬합니다. 이렇게 하면 클라이언트 측에서 댓글을 쉽게 구조화할 수 있습니다.
프론트엔드와 백엔드의 연동
이제 프론트엔드와 백엔드가 어떻게 연동되는지 살펴보겠습니다.
-
댓글 조회: 클라이언트가
/community/feed/comments?feedNo={feedNo}GET 요청을 보내면, 서버는 해당 피드의 모든 댓글과 대댓글을 조회하여 반환합니다. -
댓글 작성: 클라이언트가
/community/feed/commentPOST 요청을 보내면, 서버는 새 댓글을 데이터베이스에 추가합니다. 대댓글의 경우feedCommentParentNo에 부모 댓글의 번호를 지정합니다. -
댓글 표시: 서버로부터 받은 댓글 데이터를 클라이언트에서 구조화하여 화면에 표시합니다. 부모 댓글과 대댓글은
feedCommentParentNo를 기준으로 구분합니다.
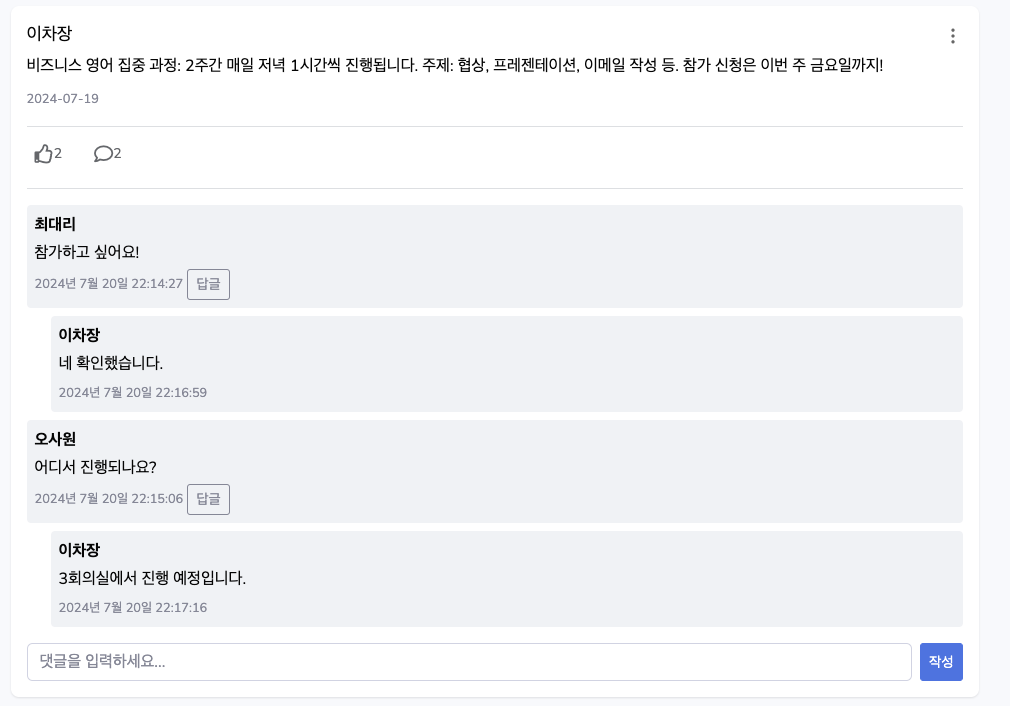
구현 화면