
1. albumentations
-
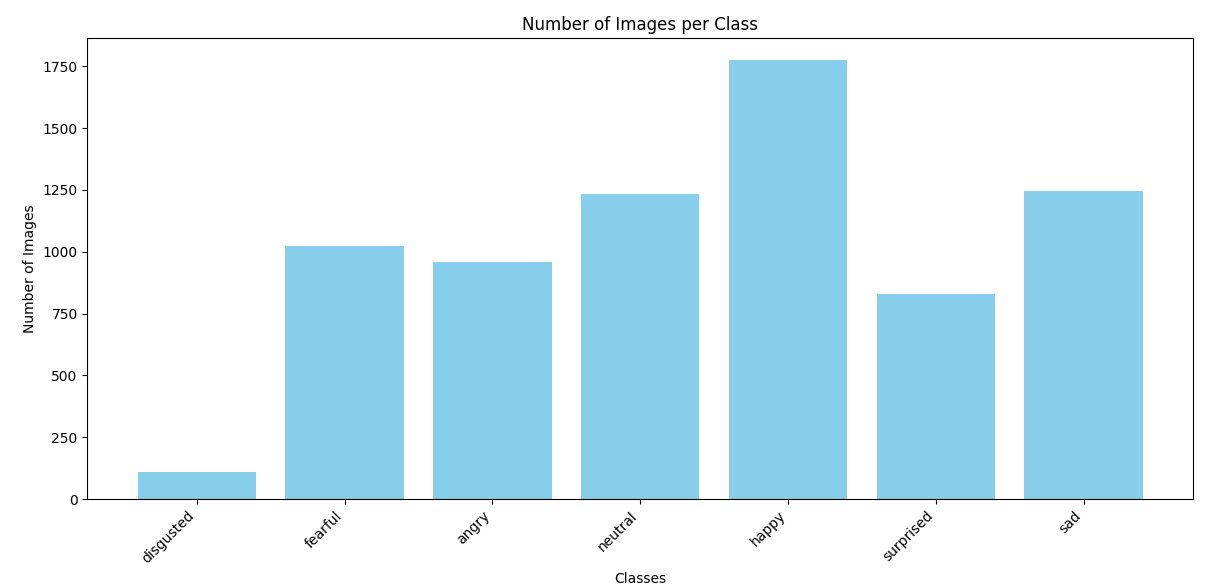
disgusted클래스는 다른 클래스에 비해 데이터가 상대적으로 적기 때문에, 데이터 증강을 통해 클래스 불균형 문제를 완화하고자 함
-
Dataset을 생성하기 앞서, aumentation을 적용하는 함수(CustomDataset)을 만듦
(주석 처리는 관련 간단한 설명과 로그 기록을 위해 임시로 작성한 코드가 포함)
python
import os
import cv2
from torch.utils.data import Dataset
# from albumentations import ReplayCompose

class CustomDataset(Dataset):
    def __init__(self, data_dir, class_augmentations, default_augmentations):
        self.data_dir = data_dir
        self.class_augmentations = class_augmentations
        self.default_augmentations = default_augmentations
        # self.class_augmentations = {key: ReplayCompose(value.transforms)
        #   for key, value in class_augmentations.items()}
        # self.default_augmentations = ReplayCompose(default_augmentations.transforms)
        self.image_paths = []
        self.labels = []

        # 카테고리별 레이블 생성
        self.category_to_label = {category: idx for idx, category in enumerate(os.listdir(data_dir))}
        for category, label in self.category_to_label.items():
            category_path = os.path.join(data_dir, category)
            if os.path.isdir(category_path):
                for img_file in os.listdir(category_path):
                    self.image_paths.append(os.path.join(category_path, img_file))
                    self.labels.append(label)

    def __len__(self):
        return len(self.image_paths)

    def __getitem__(self, idx):
        img_path = self.image_paths[idx]
        label = self.labels[idx]
        category = list(self.category_to_label.keys())[label]

        # 이미지 읽기 (Grayscale 지원)
        image = cv2.imread(img_path, cv2.IMREAD_UNCHANGED)  # 원본 형식 유지
        if image is None:
            raise ValueError(f"이미지 파일을 읽을 수 없습니다: {img_path}")

        # Grayscale(1채널)인 경우 처리
        if len(image.shape) == 2:  # (H, W) 형태라면 Grayscale
            image = cv2.cvtColor(image, cv2.COLOR_GRAY2RGB)  # 3채널로 변환

        # 증강 선택
        if category in self.class_augmentations:
            augmentations = self.class_augmentations[category]
        else:
            augmentations = self.default_augmentations

        # # Albumentations 증강 적용
        augmented = augmentations(image=image)
        # replay = augmented['replay']  # 실행된 증강 기록
        # print(replay)  # 실행된 증강 로그 확인

        image = augmented['image']

        # 텐서 변환 (float 타입으로)
        image = image.float()
return image, label-
train의 disgusted 클래스만 HorizontalFlip(50% 확률)과 RandomGamma(20% 확률)를 이용하여 데이터 증강이 발생되도록 구성
-
나머지(valid, test)는 default_augmentitions를 적용하여 기본적인 정규화와 resize를 수행하도록 함
-
default_augmentations가 resize와 normalize만 적용되고, 이는 EfficientNet에서 권장하는 입력 전처리 방식을 따름
import albumentations as A
from albumentations.pytorch import ToTensorV2
import cv2

disgusted_augmentations = A.Compose([
    A.HorizontalFlip(p=0.5),
    A.RandomGamma(p=0.2),
    A.Normalize(mean=[0.485, 0.456, 0.406], std=[0.229, 0.224, 0.225]),
    A.Resize(224,224),
    ToTensorV2()
])

default_augmentations = A.Compose([
    A.Resize(224,224),
    A.Normalize(mean=[0.485, 0.456, 0.406], std=[0.229, 0.224, 0.225]),
    ToTensorV2()
])

class_augmentations = {
    "disgusted": disgusted_augmentations,
}

train_dir = 'train'
valid_dir = 'valid'
test_dir = 'test'

train_dataset = CustomDataset(
    data_dir=train_dir,
    class_augmentations=class_augmentations,
    default_augmentations=default_augmentations
)

valid_dataset = CustomDataset(
    data_dir=valid_dir,
    class_augmentations={},
    default_augmentations=default_augmentations
)

test_dataset=CustomDataset(
    data_dir=test_dir,
    class_augmentations={},
    default_augmentations=default_augmentations
)
2. WeightedRandomSampler
WeightedRandomSampler는 데이터셋의 클래스 불균형 문제를 해결하기 위해 특정 클래스에 가중치를 부여하여 샘플링 확률을 조정하는 역할
from collections import Counter
from torch.utils.data import WeightedRandomSampler, DataLoader

# train_dataset의 레이블 분포 계산
class_counts = Counter(train_dataset.labels)
print(f"Class counts: {class_counts}")

# 클래스별 가중치 계산
total_samples = sum(class_counts.values())
class_weights = {cls: total_samples / count for cls, count in class_counts.items()}
print(f"Class weights: {class_weights}")

# 샘플별 가중치 생성
sample_weights = [class_weights[label] for label in train_dataset.labels]

# WeightedRandomSampler 생성
sampler = WeightedRandomSampler(weights=sample_weights, num_samples=len(sample_weights), replacement=True)

from torch.utils.data import DataLoader
train_loader = DataLoader(train_dataset, batch_size=16, sampler=sampler)
valid_loader = DataLoader(valid_dataset, batch_size=16, shuffle=False)
valid_loader = DataLoader(test_dataset, batch_size=16, shuffle=Fal
3. EarlyStopping
-
모델이 검증 손실을 기준으로 성능 향상이 더 이상 이루어지지 않을 때 학습을 조기에 종료함으로써 리소스를 절약하고 과적합을 방지
-
patience는 검증 손실이 연속적으로 개선되지 않을 수 있는 허용 횟수 -
설정된
delta는 손실이 개선되었다고 간주되는 최소 변화값 -
검증 손실이 개선될 경우 해당 시점의 모델을
best_model.pth로 저장 -> 학습 종료 후 가장 성능이 좋은 모델을 사용할 수 있도록 보장
class EarlyStopping:
    def __init__(self, patience=5, delta=0.0, path='best_model.pth'):
        self.patience = patience
        self.delta = delta
        self.path = path
        self.best_score = None
        self.counter = 0
        self.early_stop = False

    def __call__(self, val_loss, model):
        score = -val_loss
        if self.best_score is None:
            self.best_score = score
            self.save_checkpoint(val_loss, model)
        elif score < self.best_score + self.delta:
            self.counter += 1
            if self.counter >= self.patience:
                self.early_stop = True
        else:
            self.best_score = score
            self.save_checkpoint(val_loss, model)
            self.counter = 0

    def save_checkpoint(self, val_loss, model):
        torch.save(model, self.path)
        print(f"Validation loss가 개선되었음. {self.path}로 모델 저장")

early_stopping = EarlyStopping(patience=5, path="best_model.pth")
4. efficientnet-b7
-
EfficientNet은 뛰어난 성능과 효율성을 겸비한 최신 CNN 모델
-
EfficientNet-B7의 기본 구조를 사용했지만, 입력 크기(600x600)가 너무 크다고 판단하여 B0 모델에 맞춘
224x224크기로 전처리를 설정 -
EfficientNet의 주요 장점:
- 높은 정확도와 낮은 연산량.
- 다양한 크기(B0~B7)로 조절 가능하여 다양한 환경에 적합.
설치
!pip install efficientnet_pytorch적용코드
from efficientnet_pytorch import EfficientNet
import torch

device = torch.device("cuda" if torch.cuda.is_available() else "cpu")

class_count = len(train_dataset.category_to_label)
model = EfficientNet.from_pretrained('efficientnet-b7', num_classes=class_count).to(device)
5. optimizer
Adamax는 Adam 옵티마이저의 변형으로, 희소 그래디언트(Sparse Gradient) 문제에서 더 안정적으로 작동- 학습률 0.001은 Adam, Adamax와 같은 적응형 옵티마이저에서 일반적으로 사용되는 값으로,
대부분의 딥러닝 문제에서 잘 작동하기 때문에 기본값으로 사용
optimizer = optim.Adamax(model.parameters(), lr=0.001)6. CrossEntropyLoss
-
PyTorch에서 다중 클래스 분류 문제를 해결하기 위해 가장 일반적으로 사용되는 손실 함수
-
Softmax + NLLLoss
- Softmax: 모델의 출력 로짓(logits)을 확률 분포
- NLLLoss: 변환된 확률 분포와 실제 레이블 간의 로그 손실 계산
criterion = nn.CrossEntropyLoss()