apiVersion: batch/v1beta1
kind: CronJob
metadata:
  name: my-cronjob
spec:
  schedule: "*/1 * * * *"
  jobTemplate:
    spec:
      template:
        spec:
          containers:
          - name: my-container
            image: busybox1
            command:
            - /bin/sh
            - -c
            - date; echo "Hello, Kubernetes!"; sleep 60
          restartPolicy: OnFailure
k8s를 사용하기 위해서는 다음과 같은 yaml 파일을 구성하게 된다.
yaml 파일의 가장 큰 단점은 정적인 파일이라는 점이다. image가 busybox2인 CronJob을 추가하고 싶다면 새로운 yaml 파일을 구성해야 한다.
2개 정도의 yaml 파일을 구성하는건 큰 문제가 아닐 수 있다. 하지만 busybox3, ... , busybox10까지 총 10개의 yaml 파일을 구성해야한다면? 이건 굉장히 귀찮은 일이다.
https://kubernetes.io/ko/docs/reference/using-api/client-libraries
이런 경우 사용할 수 있도록 k8s에서는 다양한 프로그래밍 언어에서 k8s API를 사용하기 위한 클라이언트 라이브러리를 제공한다.
https://github.com/kubernetes-client/javascript
그중 JavaScript용 라이브러리를 살펴본다.
Javascript Clients for Kubernetes
라이브러리는 node 환경에서 typescript로 실행된다. 하지만 호출은 Javascript와 Typescript 모두 가능하다.
const k8s = require("@kubernetes/client-node");
const kc = new k8s.KubeConfig();
kc.loadFromDefault();
const k8sApi = kc.makeApiClient(k8s.CoreV1Api);
const main = async () => {
try {
const podsRes = await k8sApi.listNamespacedPod("default");
podsRes.body.items.forEach((item) => console.log(item.metadata.name));
} catch (err) {
console.error(err);
}
};
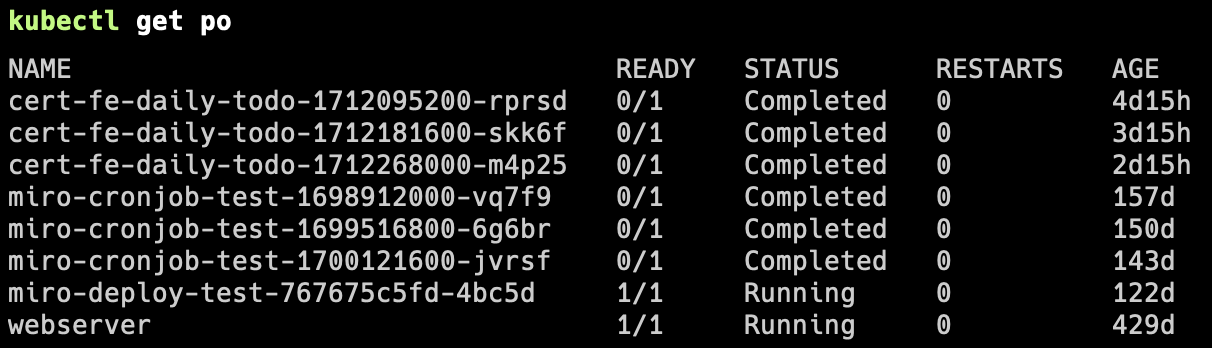
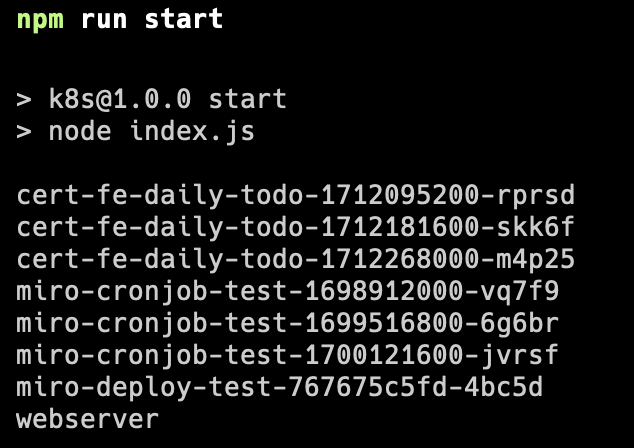
main();default namepsace에 속한 파드들의 name을 출력하는 간단한 예제이다. 실제로 정상 동작하는 것을 출력으로 확인해볼 수 있다.
How?
별도의 클러스터 설정을 추가하지 않았는데 어떻게 동작하는걸까?
이는 해당 호출에서 확인해볼 수 있다.
kc.loadFromDefault();
별도의 인자를 넘기지 않으면 HOME path의 .kube/config 파일을 자동으로 적용시킨다.
CD 환경에서 별도 클러스터 설정이 필요하다면
config 파일을 구성하고 이에 대한 경로를 명시하여 처리할 수 있다.
kc.loadFromFile('/path/to/your/kubeconfig/file');
Example
https://github.com/kubernetes-client/javascript/blob/master/examples/ingress.js
ingress yaml을 Javascript로 구축하는 예제이다.
해당 파일을 yaml로 구성한다면 다음과 같다.
const k8s = require('@kubernetes/client-node');

const namespace = 'default';

const kc = new k8s.KubeConfig();
kc.loadFromDefault();

const k8sApi = kc.makeApiClient(k8s.NetworkingV1Api); // before 1.14 use extensions/v1beta1
const clientIdentifier = 'my-subdomain';

const main = async () => {
    try {
        const createIngressRes = k8sApi.createNamespacedIngress(namespace, {
            apiVersions: 'networking.k8s.io/v1',
            kind: 'Ingress',
            metadata: {
                name: `production-custom-${clientIdentifier}`,
                labels: {
                    createdBy: 'node-client',
                },
                annotations: {
                    'meta.helm.sh/release-namespace': 'production-auto-deploy',
                },
            },
            spec: {
                ingressClassName: 'nginx',
                rules: [
                    {
                        host: `${clientIdentifier}`,
                        http: {
                            paths: [
                                {
                                    backend: {
                                        service: {
                                            name: 'production-auto-deploy',
                                            port: {
                                                number: 5000,
                                            },
                                        },
                                    },
                                    path: '/default-kuberiq(/|$)(.*)',
                                    pathType: 'ImplementationSpecific',
                                },
                            ],
                        },
                    },
                ],
                tls: [
                    {
                        hosts: [`${clientIdentifier}.example.com`],
                    },
                ],
            },
        });
        console.log(createIngressRes.body);
    } catch (err) {
        console.error(err);
    }
};

main();apiVersion: networking.k8s.io/v1
kind: Ingress
metadata:
name: production-custom-my-subdomain
labels:
createBy: 'node-client'
annotations:
meta.helm.sh/release-namespace: 'production-auto-deploy'
spec:
ingressClassName: 'nginx'
rules:
- host: my-subdomain
http:
paths:
- backend:
service:
name: production-auto-deply
port:
number: 5000
path: /default-kuberiq(/|$)(.*)
pathType: ImplementationSpecific
tls:
- hosts:
- my-subdomain.example.comcreateNamespacedIngress의 2번째 인자로 들어가는 객체의 구성이 yaml과 정확히 동일한 형태인 것을 알 수 있다.
즉 기존에 사용하던 yaml 파일을 쉽게 Javascript 파일로 변환할 수 있다. 또한 예제에서 볼 수 있듯이 중복된 값들을 변수로 분리하여 사용할 수 있다는 장점이 존재한다.
Solve
const k8s = require("@kubernetes/client-node");

const kc = new k8s.KubeConfig();
kc.loadFromDefault();

const k8sApi = kc.makeApiClient(k8s.BatchV1Api);

const getCronJob = (index) => ({
  apiVersion: "batch/v1beta1",
  kind: "CronJob",
  metadata: {
    name: "my-cronjob",
  },
  spec: {
    schedule: "*/1 * * * *",
    jobTemplate: {
      spec: {
        template: {
          spec: {
            containers: [
              {
                name: "my-container",
                image: `busybox${index}`,
                command: [
                  "/bin/sh",
                  "-c",
                  "date; echo 'Hello, Kubernetes!'; sleep 60",
                ],
              },
            ],
            restartPolicy: "OnFailure",
          },
        },
      },
    },
  },
});

const main = async () => {
  try {
    for (let i = 1; i <= 10; i++) {
      await k8sApi.createNamespacedCronJob("default", getCronJob(i));
    }
  } catch (err) {
    console.error(err);
  }
};

main();
기존에 10개의 yaml 파일을 만들어야하는 상황에서 1개의 Javascript 파일로 한번에 처리할 수 있게 되었다.
yaml 파일에 대해 잘 모르거나 공통된 .kube/config를 구성하고 싶은 경우 처음부터 자신이 사용하는 언어로 k8s의 자원을 만들어도 되겠다.

k8s = kyung 8 sik