개요
- 쿠버네티스에서 Pod를 어떤 노드에 배포하게 될지는 스케줄러가 정하게 된다. 스케줄러는 Pod를 배포할 수 있는 여유가 있는 노드로 배포하게 되는데, 이때 각 노드가 여유가 있는지를 판단하는 기준은 각 노드의 CPU, Memory의 사용량 등이 이용된다.
- 스케줄러가 어떤 기준으로 노드를 선별하게 되는지 알아보는 것이지만, 그전에 결국 노드의 자원은 노드에 띄워져 있는 쿠버네티스 리소스들의 자원의 합계치 임으로 리소스에 대한 자원을 먼저 알아보고자 한다.
Pod가 필요한 CPU, Memory (Requests, Limits)
pod의 spec.containers[].resources 에 아래와 같은 4개 정보를 설정해야 한다.
requests와 limits 이라는 항목이 있으며, 각각 cpu, memory 값을 설정할 수 있다.
- limits.cpu
- limits.memory
- requests.cpu
- requests.memory
예시
apiVersion: v1
kind: Pod
metadata:
  name: nginx-pod
  labels:
    name: nginx-pod
spec:
  containers:
  - name: nginx-pod
    image: nginx:latest
    resources:
      limits:
        cpu: "1"
        memory: "512Mi"
      requests:
        cpu: "500m"
        memory: "256Mi"
해석 : 이 컨테이너는 최소 1 CPU 및 512Mi의 메모리를 요청하며, 최대 500m의 CPU 및 256Mi의 메모리를 사용할 수 있다.
- cpu : 1000m(밀리 코어) == cpu : 1 Core (1000m == 1)
- memory : 256Mi == memory : 256Mb
참고
memory 단위 Mi는 MiB를 의미하며, cpu 단위인 m은 1/1000 core 을 의미한다 (250m=0.25). MiB와 MB의 차이점은 링크를 참고하자.
Request와 Limit
Pod의 resources부분을 작성하다 보면 Request와 Limit가 존재하는 것을 알 수 있다.
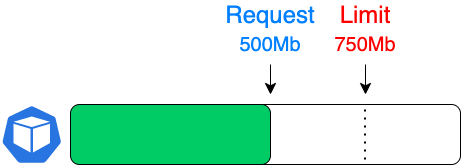
위의 그림은 Memory를 Request:500Mb, Limit:750Mb를 지정한 Pod를 예시로 들었다.
그림에서 Pod는 기본적으로 Memory를 500Mb 사용을 보장하되 더 많은 Memory를 필요로 할 경우에는 최대 750Mb까지 사용할 수 있는 것을 나타낸다.
Request는 적어도 이 만큼의 자원은 컨테이너에게 보장해야 한다는 의미이다.
Limit는 유휴 자원이 있다면 최대 이 만큼의 자원까지 컨테이너가 사용할 수 있다는 것을 의미한다.
리소스 확인하기
# Pod 확인
$ kubectl get pod nginx-pod
NAME        READY   STATUS    RESTARTS   AGE
nginx-pod   1/1     Running   0          44s
# Pod 정보 확인
$ kubectl describe pod nginx-pod
Name:             nginx-pod
Namespace:        default
Priority:         0
Service Account:  default
Node:             w2-k8s/192.168.1.102
Start Time:       Mon, 06 May 2024 16:02:30 +0900
Labels:           name=nginx-pod
Annotations:      cni.projectcalico.org/podIP: 172.16.103.139/32
                  cni.projectcalico.org/podIPs: 172.16.103.139/32
Status:           Running
IP:               172.16.103.139
IPs:
  IP:  172.16.103.139
Containers:
  nginx-pod:
    Container ID:   containerd://fa7d17e5fefa7624120a55d0aa65651abcf25c69fc23716fea814ba53ba6d5fa
    Image:          nginx:latest
    Image ID:       docker.io/library/nginx@sha256:ed6d2c43c8fbcd3eaa44c9dab6d94cb346234476230dc1681227aa72d07181ee
    Port:           <none>
    Host Port:      <none>
    State:          Running
      Started:      Mon, 06 May 2024 16:02:32 +0900
    Ready:          True
    Restart Count:  0
    Limits:
      cpu:     1
      memory:  512Mi
    Requests:
      cpu:        500m
      memory:     256Mi
    Environment:  <none>
    Mounts:
      /var/run/secrets/kubernetes.io/serviceaccount from kube-api-access-t4v65 (ro)
Conditions:
  Type              Status
  Initialized       True
  Ready             True
  ContainersReady   True
  PodScheduled      True
Volumes:
  kube-api-access-t4v65:
    Type:                    Projected (a volume that contains injected data from multiple sources)
    TokenExpirationSeconds:  3607
    ConfigMapName:           kube-root-ca.crt
    ConfigMapOptional:       <nil>
    DownwardAPI:             true
QoS Class:                   Burstable
Node-Selectors:              <none>
Tolerations:                 node.kubernetes.io/not-ready:NoExecute op=Exists for 300s
                             node.kubernetes.io/unreachable:NoExecute op=Exists for 300s
Events:
  Type    Reason     Age   From               Message
  ----    ------     ----  ----               -------
  Normal  Scheduled  53s   default-scheduler  Successfully assigned default/nginx-pod to w2-k8s
  Normal  Pulling    53s   kubelet            Pulling image "nginx:latest"
  Normal  Pulled     51s   kubelet            Successfully pulled image "nginx:latest" in 1.516445662s
  Normal  Created    51s   kubelet            Created container nginx-pod
  Normal  Started    51s   kubelet            Started container nginx-pod
아래와 같이 Limits, Requests 에 대한 리소스 정보를 확인할 수 있다.
Limits:
cpu: 1
memory: 512Mi
Requests:
cpu: 500m
memory: 256Mi
모든 Pod의 값을 한번
# pod 에 대한 정보 확인
$ kubectl get pod -o yaml [pod]

# 모든 pod 에 대한 값을 확인
$ kubectl get po -o custom-columns="Name:metadata.name,CPU-Requet:spec.containers[*].resources.requests.cpu,CPU-limit:spec.containers[*].resources.limits.cpu,MEM-Request:spec.containers[*].resources.requests.memory,MEM-limit:spec.containers[*].resources.limits.memory"

조금씩 성장하는 DevOps 엔지니어가 되겠습니다. 😄