오늘 하루 꽤 바빴는데 다행히 주말에 계산기 과제는 레이아웃을 미리 짜둬서 이 시간에라도 끝낸 것 같아요 ㅎ,ㅎ
이게 맞나 싶은데 일단 귀여워서 제 마음에 드는 먼작귀 테마의 todo list 한번 보겠습니다 '~'
1. html
<!DOCTYPE html>
<html lang="ko">
<head>
<meta charset="UTF-8">
<meta name="viewport" content="width=device-width, initial-scale=1.0">
<title>TodoList</title>
<link rel="stylesheet" href="todolist.css">
</head>
<body>
<div id="container">
<div id="listContainer">
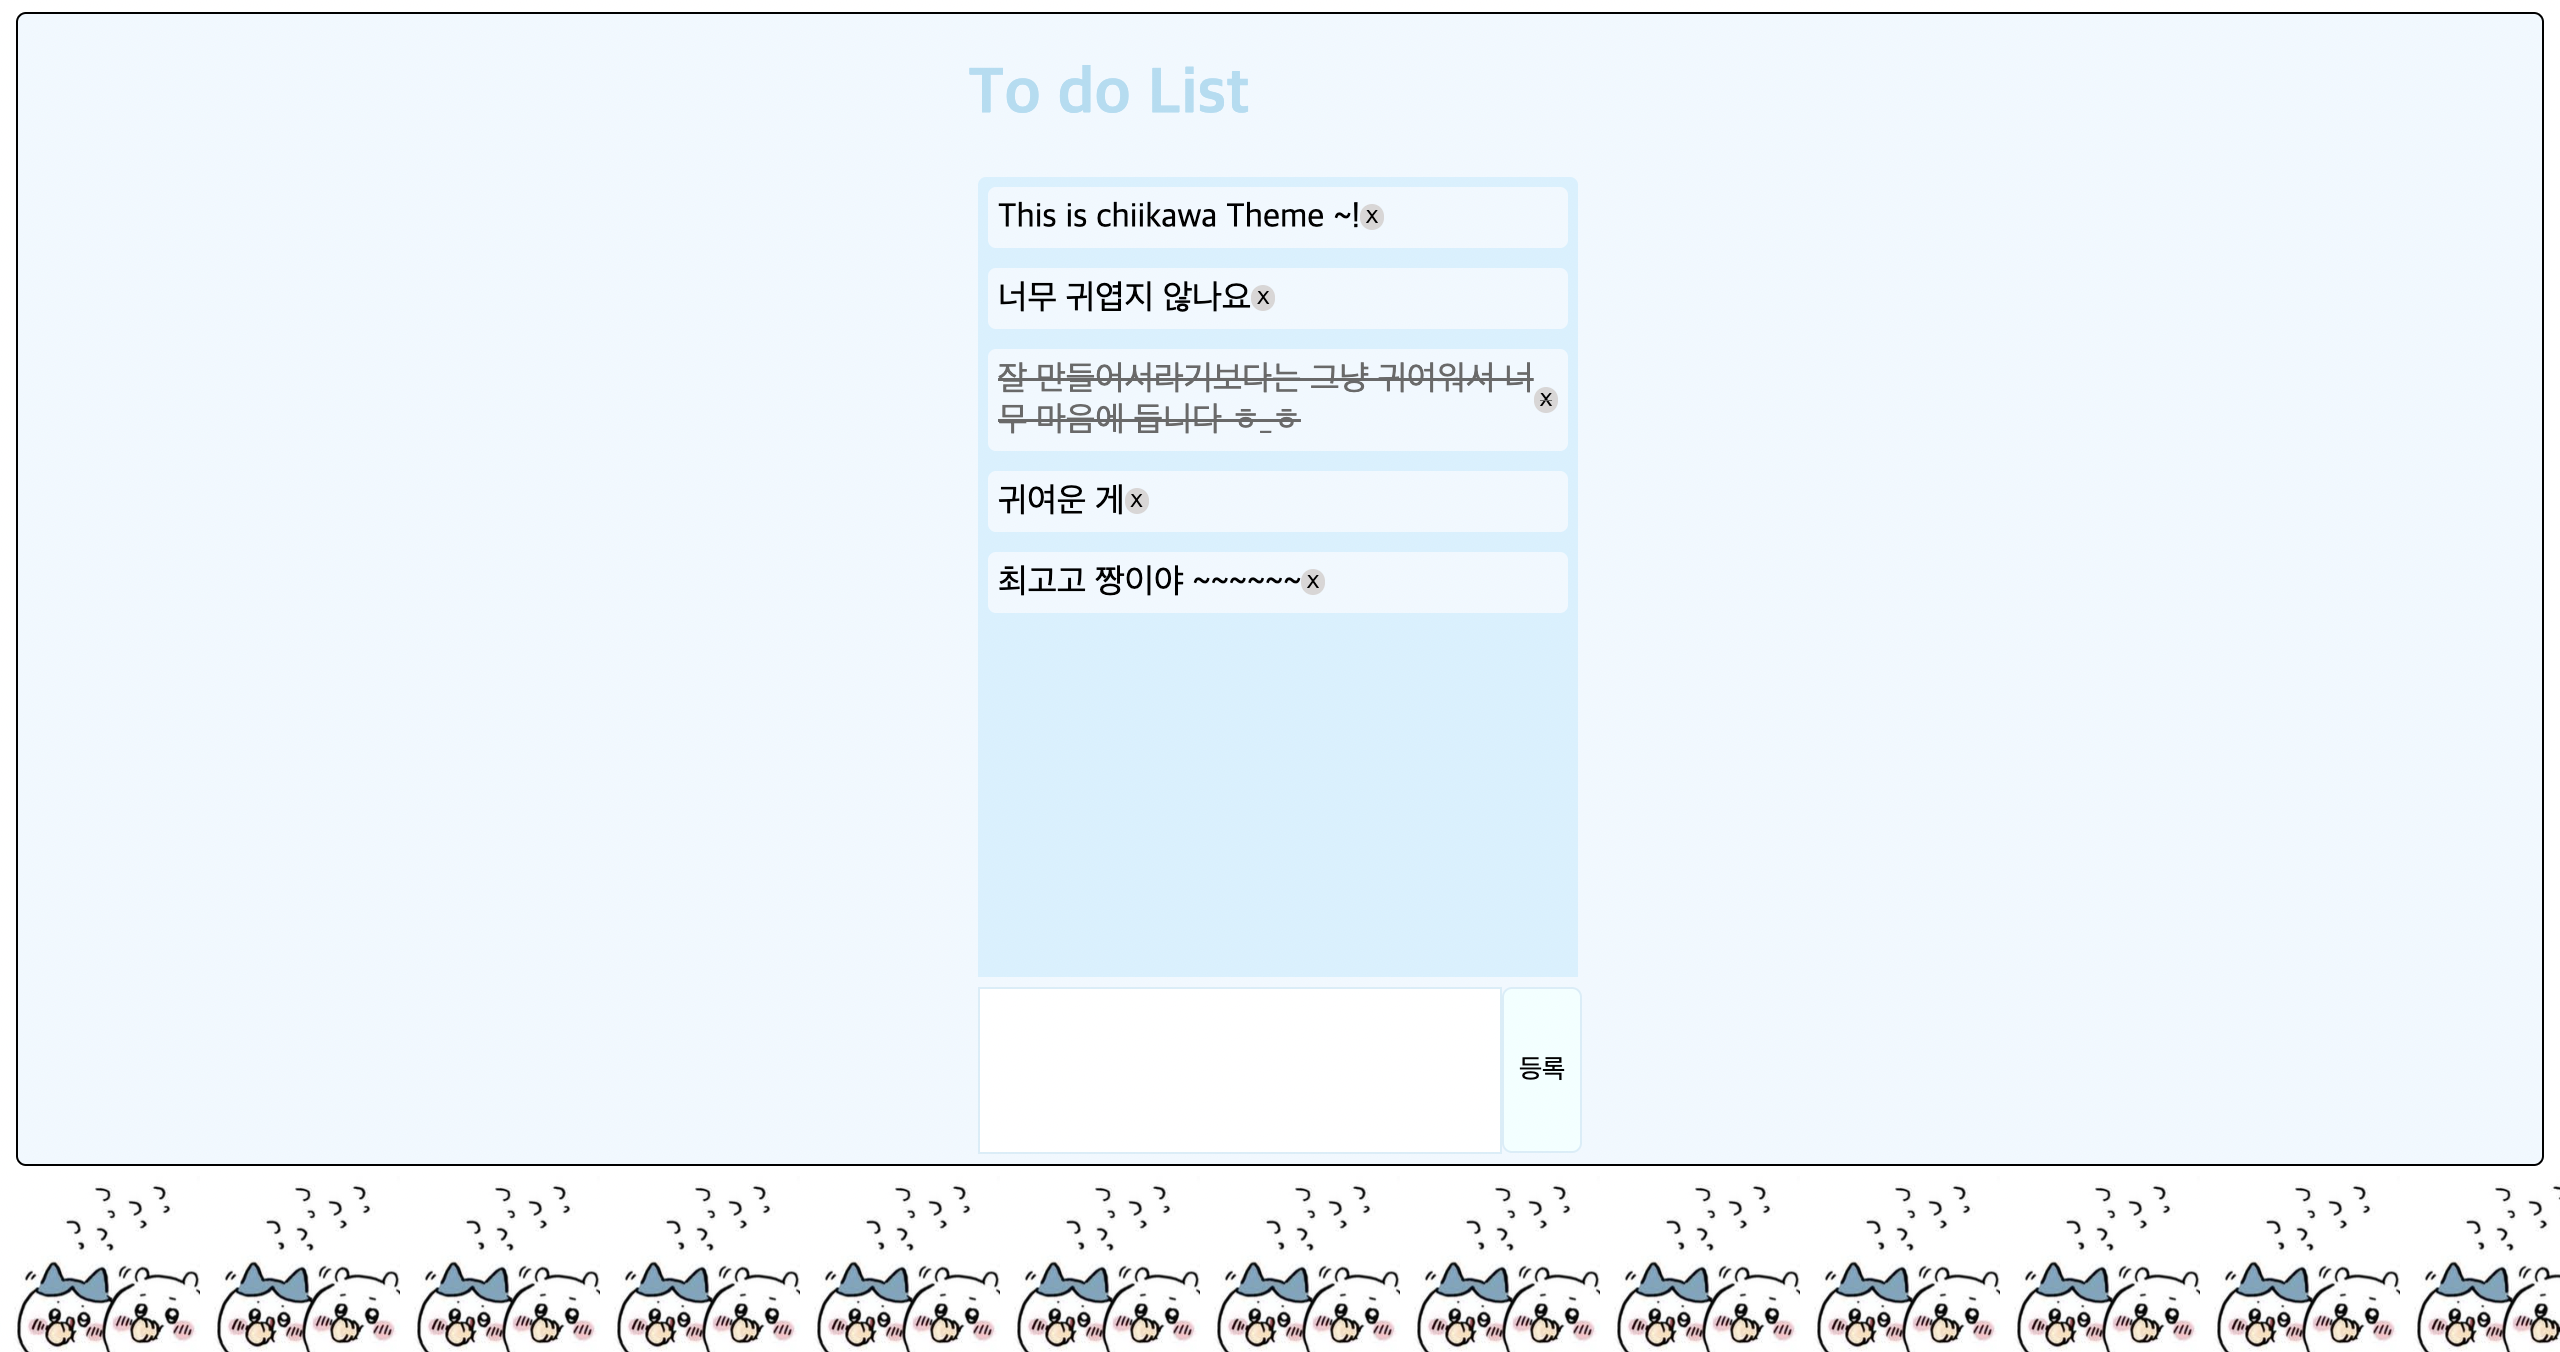
<h1> To do List</h1>
<ul id="todoList"></ul>
<form id="form" action="#">
<textarea name="text" id="inputText" cols="30" rows="5"></textarea>
<button name="text" class="submit">등록</button></form>
</div>
</div>
<script src="todolist.js"></script>
</body>
</html>HTML 구조는 정말 단순해서 딱히 설명할 게 없어요.
보시는 그대로의 아주아주 단순한 구조!
JavaScript
const todoList = document.getElementById('todoList')
const form = document.getElementById('form')
const inputText = document.getElementById("inputText")

let todoArr = []

function saveTodo() {
    const todoString = JSON.stringify(todoArr)
    localStorage.setItem("todo", todoString)
}

function loadTodo() {
    const todo = localStorage.getItem("todo")
    if (todo !== null) {
        todoArr = JSON.parse(todo)
        todoArr.forEach(renderTodoItem)
    }
}

window.onload = loadTodo()


form.addEventListener("submit", function (event) {
    event.preventDefault()

    const listItemAdded = {
        todoText: form.inputText.value,
        todoId: new Date().getTime(),
        todoDone: false
    }

    todoArr.push(listItemAdded)

    renderTodoItem(listItemAdded)

    inputText.value = ""

    saveTodo()
})

function renderTodoItem(item) {
    const li = document.createElement('li')
    li.textContent = item.todoText

    const deleteButton = document.createElement('button')
    deleteButton.textContent = "X"
    deleteButton.classList.add("delbtn")

    deleteButton.addEventListener("click", function () {

        li.remove()
        todoArr = todoArr.filter(function (todo) {
            return todo.todoId === item.todoId
        })
    });

    li.addEventListener("click", function () {

        doneItem(item.todoId)
        li.classList.toggle('done')
    });

    li.appendChild(deleteButton)
    todoList.appendChild(li)

    saveTodo()

};

function doneItem(clickedId) {
    todoArr = todoArr.map(function (item) {
        if (item.todoId === clickedId) {
            return { ...item, todoDone: !item.todoDone }
        } else {
            return item
        }
    })
}
사실 js는 모범답안 보고 그대로 따라하고 싶지 않아서 혼자 머리굴리고 이렇게도 해보고 저렇게도 해보다가 결국 막판엔 계속 잘 안되서 지피티의 도움도 살짝씩 받은 결과물입니다 (자신없다는 말을 길게 하는 거 맞음) ...ㅎ
-
localStorage를 사용해서 새로고침해도 작성된 리스트가 그대로 유지가 되게끔 사용해봤습니다.
-
함수 따로 빼서 li 추가와 함께 filter를 사용해서 각각의 todo 삭제 버튼과 기능 만들어봤습니다.
-
완료한 todo에 대해 클릭을 하면 classList.toggle을 통해 클래스를 부여해서, 추후에 CSS 효과로 제가 원하는 클릭 시 줄이 그어지는 효과를 받을 수 있도록 해주었습니다.
CSS
* {
	scrollbar-color: #9ed3ea;

    ::-webkit-scrollbar {
        width: 0px;
    }

    ::-webkit-scrollbar-thumb {
        background-color: #d4f1ff;
    }

    ::-webkit-scrollbar-track {
        background-color: #d4f1ff;
    }

    box-sizing: border-box;
}

body {
    background-image: url("하치와레 우유 복사본.jpg");
    background-position: 500px 590px;
    background-repeat: repeat no-repeat;
    background-size: 100px 100px;
}

h1 {
    color: #acddf2;
}

#container {
    display: flex;
    justify-content: center;
    align-items: center;
    border: 1px solid;
    border-radius: 5px;
    background-color: aliceblue;
}

#todoList {
    width: 300px;
    height: 400px;
    overflow: scroll;
    margin: 5px;
    padding: 0;
    border-radius: 4px;
    background-color: #d4f1ff;

    display: flex;
    flex-direction: column;
}

li {
    list-style-type: none;
    width: 290px;
    background-color: #f0f8ff;
    border-radius: 4px;
    font-size: 17px;
    margin: 5px;
    padding: 5px;
    display: flex;
    align-items: center;

}

.done {
    color: rgb(105, 105, 105);
    text-decoration: line-through;
}

.delbtn {
    border-style: none;
    border-radius: 60px;
    background-color: rgb(216, 214, 214);
    width: 5px;
    height: 13px;
    font-size: 9px;
    display: flex;
    align-items: flex-end;
    justify-content: center;
}

.delbtn:hover {
    background-color: cornflowerblue;
}

.submit {
    margin: 0;
    height: 83px;
    border-style: none;
    background-color: azure;
    border: 1px solid #d7eef8;
    border-radius: 5px;
    width: 40px;
}

#form {
    display: flex;
    margin: 5px;
}


#inputText {
    border: 0;
    resize: none;
    border: 1px solid #d7eef8;
}- overflow를 scroll로 하면 항상 거슬렸던 게 급격하게 못생겨지는 스크롤바였는데 이번엔 스크롤바 색과 크기를 조절해서 디자인에 통일성을 줬습니다.
- body에 background-image를 줘서 하치와레와 치이카와가 무언가를 마시는 귀여운 사진을 하단에 넣어주었습니다! position으로 위치를 하단에 고정해주었고 크기도 size로 조정해줌!
- 사용자가 임의로 textarea 사이즈를 조정하는 것을 막고 싶어서 resize: none을 넣어주었어요.
이런 류의 글은 처음 적어보는 거라 너무 어설프고요...
어떻게 설명해야 할지도 모르겠고...ㅋㅋㅋㅋ
무엇보다 제가 초보자라서 제가 적은 코드도 제 머리속에 완벽하게 존재하는 게 아니라 더 힘드네요 ㅎ
챗 지피티는 일단 최대한 제가 고민을 해보고 막혀서 진도가 안나갈 때만 도움을 받기로 스스로와 약속했는데
아직까진 지켜지고 있는 것 같습니다.

근데 제가 자바스크립트를 너무 못다뤄서 자꾸만 도움을 받게 된다는 게 함정.
내일은 더 알차게 적어보도록 하겠습니당... 그럼 이만


오~ 좋아요 css 스타일도 잘되어있고 js도 잘 작동하네요