개요
- opencv를 이용한 동전 인식
- mp4 사람 인식 실습
실습 내용
- 이미지 불러오기 및 전처리
img = cv2.imread("./coin/81.png")
hight, width, channel = img.shape
Grayscale 변환 및 이진화
gray = cv2.cvtColor(img , cv2.COLOR_BGR2GRAY)
blur = cv2.GaussianBlur(gray, (3,3), 0)
circle = cv2.HoughCircles(blur, cv2.HOUGH_GRADIENT, 1.6, 30, None, 200)
circle = np.uint16(np.around(circle))
circle
Grayscale(회색조)
컬러로 되어 있는 사진이나 동영상을 흑백(모노톤)으로 변경하는 것
- circle은 원의 중심 좌표와 반지름의 값을 가짐
array([[[546, 330, 47],
[559, 535, 47],
[449, 278, 44],
[682, 151, 45],
[191, 479, 51],
[367, 577, 52],
[271, 316, 46],
[687, 271, 44],
[564, 193, 52],
[452, 438, 46],
[481, 118, 46],
[354, 170, 52],
[153, 329, 52],
[644, 406, 43]]], dtype=uint16)
동전 분류 및 리스트에 정보 저장
list1 = []
for i,k in enumerate(circle[0, :]):
   x,y,radius = int(k[0]), int(k[1]), int(k[2])
   if radius < 39:
       text = '10'
   elif (radius>=39) & (radius < 44):
       text = '50'
   elif (radius>=45) & (radius < 48):
       text = '100'
   elif (radius >= 48):
       text = '500'
   cv2.circle(img,  (k[0],k[1]),  k[2], (0,255,0), 4)
   cv2.circle(img,  (k[0],k[1]),  2, (0,0,255), 5)
   cv2.putText(img, text, (x,y), cv2.FONT_HERSHEY_COMPLEX, 0.5, (0,0,255), 1, cv2.LINE_AA)
   num = int(text)
   list1.append(num)
시각화
total = sum(list1)
cv2.putText(img, f'total: {total}',(800,30), cv2.FONT_HERSHEY_COMPLEX, 0.5, (255,255,255), 1, cv2.LINE_AA)
cv2.imshow('title', img)
cv2.waitKey(0)
cv2.destroyAllWindows()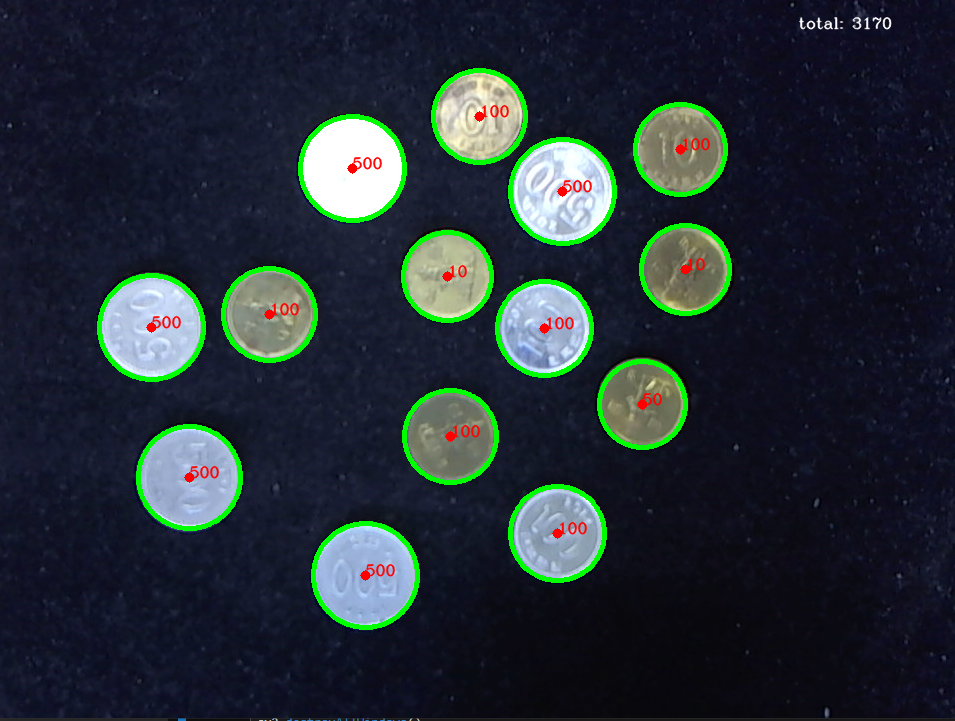
- 문제점: 10원과 100원의 크기를 구별 못함
mp4 영상에서 사람 인식하기
MobileNet SSD 모델 호출
def load_mobilenet_ssd():
    # Caffe 모델 파일 경로 (prototxt와 caffemodel)
    prototxt_path = './data/MobileNetSSD_deploy.prototxt'  # 모델 구조 파일
    model_path = './data/MobileNetSSD_deploy.caffemodel'  # 학습된 모델 파일
    net = cv2.dnn.readNetFromCaffe(prototxt_path, model_path)  # 모델 불러오기
    return net  # 불러온 모델 반환

# MobileNet SSD로 감지 가능한 객체 목록
class_names = ["background", "aeroplane", "bicycle", "bird", "boat",
               "bottle", "bus", "car", "cat", "chair", "cow", "diningtable",
               "dog", "horse", "motorbike", "person", "pottedplant", "sheep",
               "sofa", "train", "tvmonitor"]
# 얼굴 감지 모델 로드 (Haar Cascade)
face_cascade = cv2.CascadeClassifier(cv2.data.haarcascades + 'haarcascade_frontalface_default.xml')
- MobileNet SSD은 경량화된 MobileNet을 백본으로 사용하는 SSD 객체 탐지 모델
- 빠른 속도와 낮은 연산 비용 덕분에 모바일 및 임베디드 환경에 적합한 실시간 객체 탐지 모델
MobileNetSSD_deploy.prototxt: 네트워크 구조를 담은 파일 경로
MobileNetSSD_deploy.caffemodel: 사전 학습된 가중치를 담은 파일 경로
net: 파일경로와 가중치를 이용하여 모델을 불러옴
face_cascade:cv2.CascadeClassifier이용한 정면 얼굴 탐지 모델 로드
동영상에서 이미지 추출 후 사람 포함 여부 확인 및 저장
- 파일 저장 변수 선언은 생략
video = cv2.VideoCapture('동영상 파일 저장 주소')
num = 0
image_count = 50 - 용량 크기로 인해 50개의 이미지로 제한
while video.isOpened() and num < image_count:
    check, frame = video.read()
    if not check:  # 동영상이 끝났다면
        print('동영상 끝났습니다.')
        break

    # cv2.imshow('test', frame)
    (h, w) = frame.shape[:2]  # 프레임의 높이와 너비
    blob = cv2.dnn.blobFromImage(frame, 0.007843, (300, 300), 127.5)  # 이미지 전처리
    net.setInput(blob)  # 모델 입력 설정
    detections = net.forward()  # 사람 탐지를 위한 전방향 패스 실행

    # 탐지된 객체가 사람인지 확인
    for i in np.arange(0, detections.shape[2]):
        confidence = detections[0, 0, i, 2]  # 탐지된 객체의 신뢰도

        if confidence > 0.2:  # 신뢰도가 20% 이상일 경우
            idx = int(detections[0, 0, i, 1])  # 탐지된 객체의 클래스 인덱스
            if class_names[idx] == 'person':  # 사람이 탐지되었을 경우
                box = detections[0, 0, i, 3:7] * np.array([w, h, w, h])  # 사람의 위치를 계산
                (startX, startY, endX, endY) = box.astype("int")  # 좌표를 정수로 변환

                # 이미지를 파일로 저장
                mypath = f'{image_folder}myscuba_{num}.jpg'
                cv2.imwrite(mypath, frame)  # 이미지 저장
                num += 1  # 이미지 번호 증가
                break  # 한 명만 탐지된 후 루프 종료

    clean_old_images(image_folder, max_images=300)  # 이미지가 너무 많으면 오래된 이미지 삭제
video.release()  # 비디오 캡쳐 객체 해제
화면에 2*2 그리드 시각화 및 저장
# 저장된 이미지 목록 가져오기
image_files = [f for f in os.listdir(image_folder) if f.endswith('.jpg')]

# 사람이 포함된 이미지가 없을 경우 처리
if len(image_files) == 0:
    print("사람이 포함된 이미지가 없습니다.")
else:
    # 사람이 포함된 이미지 중에서 최대 4개까지 임의로 선택
    num_images_to_display = min(4, len(image_files))  # 최대 4개 이미지 선택
    selected_images = random.sample(image_files, num_images_to_display)  # 임의로 4개 선택

    # 2행 2열 형태로 이미지를 출력할 수 있는 subplot 생성
    fig, axes = plt.subplots(2, 2, figsize=(10, 10))  # 2행 2열 그리드로 설정
    axes = axes.flatten()  # axes를 1D 배열로 변환하여 반복문에서 처리

    # 선택된 이미지를 순차적으로 출력
    for i, image_file in enumerate(selected_images):
        image_path = os.path.join(image_folder, image_file)

        image = cv2.imread(image_path)  # 이미지를 읽어옴
        gray = cv2.cvtColor(image, cv2.COLOR_BGR2GRAY)  # 이미지를 흑백으로 변환
        faces = face_cascade.detectMultiScale(gray, 1.3, 5)  # 얼굴을 탐지

        (h, w) = image.shape[:2]
        # MobileNet SSD를 사용하여 이미지에서 사람 탐지
        blob = cv2.dnn.blobFromImage(image, 0.007843, (300, 300), 127.5)
        net.setInput(blob)
        detections = net.forward()

        # 얼굴에 초록색 사각형 그리기
        for (x, y, w, h) in faces:
            cv2.rectangle(image, (x, y), (x + w, y + h), (0, 255, 0), 2)

        # 사람의 전신에 파란색 사각형 그리기
        for j in np.arange(0, detections.shape[2]):
            confidence = detections[0, 0, j, 2]

            if confidence > 0.2:  # 신뢰도가 20% 이상일 경우
                idx = int(detections[0, 0, j, 1])
                if class_names[idx] == 'person':  # 사람이 탐지된 경우
                    box = detections[0, 0, j, 3:7] * np.array([w, h, w, h])
                    (startX, startY, endX, endY) = box.astype("int")
                    cv2.rectangle(image, (startX, startY), (endX, endY), (255, 0, 0), 2)

                    # 얼굴이 감지된 이미지를 별도의 폴더에 저장
                    face_image_path = os.path.join(face_image_folder, f"face_detected_{image_file}")
                    cv2.imwrite(face_image_path, image)

        # OpenCV는 BGR 형식으로 이미지를 읽기 때문에 RGB로 변환
        image_rgb = cv2.cvtColor(image, cv2.COLOR_BGR2RGB)

        # 각 이미지를 axes[i]에 맞춰서 출력
        axes[i].imshow(image_rgb)
        axes[i].axis('off')  # 축 제거
        axes[i].set_title(f'Image {i + 1}')  # 제목 설정

    plt.tight_layout()  # 레이아웃 조정
    plt.show()  # 이미지를 화면에 출력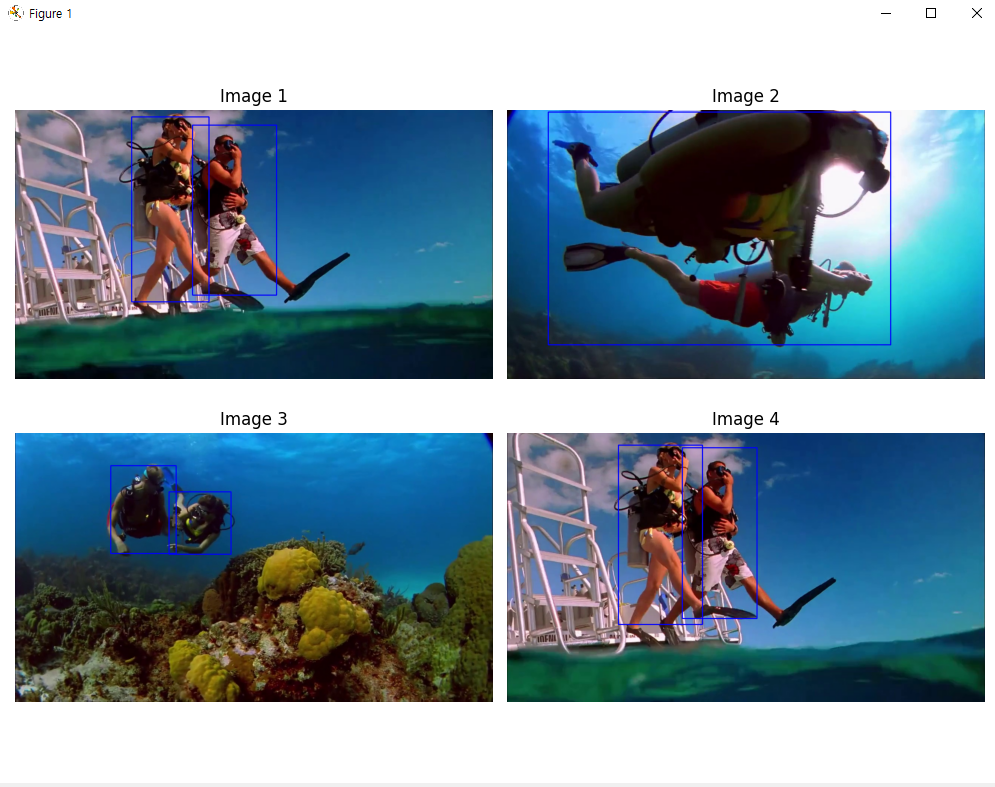

안녕하세요. 도야입니다