개요
- CNN 기초
- Cat_vs_dog를 이용한 간단한 CNN 실습
CNN(Convolution Neural Network)
- 이미지 처리에 특화된 딥러닝
- 기존 기법과 달리 별도 전처리 없이 특징을 자동으로 학습할 수 있음
- 위치 변화에 강함
- 이미지 분류, 자율 주행 등 다양한 분야에서 사용됨
CNN의 일반적인 아키텍처
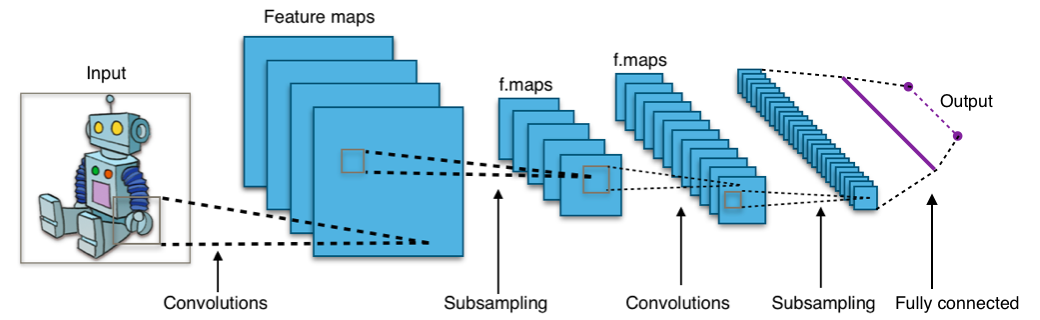
출처: https://en.wikipedia.org/wiki/Convolutional_neural_network
합성곱
- 두 함수(행렬)을 곱해 새로운 함수를 생성하는 수학적 연산
- 딥러닝에서 이미지 데이터에 필터(커널)를 적용하여 특징을 추출하는데 사용
패딩
- 반복적인 합성곱 연산을 적용했을 때 특성의 행렬의 크기가 작아지는 것을 방지 및 모서리 부분의 정보 손실을 줄이고자 이미지 주변에 0을 채워 넣는 방법
실습
- 고양이 사진과 개 사진을 구별하는 실습
실습 데이터 다운
_URL = ("https://download.microsoft.com/download/3/E/1/3E1C3F21-ECDB-4869-8368-6DEBA77B919F/kagglecatsanddogs_5340.zip")
setattr(tfds.image_classification.cats_vs_dogs, '_URL',_URL)
학습, 검증, 테스트 데이터셋 분류
(train_ds, validation_ds, test_ds), ds_info = tfds.load(
    'cats_vs_dogs',
    split = ['train[:80%]','train[80%:90%]', 'train[90%:]'],
    with_info = True, as_supervised = True
)
전처리 및 성능 최적화
def preprocess(image, label):
    image = tf.image.resize(image,[64, 64])
    image = tf.cast(image, tf.float32)/255.0
    return image, label

AUTOTUNE = tf.data.AUTOTUNE
train_ds = train_ds.map(preprocess).shuffle(1000).batch(32).prefetch(AUTOTUNE)
validation_ds = validation_ds.map(preprocess).batch(32).prefetch(AUTOTUNE)
test_ds = test_ds.map(preprocess).batch(32).prefetch(AUTOTUNE)
모델 구축
model = Sequential([
    Conv2D(filters=16, kernel_size = 3, padding = 'same', activation='relu', input_shape = (64,64,3) ),
    MaxPooling2D(),
    Conv2D(filters=16, kernel_size = 3, padding = 'same', activation='relu' ), # output 층
    MaxPooling2D(),
    Flatten(),
    Dense(units=512, activation = 'relu'),
    Dense(units=2, activation = 'softmax'),
])
모델 compile 및 학습
model.compile(
    optimizer='adam',
    loss='sparse_categorical_crossentropy',
    metrics=['accuracy']
)
history = model.fit(
    train_ds,
    validation_data=validation_ds,
    epochs=10
)
정확도 시각화
test_loss, test_acc = model.evaluate(test_ds)
# 학습 중 저장된 정확도
val_acc = history.history['val_accuracy']
epochs = range(1, len(val_acc) + 1)

plt.figure(figsize=(8, 5))
plt.plot(epochs, val_acc, label='Validation Accuracy', marker='o')
plt.hlines(test_acc, xmin=1, xmax=len(val_acc), colors='red', linestyles='--', label=f'Test Accuracy ({test_acc:.2f})')

plt.xlabel('Epoch')
plt.ylabel('Accuracy')
plt.title('검증 vs 테스트 정확도')
plt.legend()
plt.grid(True)
plt.ylim(0, 1)
plt.show()
테스트 데이터를 이용한 모델 테스트
for images, labels in train_ds.take(1):
    preds = model.predict(images)
    pred_labels = np.argmax(preds, axis=1)
    true_labels = labels.numpy()

    plt.figure(figsize=(15, 6))
    for i in range(min(20, len(images))):  # 최대 20개까지 출력
        title = f"예측: {'dog' if pred_labels[i] == 1 else 'cat'}\n실제: {'dog' if true_labels[i] == 1 else 'cat'}"
        plt.subplot(4, 5, i + 1)
        plt.imshow(images[i].numpy())
        if not pred_labels[i] == true_labels[i]:
            plt.title(title, fontdict={'color':'red'})
            plt.axis("off")
        else:
            plt.title(title,fontdict={'color':'blue'})
            plt.axis('off')

    plt.tight_layout()
    plt.show()
    break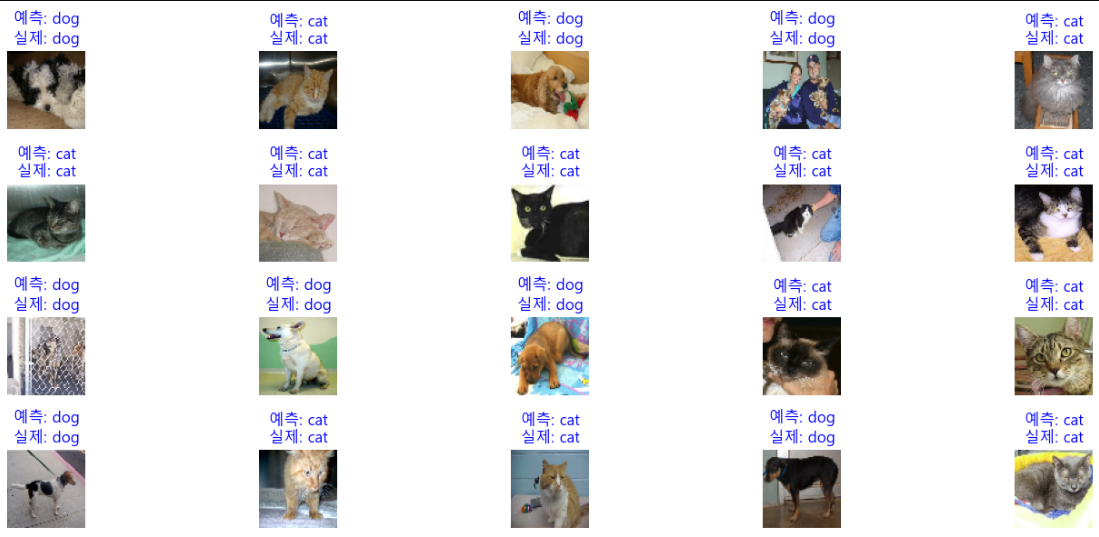

안녕하세요. 도야입니다