
개요
HTTP 통신으로 데이터를 주고 받을 때 사용되는 여러가지 형식이 있습니다. 최근에는 Json 형식으로 데이터를 주고 받는 것이 보편적이죠.
하지만 과거에 구현된 Web API 중 일부는 json을 지원하지 않고 xml만 지원하는 경우도 있습니다. 지금 혼자 구현하고자 하는 포폴용 프로젝트가 그러했습니다.
API 응답 결과인 xml 데이터를 파싱하여 반복문 돌리면서 원하는 값을 찾는 중 2중 3중 4중으로 반복문과 조건문이 겹치면서 코드가 지저분해지면서 이게 맞나 싶었고 결국 멈추게 되었습니다.
이 귀찮은 작업을 누군가 대신 해주었을 것 같은 느낌적인 느낌이 들어서 구글신께 여쭤보았고 Jaxb라는 키워드를 알게 되었다. 수 차례의 삽질 끝에
JAXB란?
JAXB(Java Architecture for XML Binding)는 자바 클래스를 XML로 표현하는 자바 API입니다. (출처 : 위키백과)
역시 이 귀찮은 작업을 대신 해줄 API를 찾을 수 있었고 개념과 사용법에 대해서 소개하고자 합니다.
JAXB 의존성
Spring Boot 에서 기본적으로 포함되어있어 별도의 의존성 추가 없이 바로 사용할 수 있습니다.
<dependency>
	<groupId>org.springframework.boot</groupId>
    <artifactId>spring-boot-starter-test</artifactId>
    <scope>test</scope>
</dependency>
Spring Boot 2.4.5 기준 spring-boot-starter-test 의존성 내부에 아래 의존성을 포함하고 있습니다.
<dependency>
	<groupId>jakarta.xml.bind</groupId>
	<artifactId>jakarta.xml.bind-api</artifactId>
    <version>2.3.3</version>
    <scope>compile</scope>
</dependency>
Marshal, Unmarshal
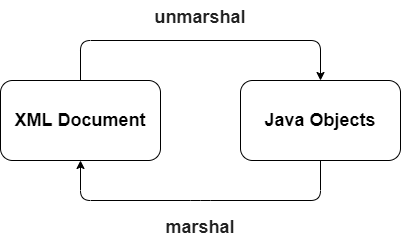
Marshal의 뜻은 '정렬시키다' 라는 뜻으로 자바 오브젝트를 XML 문서로 변환하는 것을 말합니다. Unmarshar은 반대로 XML 문서를 자바 오브젝트로 변환하는 것을 말합니다.
개발하기
Unmarshal
- 제 경우엔 언마샬이 필요했습니다. 그래서 먼저 해보겠습니다.
XML 데이터
<?xml version="1.0" encoding="UTF-8"?>
<list>
    <smart-phone>
        <model>iPhone</model>
        <price>1000000</price>
        <firmware>20.1</firmware>
    </smart-phone>
    <smart-phone>
        <model>Galaxy</model>
        <price>900000</price>
        <firmware>30.0</firmware>
    </smart-phone>
    <smart-phone>
        <model>ThinQ</model>
        <price>900000</price>
        <firmware>5.5.0</firmware>
    </smart-phone>
    <smart-phone>
        <model>HTC</model>
        <price>800000</price>
        <firmware>3</firmware>
    </smart-phone>
</list>
list 태그용 Object
위와 같은 xml 데이터가 있다고 가정해보겠습니다. 우선 list라는 태그로 사용할 객체를 만들어줍니다.
import javax.xml.bind.annotation.XmlAccessType;
import javax.xml.bind.annotation.XmlAccessorType;
import javax.xml.bind.annotation.XmlElement;
import javax.xml.bind.annotation.XmlRootElement;

@XmlAccessorType(XmlAccessType.FIELD)
@XmlRootElement(name = "list")
@Getter @Setter @ToString
public class XmlListTag {

    @XmlElement(name = "smart-phone")
    private SmartPhoneTag[] smartPhoneTags;
}
smart-phone 태그용 Object
import javax.xml.bind.annotation.XmlAccessType;
import javax.xml.bind.annotation.XmlAccessorType;
import javax.xml.bind.annotation.XmlElement;

@XmlAccessorType(XmlAccessType.FIELD)
@Getter @Setter
@ToString
public class SmartPhoneTag {

    @XmlElement(name = "model")
    private String model;

    @XmlElement(name = "price")
    private int price;

    @XmlElement(name = "firmware")
    private String firmware;
}
설명
@XmlAccessorType종류가 여러개 있지만 적지 않을 경우 public 요소까지 모두 바인딩을 시도한다. 따라서 Lombok의@Setter를 사용할 때는 생기는 set 메서드도 바인딩을 시도하기 때문에 예외가 발생한다. 따라서 private 요소들만 바인딩을 시도하도록XmlAccessType.FIELD를 적어주도록 해야 한다.@XmlRootElement가장 최상위 태그라고 알려주는 역할이고 name 값에 실제 태그 명을 적어줍니다.
그리고 하위 태그로 동일한 모양으로smart-phone이라는 태그를 가지고 있으니 새로 클래스를 만들고 배열로 만들어줍니다.@XmlElementxml 문서의 태그에 해당합니다. 변수 위에 어노테이션을 적고 해당 태그 명을 같이 적어줍니다.
Test Code
@Test
@DisplayName("unmarshal 테스트")
public void jaxbTest() throws JAXBException, IOException {

    // Given
    FileInputStream fileInputStream = new FileInputStream("test-data/data1.xml");
    JAXBContext jaxbContext = JAXBContext.newInstance(XmlListTag.class);
    Unmarshaller unmarshaller = jaxbContext.createUnmarshaller();

    // When
    XmlListTag xmlListTag = (XmlListTag) unmarshaller.unmarshal(fileInputStream);
    fileInputStream.close();

    // Then
    assertNotNull(xmlListTag);
    assertNotNull(xmlListTag.getSmartPhoneTags());
    assertEquals(4, xmlListTag.getSmartPhoneTags().length);
    assertEquals("iPhone", xmlListTag.getSmartPhoneTags()[0].getModel());
}
결과
테스트 코드도 잘 통과했고 추가로 Object를 콘솔에 출력해보니 xml 데이터가 잘 바인딩 된 것을 확인할 수 있습니다.
SmartPhoneTag(model=iPhone, price=1000000, firmware=20.1)
SmartPhoneTag(model=Galaxy, price=900000, firmware=30.0)
SmartPhoneTag(model=ThinQ, price=900000, firmware=5.5.0)
SmartPhoneTag(model=HTC, price=800000, firmware=3)
Marshal
Test Code
@Test
@DisplayName("marshal 테스트")
public void jaxbMarshalTest() throws JAXBException, IOException {

    // Given
    File file = new File("test-data/data3.xml");
    JAXBContext jaxbContext = JAXBContext.newInstance(XmlListTag2.class);
    Marshaller marshaller = jaxbContext.createMarshaller();

    XmlListTag2 xmlListTag = new XmlListTag2();
    List<SmartPhoneTag> smartPhoneTags = new ArrayList<>();

    SmartPhoneTag smartPhoneTag = SmartPhoneTag.builder()
            .model("샘성")
            .price(1230000)
            .firmware("1.2.3")
            .build();

    SmartPhoneTag smartPhoneTag2 = SmartPhoneTag.builder()
            .model("엘징")
            .price(1150000)
            .firmware("2.5")
            .build();

    smartPhoneTags.add(smartPhoneTag);
    smartPhoneTags.add(smartPhoneTag2);
    xmlListTag.setSmartPhoneTags(smartPhoneTags);

    // When
    marshaller.setProperty(Marshaller.JAXB_FORMATTED_OUTPUT, true);
    marshaller.marshal(xmlListTag, file);

    FileInputStream fileInputStream = new FileInputStream(file);
    byte[] bytes = fileInputStream.readAllBytes();
    String content = new String(bytes);

    // Then
    assertEquals("<?xml version=\"1.0\" encoding=\"UTF-8\" standalone=\"yes\"?>\n" +
            "<list>\n" +
            "    <smart-phone>\n" +
            "        <model>샘성</model>\n" +
            "        <price>1230000</price>\n" +
            "        <firmware>1.2.3</firmware>\n" +
            "    </smart-phone>\n" +
            "    <smart-phone>\n" +
            "        <model>엘징</model>\n" +
            "        <price>1150000</price>\n" +
            "        <firmware>2.5</firmware>\n" +
            "    </smart-phone>\n" +
            "</list>\n", content);
}SmartPhoneTag클래스에서@Builder어노테이션을 추가하고XmlListTag에서는 추가하고 수정하는 작업이 필요하니 배열이 아니라 List로 수정한 클래스를 하나 더 만들어서 진행했습니다.
결과
아래의 파일이 잘 생성 되었습니다.
테스트를 어떻게 할까 고민하다가 다시 파싱해서 xml 값 들어갔는지 확인하는 것이 좀 이상해서 문자열 전부 비교해버렸습니다..ㅎㅎ
<?xml version="1.0" encoding="UTF-8" standalone="yes"?>
<list>
    <smart-phone>
        <model>샘성</model>
        <price>1230000</price>
        <firmware>1.2.3</firmware>
    </smart-phone>
    <smart-phone>
        <model>엘징</model>
        <price>1150000</price>
        <firmware>2.5</firmware>
    </smart-phone>
</list>
사용된 코드는 모두 Github 에서 볼 수 있습니다.
참고자료
https://jakarta.ee/specifications/xml-binding/3.0/jakarta-xml-binding-spec-3.0.html
https://pythonq.com/so/java/173358
https://tychejin.tistory.com/135
