새로운 과제... 내가 원한다고 했으니 잘해보자!
지나가는 말로... 물론 논문을 많이 읽어보진 않았지만, 이렇게 reference가 많은 건 또 처음이다.
📑 Deep Residual Learning for Image recognition
1. Introduction
1. 핵심은?
이 논문의 Introduction에서 가장 핵심으로 꼽는 것이라고 하면,
깊이가 깊어짐에 따라 성능이 향상되지 않는다는 것이다.
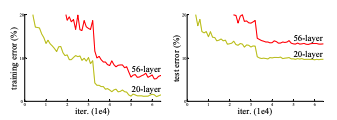
이전의 VGG와 같은 network의 경우, layer를 많이 쌓을수록, 즉 network의 깊이가 깊어질수록 성능이 좋아졌다. 하지만 어느정도의 깊이까지만 해당될 뿐, 더 깊은 네트워크는 오히려 성능이 떨어진다는 것이다. 위 사진에서 얻을 수 있는 정보는 2가지이다.
- layer를 많이 쌓는다고 성능이 향상하는 것이 아니다.
- layer를 많이 쌓아 높아진 error rate는 Dropout의 문제가 아니다. (만약 Dropout의 문제였다면, Training Error는 낮게 나오고 Test Error는 높게 나와야 함)
그래서 해결방안으로 제시한 것은 바로 Residual Learning (잔차학습) 이다.
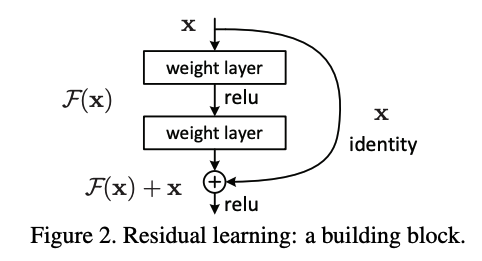
이것이 바로 Residual Learning의 Process이다. 단순히 input을 한 번 더 더해주면 되는 것이다. 그런데 왜 더해주는 부분을 x라고 하지 않고 x identity라고 했을까?
identity mapping 라고 하면, 항등함수를 의미한다. 항등함수는 정의역과 치역이 완전히 같고, 함수 f(x)가 x 자기 자신을 뱉어내는 것을 말한다. 좀 더 수학적인 부분은 인터넷에 더 자세하게 설명되어 있으니 이를 참고하면 좋을 듯하다.
내가 제일 이해가 안되었던 부분이 바로 이 identity mapping이다. 이렇게 그림으로만 볼 때는 x라고 쓰는 게 더 타당(?)하다고 생각했지만, 코드를 작성해보면서 그대로 x를 더하면 아주아주 큰일난다!는 것을 깨달았다. 내가 이해한 바탕으로 설명을 하자면,
x identity라고 쓴 이유는 F(x)의 출력값과 dimension을 맞추기 위함이다.
결론적으로 x라는 값 자체는 같지만, 이를 downsampling 한 것(혹은 upsampling 할 수도 있겠지만)을 x identity라고 한다.
이와 관련하여 코드를 살펴보자.
import torch
from torch import nn

x = torch.rand((2,3, 224, 224))

identity_downsample = nn.Conv2d(x.shape[1], x.shape[1]*4, kernel_size=1, stride=2)
x_identity = identity_downsample(x)

print(x_identity.shape)
이 결과물은 바로!

이와 같다. channel의 수가 바뀌었고, stride에 의해서 x의 shape이 바뀐 것을 확인할 수 있다. 여기서 identity_downsample이 해준 것은 channel의 수 맞추기, 즉 dimension 맞추기인 것이다.
2. 그래서 왜 ResNet을 쓰는 걸까?
결론부터 이야기하면, Vanishing Gradient를 해결하기 위함이다. Network를 Deep하게 만드는 과정에서 가장 큰 문제점은 Back Prop과정에서 생기는 Vanishing Gradient이다.
여러 비선형 함수를 거치며 Gradient는 점차 0에 수렴하게 되고 그 결과 Update 되는 Weight의 정도가 점차 줄어들며 결국 Weight Update가 이루어지지 않는 것이다.
반면에 ResNet은 이 Vanishing Gradient 문제를 극복한 친구이다. ResNet의 수식을 보자.

이 부분은 와 input 의 dimension을 맞춰주기 위한 Linear Projection이 담긴 수식이다. Network의 깊이가 깊어짐에 따라 Back Prop 과정에서 앞의 에 관한 gradient는 점차 0에 가까워질 수 있다. 하지만 뒤에 추가된 identity mapping 는 최소한 가 남아있을 것이다. 정리하자면 gradient는
라고 할 수 있다. 따라서 ResNet은 Vanishing Gradient 문제를 해결한다고 볼 수 있다.
4. Experiments
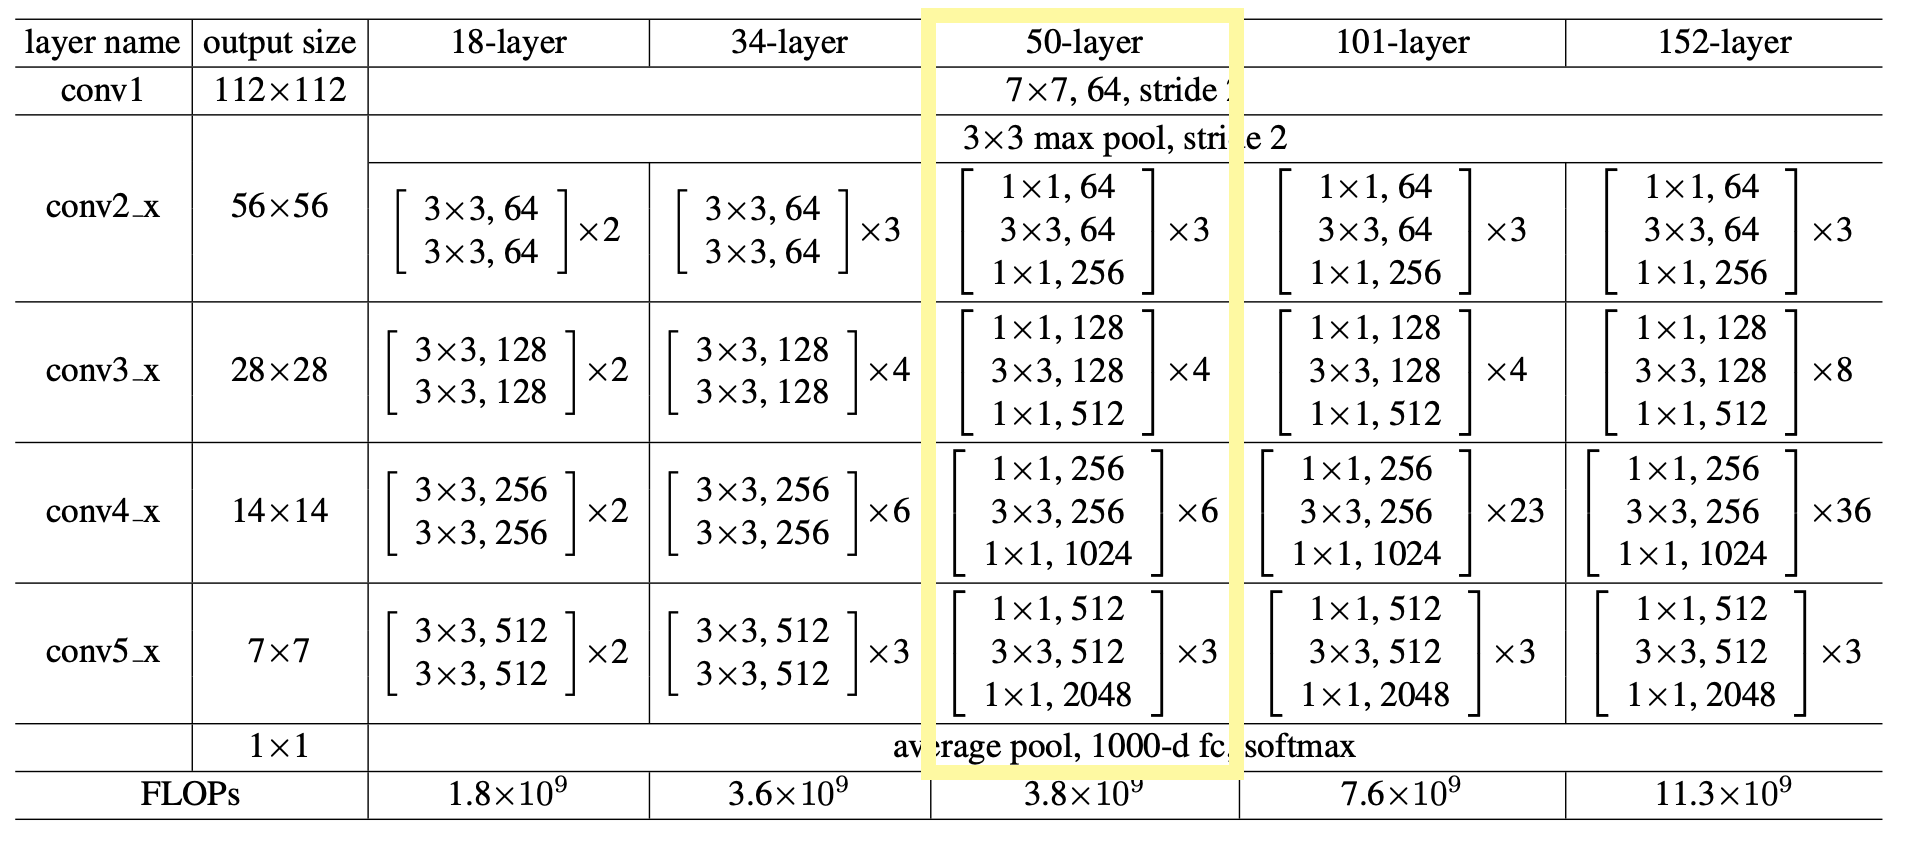
1. ResNet Architecture
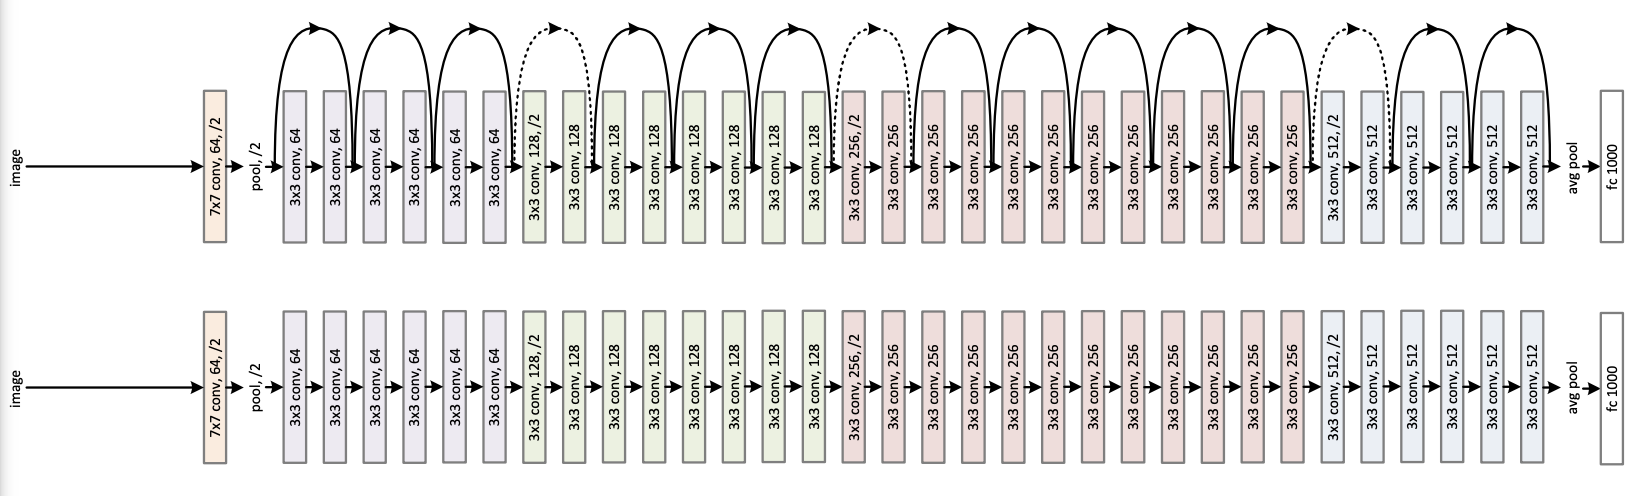
이것이 바로 ResNet-34의 아키텍처이다. Plain과 비교해보았을 때 Shortcut connection(x identity를 더해주는 것)이 있는 것을 확인할 수 있다. 중간의 점선 부분은 추후 더 자세하게 설명하도록 하겠다.
2. ResNet
class block(nn.Module):
    def __init__(self, in_channels, out_channels, identity_downsample=None, stride=1):
        super(block, self).__init__()
        self.expansion = 4 # channel이 3x3을 거치고 4배가 됨

        # 1x1
        self.conv1 = nn.Conv2d(in_channels, out_channels, kernel_size=1, stride=1, padding=0)
        self.bn1 = nn.BatchNorm2d(out_channels) # BatchNorm은 channel에 따라 계산

        # 3x3 -> 손실 정보를 없애기 위해서 padding = 1
        self.conv2 = nn.Conv2d(out_channels, out_channels, kernel_size=3, stride=stride, padding=1)
        self.bn2 = nn.BatchNorm2d(out_channels)

        # 1x1
        self.conv3 = nn.Conv2d(out_channels, out_channels*self.expansion, kernel_size=1, stride=stride, padding=0)
        self.bn3 = nn.BatchNorm2d(out_channels*self.expansion)

        # relu 정의
        self.relu = nn.ReLU()

        # identity mapping: shape(dim)을 맞춰주기 위함
        self.identity_downsample = identity_downsample

    def forward(self, x):
        identity = x

        # 1x1
        x = self.conv1(x)
        x = self.bn1(x)
        x = self.relu(x)
        # 3x3
        x = self.conv2(x)
        x = self.bn2(x)
        x = self.relu(x)
        # 1x1
        x = self.conv3(x)
        x = self.bn3(x)

        # identity
        if self.identity_downsample is not None:
            identity = self.identity_downsample(identity)
        x += identity

        # relu
        x = self.relu(x)
        return x

# ResNet 50 Architecture: 3 4 6 3
class ResNet(nn.Module):
    def __init__(self, block, layers, image_channels, num_classes):
        super(ResNet, self).__init__()
        self.in_channels = 64

        # layer_name: conv1 (output: 112x112x64)
        self.conv1 = nn.Conv2d(image_channels, 64, kernel_size=7, stride=2, padding=3) # padding = 3이어야지 output = 112x112
        self.bn1 = nn.BatchNorm2d(64)
        self.relu = nn.ReLU()

        # layer_name: conv2x (output: 56x56x256)
        self.maxpool = nn.MaxPool2d(kernel_size=3, stride=2, padding=1) #(output: 56x56x64)
        self.layer1 = self.layer(block, layers[0], out_channels=64, stride=1)

        # layer_name: conv3x (output: 28x28x512)
        self.layer2 = self.layer(block, layers[1], out_channels=128, stride=2)

        # layer_name: conv4x (output: 14x14x1024)
        self.layer3 = self.layer(block, layers[2], out_channels=256, stride=2)

        # layer_name: conv5x (output: 7x7x2048)
        self.layer4 = self.layer(block, layers[3], out_channels=512, stride=2)

        # average pooling
        self.avgpool = nn.AdaptiveAvgPool2d((1,1))
        self.fc = nn.Linear(512*4, num_classes)

    # 50개의 layer를 다 쌓을 수 없으니...
    def layer(self, block, num_residual_blocks, out_channels, stride):
        identity_downsample = None
        layers = []

        if stride != 1 or self.in_channels != self.out_channels*4:
            identity_downsample = nn.Sequential(nn.Conv2d(self.in_channels, out_channels*4, kernel_size=1, stride=stride),
                                                nn.BatchNorm2d(out_channels*4))

        layers.append(block(self.in_channels, out_channels, identity_downsample, stride))

        self.in_channels = out_channels*4

        for i in range(num_residual_blocks - 1):
            layers.append(block(self.in_channels, out_channels))

        return nn.Sequential(*layers)

    def forward(self, x):
        # ResNet 전
        x = self.conv1(x)
        x = self.bn1(x)
        x = self.relu(x)
        x = self.maxpool(x)

        # ResNet 중
        x = self.layer1(x)
        x = self.layer2(x)
        x = self.layer3(x)
        x = self.layer4(x)

        # ResNet 후
        x = self.avgpool(x)
        x = x.reshape(x.shape[0], -1) # Linear layer에 넣어주기 위해 reshape
        y = self.fc(x)

        return y

# 드디어 ResNet
def ResNet50(img_channels=3, num_classes=1000):
    return ResNet(block, [3,4,6,3], img_channels, num_classes)
내가 짠 Model 코드이다. 논문만 보고 짠 거라 부족한 부분이 많을 수도 있다... 참고로 ResNet-50 아키텍처를 보며 구현했다. (사실 아직 train도 안 돌려본 갓 태어난 코드)
위의 아키텍처를 보면 shortcut connection을 기준으로 블럭처럼 나뉘어진 것을 볼 수 있다. 또 표에서도 각 convolution마다 세부 convolution들이 나뉘어져있는 것을 확인할 수 있다. 이 부분을 block이라고 하자.
코드를 구성할 때 나는 크게 __init__과 forward로 나눈다.
- __init__: 이번 Network 혹은 Block에서 쓸 재료들을 선정
- forward: forward propagation
Residual Block
먼저 block의 init을 보자.
def __init__(self, in_channels, out_channels, identity_downsample=None, stride=1):
        super(block, self).__init__()
        self.expansion = 4

    # 1x1
    self.conv1 = nn.Conv2d(in_channels, out_channels, kernel_size=1, stride=1, padding=0)
    self.bn1 = nn.BatchNorm2d(out_channels)

    # 3x3
    self.conv2 = nn.Conv2d(out_channels, out_channels, kernel_size=3, stride=stride, padding=1)
    self.bn2 = nn.BatchNorm2d(out_channels)

    # 1x1
    self.conv3 = nn.Conv2d(out_channels, out_channels*self.expansion, kernel_size=1, stride=stride, padding=0)
    self.bn3 = nn.BatchNorm2d(out_channels*self.expansion)

    self.relu = nn.ReLU()
    self.identity_downsample = identity_downsample
전체적으로 block은 1x1 convolution과 3x3 convolution, 마지막으로 1x1 convolution으로 이루어져있다. 이를 nn 모듈을 이용해 각각을 선언해준다. 각 conv 마다 Batch Normalization이 정의되어 있는데, 간단하게 설명하면 이 Conv 과정이 Weight를 곱해주는 것이므로 BN을 이용해 정규화를 시켜주어야 한다. Batch Normalization과 관련하여서는 추후 새로 포스팅 해보겠다!
1x1 convolution은 간단하게, 연산량 감소, channel 수 조절로 설명할 수 있을 듯하다. 이와 관련해서도... 추후... 포스팅 ^_^
그 후에 relu도 선언해주고 identity_downsample도 선언해준다.
다음으로 block의 forward이다.
def forward(self, x):
    identity = x

    # 1x1
    x = self.conv1(x)
    x = self.bn1(x)
    x = self.relu(x)

    # 3x3
    x = self.conv2(x)
    x = self.bn2(x)
    x = self.relu(x)

    # 1x1
    x = self.conv3(x)
    x = self.bn3(x)

    # identity
    if self.identity_downsample is not None:
        identity = self.identity_downsample(identity)
    x += identity

    # relu
    x = self.relu(x)
    return x
forward는 이 class 내에서 이루어지는 forward propation이므로, input x를 넣어 차례차례 layer를 통과시켜준다. 자 bn3까지는 수월하게 이해를 했을 듯하고, 문제는 identity_downsample이다. (사실 전혀 문제가 아님) 뒤에서 이와 관련하여 더 자세하게 나올 것이다. 살짝만 설명을 하자면, 만약 identity_downsample이 정의되어 있지 않으면 x였던 identity는 identity_downsample을 거쳐 identity가 되고, 이것이 x에 더해지는 것이다. 여기서 x는 모든 layer를 통과한 f(x)이다.
- x -> f(x)
- identity -> x identity
(다시 쓰면, f(x) += x identity인 것!)
그리고 이 최종적으로 나온 x를 relu에 넣고 그 결과를 return 해준다.
ResNet
가장 먼저, ResNet에 들어갈 input을 한 번 정의해보자면,
input 의 shape = (224, 224, 3)
- width: 224
- height: 224
- channels: 3
class ResNet(nn.Module):
    def __init__(self, block, layers, image_channels, num_classes):
        super(ResNet, self).__init__()
        self.in_channels = 64

        # layer_name: conv1 (output: 112x112x64)
        self.conv1 = nn.Conv2d(image_channels, 64, kernel_size=7, stride=2, padding=3) # padding = 3이어야지 output = 112x112
        self.bn1 = nn.BatchNorm2d(64)
        self.relu = nn.ReLU()

        # layer_name: conv2x (output: 56x56x256)
        self.maxpool = nn.MaxPool2d(kernel_size=3, stride=2, padding=1) #(output: 56x56x64)
        self.layer1 = self.layer(block, layers[0], out_channels=64, stride=1)

        # layer_name: conv3x (output: 28x28x512)
        self.layer2 = self.layer(block, layers[1], out_channels=128, stride=2)

        # layer_name: conv4x (output: 14x14x1024)
        self.layer3 = self.layer(block, layers[2], out_channels=256, stride=2)

        # layer_name: conv5x (output: 7x7x2048)
        self.layer4 = self.layer(block, layers[3], out_channels=512, stride=2)

        # average pooling
        self.avgpool = nn.AdaptiveAvgPool2d((1,1))
        self.fc = nn.Linear(512*4, num_classes)
그럼 이제 ResNet을 만들 때 필요한 재료들이 무엇이 있는지 살펴보자.
이 그림을 다시 보면, 가장 먼저 conv1의 layer를 거친다. 이 conv layer는 7x7의 filter를 가지고 있고, stride는 2이며, channel의 수는 64개이다. 즉 input channel이 64이므로 in_channel을 64로 정의해준다.
여기서! 짚고 넘어가야 할 점이 있다. 바로 padding이다. 논문에도, 본 아키텍처에도 conv1에서의 padding 값은 나와있지 않지만, output size를 보면 padding 값이 필요하다는 것을 알 수 있다. input size, stride, output size, 마지막으로 filter size까지 모두 알고 있으니 우리는 무적이다. (?)
(width는 H를 W로만 바꿔주면 됨)
실제로 계산해보면 2.5가 나올 것이다. 이 경우 적당히 (?) 반올림 혹은 내림 해서 계산하면 되고, 나 같은 경우 대부분 반올림 해보고 (검산 한 번 더 하고) 결정한다.
그리고 conv2_x에 필요한 재료들을 챙겨보자. 가장 먼저 3x3의 max pooling을 진행해준다. 이때 stride는 2, padding은 1로 준다.
만약 padding을 왜 1로 주냐고 물어본다면... padding의 기본정의를 생각해보면 좋을 것 같다. padding은 가장 자리 혹은 주변 정보의 공간 정보를 잃지 않기 위해 사용한다. 그렇기 때문에 2x2 혹은 그 이상의 kernel size은 padding을 1 이상 주도록 하자! (그렇다고 무턱대고 1이 아님! 반드시 output dimension이랑 계산해서 맞도록 padding 값 주기...)
conv2_x부터는 우리가 만들어준 block이 등장한다. 각 convn_x에는 channel값이 다채롭게 들어갈 뿐더러, 이러한 block들이 여러개 들어간다. 그럼 이 block을 일일이 다 정의해줄 것이냐 ?!?!?! 라고 묻는다면 당연히 아니다. 물론... 그렇게 해도 되지만... 그러면 코드를 왜 짜... 더군다나 ResNet은 34, 50개의 layer로만 구성된 게 아니라 101, 152 등등 다양한 layer의 수를 가진 게 많다. 그런데 이를 하나하나 정의하기엔 우리 손이 너무 고생할 것 같지 않은가...
해당 코드가 바로 아래의 코드이다.
# 50개의 layer를 다 쌓을 수 없으니...
def layer(self, block, num_residual_blocks, out_channels, stride):
    identity_downsample = None
    layers = []

    if stride != 1 or self.in_channels != self.out_channels*4:
        identity_downsample = nn.Sequential(nn.Conv2d(self.in_channels, out_channels*4, kernel_size=1, stride=stride),
                                                nn.BatchNorm2d(out_channels*4))

    layers.append(block(self.in_channels, out_channels, identity_downsample, stride))

    self.in_channels = out_channels*4

    for i in range(num_residual_blocks - 1):
            layers.append(block(self.in_channels, out_channels))

    return nn.Sequential(*layers)
여기서 고려해줘야 할 점은 첫째도 dimension... 둘째도 dimension이다. 왜 이 말을 하냐면, 다시 ResNet-34의 아키텍처로 돌아가보자.
각 색깔 block의 첫번째 layer는 stride=2를 통해 dimension을 줄여주고 있다. 초록색 block의 점선 shortcut connection 부분을 생각해보자. stride를 통해 dimension을 줄여주었으니, 이전 dimension보다 1/2배 되어있을 것이다. 하지만! shortcut connection 부분의 x는 여전히 이전 dimension과 같을 것이고, 그럼 dimension 충돌이 생길 것이다.
이 부분을 identity_downsample이 해주는 것이다. identity_downsample은 dimension 조정을 통해 x가 문제없이 더해질 수 있도록 한다.
그 후에 해당 block들을 layers에 append 해주고, 최종적으로는 *연산자를 통해 unpack 해준다. 사실 나도 이거 생각해내고 좀 뿌듯했음 ㅎㅎ
그리고는 각 조건에 알맞게 channels수와 block 수를 설정해주면 끝!
다음으로 ResNet의 forward Propagation이다.
def forward(self, x):
    # ResNet 전
    x = self.conv1(x)
    x = self.bn1(x)
    x = self.relu(x)
    x = self.maxpool(x)

    # ResNet 속
    x = self.layer1(x)
    x = self.layer2(x)
    x = self.layer3(x)
    x = self.layer4(x)

    # ResNet 후
    x = self.avgpool(x)
    x = x.reshape(x.shape[0], -1) # Linear layer에 넣어주기 위해 reshape
    y = self.fc(x)

    return y
사실 모든 게 ResNet 속에 있는 과정이지만, 이해하기 쉽도록 ResNet Block을 거치는 부분만 ResNet 속이라고 표현하였다.
forward는 늘 그렇듯이 위에서 정의한 재료들만 속속히 잘 뽑아쓰면 문제없다!
ResNet-50 정의
마지막으로 ResNet-50을 정의해보자.
def ResNet50(img_channels=3, num_classes=1000):
    return ResNet(block, [3,4,6,3], img_channels, num_classes)
ResNet-50은 마지막 fc layer까지 모두 더하면 총 50개의 Layer를 가지고 있다. 그리고 각 block이 [3,4,6,3] 으로 구성되어 있기 때문에 ResNet-50을 선언할 때 위와 같은 함수의 파라미터를 넣는다.
이로써 모델은 다 만들었고... 정의도 잘 끝났다...
다음은 Data loader 부분과 validation 부분을 직접 구현하여 CIFAR-10 데이터셋을 이용해 성능을 확인해보도록 하겠다!