
Spring Batch란
- 큰 단위의 작업을 일괄 처리
- 대부분 처리량이 많고 비 실시간성 처리에 사용
- 대용량 데이터 계산, 정산, 통계, 데이터베이스, 변환 등
- 컴퓨터 자원을 최대로 활용
- 컴퓨터 자원 사용이 낮은 시간대에 배치를 처리
- 배치만 처리하기 위해 사용자가 사용하지 않는 또 다른 컴퓨터 자원을 사용
- 사용자 상호작용으로 실행되기 보단, 스케줄러와 같은 시스템에 의해 실행되는 대상
- 예를 들면 매일 오전 10시에 배치 실행, 매주 월요일 12시 마다 실행
- crontab, jenkins
- 배치 처리를 하기 위한 Spring framwork 기반 기술
- Spring 에서 지원하는 기술 적용 가능
- DI, AOP, 서비스 추상화
- 스프링 배치의 실행 단위인 Job과 Step
- 비교적 간단한 작업(Tasklet) 단위 처리와, 대량 묶음(Chunk) 단위 처리
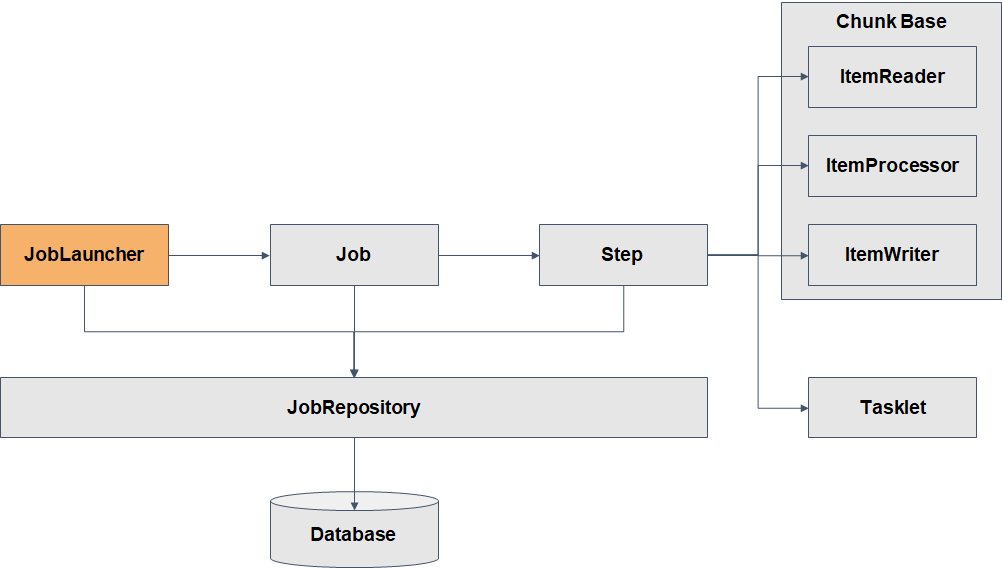
Spring Batch의 실행
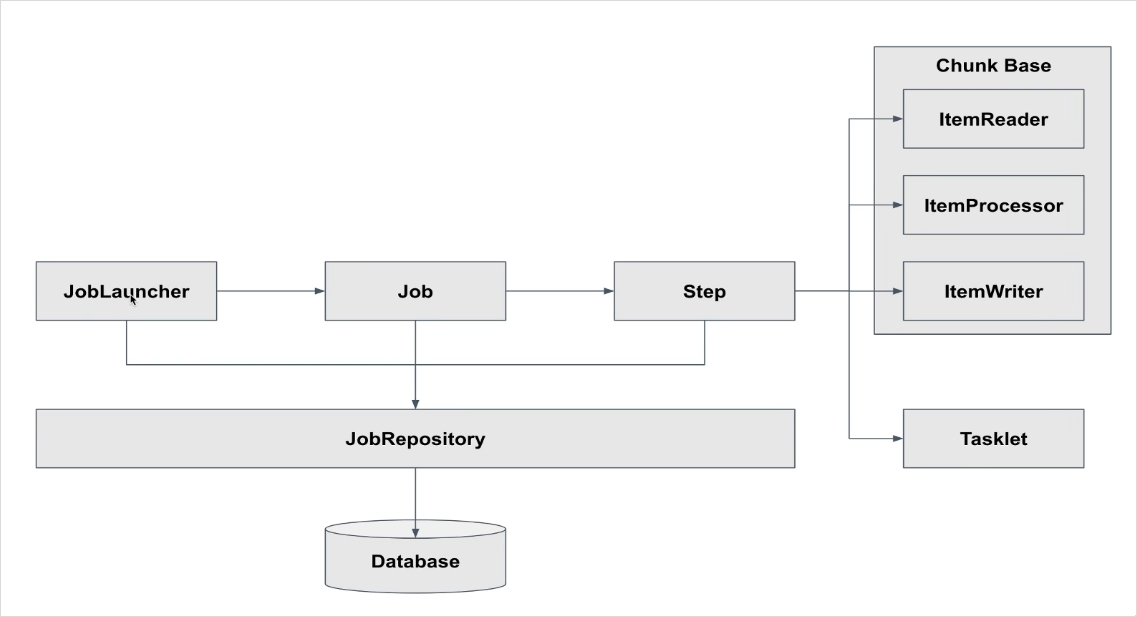
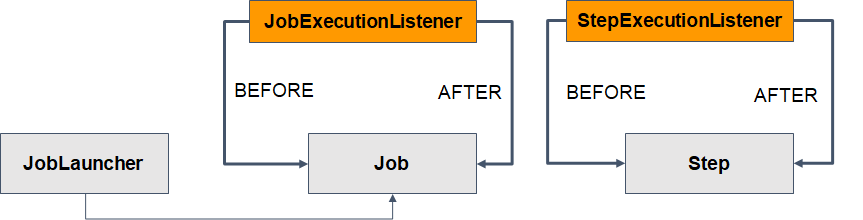
스프링 배치는 Job 타입의 빈이 생성되면 JobLauncher 객체에 의하여 Job을 실행하고 Job은 Step을 실행한다.
JobRepository는 DB또는 메모리에 배치가 실행될 수 있도록 배치의 메타 데이터를 관리하는 클래스이다.
Spring Batch Dependency
💡 implementation 'org.springframework.boot:spring-boot-starter-batch'
Job & Step
Step
Step은 Job의 세부 실행 단위이며, N개가 등록돼 실행된다.
Step의 실행단위는 크게 2가지가 있다.
- Chunk 기반 : 하나의 큰 덩어리를 n개씩 나눠서 실행
- Task 기반 : 하나의 작업 기반으로 실행
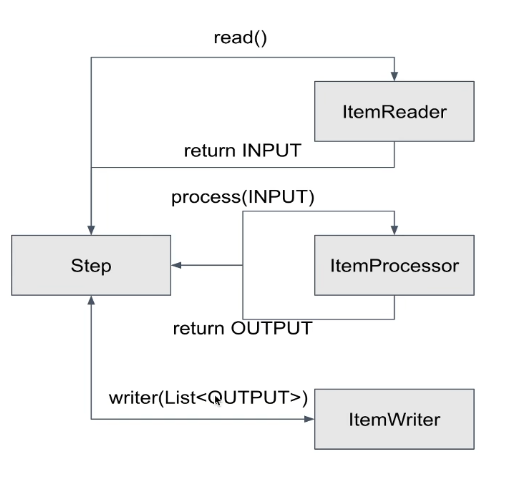
- Chunk 기반 Step은 ItemReader, ItemProcessor, ItemWriter가 있다.
- Item은 배치 처리 대상 객체를 의미
- ItemReader는 배치 처리 대상 객체를 읽어 ItemProcessor or ItemWriter에게 전달한다.
- ItemProcessor는 input 객체를 output 객체로 filtering 또는 processing 해 ItemWriter에게 전달한다.
- 예) ItemReader에서 읽은 데이터를 수정 또는 ItemWriter 대상인지 filtering 한다.
- ItemProcessor는 optional 하다.
- ItemProcessor가 하는 일을 ItemReader 또는 ItemWriter가 대신할 수 있다.
- ItemWriter는 배치 처리 대상 객체를 처리한다.
- 예) DB update를 하거나, 처리 대상 사용자에게 알림을 보낸다.
Job
스프링 배치의 실행 단위, 독립적으로 실행할 수 있는 순서 지정된 스텝의 목록. Job의 실행은 JobLauncher에서 실행된다.
Job은 N개의 Step을 실행할 수 있으며, 흐름(Flow)을 관리할 수 있다.
CommandLineJobRunner: 스크립트 or 명령행 이용JobRegistryBackgroundJobRunner: 자바 프로세스 내에서 쿼츠나 JMX 후크 같은 스케줄러 이용JobLauncherCommandLineRunner: Spring boot 서버가 올라갈 때 모든 Job 타입의 빈을 실행- 스프링 배치는 spring batch tables를 활용하므로 테이블이 자동으로 생성될 수 있도록
application.yml에 아래 내용을 추가해준다.spring: batch: jdbc: initialize-schema: always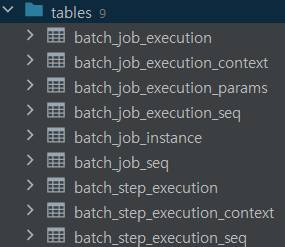
Batch Job Execution table
배치 실행을 위한 메타 데이터가 저장되는 테이블- BATCH_JOB_INSTANCE
- Job이 실행되며 생성되는 최상위 계층의 테이블
- job_name과 job_key를 기준으로 하나의 row가 생성되며, 같은 job_name과 job_key가 저장될 수 없다.
- job_key는 BATCH_JOB_EXECUTION_PARAMS에 저장되는 Parameter를 나열해 암호화해 저장한다.
- BATCH_JOB_EXECUTION
- Job이 실행되는 동안 시작/종료 시간, job 상태 등을 관리
- BATCH_JOB_EXECUTION_PARAMS
- Job을 실행하기 위해 주입된 parameter 정보 저장
- BATCH_JOB_EXECUTION_CONTEXT
- Step이 실행되는 동안 필요한 데이터 또는 실행된 결과 저장
- Job 내에서 Step간에 공유되는 데이터
- BATCH_STEP_EXECUTION_CONTEXT
- Step이 실행되며 공유해야할 데이터를 직렬화해 저장
- 하나의 Step에서 공유되는 데이터
- BATCH_JOB_INSTANCE
- 만일
JobLauncherCommandLineRunner에 의하여 모든 Job이 실행된는 것을 막고 싶다면application.yml에 아래 내용 추가spring: batch: job: names: ${job.name:NONE}
- 스프링 배치는 spring batch tables를 활용하므로 테이블이 자동으로 생성될 수 있도록
- Job → JobInstance → JobExecution으로 실행되며 JobInstance는 수행된 JobExecution에 대하여 완료로 간주하고 다시 실행이 불가하다.
- spring.batch.job.names 등록
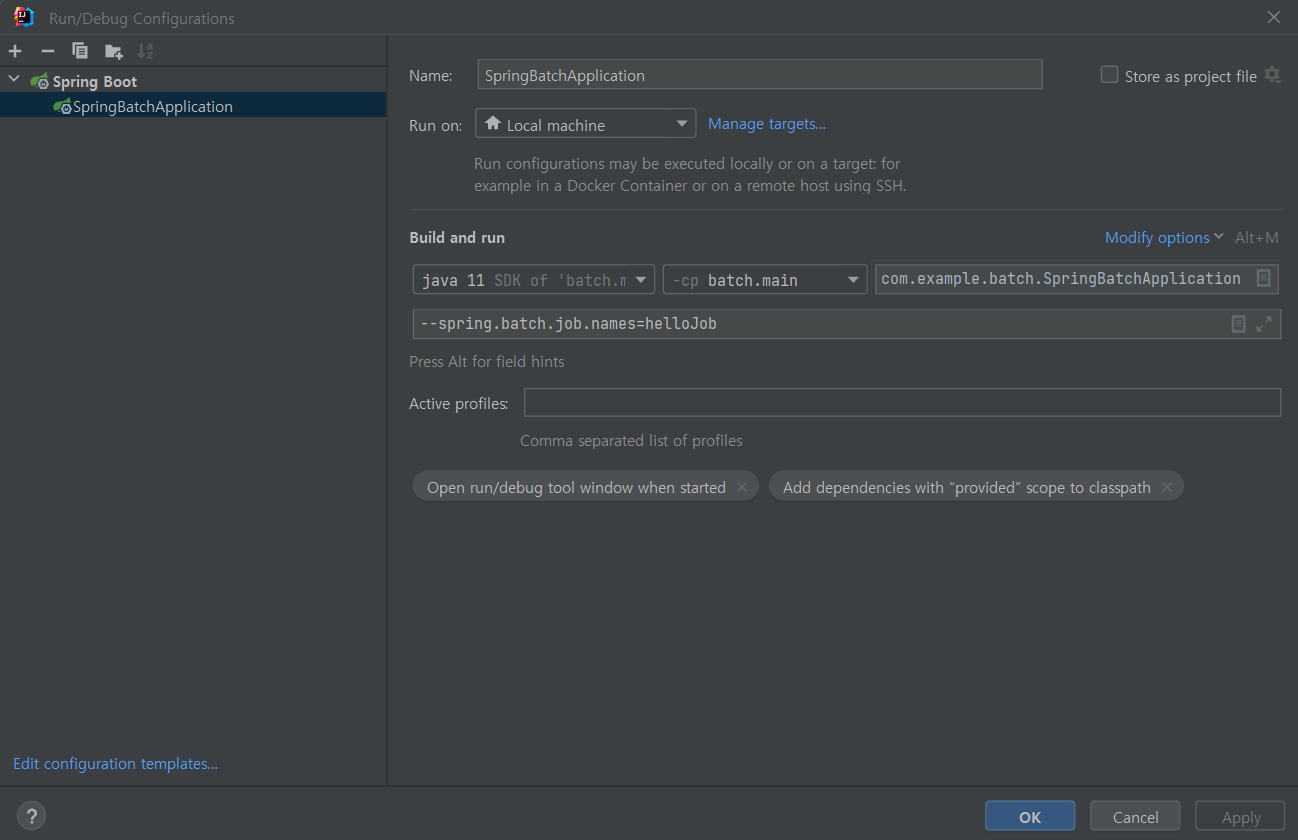
- spring.batch.job.names 등록
- JobInstance의 생성 기준은 JobParameters 중복 여부에 따라 생성된다.
- 다른 parameter로 Job이 실행되면, JobInstance가 생성된다.
- 같은 parameter로 Job이 실행되면, 이미 생성된 JobInstance가 실행된다.
- Job이 재실행 대상이 아닌 경우 에러가 발생
- JobExecution은 항상 새롭게 생성된다.
- Job을 항상 새로운 JobInstance로 실행 될 수 있도록 RunIdIncrementer 제공
-
RunIdIncrementer는 항상 다른 run.id를 Parameter로 설정
@Bean public Job helloJob(){ return jobBuilderFactory.get("helloJob") .incrementer(new RunIdIncrementer()) .start(this.helloStep()) .build(); }.incrementer에new RunIdIncrementer()로 항상 새로운 id를 부여한다.
-
Task 기반 배치와 Chunk 기반 배치
Tasklet을 사용한 Task 기반 처리
- 배치 처리 과정이 비교적 쉬운 경우 쉽게 사용
- 대량 처리를 하는 경우 더 복잡
- 하나의 큰 덩어리를 여러 덩어리로 나누어 처리하기 부적합
- Task 기반 배치 처리 예제
package com.example.batch.part3;

import lombok.RequiredArgsConstructor;
import lombok.extern.slf4j.Slf4j;
import org.springframework.batch.core.Job;
import org.springframework.batch.core.Step;
import org.springframework.batch.core.configuration.annotation.JobBuilderFactory;
import org.springframework.batch.core.configuration.annotation.StepBuilderFactory;
import org.springframework.batch.core.launch.support.RunIdIncrementer;
import org.springframework.batch.core.step.tasklet.Tasklet;
import org.springframework.batch.repeat.RepeatStatus;
import org.springframework.context.annotation.Bean;
import org.springframework.context.annotation.Configuration;

import java.util.ArrayList;
import java.util.List;

/**
 * author        : duckbill413
 * date          : 2023-01-21
 * description   :
 * Tasklet을 사용한 Task 기반 배치 처리
 * 100개의 문자열을 리스트에 입력하고 리스트의 사이즈를 출력
 **/
@Slf4j
@Configuration
@RequiredArgsConstructor
public class TaskProcessingConfiguration {
    private final JobBuilderFactory jobBuilderFactory;
    private final StepBuilderFactory stepBuilderFactory;

    @Bean
    public Job taskProcessingJob(){
        return jobBuilderFactory.get("taskProcessingJob")
                .incrementer(new RunIdIncrementer())
                .start(this.taskBaseStep())
                .build();
    }

    @Bean
    public Step taskBaseStep(){
        return stepBuilderFactory.get("taskBaseStep")
                .tasklet(this.tasklet())
                .build();
    }

    private Tasklet tasklet(){
        return (contribution, chunkContext) -> {
            List<String> items = getItems();
            log.info("task item size: {}", items.size());
            return RepeatStatus.FINISHED;
        };
    }

    private List<String> getItems(){
        List<String> items = new ArrayList<>();
        for (int i = 0; i < 100; i++) {
            items.add(i + " Hello");
        }
        return items;
    }
}
Chunk를 사용한 chunk(덩어리) 기반 처리
-
ItemReader, ItemProcessor, ItemWriter의 관계 이해 필요
-
대량 처리를 하는 경우 Tasklet 보다 비교적 쉽게 구현
-
예를 들면 10,000개의 데이터 중 1,000개씩 10개의 덩어리로 수행
- 이를 Tasklet으로 처리하면 10,000개를 한번에 처리하거나, 수동으로 1,000개씩 분할
- 이를 Tasklet으로 처리하면 10,000개를 한번에 처리하거나, 수동으로 1,000개씩 분할
-
ItemReader에서 null을 return 할 때 까지 Step은 반복 된다.
-
ItemProcessor은 ItemReader에서 받아온 데이터를 처리하고 반환하면 step에서 List로 처리된 output 데이터를 ItemWriter에 전달한다.
<INPUT, OUTPUT> chunk(int): INPUT과 OUTPUT Type 정의, chunk의 size 정
-
ItemWriter은 List을 받아 write 한다.
-
Chunk 기반 Batch 사용 예제
package com.example.batch.part3; import lombok.RequiredArgsConstructor; import lombok.extern.slf4j.Slf4j; import org.springframework.batch.core.Job; import org.springframework.batch.core.Step; import org.springframework.batch.core.configuration.annotation.JobBuilderFactory; import org.springframework.batch.core.configuration.annotation.StepBuilderFactory; import org.springframework.batch.core.launch.support.RunIdIncrementer; import org.springframework.batch.item.ItemProcessor; import org.springframework.batch.item.ItemReader; import org.springframework.batch.item.ItemWriter; import org.springframework.batch.item.support.ListItemReader; import org.springframework.context.annotation.Bean; import org.springframework.context.annotation.Configuration; import java.util.ArrayList; import java.util.List; /** * author : duckbill413 * date : 2023-01-21 * description : * Chunk 기반 배치 처리 예제 * 100개의 데이터를 10개씩 10번에 걸쳐 실행될 수 있도록 실행 **/ @Slf4j @Configuration @RequiredArgsConstructor public class ChunkProcessingConfiguration { private final JobBuilderFactory jobBuilderFactory; private final StepBuilderFactory stepBuilderFactory; @Bean public Job chunkProcessingJob(){ return jobBuilderFactory.get("chunkProcessingJob") .incrementer(new RunIdIncrementer()) .start(this.chunkBaseStep()) .build(); } @Bean public Step chunkBaseStep(){ return stepBuilderFactory.get("chunkBaseStep") .<String, String> chunk(10) .reader(itemReader()) .processor(itemProcessor()) .writer(itemWriter()) .build(); } private ItemWriter<String> itemWriter() { return items -> log.info("chunk item size : {}", items.size()); } private ItemProcessor<String, String> itemProcessor() { return item -> item + ", Spring Batch"; } private ItemReader<String> itemReader() { return new ListItemReader<>(getItems()); } private List<String> getItems(){ List<String> items = new ArrayList<>(); for (int i = 0; i < 100; i++) { items.add(i + " Hello"); } return items; } } -
Task를 Chunk 처리 나누어서 처리하기
RepeatStatus.CONTINUABLE로 여러번 반복하여 실행하도록 Task를 구현한다. 종료 조건을 명확하게 지정해 주어야 한다.- 사용 예제
package com.example.batch.part3;

import lombok.RequiredArgsConstructor;
import lombok.extern.slf4j.Slf4j;
import org.springframework.batch.core.Job;
import org.springframework.batch.core.Step;
import org.springframework.batch.core.StepExecution;
import org.springframework.batch.core.configuration.annotation.JobBuilderFactory;
import org.springframework.batch.core.configuration.annotation.StepBuilderFactory;
import org.springframework.batch.core.launch.support.RunIdIncrementer;
import org.springframework.batch.core.step.tasklet.Tasklet;
import org.springframework.batch.repeat.RepeatStatus;
import org.springframework.context.annotation.Bean;
import org.springframework.context.annotation.Configuration;

import java.util.ArrayList;
import java.util.List;

/**
 * author        : duckbill413
 * date          : 2023-01-21
 * description   :
 * Tasklet을 사용한 Task 기반 배치 처리
 * 100개의 문자열을 리스트에 입력하고 리스트의 사이즈를 출력
 **/
@Slf4j
@Configuration
@RequiredArgsConstructor
public class TaskSizeProcessingConfiguration {
    private final JobBuilderFactory jobBuilderFactory;
    private final StepBuilderFactory stepBuilderFactory;

    @Bean
    public Job taskSizeProcessingJob(){
        return jobBuilderFactory.get("taskSizeProcessingJob")
                .incrementer(new RunIdIncrementer())
                .start(this.taskSizeBaseStep())
                .build();
    }

    @Bean
    public Step taskSizeBaseStep(){
        return stepBuilderFactory.get("taskBaseStep")
                .tasklet(this.tasklet())
                .build();
    }

    private Tasklet tasklet(){
        List<String> items = getItems();

        return (contribution, chunkContext) -> {
            StepExecution stepExecution = contribution.getStepExecution();

            int chunkSize = 10;
            int fromIndex = stepExecution.getReadCount();
            int toIndex = fromIndex + chunkSize;
            if (toIndex > items.size())
                toIndex = items.size();

            if (fromIndex >= items.size()){
                return RepeatStatus.FINISHED;
            }

            List<String> subList = items.subList(fromIndex, toIndex);

            log.info("task sub item size: {}", subList.size());

            stepExecution.setReadCount(toIndex);
            return RepeatStatus.CONTINUABLE;
        };
    }

    private List<String> getItems(){
        List<String> items = new ArrayList<>();
        for (int i = 0; i < 99; i++) {
            items.add(i + " Hello");
        }
        return items;
    }
}
JobParameters 이해
- 배치 실행에 필요한 값을 parameter를 통해 외부에서 주입
- JobParameters는 외부에서 주입된 parameter를 관리하는 객체
- parameter를 JobParameters와 Spring EL(Expression Language)로 접근
String parameter = jobParameters.getString(key, defaultValue);@Value(”#{jobParameters[key]}”)
- JobParameter 예제1 (Task 기반에서 실행)
taskSizeProcessingConfiguration의 tasklet을 수정하여 생성private Tasklet tasklet(){ List<String> items = getItems(); return (contribution, chunkContext) -> { StepExecution stepExecution = contribution.getStepExecution(); JobParameters jobParameters = stepExecution.getJobParameters(); String value = jobParameters.getString("chunkSize", "10"); int chunkSize = StringUtils.isNotEmpty(value) ? Integer.parseInt(value) : 10; int fromIndex = stepExecution.getReadCount(); int toIndex = fromIndex + chunkSize; if (toIndex > items.size()) toIndex = items.size(); if (fromIndex >= items.size()){ return RepeatStatus.FINISHED; } List<String> subList = items.subList(fromIndex, toIndex); log.info("task sub item size: {}", subList.size()); stepExecution.setReadCount(toIndex); return RepeatStatus.CONTINUABLE; }; }JobParameter의chunkSize를 불러와서 파라메터로 사용한다. Build시에-chunkSize=20 --job.name=taskJobParameterProcessingJob로 Program arguments를 수정해주어 실행시킨다.- 실행 결과
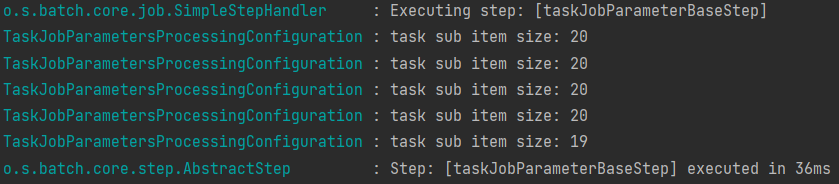
- 실행 결과
- JobParameter의 접근 Spring EL 예제 (Chunk 기반에서 실행)
@Bean @JobScope // @StepScope도 동일 public Step chunkJobParameterBaseStep(@Value("#{jobParameters[chunkSize]}") String chunkSize) { return stepBuilderFactory.get("chunkJobParameterBaseStep") .<String, String>chunk(StringUtils.isNotEmpty(chunkSize) ? Integer.parseInt(chunkSize) : 10) .reader(itemReader()) .processor(itemProcessor()) .writer(itemWriter()) .build(); }@JobScope와@Value어노테이션을 사용하여 파라메터를 불러온다.@Value("#{jobParameters[chunkSize]}") String chunkSize
@JobScope & @StepScope
- @Scope는 어떤 시점에 bean을 생성/소멸 시킬지 bean의 lifecycle을 설정
@JobScope는 job 실행 시점에 생성/소멸- Step에 선언
@StepScope는 step 실행 시점에 생성/소멸- Tasklet, Chunk(ItemReader, ItemProcessor, ItemWriter)에 선언
- Spring의 @Scope와 같은 것
- @Scope(”job”) == @JobScope
- @Scope(”step”) == @StepScope
- Job과 Step 라이프사이클에 의해 생성되기 때문에 Thread safe하게 작동
@Value(”#{jobParameters[key]}”)를 사용하기 위해@JobScope와@StepScope는 필수
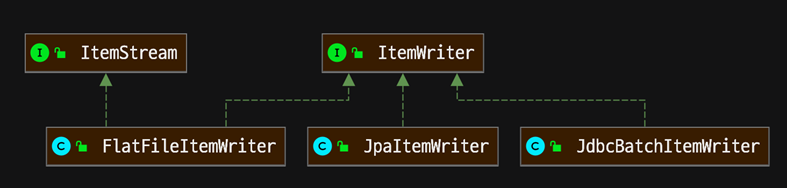
ItemReader Interface 구조
- 배치 대상 데이터를 읽기 위한 설정
- 파일, DB, 네트워크, 등에서 읽기 위함.
- Step에 ItemReader는 필수
- 기본 제공되는 ItemReader 구현체
- file, jdbc, jpa, hibernate, kafka, etc…
- ItemReader 구현체가 없으면 직접 개발
- ItemStream은 ExecutionContext로 read, write 정보 저장

- ItemReader Interface를 이용하여 ListItemReader와 같은 기능 구현하기
public class CustomItemReader<T> implements ItemReader<T> {
    private final List<T> items;

    public CustomItemReader(List<T> items){
        this.items = items;
    }
    @Override
    public T read() throws Exception, UnexpectedInputException, ParseException, NonTransientResourceException {
        if (!items.isEmpty())
            return items.remove(0);
        return null; // null을 리턴하면 junk 종료를 의미
    }
}
CSV 파일 데이터 읽기
- FlatFileItemReader 클래스로 파일에 저장된 데이터를 읽어 객체에 매핑
- 예제 csv 파일
id, 이름, 나이, 거주지 1, 이경원, 32, 인천 2, 홍길동, 30, 서울 3, 나주혁, 25, 강원 - Person 객체에 대하여 csv 파일을 읽어오는 FlatFileItemReader 생성
@Bean
    public Step csvFileStep() throws Exception {
        return stepBuilderFactory.get("csvFileStep")
                .<Person, Person> chunk(10)
                .reader(this.csvFileItemReader())
                .writer(itemWriter())
                .build();
    }

    private FlatFileItemReader<Person> csvFileItemReader() throws Exception {
        DefaultLineMapper<Person> lineMapper = new DefaultLineMapper<Person>();
        DelimitedLineTokenizer tokenizer = new DelimitedLineTokenizer();
        tokenizer.setNames("id", "name", "age", "address");
        lineMapper.setLineTokenizer(tokenizer);

        lineMapper.setFieldSetMapper(fieldSet -> {
            int id = fieldSet.readInt("id");
            String name = fieldSet.readString("name");
            String age = fieldSet.readString("age");
            String address = fieldSet.readString("address");

            return new Person(id, name, age, address);
        });

        FlatFileItemReader<Person> itemReader = new FlatFileItemReaderBuilder<Person>()
                .name("csvFileItemReader")
                .encoding("UTF-8")
                .resource(new ClassPathResource("test.csv"))
                .linesToSkip(1)
                .lineMapper(lineMapper)
                .build();
        itemReader.afterPropertiesSet(); // 필드 설정값이 정상인지 검증하는 메서드

        return itemReader;
    }
JDBC 데이터 읽기
- Cursor 기반 조회
- 배치 처리가 완료될 때 까지 DB Connection이 연결
- DB Connection 빈도가 낮아 성능이 좋은 반면, 긴 Connection 유지 시간 필요
- 하나의 Connection에서 처리되기 때문에, Thread Safe 하지 않음
- 모든 결과를 메모리에 할당하기 때문에, 더 많은 메모리를 사용
- Cursor 기반 조회 실습
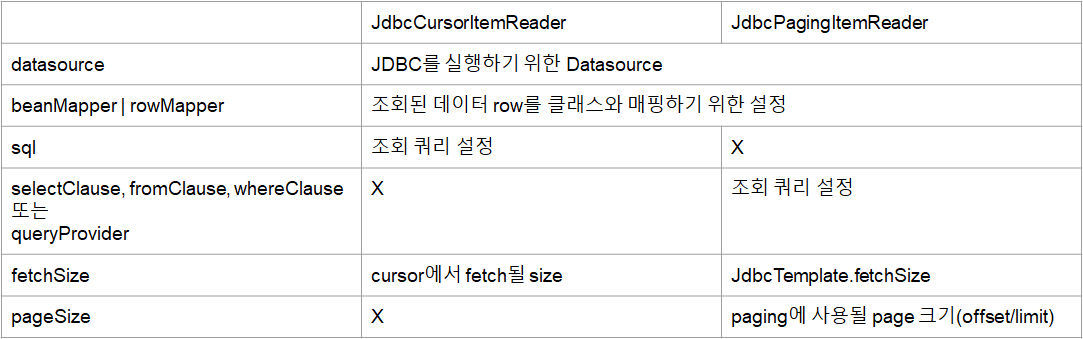
private JdbcCursorItemReader<Person> jdbcCursorItemReader() throws Exception { JdbcCursorItemReader jdbcCursorItemReader = new JdbcCursorItemReaderBuilder<Person>() .name("jdbcCursorItemReader") .dataSource(dataSource) .sql("select id, name, age, address from person") .rowMapper((rs, rowNum) -> new Person(rs.getInt(1), rs.getString(2), rs.getString(3), rs.getString(4))) .build(); jdbcCursorItemReader.afterPropertiesSet(); return jdbcCursorItemReader; }- sql을 이용하여 조회 쿼리를 작성하여 조회할 수 있다.
- Paging 기반 조회
- 페이징 단위로 DB Connection 을 연결
- DB Connection 빈도가 높아 비교적 성능이 낮은 반면, 짧은 Connection 유지 시간 필요
- 매번 Connection을 하기 때문에 Thread Safe
- 페이징 단위의 결과만 메모리에 할당하기 때문에, 비교적 더 적은 메모리를 사용
- Paging 기반 조회 실습
private JdbcPagingItemReader<Person> jdbcPagingItemReader() throws Exception { Map<String, Object> parameterValues = new HashMap<>(); parameterValues.put("id", 1); // Id 1인 사람만 조회 JdbcPagingItemReader jdbcPagingItemReader = new JdbcPagingItemReaderBuilder<Person>() .name("jdbcPagingItemReader") .dataSource(dataSource) .pageSize(1) .fetchSize(1) .rowMapper((rs, rowNum) -> new Person( rs.getInt("id"), rs.getString("name"), rs.getString("age"), rs.getString("address") )) .queryProvider(this.createQueryProvider()) .parameterValues(parameterValues) .build(); jdbcPagingItemReader.afterPropertiesSet(); return jdbcPagingItemReader; } private PagingQueryProvider createQueryProvider() throws Exception { SqlPagingQueryProviderFactoryBean queryProviderFactoryBean = new SqlPagingQueryProviderFactoryBean(); queryProviderFactoryBean.setDataSource(dataSource); queryProviderFactoryBean.setSelectClause("select id, name, age, address"); queryProviderFactoryBean.setFromClause("from person"); queryProviderFactoryBean.setWhereClause("where id = :id"); // Where 절 Map<String, Order> sortKeys = new HashMap<>(1); sortKeys.put("id", Order.DESCENDING); queryProviderFactoryBean.setSortKeys(sortKeys); // Order 절 return queryProviderFactoryBean.getObject(); }- Cursor 에서는 sql로 조회하였지만 Paging에서는
PagingQeuryProvider의setSelectClause,setFromClause등을 이용하여 조회를 수행한다. 이때, sql과 같이 where, order 등도 사용 가능하다.
- Cursor 에서는 sql로 조회하였지만 Paging에서는
- JdbcCursorItemReader 와 JdbcPagingItemReader
JPA 데이터 읽기
- 4.3 + 에서 Jpa 기반 CursorItemReader 가 제공됨
- 기본에는 Jpa는 Paging 기반의 ItemReader만 제공됨
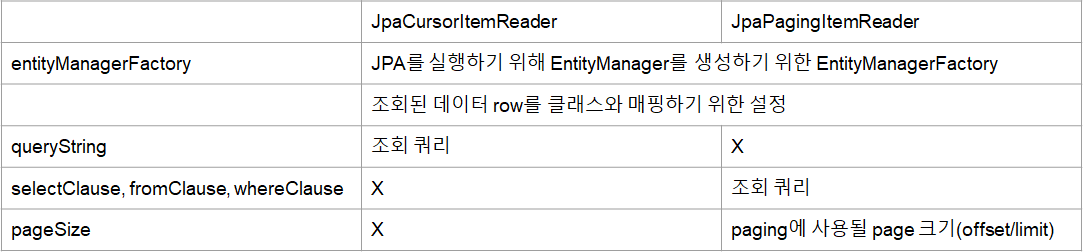
- JDBC는 DataSource가 필요한 반면 JPA는 EntityManager을 필요로 한다.
ItemWriter interface 구조 이해
- ItemWriter는 마지막으로 배치 처리 대상 데이터를 어떻게 처리할 지 결정
- Step에서 ItemWriter는 필수
- 예를 들면 ItemReader에서 읽은 데이터를
- DB에 저장, API로 서버에 요청, 파일에 데이터를 write
- 항상 write는 아니다.
- 데이터를 최종 마무리하는 것이 ItemWriter의 역할
- 데이터를 최종 마무리하는 것이 ItemWriter의 역할
CSV 파일 데이터 쓰기
FlatFileItemWriter는 데이터가 매핑된 객체를 파일로 write- CSV FileWriter 예제
private ItemWriter<Person> csvFileItemWriter() throws Exception { BeanWrapperFieldExtractor fieldExtractor = new BeanWrapperFieldExtractor<Person>(); fieldExtractor.setNames(new String[]{"id", "name", "age", "address"}); DelimitedLineAggregator<Person> personDelimitedLineAggregator = new DelimitedLineAggregator<>(); // 각 필드의 값을 하나의 라인에 작성하기 위하여 구분값 필요 personDelimitedLineAggregator.setDelimiter(", "); personDelimitedLineAggregator.setFieldExtractor(fieldExtractor); // mapping 설정 종료 FlatFileItemWriter<Person> csvFileItemWriter = new FlatFileItemWriterBuilder<Person>() .name("csvFileItemWriter") .encoding("UTF-8") .resource(new FileSystemResource("output/test-output.csv")) .lineAggregator(personDelimitedLineAggregator) .headerCallback(writer -> writer.write("id, 이름, 나이, 주소")) // header .footerCallback(writer -> writer.write("------------------\n")) // footer .append(true) // 데이터 추가시 파일이 생성되는 것이 아닌 추가되도록 함 .build(); csvFileItemWriter.afterPropertiesSet(); return csvFileItemWriter; }headerCallback과footerCallback을 사용하여 데이터 추가의 시작과 끝에 정보를 추가할 수 있다.append를 true로 하면 데이터 추가시 파일이 이미 존재한다면 새로 파일을 생성하는 것이 아닌 데이터만 뒤에 추가하게 된다.
JDBC 데이터 쓰기
JdbcBatchItemWriter는 jdbc를 사용에 DB에 writeJdbcBatchItemWriter는 bulk insert/update/delete 처리- insert into person (name, age, address) values (1, 2, 3), (4, 5, 6), (7, 8, 9)
- application.yml의 MySQL 옵션 수정
jdbc:mysql://localhost/{table-name}?characterEncoding=UTF-8&serverTimezone=UTC&rewriteBatchedStatements=true
rewriteBatchedStatement는 JdbcBatchItemWriter의 bulk를 사용하기 위한 옵션
- 단건 처리가 아니기 때문에 비교적 높은 성능을 가진다.
- JDBC ItemWriter 실습 예제
private ItemWriter<Person> jdbcBatchItemWriter() { JdbcBatchItemWriter<Person> personJdbcBatchItemWriter = new JdbcBatchItemWriterBuilder<Person>() .dataSource(dataSource) .itemSqlParameterSourceProvider(new BeanPropertyItemSqlParameterSourceProvider<>()) .sql("insert into person(name, age, address) values(:name, :age, :address)") .build(); personJdbcBatchItemWriter.afterPropertiesSet(); return personJdbcBatchItemWriter; }JdbcBatchItemWriter은 Jdbc ItemReader와 같이DataSource를 이용한다.JdbcBatchItemWriter는 JDBC를 활용해 Item을 쉽게 Write 할 수 있게 해준다.- Bean에 등록된 Entity를 대상으로
new BeanPropertyItemSqlParameterSourceProvider<>()를 이용하여 쉽게 매핑 가능하다.
JPA 데이터 쓰기
JpaItemWriter는 JPA Entity 기반으로 데이터를 DB에 write- Entity를 하나씩 EntityManager.persist 또는 EntityManager.merge로 insert
- JPA ItemWriter 실습 예제
private ItemWriter<Person> jpaItemWriter() throws Exception { JpaItemWriter<Person> personJpaItemWriter = new JpaItemWriterBuilder<Person>() .entityManagerFactory(entityManagerFactory) .build(); personJpaItemWriter.afterPropertiesSet(); return personJpaItemWriter; }- ItemReader와 같이 ItemWriter에서도
EntityManagerFactory를 활용한다. - 실행 시켜보면 아래와 같이 insert 실행하기 전 select를 먼저 실행해 보는 것을 확인해 볼 수 있다.
Hibernate: select person0_.id as id1_0_0_, person0_.address as address2_0_0_, person0_.age as age3_0_0_, person0_.name as name4_0_0_ from person person0_ where person0_.id=? Hibernate: insert into person (address, age, name) values (?, ?, ?)-
별다른 설정이 없는 경우
EntityManager에 Merge 메서드로 실행되기 때문에 select문도 같이 실행되게 된다. -
JPA 특성상 Entity가 수정 대상인지 확인하기 위해서 select문을 먼저 실행해 보는 것이다.
new JpaItemWriterBuilder<Person>() .entityManagerFactory(entityManagerFactory) .usePersist(true) .build(); -
Builder에서
usePersist를true로 놓으면 select문을 실행하지 않는다.Hibernate: insert into person (address, age, name) values (?, ?, ?)
로 insert문만 실행되게 된다.
-
만일, Entity의 Id 값을 직접 할당하지 않는다면
usePersist를 사용하지 않더라로 select문은 실행되지 않는다.
-
- ItemReader와 같이 ItemWriter에서도
ItemProcessor interface 구조 이해
- ItemReader에서 읽은 데이터를 가공 또는 Filtering
- Step의 ItemProcessor는 optional
- ItemProcessor는 필수는 아니지만, 책임 분리를 분리하기 위해 사용
- ItemProcessor는 I(input), O(output)로 변환하거나
- ItemWriter의 실행 여부를 판단 할 수 있도록 filtering 역할을 한다.
- ItemWriter는 not null만 처리한다.
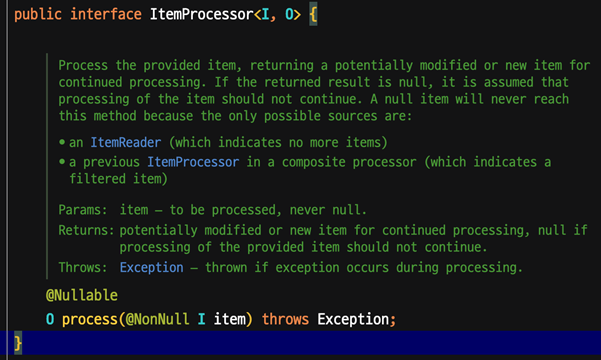
- ItemWriter는 not null만 처리한다.
- 실습 예제
- 예를 들어 person.id가 짝수인 person 만 return 하는 경우
- ItemWriter는 5개의 person만 받아 처리
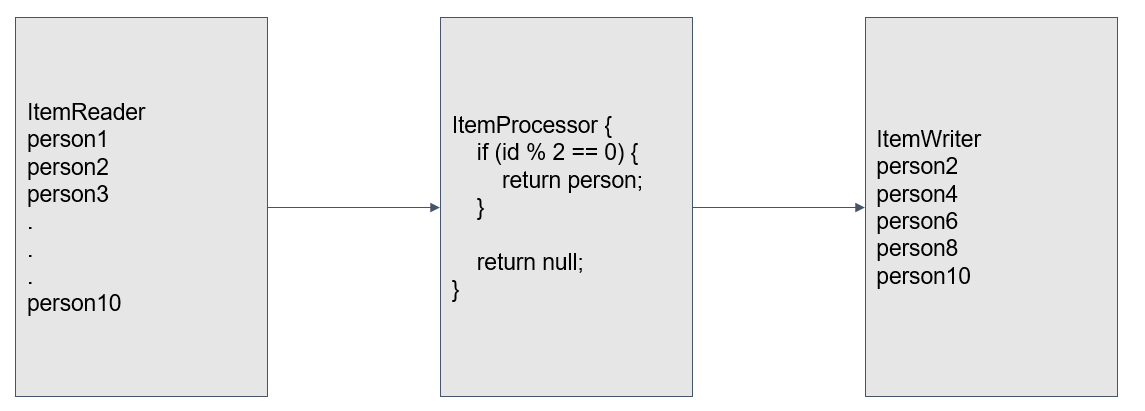
- ItemProcessor 실습
private ItemProcessor<? super Person, ? extends Person> itemProcessor() {
    return item -> {
        if (item.getId() % 2 == 0)
            return item;
        else
            return null;
    };
}
CSV 파일을 읽고 MySQL DB에 insert 하기
- CSV 파일 데이터를 읽어 H2 DB에 데이터 저장하는 배치 개발
- Reader
- 30개의 person data를 csv 파일에서 읽어온다.
- 예제 코드
private FlatFileItemReader<Person> itemReader() throws Exception {
    DefaultLineMapper<Person> lineMapper = new DefaultLineMapper<>();
    DelimitedLineTokenizer lineTokenizer = new DelimitedLineTokenizer();
    lineTokenizer.setNames("name", "age", "address");
    lineMapper.setLineTokenizer(lineTokenizer);
    lineMapper.setFieldSetMapper(fieldSet -> new Person(
            fieldSet.readString(0),
            fieldSet.readString(1),
            fieldSet.readString(2)));

    FlatFileItemReader<Person> itemReader = new FlatFileItemReaderBuilder<Person>()
            .name("savePersonItemReader")
            .encoding("UTF-8")
            .linesToSkip(1)
            .resource(new FileSystemResource("output/test-input.csv"))
            .lineMapper(lineMapper)
            .build();

    itemReader.afterPropertiesSet();
    return itemReader;
}
- Processor
- allow_duplicate 파라미터로 person.name의 중복 여부 조건을 판단한다.
allow_duplicate == true인 경우 모든 person을 return 한다.allow_duplicate == false또는 null 인 경우 person.name이 중복된 데이터는 null로 return 한다.- 중복 체크는
java.util.Map을 사용하여 쉽게 구현 가능하다. - 예제 코드
public class DuplicateValidationProcessor<T> implements ItemProcessor<T, T> { private final Map<String, Object> keyPool = new ConcurrentHashMap<>(); // Multi-thread 환경 지원 private final Function<T, String> keyExtractor; private final boolean allowDuplicate; public DuplicateValidationProcessor(Function<T, String> keyExtractor, boolean allowDuplicate) { this.keyExtractor = keyExtractor; this.allowDuplicate = allowDuplicate; } @Override public T process(T item) throws Exception { if (allowDuplicate) return item; String key = keyExtractor.apply(item); if (keyPool.containsKey(key)) return null; keyPool.put(key, key); return item ; } }ConcurrentHashMap은 HashMap과 다르게 멀티 쓰레드 환경을 지원한다.Function은 데이터 T를 입력받아 key를 생성하여 리턴한다.
- Writer
- 2개의 ItemWriter를 사용해서 Person H2 DB에 저장 후 몇 건 저장됐는지 log를 찍는다.
- Person 저장 ItemWriter와 log 출력 ItemWriter
CompositeItemWriter를 사용하여 여러개의 ItemWriter 등록이 가능하다.- 예제 코드
public CompositeItemWriter<Person> compositeItemWriter() throws Exception { CompositeItemWriter<Person> compositeItemWriter = new CompositeItemWriterBuilder<Person>() .delegates(jpaItemWriter(), itemLogWriter()) .build(); compositeItemWriter.afterPropertiesSet(); return compositeItemWriter; } private ItemWriter<? super Person> jpaItemWriter() throws Exception { JpaItemWriter<Person> personJpaItemWriter = new JpaItemWriterBuilder<Person>() .entityManagerFactory(entityManagerFactory) .build(); personJpaItemWriter.afterPropertiesSet(); return personJpaItemWriter; } private ItemWriter<? super Person> itemLogWriter() { return items -> log.info("person size: {}", items.size()); }CompositeItemWriter을 활용하여 두개 이상의ItemWriter을 등록할 수 있다.delegates에 등록된ItemWriter은 순서대로 실행되므로 주의하자
JUnit 테스트 코드 작성하기
- JobLauncher는 Job을 실행
- JobLauncherTestUtils은 테스트 코드에서 Job과 Step 실행
- Spring Test에
@EnableBatchProcessing등록
package com.example.batch; import org.springframework.batch.core.configuration.annotation.EnableBatchProcessing; import org.springframework.boot.autoconfigure.EnableAutoConfiguration; import org.springframework.context.annotation.Configuration; @Configuration @EnableBatchProcessing @EnableAutoConfiguration public class TestConfiguration { } - JobLauncher, StepLauncher 실행해보기
package com.example.batch.part3.FileItemProcessor; import com.example.batch.TestConfiguration; import com.example.batch.part3.PersonRepository; import org.assertj.core.api.Assertions; import org.junit.After; import org.junit.Test; import org.junit.runner.RunWith; import org.springframework.batch.core.JobExecution; import org.springframework.batch.core.JobParameters; import org.springframework.batch.core.JobParametersBuilder; import org.springframework.batch.core.StepExecution; import org.springframework.batch.test.JobLauncherTestUtils; import org.springframework.batch.test.context.SpringBatchTest; import org.springframework.beans.factory.annotation.Autowired; import org.springframework.test.context.ContextConfiguration; import org.springframework.test.context.junit4.SpringRunner; @SpringBatchTest @RunWith(SpringRunner.class) @ContextConfiguration(classes = {SavePersonConfiguration.class, TestConfiguration.class}) public class SavePersonConfigurationTest { @Autowired private JobLauncherTestUtils jobLauncherTestUtils; @Autowired private PersonRepository personRepository; @After public void tearDown() throws Exception { personRepository.deleteAll(); } @Test public void test_step() { JobExecution jobExecution = jobLauncherTestUtils.launchStep("savePersonStep"); Assertions.assertThat(jobExecution.getStepExecutions().stream() .mapToInt(StepExecution::getWriteCount) .sum()) .isEqualTo(personRepository.count()) .isEqualTo(3); } @Test public void test_allow_duplicate() throws Exception { // given JobParameters jobParameters = new JobParametersBuilder() .addString("allow_duplicate", "false") .toJobParameters(); // when JobExecution jobExecution = jobLauncherTestUtils.launchJob(jobParameters); // then Assertions.assertThat(jobExecution.getStepExecutions().stream() .mapToInt(StepExecution::getWriteCount) .sum()) .isEqualTo(personRepository.count()) .isEqualTo(3); } @Test public void test_not_allow_duplicate() throws Exception { // given JobParameters jobParameters = new JobParametersBuilder() .addString("allow_duplicate", "true") .toJobParameters(); // when JobExecution jobExecution = jobLauncherTestUtils.launchJob(jobParameters); // then Assertions.assertThat(jobExecution.getStepExecutions().stream() .mapToInt(StepExecution::getWriteCount) .sum()) .isEqualTo(personRepository.count()) .isEqualTo(30); } }@SpringBatchTest를 등록해야JobLauncherTestUtils를 등록해 사용할 수 있다.
JobExecutionListener, StepExecutionListener
- 스프링 배치에 전 처리, 후 처리를 하는 다양한 존재의 Listener 존재.
- interface 구현
- @Annotation 정의
- Job 실행 전과 후에 실행할 수 있는 JobExecutionListener
- Step 실행 전과 후에 실행할 수 있는 JobExecutionListener
JobListener, StepListener 실행 예제
- Listener class
package com.example.batch.part3.FileItemProcessor; import lombok.extern.slf4j.Slf4j; import org.springframework.batch.core.ExitStatus; import org.springframework.batch.core.JobExecution; import org.springframework.batch.core.JobExecutionListener; import org.springframework.batch.core.StepExecution; import org.springframework.batch.core.annotation.AfterJob; import org.springframework.batch.core.annotation.AfterStep; import org.springframework.batch.core.annotation.BeforeJob; import org.springframework.batch.core.annotation.BeforeStep; /** * author : duckbill413 * date : 2023-02-05 * description : **/ @Slf4j public class SavePersonListener { public static class SavePersonStepExecutionListener { @BeforeStep public void beforeStep(StepExecution stepExecution){ log.info("beforeStep"); } @AfterStep public ExitStatus afterStep(StepExecution stepExecution){ log.info("afterStep : {}", stepExecution.getWriteCount()); if (stepExecution.getWriteCount() == 0) return ExitStatus.FAILED; return stepExecution.getExitStatus(); } } public static class SavePersonJobExecutionListener implements JobExecutionListener{ @Override public void beforeJob(JobExecution jobExecution) { log.info("beforeJob"); } @Override public void afterJob(JobExecution jobExecution) { int sum = jobExecution.getStepExecutions().stream().mapToInt(StepExecution::getWriteCount).sum(); log.info("afterJob : {}", sum); } } public static class SavePersonAnnotationJobExecutionListener { @BeforeJob public void beforeJob(JobExecution jobExecution) { log.info("annotation beforeJob"); } @AfterJob public void afterJob(JobExecution jobExecution) { int sum = jobExecution.getStepExecutions().stream().mapToInt(StepExecution::getWriteCount).sum(); log.info("annotation afterJob : {}", sum); } } } - JobBuilder과 StepBuilder에 Listener 등록
@Bean
public Job savePersonJob() throws Exception {
    return this.jobBuilderFactory.get("savePersonJob")
            .incrementer(new RunIdIncrementer())
            .start(this.savePersonStep(null))
            .listener(new SavePersonListener.SavePersonJobExecutionListener())
            .listener(new SavePersonListener.SavePersonAnnotationJobExecutionListener())
            .build();
}
@Bean
@JobScope
public Step savePersonStep(@Value("#{jobParameters[allow_duplicate]}") Boolean allowDuplicate) throws Exception {
    return this.stepBuilderFactory.get("savePersonStep")
            .<Person, Person>chunk(10)
            .reader(this.itemReader())
            .processor(new DuplicateValidationProcessor<>(Person::getName, allowDuplicate))
            .writer(this.compositeItemWriter())
            .listener(new SavePersonListener.SavePersonStepExecutionListener())
            .build();
}
StepListener 이해
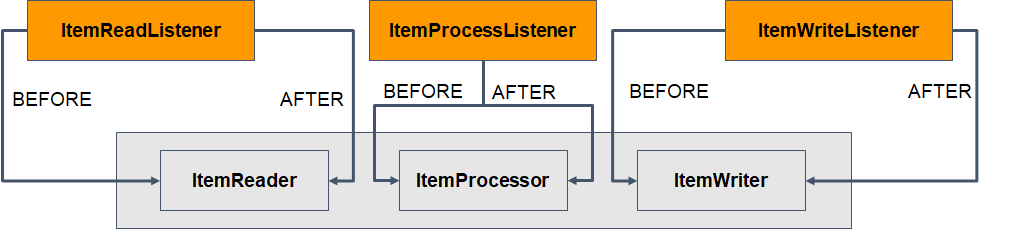
- ItemReader 전, 후, 에러 처리 ItemReadListener
- ItemProcessor 전, 후, 에러 처리 ItemProcessListener
- ItemWriter 전, 후, 에러 처리 ItemWriteListener
- Step에 관련된 모든 Listener는 StepListener를 상속
- StepExecutionListener
- SkipListener
- ItemReadListener
- ItemProcessListener
- ItemWriteListener
- ChunkListener

SkipListener
- onSkipInRead : @OnSkipInRead
- ItemReader에서 Skip이 발생한 경우 호출
- onSkipWrite : @OnSkipInWrite
- ItemWriter에서 Skip이 발생한 경우 호출
- onSkipInProcess : @OnSkipInProcess
- ItemProcessor에서 Skip이 발생한 경우 호출

ItemReadListener
- beforeRead : @BeforeRead
- ItemReader.read() 메소드 호출 전 호출
- afterRead : @AfterRead
- ItemReader.read() 메소드 호출 후 호출
- onReadError : @OnReadError
- ItemReader.read() 메소드에서 에러 발생시 호출
ItemWriteListener
- beforeWrite : @BeforeWrite
- ItemWriter.write() 메소드 호출 전 호출
- afterWrite : @AfterWrite
- ItemWriter.write() 메소드 호출 후 호출
- onWriteError : @OnWriteError
- ItemWriter.write() 메소드에서 에러 발생 시 호출
ItemProcessListener
- beforeProcess : @BeforeProcess
- ItemProcess.process() 메소드 호출 전 호출
- afterProcess : @AfterProcess
- ItemProcess.process() 메소드 호출 후 호출
- onProcessError : @OnProcessError
- ItemProcess.process() 메소드에서 에러 발생 시 호출
ChunkListener
- beforeChunk : @BeforeChunk
- chunk 실행 전 호출
- afterChunk : @AfterChunk
- chunk 실행 후 호출
- afterChunkError : @AfterChunkError
- chunk 실행 중 에러 발생 시 호출
Skip 에러 처리
- step 수행 중 발생한 특정 Exception과 에러 횟수 설저으로 예외처리 설정
- skip(NotFoundNameException.class), skipLimit(3)으로 설정된 경우
- NotFoundNameException 발생 3번까지는 에러를 skip 한다.
- NotFoundNameException 발생 4번는 Job과 Step의 상태는 실패로 끝나며, 배치가 중지된다.
- 단, 에러가 발생하기 전까지 데이터는 모두 처리된 상태로 남는다.
- Step은 chunk 1개 기준으로 Transaction 동작
- 예를 들어 items = 100, chunk.size = 10, 총 chunk 동작 횟수 = 10
- chunk 1-9는 정상 처리, chunk 10에서 Exception이 발생된 경우
- chunk 1-9 에서 처리된 데이터는 정상 저장되고, Job과 Step의 상태는 FAILED 처리
- 배치 재 실행 시 chunk 10 부터 처리할 수 있도록 배치를 만든다.
- 예를 들어 items = 100, chunk.size = 10, 총 chunk 동작 횟수 = 10
- 추가 요구 사항 예제
- Person.name이 empty String 인 경우 NotFoundNameException 발생
- NotFoundNameException이 3번 이상 발생하는 경우 Step 실패 처리
- SkipListener가 실행 되는 조건
- 에러 발생 횟수가 skipLimit 이하 인 경우
- skipLimit(2), throw Exception이 3번 발생하면 실행되지 않는다.
- skipLimit(3), throw Exception이 3번 발생하면 실행된다.
- skip 설정 조건에 해당하는 경우에만 실행
- SkipListner는 항상 faultTolerant() 메소드 후 선언
- 예제 코드
@Bean
@JobScope
public Step savePersonStep(@Value("#{jobParameters[allow_duplicate]}") Boolean allowDuplicate) throws Exception {
  return this.stepBuilderFactory.get("savePersonStep")
          .<Person, Person>chunk(10)
          .reader(this.itemReader())
          .processor(itemProcessor(allowDuplicate))
          .writer(this.compositeItemWriter())
          .listener(new SavePersonListener.SavePersonStepExecutionListener())
          .faultTolerant() // Skip과 같은 예외처리 메소드 지원
          .skip(NotFoundNameException.class)
          .skipLimit(2)
          .build();
}
private ItemProcessor<? super Person, ? extends Person> itemProcessor(Boolean allowDuplicate) throws Exception {
  DuplicateValidationProcessor<Person> personDuplicateValidationProcessor =
          new DuplicateValidationProcessor<>(Person::getName, allowDuplicate);
  ItemProcessor<Person, Person> validationProcessor = item -> {
      if (item.isNotEmptyName())
          return item;
      throw new NotFoundNameException();
  };
  CompositeItemProcessor<Person, Person> compositeItemProcessor = new CompositeItemProcessorBuilder()
          .delegates(validationProcessor, personDuplicateValidationProcessor)
          .build();
  compositeItemProcessor.afterPropertiesSet();
  return compositeItemProcessor;
}
- `stepBuilderFactory`에 skip 예외 처리 등록을 도와주는 `faultTolerant()`를 등록한다. `faultTolerant()` 뒤에 skip 메서드를 등록해야 한다. - `ItemProcessor`에 Name이 Empty인경우 에러를 Throw하는 ItemProcessor을 추가한다. 여러개의 ItemProcessor 등록을 위하여 ItemWriter와 같이 `CompositeItemProcessor`를 이용한다.
Retry 에러 처리
retry는 재시도 하였을 경우 성공할 여지가 있는 경우에 사용되게 된다.
- Step 수행 중 간헐적으로 Exception 발생시 재시도(retry) 설정
- DB Deadlock, Network timeout 등
- retry(NullPointException.class), retryLimit(3) 으로 설정된 경우
- NotFoundNameException이 발생한 경우 3번까지 재시도
- 더 구체적으로 Retry를 정의하려면 RetryTemplate 이용
추가 요구사항 예제
- NotFoundNameException이 발생하면, 3번 재시도 후Person.name을“UNKNOWN”으로 변경
- Retry 설정한 ItemProcessor 생성public class PersonValidationRetryProcessor implements ItemProcessor<Person, Person> { private final RetryTemplate retryTemplate; public PersonValidationRetryProcessor() { this.retryTemplate = new RetryTemplateBuilder() .maxAttempts(3) // RetryLimit 과 유사 .retryOn(NotFoundNameException.class) .build(); } @Override public Person process(Person item) throws Exception { return this.retryTemplate.execute(context -> { // RetryCallback if (item.isNotEmptyName()) return item; throw new NotFoundNameException(); }, context -> { // RecoveryCallback return item.unknownName(); }); } }
RetryTemplate를 이용하여 retry 설정을 완료해 준다.
CompositeItemProcessor에 ItemProcessor 추가 등CompositeItemProcessor<Person, Person> compositeItemProcessor = new CompositeItemProcessorBuilder() .delegates(new PersonValidationRetryProcessor(), validationProcessor, personDuplicateValidationProcessor) .build();
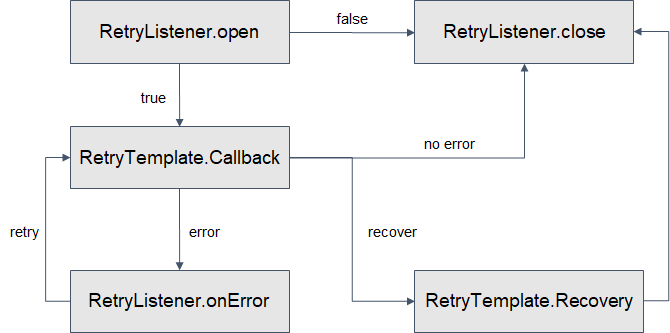
- RetryListener.open
- return false 인 경우 retry를 시도하지 않음
- RetryTemplate.RetryCallback
- RetryListener.onError
- maxAttempts 설정값 만큼 반복
- RetryTemplate.RecoveryCallback
- maxAttempts 반복 후에도 에러가 발생한 경우 실행
- RetryListener.close
- RetryListener LifeCycle
RetryListener 구현 코드
public static class SavePersonRetryListener implements RetryListener{

    @Override
    public <T, E extends Throwable> boolean open(RetryContext context, RetryCallback<T, E> callback) {
        return true; // retry 를 시작하는 설정 true일때 시작
    }

    @Override
    public <T, E extends Throwable> void close(RetryContext context, RetryCallback<T, E> callback, Throwable throwable) {
        log.info("close"); // retry 종료 후 호출
    }

    @Override
    public <T, E extends Throwable> void onError(RetryContext context, RetryCallback<T, E> callback, Throwable throwable) {
        log.info("onError"); // retry 중 에러 발생 시 호출
    }
}
이후 ItemProcessor의 retryTemplate에 withListener(new SavePersonRetryListener)로 등록하여 사용
Spring Batch 실습 예제
cs_diary/spring/spring-batch at main · duckbill413/cs_diary